经过前面的介绍,我们已经看到了Redux中的一些核心概念。Redux跟React没有直接的关系,本身可以支持React、Angular、Ember等等框架。
通过react-redux这个库,可以方便的将react和redux结合起来:react负责页面展现,redux负责维护/更新数据状态。
下面就看看react-redux相关的内容。
react-redux库中提出了容器组件(Container Component)和展示组件(Presentational Component)的概念:
| 容器组件 | 展示组件 | |
|---|---|---|
| Location | 最顶层,路由处理 | 中间和子组件 |
| Aware of Redux | 是 | 否 |
| 读取数据 | 从 Redux 获取 state | 从 props 获取数据 |
| 修改数据 | 向 Redux 派发 actions | 从 props 调用回调函数 |
通常的做法是只在最顶层组件里使用 Redux,其余内部组件仅仅是展示性的,所有数据都通过 props 传入。
了解了容器组件和展示组件之后,就进一步看看react是怎么连接到Redux store中的数据。
下面就介绍一下react-redux中提供了两个重要功能模块Provider和connect。
通过Provider的代码可以看到,Provide本质上是一个react组件。
export default class Provider extends Component {
  getChildContext() {
    return { store: this.store }
  }

  constructor(props, context) {
    super(props, context)
    this.store = props.store
  }

  render() {
    const { children } = this.props
    return Children.only(children)
  }
}
Provider组件主要用到了react通过context属性,可以将属性(props)直接给子孙component,无须通过props层层传递,从而减少组件的依赖关系。
所以说,Provider的作用就是获得Redux Store对象,然后将其传递给子孙组件。
connect函数是React与Redux连接的核心。
通过源码可以看到,connect函数运行后,会返回一个wrapWithConnect函数,该函数可以接收一个react组件,然后返回一个经过处理的Connect组件。
return function wrapWithConnect(WrappedComponent) {
  class Connect extends Component {
    constructor(props, context) {
      // 从祖先Component处获得store
      this.store = props.store || context.store
      this.stateProps = computeStateProps(this.store, props)
      this.dispatchProps = computeDispatchProps(this.store, props)
      this.state = { storeState: null }
      // 对stateProps、dispatchProps、parentProps进行合并
      this.updateState()
    }
    shouldComponentUpdate(nextProps, nextState) {
      // 进行判断,当数据发生改变时,Component重新渲染
      if (propsChanged || mapStateProducedChange || dispatchPropsChanged) {
        this.updateState(nextProps)
          return true
        }
      }
      componentDidMount() {
        // 改变Component的state
        this.store.subscribe(() = {
          this.setState({
            storeState: this.store.getState()
          })
        })
      }
      render() {
        // 生成包裹组件Connect
        return (
          <WrappedComponent {...this.nextState} />
        )
      }
  }
  Connect.contextTypes = {
    store: storeShape
  }
  return Connect;
}
新生成的Connect组件主要有下面的特点:
- 通过this.context获取祖先Component的store(这是就跟Provider组件联系在一起了)
- props包括stateProps、dispatchProps、parentProps,合并在一起得到nextState ,作为props传给真正的Component
- componentDidMount方法的作用是添加事件this.store.subscribe(this.handleChange),监听Redux Store的变化
- shouldComponentUpdate方法的作用是判断是否有避免进行渲染,提升页面性能,并得到nextState
- componentWillUnmount方法移除注册的事件
任何一个通过connect()函数处理过的组件都可以得到一个dispatch方法作为组件的props,以及得到全局state中的所有内容。
但是有时候react组件中并不一定会用到Redux Store中state的所有内容,这时候就可以通过connect函数的参数进行优化了。
现在再次回到connect函数,看看该函数的参数列表:
export default function connect(mapStateToProps, mapDispatchToProps, mergeProps, options = {})
该函数的参数中有下面两个比较常用的:
- mapStateToProps: 一个函数,返回值是从Redux的state里挑出部分值,这些数据会被合并到wrapWithConnect函数处理的组件props里
- mapDispatchToProps: 一个函数,返回值是Redux的actionCreators,这些数据会被合并到wrapWithConnect函数处理的组件props里
介绍过react-redux后,可以通过下图描述一下整个react-redux应用的数据流。
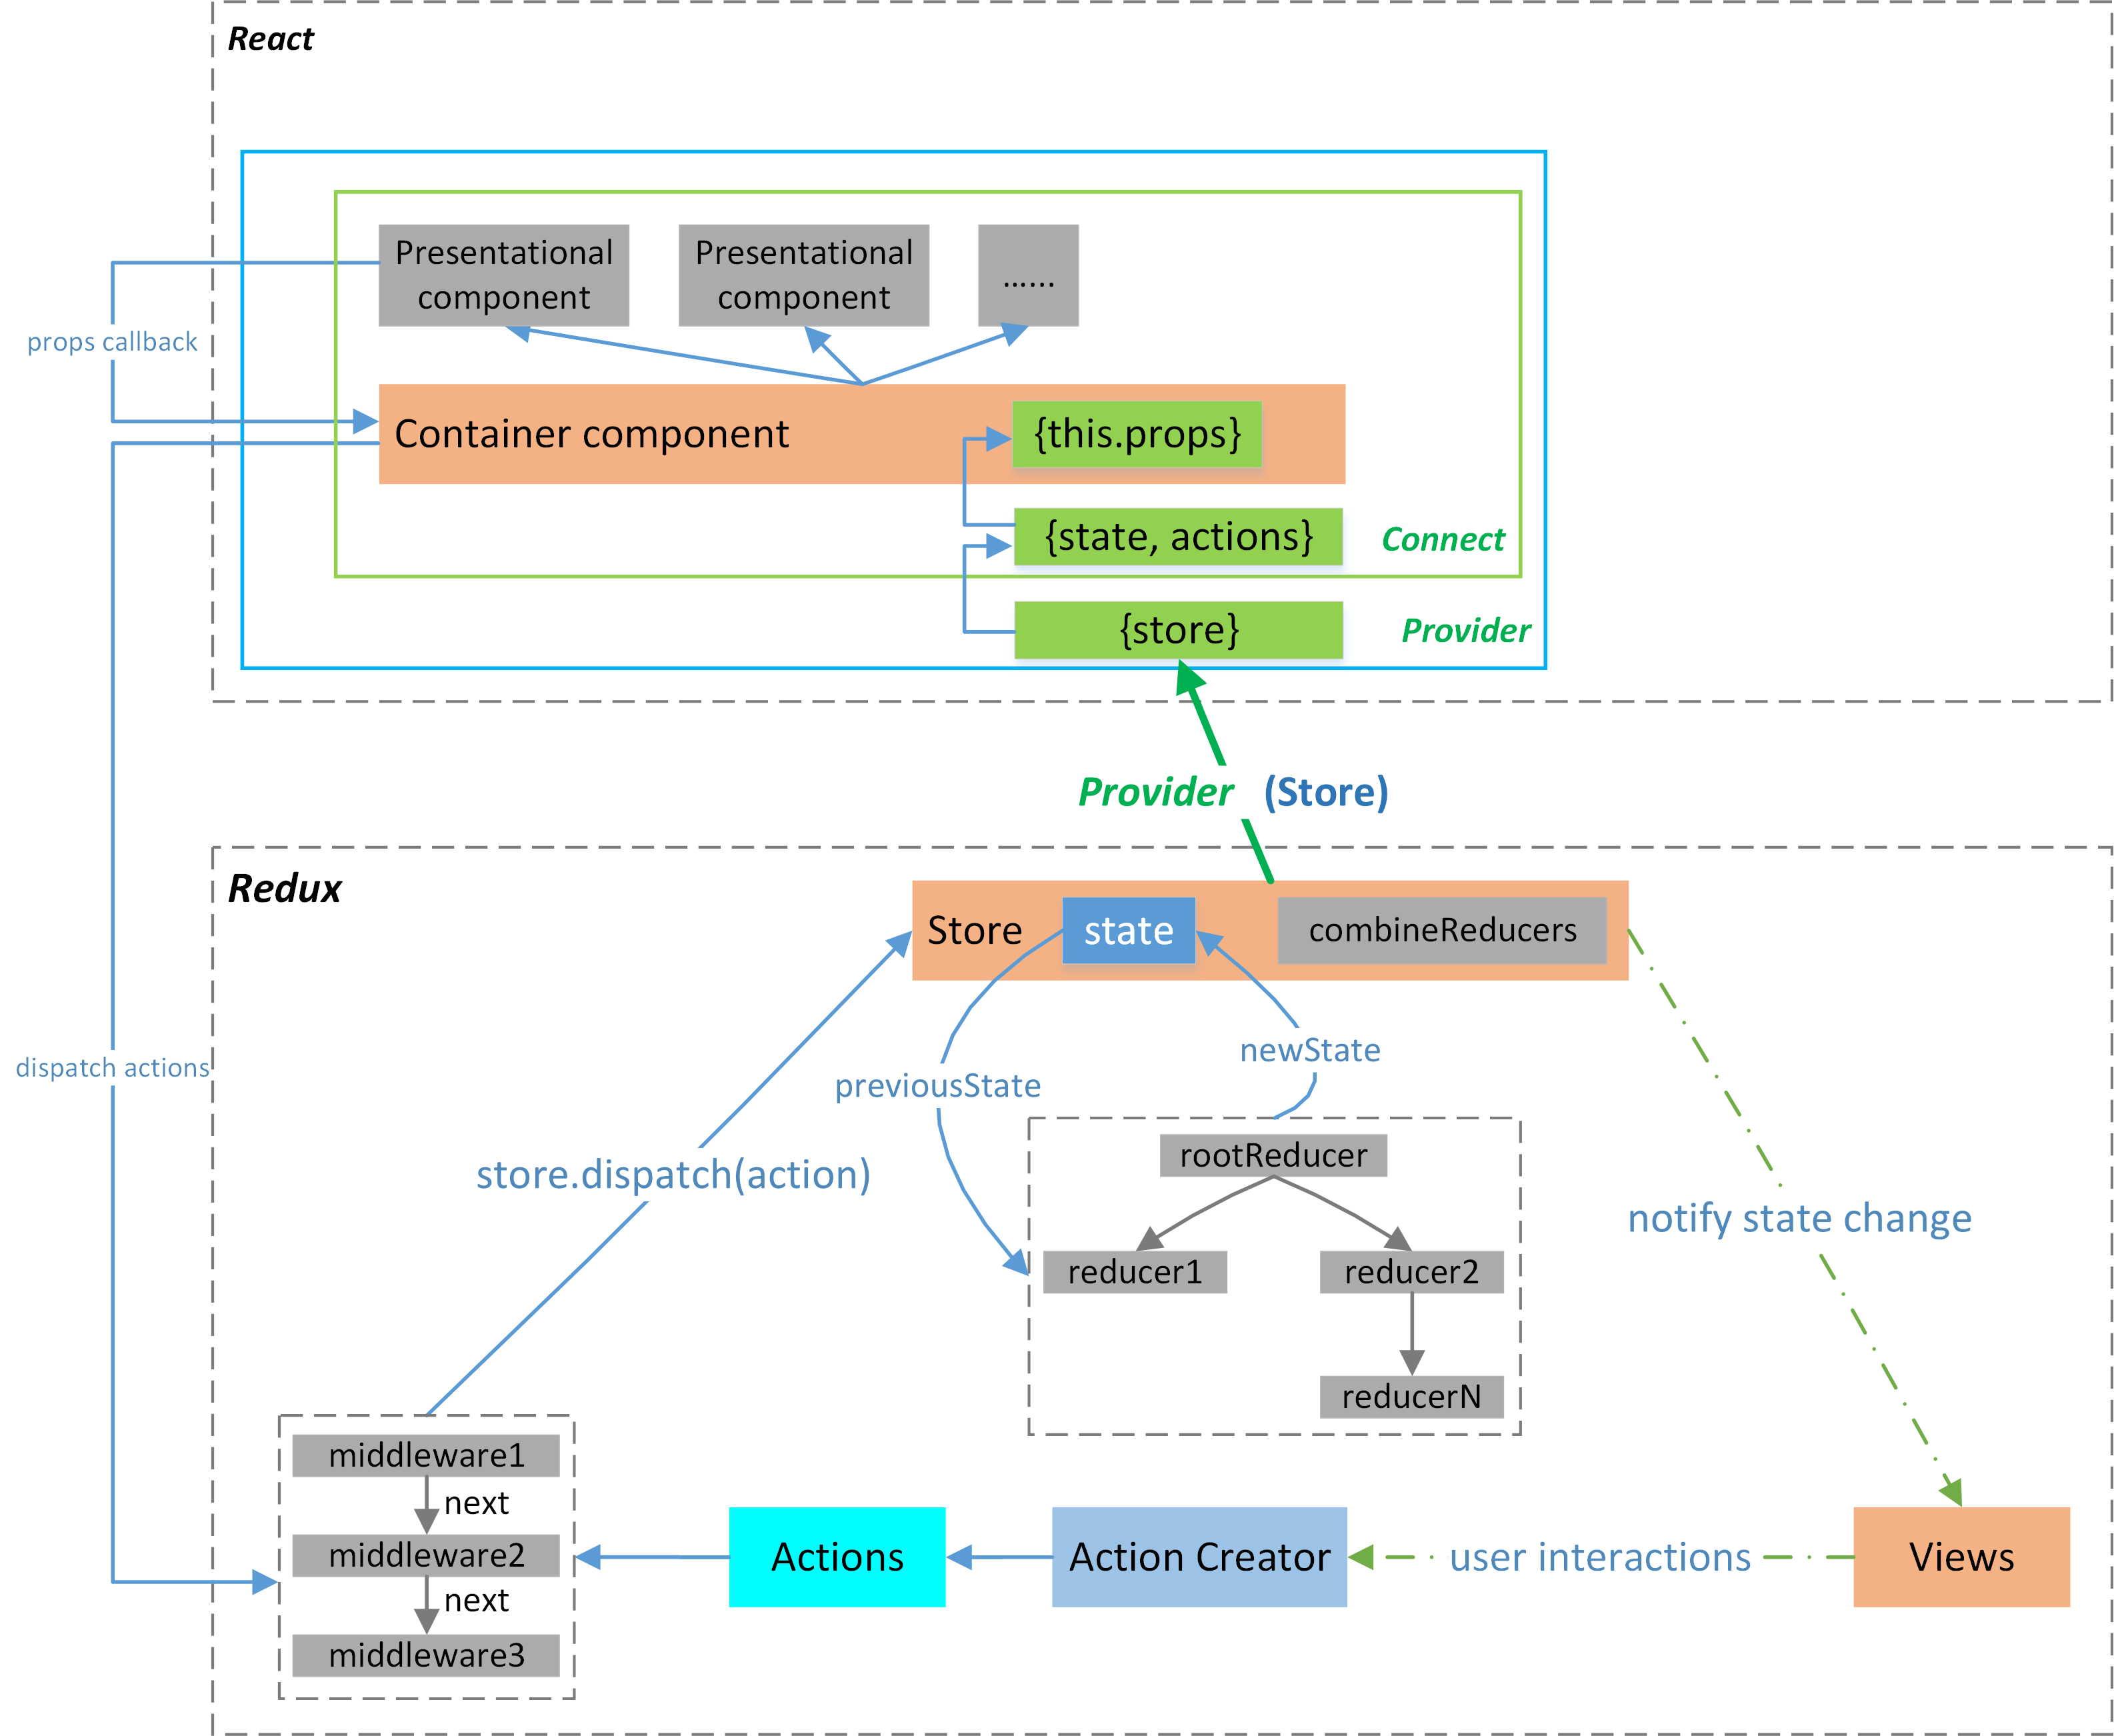
注意:
- react-redux应用利用全局唯一Provider组件,通过Context特性提供Store给子组件使用
- connect负责与展示组件进行交互,注意使用mapStateToProps参数map组件需要的数据,减少不必要的性能消耗
- Redux Store中的state跟react组件的state没有任何关系,千万不要弄混
关于redux-react使用,可以参考demo-react-contact。
这是一个非常简单的例子,例子中展示了Redux中的三个核心概念Action、Reducer和Store,以及redux-react中Provider和Connect两个模块的使用。