早期的 JavaScript 往往作为嵌入到 HTML 页面中的用于控制动画与简单的用户交互的脚本语言,我们习惯这样写:
<!--html-->
<script type="application/javascript">
  // module1 code
  // module2 code
</script>
所有的嵌入到网页内的 JavaScript 对象都会使用全局的 window 对象来存放未使用 var 定义的变量。这就会导致一个问题,那就是,最后调用的函数或变量取决于我们引入的先后顺序。
随着单页应用与富客户端的流行,不断增长的代码库也急需合理的代码分割与依赖管理的解决方案,这也就是我们在软件工程领域所熟悉的模块化(Modularity)。
简而言之,模块化就是将一个大的功能拆分为多个块,每一个块都是独立的,你不需要去担心污染全局变量,命名冲突什么的。
模块化的好处:
- 封装功能
- 封闭作用域
- 可能解决依赖问题
- 工作效率更高,重构方便
- 解决命名冲突
- ...
- 全局function模式:将不同的功能封装成不同的全局函数
function m1 () {
  // ...
}

function m2 () {
  // ...
}问题:污染全局命名空间,容易引起命名冲突或数据不安全,而且模块成员之间看不出直接关系。
- namespace模式:简单对象封装,减少了全局变量,解决命名冲突
let greeting = {
  helloInLang: {
    en: 'Hello world!',
    es: '¡Hola mundo!',
    ru: 'Привет мир!'
  },

  sayHello: function (lang) {
    return helloInLang[lang]
  }
}

greeting.helloInLang.en = 'hello' //能直接修改模块内部的数据
greeting.sayHello('en') // hello问题:数据不安全(外部可以直接修改模块内部的数据)。
- IIFE模式:匿名函数自调用(闭包),数据是私有的, 外部只能通过暴露的方法操作
// file lib/greeting.js
(function(window) {
  var helloInLang = {
    en: 'Hello world!',
    es: '¡Hola mundo!',
    ru: 'Привет мир!'
  }
  //操作数据的函数
  function sayHello() {
    //用于暴露有函数
    return helloInLang[lang]
  }
  function otherFun() {
    //内部私有的函数
    console.log('otherFun()')
  }
  //暴露行为
  window.greeting = { sayHello }
})(window)
// index.html文件
<script type="text/javascript" src="lib/greeting.js"></script>
<script type="text/javascript">
greeting.sayHello('en')
console.log(greeting.helloInLang) //undefined 不能访问模块内部数据
greeting.helloInLang = 'xxxx' //不是修改的模块内部的helloInLang
greeting.sayHello('en') //没有改变
</script>问题:无法解决模块依赖问题。
- IIFE模式增强:引入依赖
// file lib/greeting.js
(function(window, $) {
  var helloInLang = {
    en: 'Hello world!',
    es: '¡Hola mundo!',
    ru: 'Привет мир!'
  }
  //操作数据的函数
  function sayHello() {
    //用于暴露有函数
    $('body').css('background', 'red')
    return helloInLang[lang]
  }
  function otherFun() {
    //内部私有的函数
    console.log('otherFun()')
  }
  //暴露行为
  window.greeting = { sayHello }
})(window, jQuery)
// index.html文件
<!-- 引入的js必须有一定顺序 -->
<script type="text/javascript" src="jquery-1.10.1.js"></script>
<script type="text/javascript" src="lib/greeting.js"></script>
<script type="text/javascript">
greeting.sayHello('en')
</script>- CommonJS:主要是应用在Nodejs服务端,属于动态同步加载。
// file lib/greeting.js
var helloInLang = {
  en: 'Hello world!',
  es: '¡Hola mundo!',
  ru: 'Привет мир!'
}

module.exports = {
  sayHello: function (lang) {
    return helloInLang[lang]
  }
}
// file hello.js
const greeting = require('./lib/greeting.js')
var phrase = greeting.sayHello('en')
document.write(phrase)- AMD && CMD:AMD是
RequireJS提出的,主要是依赖前置。CMD是SeaJS提出的,主要是就近依赖(只要用到才会导入),两者用法接近。属于异步加载。
// file lib/greeting.js
define(function() {
  var helloInLang = {
    en: 'Hello world!',
    es: '¡Hola mundo!',
    ru: 'Привет мир!'
  }

  return {
    sayHello: function (lang) {
      return helloInLang[lang]
    }
  }
})
// file hello.js
define(['./lib/greeting'], function(greeting) {
var phrase = greeting.sayHello('en')
document.write(phrase)
})- UMD:因为AMD中无法使用CommonJS,所以出来了一个UMD,可在UMD中同时使用AMD和CommonJS
(function (define) {
  define(function () {
    var helloInLang = 'hello'

    return {
      sayHello: function (lang) {
        return helloInLang[lang]
      }
    }
  })
}(
	typeof module === 'object' && module.exports && typeof define !=='function'
  	? function (factory) { module.exports = factory() }
  	: define
))- ESM(ES Module):ES6新规范,JavaScript终于在语言标准的层面上,实现了模块功能,使得在编译时就能确定模块的依赖关系,以及其输入和输出的变量,属于静态加载(编译时加载)。
// file lib/greeting.js
const helloInLang = {
  en: 'Hello world!',
  es: '¡Hola mundo!',
  ru: 'Привет мир!'
}

export const sayHello = (lang) => {
  return helloInLang[lang]
}
// file hello.js
import { sayHello } from './lib/greeting'
sayHello('en')问题:目前浏览器和Nodejs的支持程度都并不理想,需要使用额外的工具如Babel编译成ES5,才可以在浏览器和Nodejs中运行。
由于模块化的原因,我们不得不处理不同模块的依赖关系。随着项目越来越庞大,这种关系会变得越来越难以维护。为了方便开发和维护,我们就会使用到打包工具webpack。
webpack可以根据模块的依赖关系进行静态分析,然后将这些模块按照指定的规则生成对应的静态资源。那么,它究竟是如何处理这些依赖关系的呢?
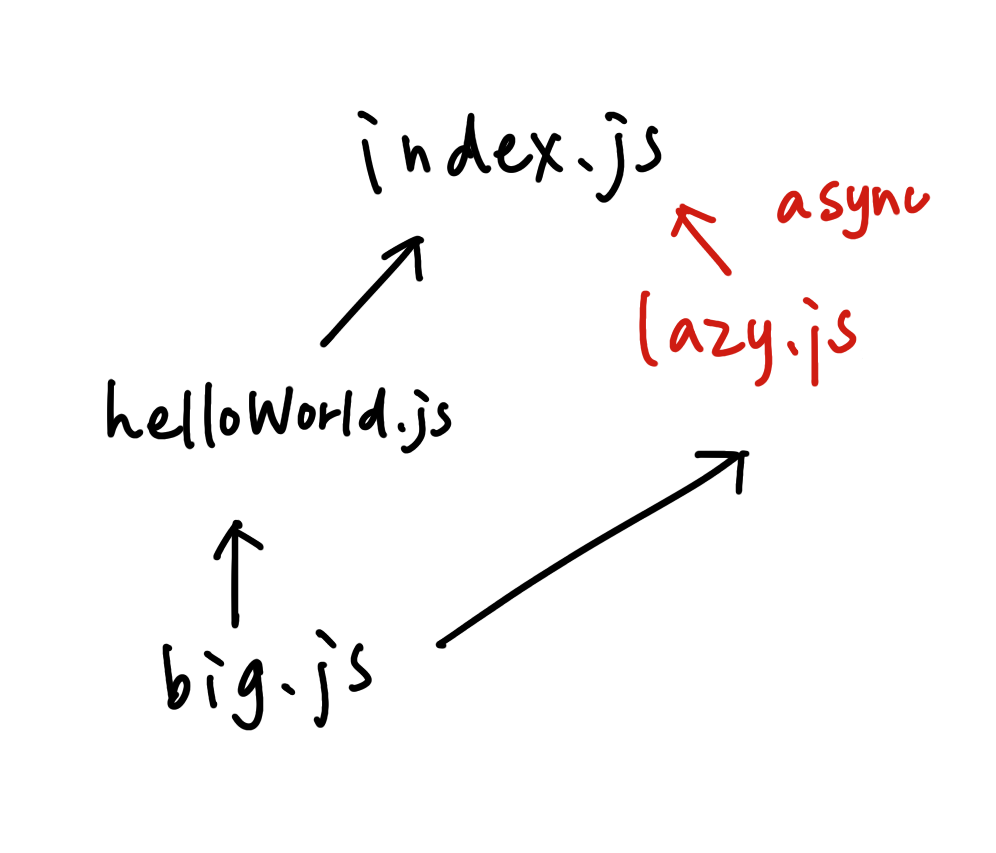
新建一个简单的项目,目录下包含这样几个文件:
src
 ├── big.js
 ├── helloWorld.js
 ├── index.js
 └── lazy.js
// index.js
import helloWorld from './helloWorld'

const node = document.createElement("div")
node.innerHTML = helloWorld + 'loading...'

import(/* webpackChunkName: "async" */ './lazy')
  .then(({ default: lazy }) => {
    node.innerHTML = helloWorld + lazy
  })

document.body.appendChild(node)
// helloWorld.js
import big from './big'
const helloWorld = big('hello world!')
export default helloWorld// lazy.js
import big from './big'
const lazy = big("lazy loaded!")
export default lazy// big.js
export default (val) => {
return val && val.toUpperCase()
}从以上代码中我们可以观察到每个模块之间的引用关系:
* src/index.js (ESM)
  # ./helloWorld
  # (async) ./lazy
  - src/helloWorld.js
  - (async) src/lazy.js
* src/helloWorld.js (ESM)
  # ./big
  - src/big.js
* src/big.js
* src/lazy.js (ESM)
  # ./big
  - src/big.js
使用webpack打包后的结果:

我们可以观察一下打包生成的main.js里的内容,这里的代码比我们的源代码多了许多乱七八糟的东西,但是我们可以将它简化:
/******/ (function(modules) { // webpackBootstrap
/*中间部分删减*/
/******/ })
/************************************************************************/
/******/ ({

/***/ "./src/big.js":
/***/ (function(module, __webpack_exports__, __webpack_require__) {
/*中间部分删减*/
/***/ }),

/***/ "./src/index.js":
/***/ (function(module, __webpack_exports__, __webpack_require__) {
/*中间部分删减*/
/***/ })

/******/ });简化后我们可以发现,main.js里的内容本质上是一个立即执行函数,这个函数的参数便是我们模块代码(队列):
(function (modules) {
  // 模块串联逻辑
})({
  // 所有的模块对象
  [moduleId]: function () { /* code... */ }
  // 更多`模块-id键值`对
})由于在webpack中配置了concatenateModules: true(作用域提升),index.js与helloWorld.js模块合并成了一个文件。查看模块-id键值中的function内容可以发现,webpack对模块内的import与export进行了改写:
// big.js
(function (__require__, exports) {
  exports.default = (val) => {
     return val && val.toUpperCase()
  }
})
// index.js + helloWorld.js
(function (__require__, exports) {
const big = __require__('./src/big.js')
const helloWorld = big.default('hello world')
const node = document.createElement("div")
node.innerHTML = helloWorld + 'loading...'
// 先看普通的import
// import(/* webpackChunkName: "async" */ './lazy')
// .then(({ default: lazy }) => {
// node.innerHTML = helloWorld + lazy
// })
document.body.appendChild(node)
})// lazy.js
(function (__require__, exports) {
const big = __require__('./src/big.js')
const lazy = big.default('lazy loaded!')
exports.default = lazy
})我们知道import需要具备以下功能:
- 执行目标模块代码
- 导出目标模块的export内容给外部使用
因此__require__与export需要具备以上功能,使代码能在单文件中相互引用并执行:
!(function (modules) {
  function __require__ (id) {
    // 设置一个缓存,有的话直接返回
    if (cache[id]) return cache[id].exports

    var module = {
      exports: {}
    }
    // 1.执行当前模块的内容,这个modules[id]就是我们之前对每个模块封装后的代码
    modules[id](__require__, module.exports, module)
    cache[id] = module
    // 2.导出当前模块的export内容给外部使用
    return module.exports
  }
})({
  // [moduleId]: function () {}
})!(function (modules) {
function __require__ (id) {
// 设置一个缓存,有的话直接返回
if (cache[id]) return cache[id].exports
var module = {
exports: {}
}
// 1.执行当前模块的内容,这个modules[id]就是我们之前对每个模块封装后的代码
modules[id](__require__, module.exports, module)
cache[id] = module
// 2.导出当前模块的export内容给外部使用
return module.exports
}
})({
'./src/big.js': (function (__require__, exports) {
exports.default = (val) => {
return val && val.toUpperCase()
}
}),
'./src/index.js': (function (__require__, exports) {
const big = __require__('./src/big.js')
const helloWorld = big.default('hello world')
const node = document.createElement("div")
node.innerHTML = helloWorld + 'loading...'
// 先看普通的import
// import(/* webpackChunkName: "async" */ './lazy')
// .then(({ default: lazy }) => {
// node.innerHTML = helloWorld + lazy
// })
document.body.appendChild(node)
})
})__require__.loadChunk('async') // 请求lazy.js的内容
.then(__require__.bind(null, './src/lazy.js')) // 请求完毕后将模块 require 进去
.then(function (_ref) { // 执行代码内容
var lazy = _ref.default
node.innerHTML = helloWorld + lazy
})// 请求部分,loadChunk的实现
let chunkResolves = {}
__require__.loadChunk = function (chunkId) {
return new Promise (resolve => {
chunkResolves[chunkId] = resolve
let srcipt = document.createElement('script')
script.src = 'src/' + chunkId + '.js'
document.head.appendChild(script)
})
}// 得到callback()数据包
window.webpackJsonpCallback ('async', {
'./src/lazy.js': (function (__require__, exports) {
const big = __require__('./src/big.js')
const lazy = big.default('lazy loaded!')
exports.default = lazy
})
})// 每个模块下载(promise)完成对应的resolve
let chunkResolves = {}
window.webpackJsonpCallback = function (chunkId, newModules) {
for (const id in newModules) {
modules[id] = newModules[id]
chunkResolves[chunkId]()
}
}了解了webpack的打包步骤,我们可以模拟以上过程编写出完整的代码。
// 打包程序所需要的主要模块功能

// 解析模块
function createAsset (filename) {}
// 生成依赖图
function createGraph (entry) {}
// 打包
function bundle (graph) {}

const graph = createGraph('./src/index.js')
const result = bundle(graph)

console.log(result)
所需依赖工具:
- @babel/parser:js解析器,将文本代码转化成AST(语法树)
- @babel/traverse:遍历AST寻找依赖关系
- @babel/core的transformFromAst:将AST代码转化成浏览器所能识别的代码(ES5)
function createAsset (filename) {
  // 读取文件
  const content = fs.readFileSync(filename, 'utf-8')
  // 我们通过 babylon 这个 javascript 解析器来理解 import 进来的字符串
  const ast = parser.parse(content, {
    sourceType: 'module'
  })
  // 该模块所依赖的模块的相对路径
  const dependencies = []
  // import声明
  traverse(ast, {
    ImportDeclaration: ({ node }) => {
      dependencies.push(node.source.value)
    }
  })
  // 递增设置模块ID
  const id = ID++
  // AST -> ES5
  const { code } = transformFromAst(ast, null, {
    presets: ['@babel/env'],
  })

  return {
    id,
    filename,
    dependencies,
    code
  }
}function createGraph (entry) {
// 从第一个文件开始,首先解析index文件
const mainAsset = createAsset(entry)
// 定义一个依赖队列,一开始的时候只有入口文件
const queue = [mainAsset]
// 遍历 queue,广度优
for (const asset of queue) {
asset.mapping = {}
const dirname = path.dirname(asset.filename)
// 遍历依赖数组,解析每一个依赖模块
asset.dependencies.forEach(relativePath => {
const absolutePath = path.join(dirname, relativePath) + '.js'
// 解析
const child = createAsset(absolutePath)
// 子模块`路径-id`map
asset.mapping[relativePath] = child.id
queue.push(child)
})
}
return queue
}function bundle (graph) {
let modules = ''
graph.forEach(mod => {
modules += `${mod.id}: [
function (require, module, exports) {
${mod.code}
},
${JSON.stringify(mod.mapping)}
],`
})
const result = `
(function (modules) {
function require(id) {
const [fn, mapping] = modules[id]
function localRequire (name) {
return require(mapping[name])
}
const module = { exports: {} }
fn(localRequire, module, module.exports)
return module.exports
}
require(0)
})({
${modules}
})
`
return result
}项目地址:mini-pack
参考文章: