If you have any questions regarding bugs and feature requests, visit the ZEGOCLOUD community .
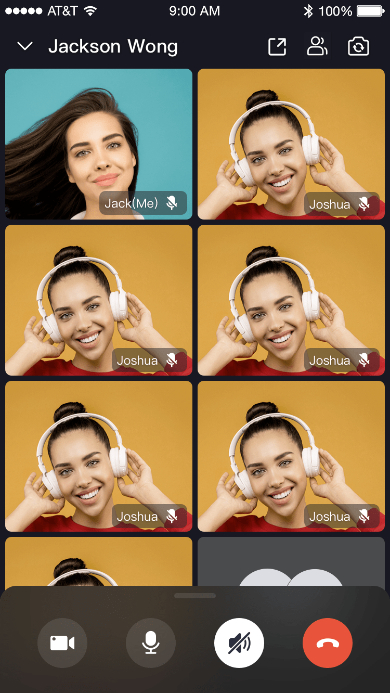
Call Kit is a prebuilt feature-rich call component, which enables you to build one-on-one and group voice/video calls into your app with only a few lines of code.
And it includes the business logic with the UI, you can add or remove features accordingly by customizing UI components.
| One-on-one call | Group call |
|---|---|
 |
 |
-
Build apps faster and easier
-
When you want to prototype 1-on-1 or group voice/video calls ASAP
-
Consider speed or efficiency as the first priority
-
Call Kit allows you to integrate in minutes
-
-
Customize UI and features as needed
-
When you want to customize in-call features based on actual business needs
-
Less time wasted developing basic features
-
Call Kit includes the business logic along with the UI, allows you to customize features accordingly
-
- Ready-to-use one-on-one/group calls
- Customizable UI styles
- Real-time sound waves display
- Device management
- Switch views during a one-on-one call
- Extendable top/bottom menu bar
- Participant list
- Add basic dependencies:
Open Terminal, navigate to the
Podfilefile, and run the following command:pod init pod 'ZegoUIKitPrebuiltCall' pod install
- Go to ZEGOCLOUD Admin Console|_blank, get the
appIDandappSignof your project. - Get the
userIDanduserNamefor connecting the Video Call Kit service. - And also get a
callIDfor making a call.
userIDandcallIDcan only contain numbers, letters, and underlines (_).- Users that join the call with the same
callIDcan talk to each other.
// YourViewController.swift class ViewController: UIViewController { // Others code... @IBAction func makeNewCall(_ sender: Any) { let config: ZegoUIkitPrebuiltCallConfig = ZegoUIkitPrebuiltCallConfig() let audioVideoConfig: ZegoAudioVideoViewConfig = ZegoAudioVideoViewConfig() let menuBarConfig: ZegoBottomMenuBarConfig = ZegoBottomMenuBarConfig() config.audioVideoViewConfig = audioVideoConfig config.bottomMenuBarConfig = menuBarConfig let layout: ZegoLayout = ZegoLayout() layout.mode = .pictureInPicture let pipConfig: ZegoLayoutPictureInPictureConfig = ZegoLayoutPictureInPictureConfig() pipConfig.smallViewPostion = .topRight layout.config = pipConfig config.layout = layoutlet callVC = ZegoUIKitPrebuiltCallVC.init(yourAppID, appSign: yourAppSign, userID: self.selfUserID, userName: self.selfUserName ?? "", callID: self.callID, config: config)callVC.modalPresentationStyle = .fullScreen self.present(callVC, animated: true, completion: nil) } }
Then, you can make a new call by presenting the VC.
Open the Info.plist, add the following code inside the dict part:
<key>NSCameraUsageDescription</key>
<string>We require camera access to connect to a call</string>
<key>NSMicrophoneUsageDescription</key>
<string>We require microphone access to connect to a call</string>
Now you have finished all the steps!
You can simply click the Run on XCode to run and test your App on your device.