A-Frame is a web framework for building virtual reality experiences using HTML and JavaScript. Therefore, to complete this tutorial, it is expected that the participants have minimal knowledge of these technologies.
A-Frame can be developed from a plain HTML file without having to install anything. To get started, create an .html file and include the A-Frame script in the <head> tag:
<html>
  <head>
    <script src="https://aframe.io/releases/1.1.0/aframe.min.js"></script>
  </head>
  <body>
    <a-scene>
      <a-box position="-1 0.5 -3" rotation="0 45 0" color="#4CC3D9"></a-box>
      <a-sphere position="0 1.25 -5" radius="1.25" color="#EF2D5E"></a-sphere>
      <a-cylinder
        position="1 0.75 -3"
        radius="0.5"
        height="1.5"
        color="#FFC65D"
      ></a-cylinder>
      <a-plane
        position="0 0 -4"
        rotation="-90 0 0"
        width="4"
        height="4"
        color="#7BC8A4"
      ></a-plane>
      <a-sky color="#ECECEC"></a-sky>
    </a-scene>
  </body>
</html>All the a-frame action happens within the a-scene entity. In the example above, we have the scene tag with a handful of a-frame entities. These entities represented as HTML elements are called primitives.
Entities or primitives can be described as a 3D object which can take different geometric shapes, such as a box, sphere, or a cylinder. To see every primitive that A-Frame provides, refer to the A-Frame documentation, at the bottom of the documentation navigation sidebar.
For this tutorial, we will be focusing on the most basic primitives, detailed in the table below.
| Primitive | Description |
|---|---|
<a-box> |
The box primitive creates shapes such as boxes, cube, or walls |
<a-cylinder> |
The cylinder primitive is used to create tubes and curved surfaces |
<a-sphere> |
The sphere primitive creates a spherical or polyhedron shapes |
<a-plane> |
The plane primitive is used to create flat surfaces |
<a-sky> |
The sky primitive adds a background color or 360° image to a scene |
If we use the primitives as presented in the table above, the created primitives appear in their default form. To change its attributes, we associate components with these entities such as position, rotation, color, and scale. In A-Frame, components have the same syntax as an HTML attribute:
<a-box position="0 0 -4" color="#FF0000"
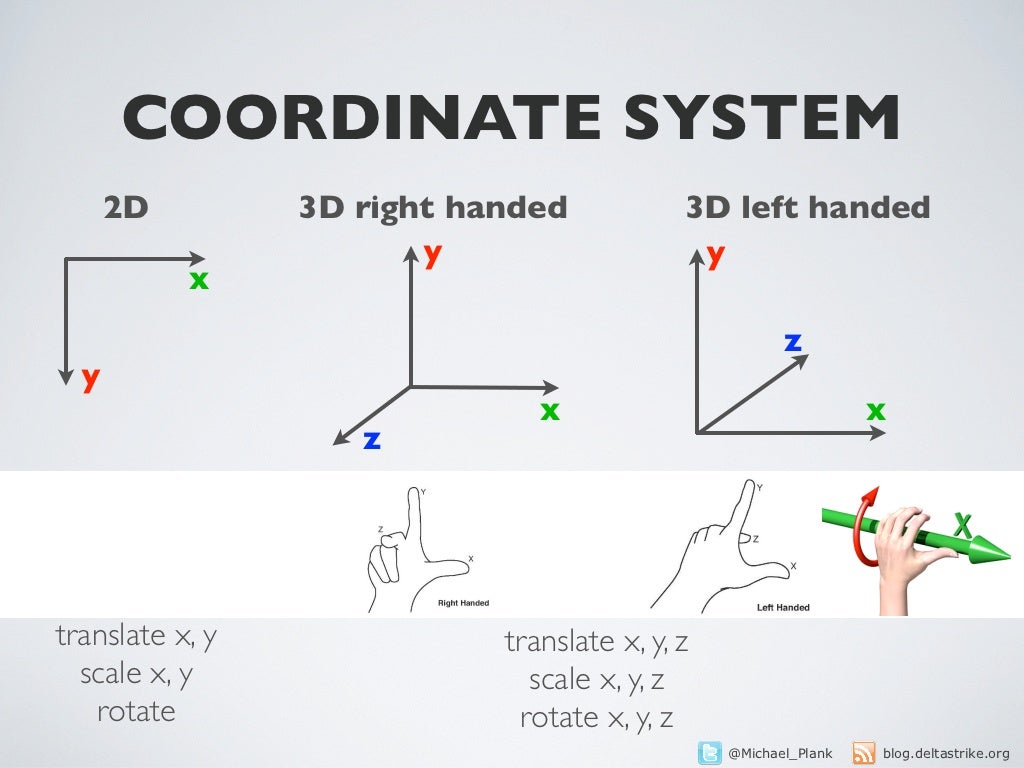
The code above creates a red box in the position given by the (0, 0, -4) coordinates. A-Frame uses a right-handed coordinate system where the negative Z axis extends into the screen.
The position component places entities at certain spots in 3D space. Position takes a coordinate value as three space-delimited numbers.
<a-sphere position="0 1 -1"></a-sphere>
A-Frame uses a right-handed coordinate system where the negative Z axis extends into the screen.
The rotation component defines the orientation of an entity in degrees. It takes x, y, and z, as three space-delimited numbers indicating degrees of rotation.
<a-box rotation="45 90 180"></a-box>
The scale component defines a shrinking, stretching, or skewing transformation of an entity. It takes three scaling factors for the X, Y, and Z axes.
<a-plane scale="0.5 1 2"></a-plane>
The unit of measurement used in A-Frame is the meter. To define the size in A-Frame we have different attributes depending on the object's geometry. The box primitive takes the width, height, and depth attributes to control the size whereas the sphere and circle take the radius attribute. A cylinder uses both the height and the radius attribute:
<a-box position="2 0 -5" width="1" height="2" depth="1" color="#FFAA00"></a-box>

<a-sphere position="-2 0 -5" radius="0.75" color="red"></a-sphere>

<a-cylinder
  position="0 0 -5"
  radius="1"
  height="1.5"
  color="#212121"
></a-cylinder>In A-Frame, besides the color, we can also apply textures to the entities in our scene. The process of applying a texture to an entity is very straightforward and we can apply it to every entity in the scene. Additionally, A-Frame also provides components for loading 3D models, to further enrich the VR scene. A-Frame has an asset management system that allows us to place our assets in one place and to preload and cache assets for better performance. We will start here.
The asset management system allow us to preload our assets, such as models and textures, before rendering the scene. This makes sure that assets aren’t missing visually, and this is beneficial for performance to ensure scenes don’t try to fetch assets while rendering. Assets include:
<a-asset-item><audio><img><video>
To set a texture to an entity, we need to specify the src property. src can be a selector to any element in the asset management system. It is customary in A-Frame to use ID selectors for assets: we assign an id to the asset in the asset management system, and then use an ID selector in the primitive we want to apply that asset in. For example, to set a simple texture to an <a-box> primitive, we simply load the texture to the asset management system, assign it an id of my-texture and specify the source in our primitive as being #my-texture.
<a-scene>
  <a-assets>
    <img id="my-texture" src="texture.png" />
  </a-assets>

  <a-box material="src: #my-texture"></a-entity>
</a-scene>
To load a 3D Model, the process is very similar. A-Frame recommends using glTF model. The <gltf-model> component loads a 3D model using a .gltf or .glb file
<a-scene background="color: #ECECEC">
  <a-assets>
    <a-asset-item
      id="cityModel"
      src="https://cdn.aframe.io/test-models/models/glTF-2.0/virtualcity/VC.gltf"
    ></a-asset-item>
  </a-assets>
  <a-entity gltf-model="#cityModel" modify-materials></a-entity>
</a-scene>The animation component lets us animate and tween values including:
- Component values such as position, visibility, scale, and rotation.
- Component property values such as light, intensity, etc.
As example, below we have a translating box:
<a-box
  position="-1 1.6 -5"
  animation="property: position; to: 1 8 -10; dur: 2000; easing: linear; loop: true"
  color="tomato"
></a-box>
See more about the animation component in the A-Frame documentation
So far we have mentioned entities numerous times during this brief introduction to A-Frame, so what is the definition of an entity? In A-Frame entities are placeholders objects to which we plug in components to provide them appearance, behavior, and functionality.
We can attach components to it to make it render something or do something. To give it shape and appearance, we can attach the geometry and material components.
The geometry component provides a basic shape fo an entity. The primitive property defines the general shape.
The material component gives appearance to an entity. We can define properties such as color, opacity, or texture.
Entities are inherently attached with the position, rotation, and scale components.
Consider the following example:
<a-entity
  geometry="primitive: box"
  material="color: red"
  position="2 2 -10"
  scale="2 2 1"
>
</a-entity>
Refer to the A-Frame documentation to see further more information.
Components of A-Frame's are JavaScript modules that can be mixed, matched, and composed onto entities to build appearance, behavior, and functionality. We can register a new component in JavaScript and use it declaratively from the DOM. Components are configurable, reusable, and shareable. Most code in an A-Frame application should live within components [1].
To use a component, we first must define it before the <a-scene> tag, as example:
<html>
  <head>
    <!-- Import external component -->
    <script src="foo-component.js"></script>
  </head>
  <body>
    <script>
      // Or inline before the <a-scene>.
      AFRAME.registerComponent("bar", {
        // ...
      });
    </script>

    <a-scene> </a-scene>
  </body>
</html>
Let's have a first look to a basic component to get the general idea. This component will log a simple message once when the component’s entity is attached using the .init() handler. But first, we need to register the component.
Components are registered with AFRAME.registerComponent(). The first argument is the name of the component, which will be used as the HTML attribute name, and for this example it will be hello-world. The second is a JavaScript object of methods and properties.
In the next example, we have our init() handler.
AFRAME.registerComponent('hello-world', {
  init: function () {
    console.log('Hello, World!');
  }
});
Then we can use our hello-world component declaratively as an HTML attribute. Do not forget to include the JavaScript file or declare inline before the <a-scene> tag.
<html>
  <head>
    <script src="https://aframe.io/releases/1.1.0/aframe.min.js"></script>
    <!-- Import the hello-world component -->
    <script src="hello-world.js"></script>
  </head>
  <body>
    <!-- Attach the component to the scene -->
    <a-scene hello-world> </a-scene>
  </body>
</html>
To set a component, rather than via static HTML , is to set it programmatically with .setAttribute(). In the example bellow, we set the hello-worldcomponent on the scene programmatically:
document.querySelector('a-scene').setAttribute('hello-world', '');Some components have methods available programmatically, and it is not possible to access them directly through HTML. For example, the Vibrotactile component has three internal methods only accessible through JavaScript.
A component's methods can be accessed through the entity from the .components object. Consider this example:
AFRAME.registerComponent('foo', {
  init: function () {
    this.bar = 'baz';
  },

  qux: function () {
    // ...
  }
});
To access the quxmethod:
var fooComponent = document.querySelector('[foo]').components.foo;
fooComponent.qux();
We can query for elements containing a component with the attribute selector (i.e., [ COMPONENT_NAME]), as used in the example above.
Refer to the A-Frame documentation for more information on creating and register a component.
In A-Frame we can use components created by the community. Here, we will use the vibrotactile component. This component sends vibrotactile feedback to the user (if (s)he is using a special vibrotactile device) when interacting with scene elements that have the component associated. A basic example of its usage:
<html>
  <head>
    <script src="https://aframe.io/releases/1.1.0/aframe.min.js"></script>
    <!-- Import the vibrotactile component -->
    <script src="vibrotactile.js"></script>
  </head>
  <body>
    <a-scene>
      <a-box vibrotactile="src: vibrations.json; event: mouseenter;"></a-box>
    </a-scene>
  </body>
</html>
The Vibrotactile component takes two arguments:
- A path to a vibration file exported from Vibrotactile Editor
- An A-Frame event which will trigger the vibration.
In the example above, when the mouse intersects with the box primitive, it will trigger the vibrations from the vibrations.json file.
Refer to the examples folder.
Make changes in the example Task1 provided to match the following:
- Change the sky primitive color to
#ADD8E6 - Apply a x-axis rotation of 45º in the box primitive
- Change the y-axis position of the sphere to 2 meters.
- Create another box primitive and apply a scale transformation of
3 1 1.
Navigate in the scene using the arrow keys or the "wasd" controls.
Make changes in the example Task2 provided to match the following:
- Apply one texture from the asset management system to the box primitive.
- Apply the "Gas Station" 3D Object Model to the empty entity
Make changes in the example Task3 provided to match the following:
- Apply a translation animation to the
<a-box>primitive from its initial position to"2 1.5 -10"
Make changes in the example Task4 provided to match the following:
Using the <a-entity> element provide the following characteristics:
- Give the empty entity the shape and appearance of a yellow (
#FFF200) cube. - Position the yellow cube at
"2 1.5 -10" - Give to another empty entity the shape and appearance of a red (
#FF0000) sphere. - Position the red sphere at
"-2 1.5 -10"and apply a scale transformation of2 2 1.
At this point, we have finished the first section of the A-Frame Tutorial. The main objective was to introduce the basic concepts of this framework. With the knowledge acquired we now want the participant to do two more tasks focused on the use of an external component, the vibrotactile component.