Skip to content
New issue

Have a question about this project? Sign up for a free GitHub account to open an issue and contact its maintainers and the community.

By clicking “Sign up for GitHub”, you agree to our terms of service and privacy statement. We’ll occasionally send you account related emails.

Already on GitHub? Sign in to your account

Kotlin coroutine详解 #11

Open
aCoder2013 opened this issue Oct 6, 2017 · 0 comments
Open

Kotlin coroutine详解 #11

aCoder2013 opened this issue Oct 6, 2017 · 0 comments

Comments

@aCoder2013
Copy link
Owner

aCoder2013 commented Oct 6, 2017

前言

本文主要介绍一下Kotlin是如何实现Coroutine的,对于具体的用法推荐参考一下官方文档,讲得还是比较详细的

什么是 Coroutine

概念上来说类似于线程,拥有自己的栈、本地变量、指令指针等,需要一段代码块来运行并且拥有类似的生命周期。但是和线程不同,coroutine并不和某一个特定的线程绑定,它可以在线程A中执行,并在某一个时刻暂停(suspend),等下次调度到恢复执行的时候在线程B中执行。不同于线程,coroutine是协作式的,即子程序可以通过在函数中有不同的入口点来实现暂停、恢复,从而让出线程资源。

实战演练

首先看一个简单的小demo,来看看Kotlin的Coroutine是具体适合使用的:

    @Test
    fun async() {
        async {
            delay(1000)
            print("World!")
        }
        print("Hello ")
        Thread.sleep(2000)
    }

上面这段代码会输出Hello World!, 那么下面我们看看具体是如何工作的.

原理剖析

asyn()这里是一个函数,下面是它的源码:

public val DefaultDispatcher: CoroutineDispatcher = CommonPool

public fun <T> async(
    context: CoroutineContext = DefaultDispatcher,
    start: CoroutineStart = CoroutineStart.DEFAULT,
    block: suspend CoroutineScope.() -> T
): Deferred<T> {
    val newContext = newCoroutineContext(context)
    val coroutine = if (start.isLazy)
        LazyDeferredCoroutine(newContext, block) else
        DeferredCoroutine<T>(newContext, active = true)
    coroutine.initParentJob(context[Job])
    start(block, coroutine, coroutine)
    return coroutine
}

这个函数有三个参数,其中两个都有默认值,也就是默认不需要传递,context是指coroutine的上下文,默认是DefaultDispatcher,DefaultDispatcher当前的实现是CommonPool,由于目前还是experimental,后面说不定会更改成其他的实现。

object CommonPool : CoroutineDispatcher() {
    private var usePrivatePool = false

    @Volatile
    private var _pool: Executor? = null

    private inline fun <T> Try(block: () -> T) = try { block() } catch (e: Throwable) { null }

    private fun createPool(): ExecutorService {
        val fjpClass = Try { Class.forName("java.util.concurrent.ForkJoinPool") }
            ?: return createPlainPool()
        if (!usePrivatePool) {
            Try { fjpClass.getMethod("commonPool")?.invoke(null) as? ExecutorService }
                ?.let { return it }
        }
        Try { fjpClass.getConstructor(Int::class.java).newInstance(defaultParallelism()) as? ExecutorService }
            ?. let { return it }
        return createPlainPool()
    }

    private fun createPlainPool(): ExecutorService {
        val threadId = AtomicInteger()
        return Executors.newFixedThreadPool(defaultParallelism()) {
            Thread(it, "CommonPool-worker-${threadId.incrementAndGet()}").apply { isDaemon = true }
        }
    }
}

CommonPool默认会使用ForkJoinPool作为coroutine的调度策略,如果不存在则fallback到线程池的策略,ForkJoinPool实现了work-stealing算法,当前线程的工作完成后从其他线程的待执行任务中窃取,具体的解释推荐直接看其注释,比网上的博客清晰的多。
而第二个参数CoroutineStart 指的是coroutine启动的选项,总的来说有四种:

/*
 * * [DEFAULT] -- immediately schedules coroutine for execution according to its context;
 * * [LAZY] -- starts coroutine lazily, only when it is needed;
 * * [ATOMIC] -- atomically (non-cancellably) schedules coroutine for execution according to its context;
 * * [UNDISPATCHED] -- immediately executes coroutine until its first suspension point _in the current thread_.
 */

第三个就是实际的coroutine要执行的代码段了,下面我们看看具体的执行流程:

public fun <T> async(
    context: CoroutineContext = DefaultDispatcher,
    start: CoroutineStart = CoroutineStart.DEFAULT,
    block: suspend CoroutineScope.() -> T
): Deferred<T> {
    /**
   *  初始化上下文,例如名字(方便调试)
   */
    val newContext = newCoroutineContext(context)
    val coroutine = if (start.isLazy)
        LazyDeferredCoroutine(newContext, block) else
        DeferredCoroutine<T>(newContext, active = true)
    //这里是DeferredCoroutine,并且不存在父任务
    coroutine.initParentJob(context[Job])
    //Kotlin的运算符重载,会转化为对应参数的invoke方法
   //https://kotlinlang.org/docs/reference/operator-overloading.html
    start(block, coroutine, coroutine)
    return coroutine
}

public fun newCoroutineContext(context: CoroutineContext): CoroutineContext {
    val debug = if (DEBUG) context + CoroutineId(COROUTINE_ID.incrementAndGet()) else context
    return if (context !== DefaultDispatcher && context[ContinuationInterceptor] == null)
        debug + DefaultDispatcher else debug
}

下面就会调用CoroutineStart中对应的invoke方法:

    public operator fun <R, T> invoke(block: suspend R.() -> T, receiver: R, completion: Continuation<T>) =
        when (this) {
            //类似java的switch语句(TABLESWITCH/lookupswitch)
            //https://kotlinlang.org/docs/reference/control-flow.html
            CoroutineStart.DEFAULT -> block.startCoroutineCancellable(receiver, completion)
            CoroutineStart.ATOMIC -> block.startCoroutine(receiver, completion)
            CoroutineStart.UNDISPATCHED -> block.startCoroutineUndispatched(receiver, completion)
            CoroutineStart.LAZY -> Unit // will start lazily
        }

接着会去调用startCoroutineCancellable方法:

internal fun <R, T> (suspend (R) -> T).startCoroutineCancellable(receiver: R, completion: Continuation<T>) =
    createCoroutineUnchecked(receiver, completion).resumeCancellable(Unit)

//
public fun <R, T> (suspend R.() -> T).createCoroutineUnchecked(
        receiver: R,
        completion: Continuation<T>
): Continuation<Unit> =
        if (this !is kotlin.coroutines.experimental.jvm.internal.CoroutineImpl)
            buildContinuationByInvokeCall(completion) {
                @Suppress("UNCHECKED_CAST")
                (this as Function2<R, Continuation<T>, Any?>).invoke(receiver, completion)
            }
        else
            //这里create方法会去创建CoroutineImpl,但是我们看到CoroutineImpl中这方法会直接抛异常
            //wtf?实际上这里传递进来的this是编译器根据async中的lambda动态生产的类的实例,因此
            //也就是说实际的调用是那个动态类
            (this.create(receiver, completion) as kotlin.coroutines.experimental.jvm.internal.CoroutineImpl).facade

上面说到编译器会生成内部类,那么我们看看这里到底有什么黑魔法,下面贴一下具体的结构
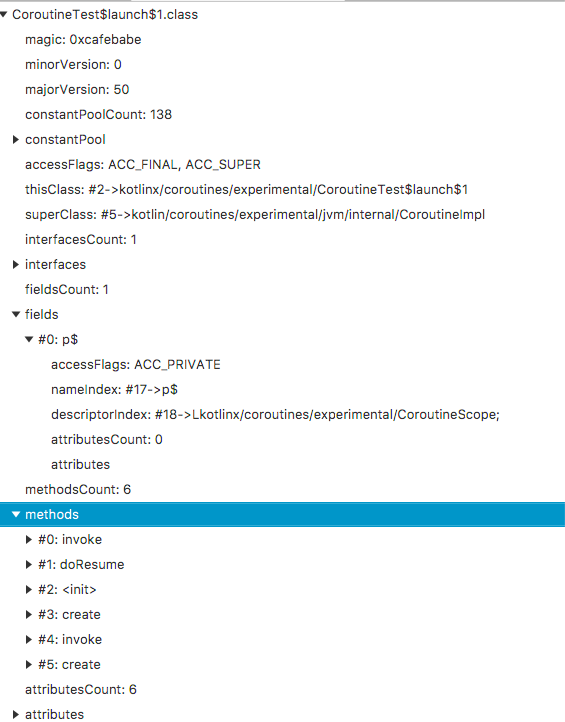
image
反编译之后,先只看create方法:

static final class CoroutineTest.launch
extends CoroutineImpl
implements Function2<CoroutineScope, Continuation<? super Unit>, Object> {
    private CoroutineScope p$;
    
    @NotNull
    public final Continuation<Unit> create(@NotNull CoroutineScope $receiver, @NotNull Continuation<? super Unit> $continuation) {
        Intrinsics.checkParameterIsNotNull((Object)$receiver, (String)"$receiver");
        Intrinsics.checkParameterIsNotNull($continuation, (String)"$continuation");
        CoroutineImpl coroutineImpl = new ;
        CoroutineScope coroutineScope = coroutineImpl.p$ = $receiver;
        return coroutineImpl;
    }
}

创建完需要的上下文之后,会去调用拿到Continuation后,就去调用resumeCancellable方法:

internal fun <R, T> (suspend (R) -> T).startCoroutineCancellable(receiver: R, completion: Continuation<T>) =
    createCoroutineUnchecked(receiver, completion).resumeCancellable(Unit)
internal fun <T> Continuation<T>.resumeCancellable(value: T) = when (this) {
    is DispatchedContinuation -> resumeCancellable(value)
    else -> resume(value)
}

    @Suppress("NOTHING_TO_INLINE") // we need it inline to save us an entry on the stack
    inline fun resumeCancellable(value: T) {
        val context = continuation.context
        if (dispatcher.isDispatchNeeded(context))
            dispatcher.dispatch(context, DispatchTask(continuation, value, exception = false, cancellable = true))
        else
            resumeUndispatched(value)
    }

image
可以看到最终就是丢到CommonPool中(ForkJoinPool),不过在那之前会包装成一个DispatchTask:

internal class DispatchTask<in T>(
    private val continuation: Continuation<T>,
    private val value: Any?, // T | Throwable
    private val exception: Boolean,
    private val cancellable: Boolean
) : Runnable {
    @Suppress("UNCHECKED_CAST")
    override fun run() {
        val context = continuation.context
        val job = if (cancellable) context[Job] else null
        withCoroutineContext(context) {
            when {
                job != null && !job.isActive -> continuation.resumeWithException(job.getCancellationException())
                exception -> continuation.resumeWithException(value as Throwable)
                else -> continuation.resume(value as T)
            }
        }
    }

    override fun toString(): String =
        "DispatchTask[$value, cancellable=$cancellable, ${continuation.toDebugString()}]"
}

在我们的场景下最终会调用:Continuation#public fun resume(value: T),这里的实际会调用:

abstract class CoroutineImpl(
        arity: Int,
        @JvmField
        protected var completion: Continuation<Any?>?
) : Lambda(arity), Continuation<Any?> {
    override fun resume(value: Any?) {
        processBareContinuationResume(completion!!) {
            doResume(value, null)
        }
    }
}
@kotlin.internal.InlineOnly
internal inline fun processBareContinuationResume(completion: Continuation<*>, block: () -> Any?) {
    try {
        val result = block()
        if (result !== COROUTINE_SUSPENDED) {
            @Suppress("UNCHECKED_CAST")
            (completion as Continuation<Any?>).resume(result)
        }
    } catch (t: Throwable) {
        completion.resumeWithException(t)
    }
}

这里doResume就是上文提到Kotlin编译器生成的内部类:

    @Nullable
    public final Object doResume(@Nullable Object var1_1, @Nullable Throwable var2_2) {
        var5_3 = IntrinsicsKt.getCOROUTINE_SUSPENDED();
        switch (var0.label) {
            case 0: {
                v0 = var2_2;
                if (v0 != null) {
                    throw v0;
                }
                var3_4 = this.p$;
                this.label = 1;
                v1 = DelayKt.delay$default((long)1000, (TimeUnit)null, (Continuation)this, (int)2, (Object)null);
                if (v1 == var5_3) {
                    return var5_3;
                }
                ** GOTO lbl18
            }
            case 1: {
                v2 = throwable;
                if (v2 != null) {
                    throw v2;
                }
                v1 = data;
lbl18: // 2 sources:
                var4_5 = "World!";
                System.out.print((Object)var4_5);
                return Unit.INSTANCE;
            }
        }
        throw new IllegalStateException("call to 'resume' before 'invoke' with coroutine");
    }

可以看到实际上Kotlin使用状态机实现的Coroutine,根据label的状态决定要执行的代码块,Kotlin会在编译时根据可suspend的方法插入相应的label,从而实现主动让出线程资源,并且将本地变量保存到Continuation的实例变量中,等到下次得到调度的时候,根据label来决定要执行的代码块,等到函数实际执行完的时候则直接返回对应的返回值(没有的话则是默认值).
比如看下面这段代码:

val a = a()
val y = foo(a).await() // suspension point #1
b()
val z = bar(a, y).await() // suspension point #2
c(z)

这段代码总共有三种状态:

  1. 初始状态,在所有的suspension point点之前
  2. 第一个暂停点
  3. 第二个暂停点

每一个状态都是continuation的入口点之一,这段代码会编译为一个实现了状态机的匿名类,有一个状态变量用于保存当前状态机的状态,以及用于保存当前coroutine的本地变量,编译后的代码用Java代码类似下面:

class <anonymous_for_state_machine> extends CoroutineImpl<...> implements Continuation<Object> {
    // 状态机当前的状态
    int label = 0
    
    // coroutine的本地变量
    A a = null
    Y y = null
    
    void resume(Object data) {
        if (label == 0) goto L0
        if (label == 1) goto L1
        if (label == 2) goto L2
        else throw IllegalStateException()
        
      L0:
        a = a()
        label = 1
        data = foo(a).await(this) // 'this' 默认会被传递给await方法
        if (data == COROUTINE_SUSPENDED) return //如果需要暂停则返回
      L1:
        //重新得到调度
        y = (Y) data//保存本地变量
        b()
        label = 2
        data = bar(a, y).await(this) 
        if (data == COROUTINE_SUSPENDED) return 
      L2:
        Z z = (Z) data
        c(z)
        label = -1 // No more steps are allowed
        return
    }          
}    

当coroutine开始执行的时候,默认label为0,那么就会跳转到L0,然后执行一个耗时的业务逻辑,将label设置为1,调用await,如果coroutine的执行需要暂停的那么就返回掉。当需要继续执行的时候就再次调用resume(),这次就会跳转到L1, 执行完业务逻辑后,将label设置为2,调用await并根据是否需要暂停来return,下次的继续调度,这次会从L2开始执行,然后label设置为-1,意味着不需要执行完了,不需要再调度了。

回到最初的代码段,我们首先调用了delay方法,这个方法默认使用ScheduledExecutorService,从而将当前的coroutine上下文包装到DispatchTask,再对应的延迟时间之后再恢复执行,恢复执行之后,这时候label是1,那么就会直接进入第二段代码,输出World!

    @Test
    fun async() {
        async {
            //在另外的线程池中执行,通过保存当前的执行上下文(本地变量、状态机的状态位等),并丢到
            //ScheduledExecutorService中延迟执行
            delay(1000)
            print("World!")
        }
        //主线程中直接输出
        print("Hello ")
        Thread.sleep(2000)
    }

165021507294969_ pic_hd

总结

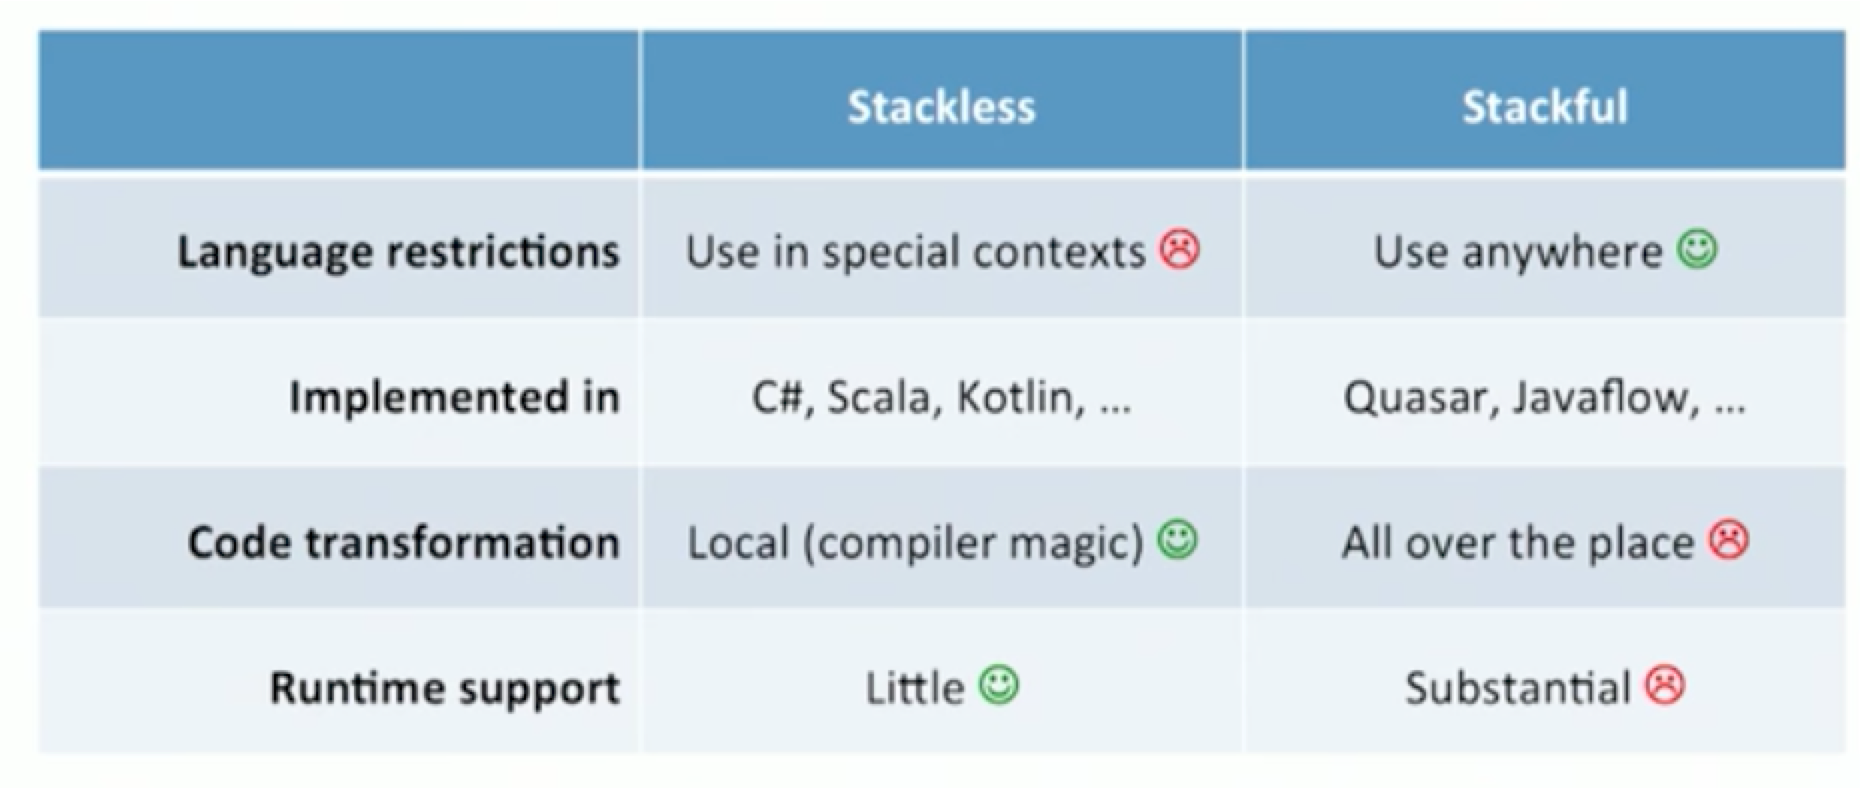
本文大致讲解了一些Kotlin中Coroutine的实现原理,当然对于协程,很多编程语言都有相关的实现,推荐都看一下文档,实际使用对比看看。
image

参考资料

  1. https://github.com/Kotlin/kotlin-coroutines
  2. https://en.wikipedia.org/wiki/Coroutine
  3. https://www.lua.org/pil/9.html
  4. https://golang.org/doc/effective_go.html#concurrency
  5. https://www.youtube.com/watch?v=4W3ruTWUhpw
  6. https://www.youtube.com/watch?v=EMv_8dxSqdE

Flag Counter

Sign up for free to join this conversation on GitHub. Already have an account? Sign in to comment
Labels
None yet
Projects
None yet
Development

No branches or pull requests

1 participant