WebSocket based version of motor-on-roller-blind. I.e. there is no need of an MQTT server but MQTT is supported as well - you can control it with WebSockets and/or with MQTT messages.
3d parts for printing are available on Thingiverse.com: "motor on a roller blind"
- A tiny webserver is setup on the esp8266 that will serve one page to the client
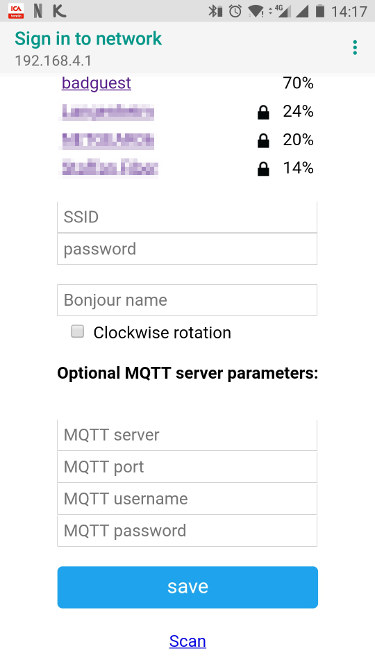
- Upon powering on the first time WIFI credentials, a hostname and - optional - MQTT server details is to be configured. You can specify if you want clockwise (CW) rotation to close the blind and you can also specify MQTT authentication if required. Connect your computer to a new WIFI hotspot named BlindsConnectAP. Password = Welcome123
- Connect to your normal WIFI with your client and go to the IP address of the device - or if you have an mDNS supported device (e.g. iOS, OSX or have Bonjour installed) you can go to http://{hostname}.local. If you don't know the IP-address of the device check your router for the leases (or check the serial console in the Arduino IDE or check the
/BLIND/registerMQTT message if you are using an MQTT server) - As the webpage is loaded it will connect through a websocket directly to the device to progress updates and to control the device. If any other client connects the updates will be in sync.
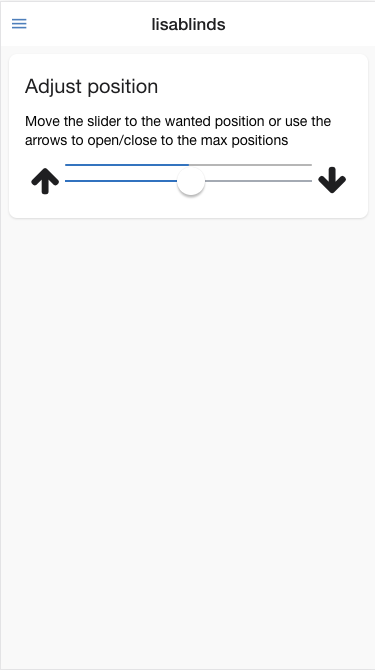
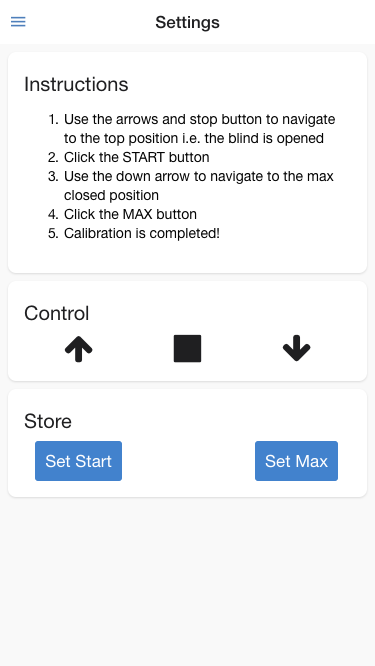
- Go to the Settings page to calibrate the motor with the start and end positions of the roller blind. Follow the instructions on the page
- When it connects to WIFI and MQTT it will send a "register" message to topic
/BLIND/registerwith a payload containing IP-address - A message to
/BLIND/[device-name]/inwill steer the blind according to the "payload actions" below - Updates from the device will be sent to topic
/BLIND/[device-name]/out
*device-name have to be specified during WIFI configuration process (after device flashing or factory reset).
Simply do not enter any string in the MQTT server form field upon WIFI configuration of the device (step 3 above).
(start)- (calibrate) Sets the current position as top position(max)- (calibrate) Sets the current position as max position. Setstartbefore you definemaxasmaxis a relative position tostart(0)- (manual mode) Will stop the curtain(-1)- (manual mode) Will open the curtain. Requires(0)to stop the motor(1)- (manual mode) Will close the curtain. Requires(0)to stop the motor0-100- (auto mode) A number between 0-100 to set % of opened blind. Requires calibration before use. E.g.50will open it to 50%
For those who do not want to carry smartphone all the time, device supports manual operation using buttons - UP and DOWN. Calibration using webpage is still needed though. Supported buttons action: single click.
- Single click breaks motors move if "auto" mode move is active.
- Single click triggers "auto" mode move to position: "0" or "100" if motor is stopped.
(no need to keep button pressed for changing motor position)
If you plan to use buttons very far from device please use external pullup resistors and INPUT mode instead of INPUT_PULLUP.
- Press and hold up and down buttons
- Press and release reset hardware button or reconnect power supply
- Keep up and down buttons pressed at least 5seconds
- Release buttons and wait for device to reboot
NOTE: After flashing - remove power source, otherwise device will hang after reset. This is one-time-only issue so next resets will be done properly.
Button pins:
Up - D1Down - D2
Motor pins:
IN1 - D5IN2 - D6IN3 - D7IN4 - D8
Embedded LED (D4) works as heartbeat:
- 3 short blinks: booting device/starting up (please note that 3 short blinks in loop can be triggered by wrong configuration: device name is required. In case of crash loop please erase configuration by factory reset and next remove power source)
- LED is on constantly: AP mode / Configuration mode (please check available WiFi networks and connect to BlindsConnectAP)
- 3 long blinks: connected to network and ready to use (please calibrate device after first connection)
Entities Card:

Device name for below example is OKNO_1
Add below code to configuration.yaml:
homeassistant:
  packages: !include_dir_named packages
Create new package file for covers, e.g.: packages\covers.yaml
cover:
  - platform: mqtt
    name: "Window 1A"
    command_topic: "/BLIND/Okno1A/in"
    position_topic: "/BLIND/Okno1A/outOld"
    set_position_topic: "/BLIND/Okno1A/in"
    payload_open: "0"
    payload_close: "100"
    payload_stop: "(0)"
    position_open: 100
    position_closed: 0
    optimistic: false
    value_template: '{{ value_json.position }}'
Add new Entities Card to your configuration, e.g.:
entities:
  - entity: cover.mqtt_cover
show_header_toggle: false
title: Cover
type: entities
0% means that cover is opened
100% means that cover is closed
- Stepper_28BYJ_48: https://github.com/thomasfredericks/Stepper_28BYJ_48/
- PubSubClient: https://github.com/knolleary/pubsubclient/
- ArduinoJson: https://github.com/bblanchon/ArduinoJson
- WIFIManager: https://github.com/tzapu/WiFiManager
- WbSocketsServer: https://github.com/Links2004/arduinoWebSockets