This project is no longer under active development.
This project is just a place for me to record any progress I make as I hack around with my WowWee MiP Balancing Robot.

WowWee MiP robot available @ Sparkfun
Hacking the MiP - Proto Pack by Sparkfun
Hacking the MiP - Proto Back by Sparkfun
WowWee MiP Bluetooth Low Energy Protocol Documentation on GitHub
charcole's OS X MiP Sample on GitHub
WowWee MiP Quick Teardown on macetech.com
Official WowWee MiP iOS SDK
My MiP teardown
My MiP C API
Wow! It has been 3 years since I last did any MiP hacking that made it to this page. Time to correct that!
Sparkfun designed an Arduino compatible MiP ProMini Pack but it turns out that it had issues with reliably receiving MiP responses. After some investigation, @Tiogaplanet was able to determine that the issue was caused by the ATMEGA328 not being able to reliably receive data at 115200 bps when running at 8MHz as was done by Sparkfun in their MiP ProMini Pack. He confirmed that it did work when run at 16MHz. That issue kicked off this redesign of the MiP ProMini Pack running at 16MHz/5V.
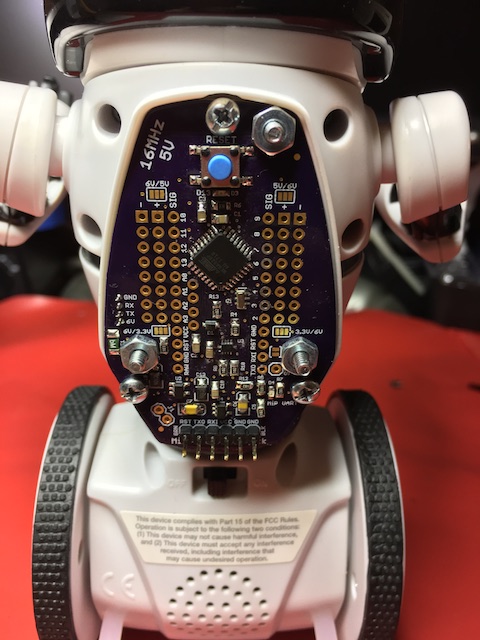
I also ported my existing MiP C API project and refactored it to make it more Arduino friendly. This library can be found here on GitHub.
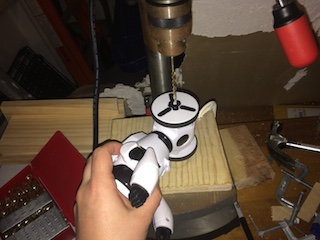
Yesterday I took my MiP apart so that I could start coming up with a plan on how I wanted to upgrade my MiP to use rechargeable LiPo batteries and connect a microcontroller directly to the internal UART port. I started the tear down in the garage at the drill press. This is where I drilled out the wheel hubs with a 3/16" drill bit as suggested in this Sparkun tutorial.
Once the hubs were drilled out, I was able to loosen the screws in the hubs and remove the wheels from the MiP.
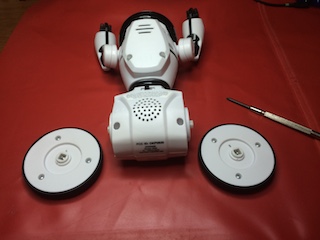
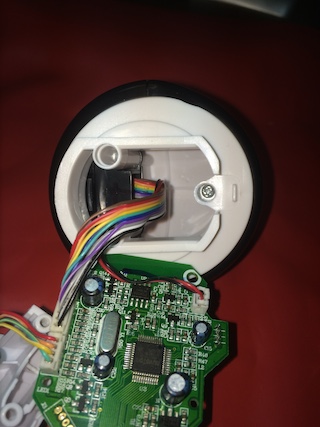
After removing the battery pack along with all of the screws accessible from the back of the MiP, I was able to split the front and back pieces of the MiP apart.


Here are some close-up shots of the top of the MiP circuit board:
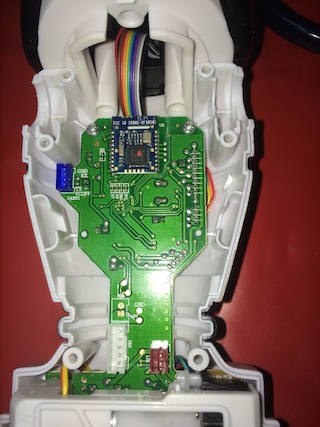
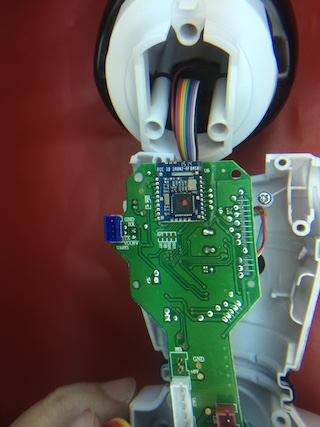
The blue port in those photos is the 4-pin UART connector to which a microcontroller can be attached. Full resolution versions of those two images can be found at:
https://raw.githubusercontent.com/adamgreen/MiP/master/images/20150425-05-Full.jpg
https://raw.githubusercontent.com/adamgreen/MiP/master/images/20150425-10-Full.jpg
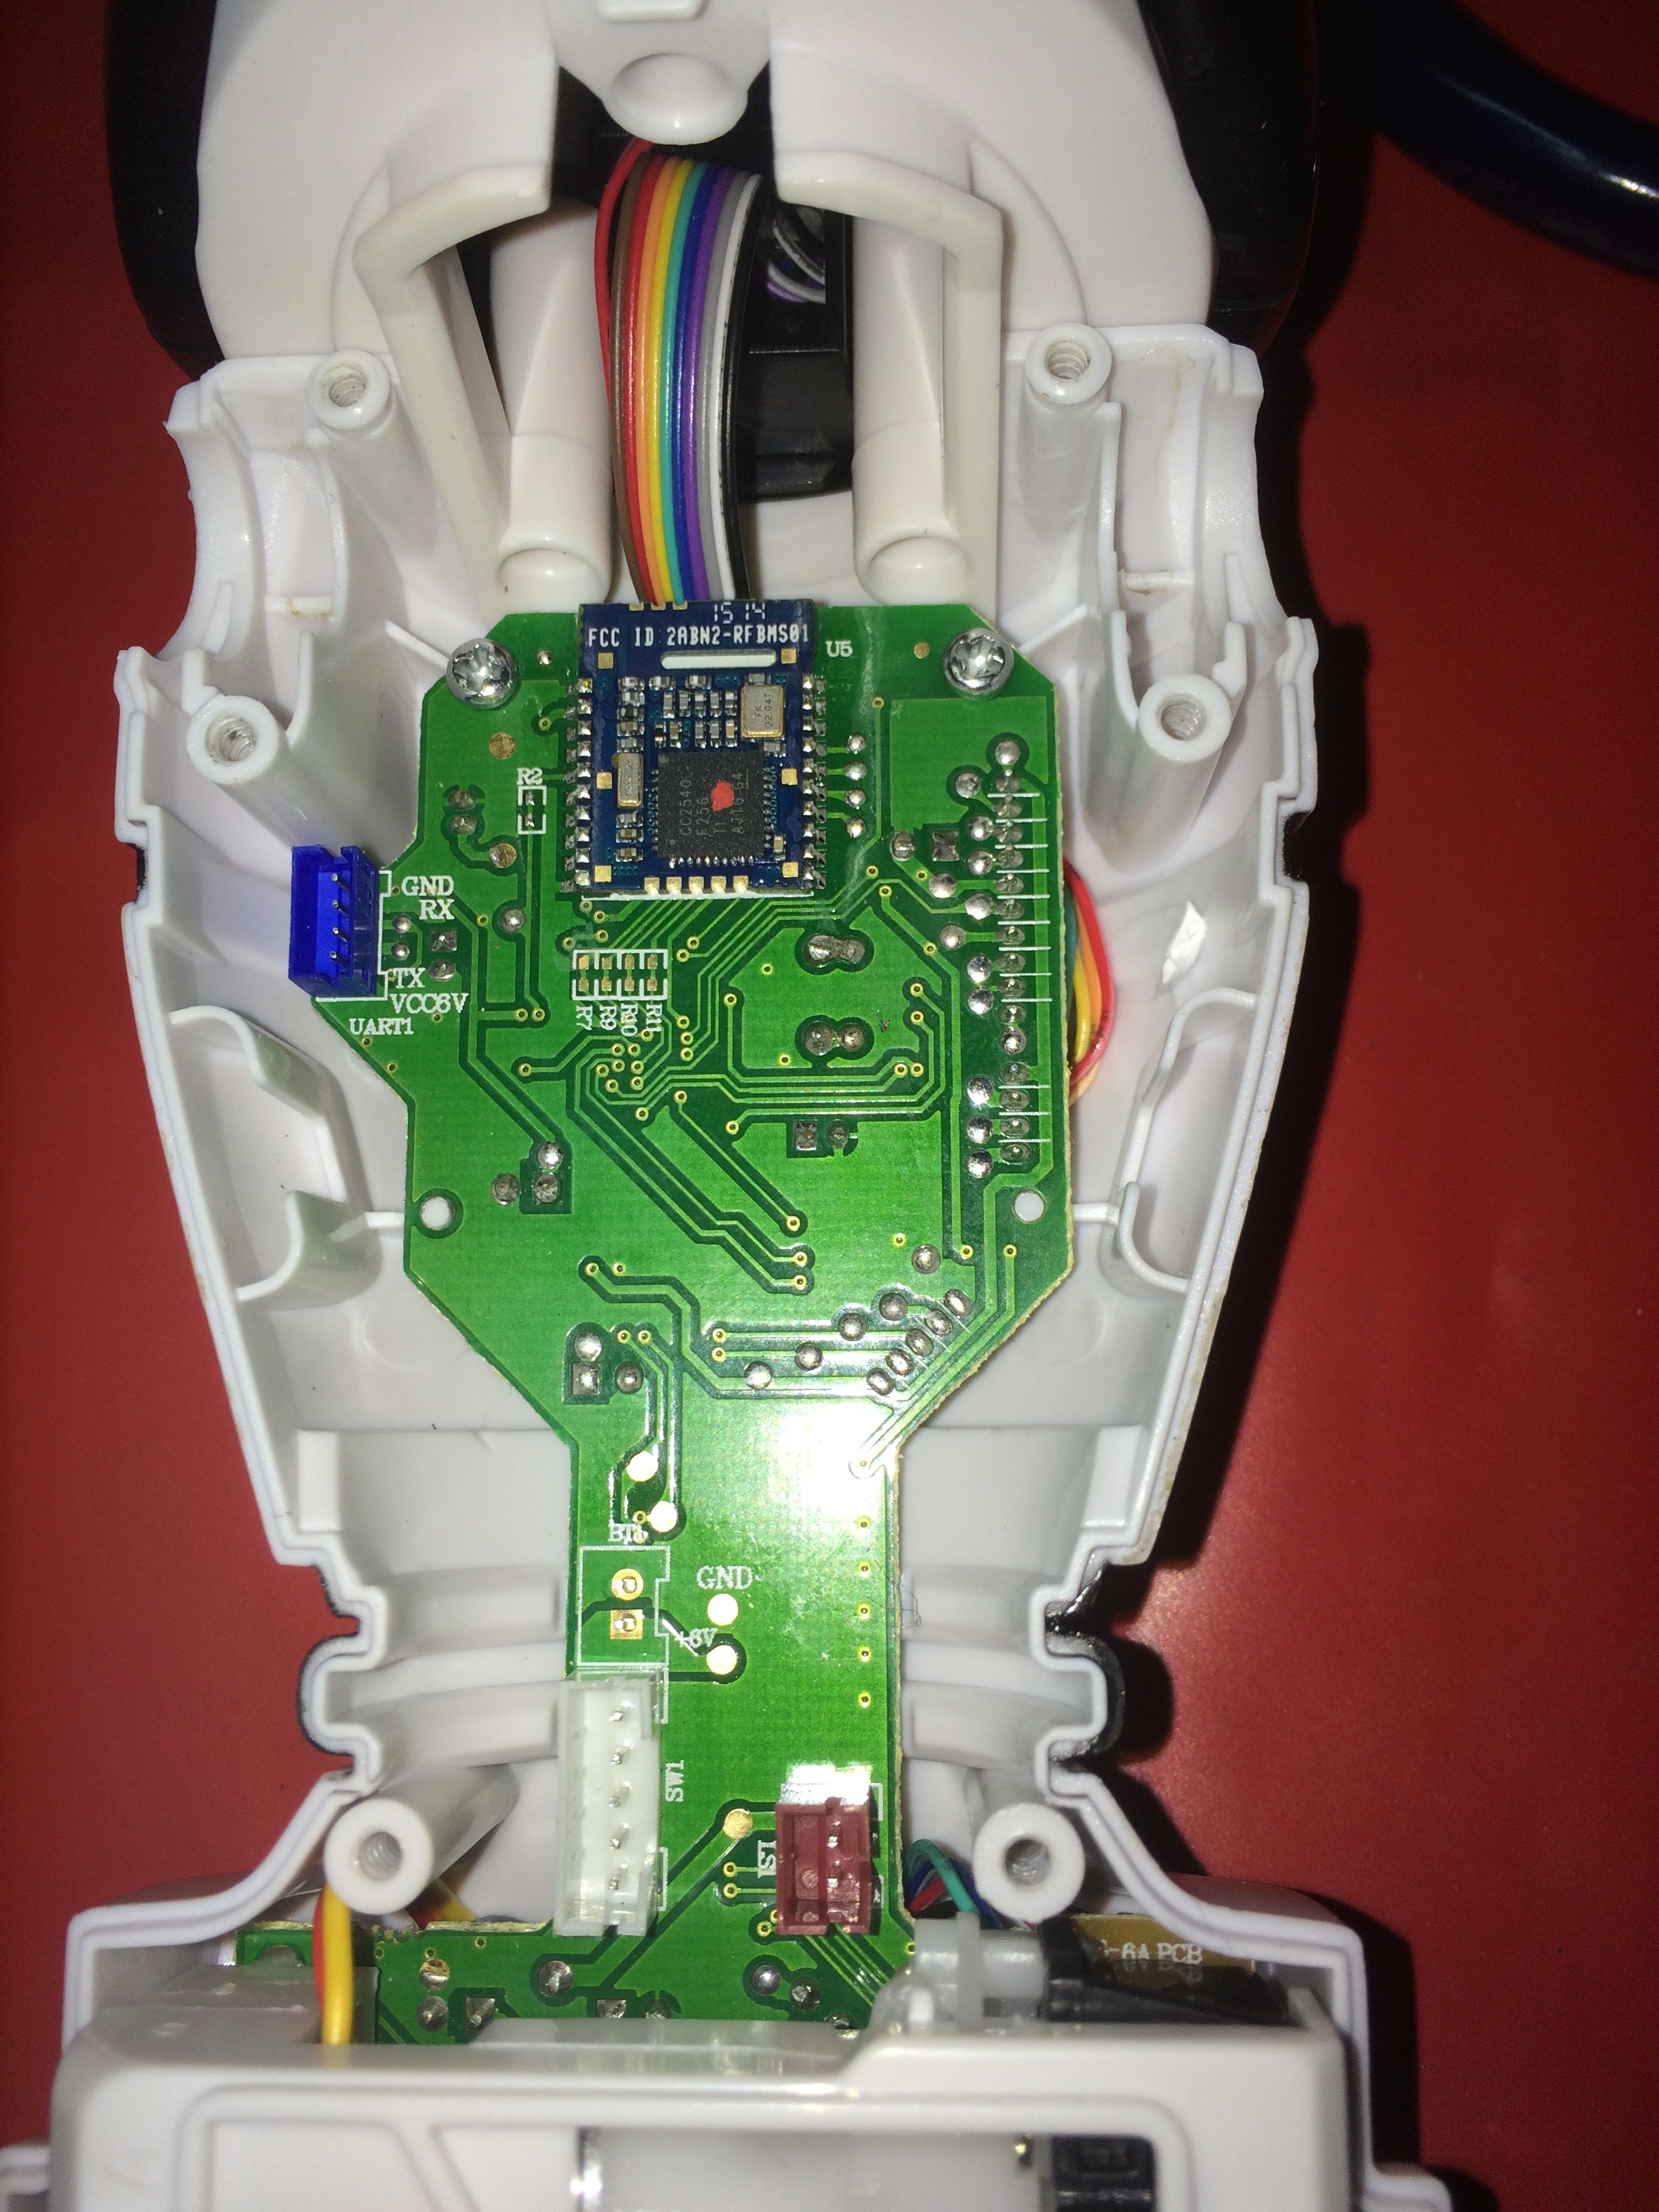
After disconnecting the cables (battery, switch, and speaker) between the circuit board and back plastics and removing a few more screws (located on the circuit board and plastics around the drive train), I was able to expose the bottom of the MiP circuit board. 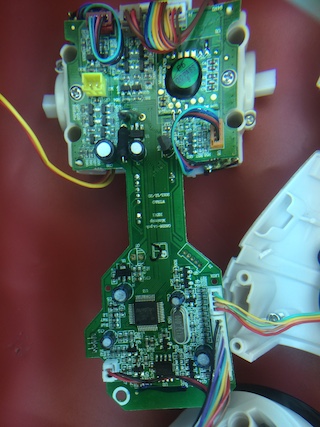
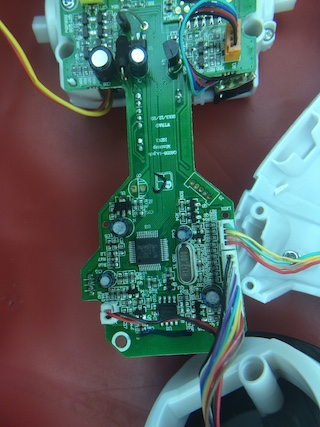
Full resolution versions of those three images can be found at:
https://raw.githubusercontent.com/adamgreen/MiP/master/images/20150425-07-Full.jpg
https://raw.githubusercontent.com/adamgreen/MiP/master/images/20150425-08-Full.jpg
https://raw.githubusercontent.com/adamgreen/MiP/master/images/20150425-06-Full.jpg
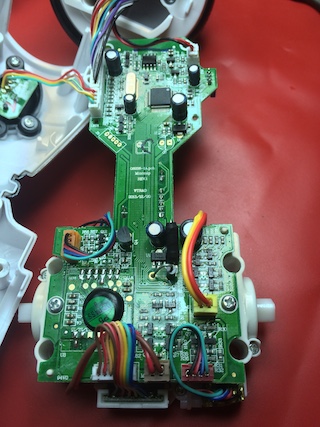
The interior of the MiP is quite packed so it will be hard to squeeze in any more electronics but I did notice that the head had some free space I can probably put to good use:
I took a few notes once I had the MiP all apart:
- The motors appear to have a coil resistance of 7.4 ohms. This means that at 5V, the motors could require 5V / 7.4 ohms = 676mA for the stall current.
- I suspect that a voltage regulator that could output 2A peak should be adequate for the LiPo battery replacement project.
- The CPU is a NuvoTon NM05716LDN. This part number is similar to the M0516LDN NuMicro M051 series of ARM Cortex-M0 microcontroller from NuvoTon. The NuvoTon website has data sheets and technical reference manuals for that device.
- J3 appears to be an unpopulated SWD debugger port. At this point I think it might have the following pinout (in order from pin closest to J3 label):
- Ground
- Unknown (maybe nReset signal?)
- ICE_CLK (SWD clock)
- ICE_DAT (SWD data)
- 3.3V
- There is an additional FT24C02A 2kbit EEPROM device from Fremont Micro Devices on the top of the board.
I will need to place a few orders from Sparkfun and/or Adafruit in the near future to continue with my MiP hacks.
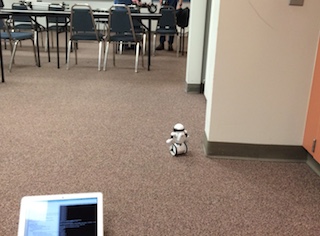
I took the MiP along with me to today's Seattle Robotics Society meeting. The photo above shows the MiP navigating around the meeting room with my wall following code. This code takes advantage of my MiP C API so that it could run on my MacBook Air and control the MiP via Bluetooth Low Energy. It did hit a few snags in its travels:
- It is better to keep the arms down so that they don't get hooked on anything.
- It did get snagged on a few cables.
- One cable was too large to get over even when the MiP was moving along at a good clip. I was able to get the MiP to travel over the smaller cables on the floor (like laptop power cables) when I was driving the MiP around the room using the iPhone MiP app.
- It was easy to get snagged up on the power cables where they plugged into the wall outlet since the MiP was following the outer wall.
- It got confused underneath a chair and started driving out towards the middle of the room. If there were a lot of people milling around in the room, it could lead to similar problems.
Over the weekend, I added support for more MiP commands to my MiP C API:
- mipSetVolume()
- mipGetVolume()
- mipPlaySound()
- mipReadOdometer()
- mipResetOdometer()
- mipGetStatus()
- mipGetLatestStatusNotification()
- mipGetLatestGestureNotification()
- mipGetLatestShakeNotification()
- mipGetWeight()
- mipGetLatestWeightNotification()
- mipGetClapSettings()
- mipEnableClap()
- mipSetClapDelay()
- mipGetLatestClapNotification()
I have now completed most of the core commands that I think are most useful for my robot projects so I am going to take a break from adding any more support to the MiP C API for now. In the future there are a few more features that I would like to support:
- Changing of game modes.
- Commands which put the MiP to sleep, shutdown BLE, etc.
- Commands which retrieve and modify EEPROM settings.
- Commands which require two MiPs to use and test. Currently I have just the one MiP so I didn't have a way to test these features so I have postponed their implementation.
I have moved the MiP C API to its own github repository now: https://github.com/adamgreen/MiP-Capi. The OSX_ConsoleSample was updated to utilize this new repo as a git submodule so that the sample now just contains the wall following sample code.
I am now going to take a break from MiP hacking for a few weeks. Once I jump back to this project I plan to start with some hardware modifications:
- Switch to Li-Ion batteries.
- Attach a microcontroller directly to the MiP's UART, bypassing BLE.
I finished implementing the LED and motion related commands in my MiP C API. The following APIs were added since my last post:
- mipFlashChestLED()
- mipGetChestLED()
- mipSetHeadLEDs()
- mipGetHeadLEDs()
- mipGetSoftwareVersion()
- mipGetHardwareInfo()
- mipDistanceDrive()
- mipDriveForward()
- mipDriveBackward()
- mipSetPosition()
- mipGetUp()
My next priority is to implement sound related functionality and commands which query the state of sensors such as odometer, clap, shake, etc.
I have made some real progress on my MiP C API over the last couple of days. I added enough high level functions so that I could refactor my wall following example to no longer need to build up command buffers manually and call the mipRaw*() functions. The added functions include:
- mipSetGestureRadarMode()
- mipGetGestureRadarMode()
- mipSetChestLED()
- mipContinuousDrive()
- mipTurnLeft()
- mipTurnRight()
- mipStop()
- mipGetLatestRadarNotification()
My next priority is to implement functions for all of the remaining LED and motion related commands supported by the WowWee MiP BLE Protocol.
I started implementing and documenting the new high level MiP C API this weekend.
MiP C API Header File
MiP C API Documentation
The public MiP C API functions that have been implemented so far are just light wrappers around the lower level transport API that I already had in place. I am now going to start implementing functions for MiP features such as continuous drive, setting chest LEDs, etc.
I have been continuing to experiment with the BLE transport code that I implemented earlier in the week and so far it appears to be holding up well. I do still need to add support for auto-reconnecting if the BLE connection should go down. As part of that experimentation, I have implemented the beginnings of a basic wall following algorithm in the OSX_ConsoleSample and pushed it up to GitHub earlier this morning.
- It starts out by waiting for the user to pick up the robot and place it facing the wall at a distance < 10cm.
- Once the code detects that it has been facing the wall at < 10cm for 5 seconds, it is ready to start.
- It backs away from the wall until it no longer detects the wall with its IR sensors.
- The MiP then turns left by 120 degrees. This causes it to face away from the wall a bit.
- The robot then starts traveling forward, arcing to the right towards the wall.
- Once a wall or obstacle is detected it stops and turns to the left, away from the wall/obstacle. It then loops back to the previous step, arcing back towards the wall.
I am going to start implementing a higher level API on top of the existing mipTransport*() API. The initial priority will be to implement the functionality that I am currently utilizing in my wall following sample (enabling radar mode, continuous drive, set chest LED colour, etc.) The final goal will be to implement developer friendly wrappers for all of the documented MiP commands.
I have found another very useful reference for helping to understand the MiP commands. The MipCommandValues.h header in the official WowWee MiP iOS SDK provides additional information about the protocol, such as the kMipSoundFileValue enumeration describing the sounds which can be played.
I finished my initial experimentation with several of the MiP commands and it looks like it will enable the creation of a few cool projects. As I went through this process I did encounter a few issues that I thought I would highlight here:
- Set MiP Volume (0x15) - This is one of the first commands that I played around with so that the robot wouldn't be so loud when it made its sounds to announce that I had disconnected from it. The volume level can be set to values between 0 and 7: where 0 is off, 1 is low volume, and 7 is the highest volume setting. Once you set the volume, it is remembered across power cycles.
- Distance Drive (0x70) - I noticed a few things when experimenting with this command:
- When I commanded it to drive a particular distance, it always seemed to drive a little further than requested. I also noticed that the robot oscillated back and forth by as much as +/- 2cm to maintain its balance so that made it difficult to get an accurate measurement of how much the robot actually travelled. This means that I wouldn't be able to use this command to drive through a course using dead reckoning alone. I will just have to get more creative :)
- I would note that the turning control seemed to be pretty accurate. It could pull off decent 90 degree turns when commanded to do so.
- This driving command can be used to execute turns and forward/reverse translations at the same time. If you ask it to turn by a few degrees and drive ahead a longer distance, both the turn and traversal will start at the same time but the turn and traversal are not interpolated to complete at the same time. The turning will finish earlier and then it will just continue driving straight from that point.
- Multiples of these commands can be sent to the MiP and it will queue them up to be executed one after another. The documentation indicates that the queue can hold 20 such requests. I only tested with 2 and they worked as expected.
- I found that the turns performed by this command were in the opposite direction from what the protocol documentation indicated. When looking down at the robot, a clockwise command would produce a counter-clockwise rotation and vice versa. I updated the documentation to flip these around to match what I actually see when using the command with the robot. It should be noted that most of the other turn related commands used right/left terminology instead of clockwise/anti-clockwise descriptions in the protocol documentation.
- Continuous Drive (0x78) - At first I couldn't get this command to work at all. As I did more investigation I figured out a few things to get it working:
- You need to keep sending this command quite regularly or the bot will stop moving. 50 msecs as mentioned in the protocol documentation for this command appears to be a good interval to use. It is also the interval that gets used in WowWee's MiP iOS SDK sample program as seen here.
- Initially the forward motion would always be jerky when I used this command, no matter what interval I used (I tried both lower and higher than 50 msecs). To investigate this issue further I wanted to sniff the BLE packets being sent from my MacBook to the MiP. Apple's Hardware IO Tools for Xcode includes the Packet Logger utility which can do exactly that. Once I had that installed, I discovered that my test application was taking 100 msecs to complete each Continuous Drive command before it would allow the next one to be sent. The log showed that OS X would issue ATT Send packets and then wait almost 100 msecs for the ATT Receive packet to come back from the MiP before it progressed to the next packet. I then changed the type used with the writeValue:forCharacteristic:type: selector call from CBCharacteristicWriteWithResponse to CBCharacteristicWriteWithoutResponse. That change eliminated the delay and the MiP would then respond more smoothly.
- The documentation for this command indicates that it used 2 bytes of data but the description of the data seemed to indicate that only a single byte was sent. It turns out that 2 bytes are actually required. The first byte indicates the forward/reverse velocity with values between 0x01 and 0x40. The second byte indicates the amount of rotation desired with values between 0x41 and 0x80. I updated the documentation to make this requirement clearer.
- Read Odometer (0x85) - The odometer on the MiP functions similar to that in a car. It tracks total distance travelled, even across power cycles. It is only reset to 0 when the Reset Odometer (0x86) is sent to the robot.
- Set Gesture Or Radar Mode (0x0C) - I found that placing the robot in "Gesture Mode" will cause the robot to issue Gesture Detect (0x0A) notifications but it appears to pop the MiP out of App mode and into Default MiP mode. Placing the MiP in "Radar Mode" appears to leave the MiP in App mode so that it can still be controlled via BLE while Radar Response (0x0C) notifications are sent to let the app know when objects appear and disappear from the front of the bot.
I started experimenting with the commands from the WowWee MiP Bluetooth Low Energy Protocol after I completed the initial version of my OS X Core Bluetooth transport code. During this experimentation I encountered a few issues in my code that I fixed before progressing further. These issues included:
- The mipTransportGetResponse() function would occasionally hang waiting for a response. Sometimes the expected responses just never arrived. I updated mipTransportGetResponse() so that it can now detect if it has been waiting for more than a second for such a response and if so, re-issue the request and try waiting again. It will make a maximum of MIP_MAXIMUM_REQEUST_RETRIES (2) retries before it gives up and returns MIP_ERROR_TIMEOUT to the caller. I would need to setup a BLE packet sniffer to determine who is really at fault here (OS X, the MiP, or me). I decided a better use of my time would be to just implement this retry logic instead.
- I have had OS X connect to the MiP but the MiP not appear to switch to a connected state (its chest light stays blue). This most often happened if I quickly attempted to rerun my sample immediately after the previous run completed. I would get response timeouts from OS X when this happened. I added a mipTransportDisconnectFromRobot() API so that a developer can disconnect from a MiP robot and force a reconnection if they detect such problems.
- I improved out of band response/notification handling. Previously the developer could only retrieve the most recent notification sent from the MiP. I noticed that once the robot was moving around, more notifications were being generated and this could make it easy for a developer to miss an important notification. I switched to using a 10 item queue instead. This allows the developer to now retrieve the most recent 10 responses.
I pushed up the first version of my OS X console sample for interacting with the MiP robot. It is very rough at this point but it will let me continue my experiments with the MiP to see what it is and isn't capable of doing. The following is taken from the commit text for this initial functionality:
commit 24b4e8b947e609dc6b1f6e8abb9538447bfcd6f1
Author: Adam Green <adamgr@foo.bar>
Date:   Wed Mar 25 13:43:19 2015 -0700

    Initial commit of OS X console sample

    This is the initial commit of the sample code that I have written to
    allow the control of the MiP robot over Bluetooth Low Energy (BLE)
    using the Core Bluetooth framework on OS X.

    Two threads are used in this sample.  The main thread is left executing
    a NSApplication run loop.  A worker thread is started to run the
    code which wants to interact with the robot to do things like
    commanding it to drive around.  The code running in this thread
    starts at the robotMain() function found in main.c  When it needs
    to utilize the Core Bluetooth stack, it communicates its requests to
    the main thread via mipTransport*() functions.

    There are a few limitations to the current code:
    * The transport mechanism, OS X Core Bluetooth in this case, is exposed
      directly to the developer.  In the future this will be abstracted
      behind a transport agnostic interface.  But that will only happen if
      I continue to experiment with the MiP robot after playing around with
      this current API to see what is and isn't possible to accomplish with
      this little bot.
    * There is currently no code to attempt reconnecting to the MiP if it
      should go out of range or otherwise lose its BLE connectivity for a
      brief period of time.
    * It is relatively untested at this time.  I will continue to test and
      explore the abilities of the MiP and this code in the near futre.
    * There is limited documentation.  I did add some comments to the
      mip.h header file.  I will flush this documentation out further in
      the future if I decide to continue with these MiP hacks.
The code which sends requests and receives responses from the MiP in this sample can be found in the robotMain() function. This is an excerpt:
void robotMain(void)
{
    // Connect to the first MiP robot discovered.
    MiPTransport* pTransport = mipTransportInit(NULL);
    mipTransportConnectToRobot(pTransport, NULL);

    // Set the chest LED to purple.
    static const uint8_t setChestPurple[] = "\x84\xff\x00\xff";
    mipTransportSendRequest(pTransport, setChestPurple, sizeof(setChestPurple)-1, MIP_EXPECT_NO_RESPONSE);

    // Read out the current settings for the chest LED.
    static const uint8_t getChestColor[] = "\x83";
    uint8_t response[5+1];
    size_t responseLength = 0;
    mipTransportSendRequest(pTransport, getChestColor, sizeof(getChestColor)-1, MIP_EXPECT_RESPONSE);
    mipTransportGetResponse(pTransport, response, sizeof(response), &responseLength);
    printf("Response Length: %lu\n", responseLength);
    printf("Command: %02X\n", response[0]);
    printf("Red    : %02X\n", response[1]);
    printf("Green  : %02X\n", response[2]);
    printf("Blue   : %02X\n", response[3]);
    printf("On     : %u\n", (unsigned int)response[4] * 10);
    printf("Off    : %u\n", (unsigned int)response[5] * 10);

    mipTransportUninit(pTransport);
}
The limited documentation that exists at this point can be found in mip.h.
I will spend the next few days expanding on this sample to play around with various commands from the MiP BLE Protocol documentation to get a feel for what kind of control I can have over the MiP robot and what types of hacks it will enable.
I have been silent for a few days now that I am actually writing some Objective-C code to run on my MacBook. I am still not at the point that I have things implemented enough to document much here but I hope to soon have something worth sharing.
As I have been relearning how to write code for OS X and learning more about multithreaded programming on that platform, I have come across a few interesting resources that I thought I would record here:
Apple's Threading Programming Guide
Just Software Solutions - Implementing a Thread-Safe Queue using Condition Variables
Advanced Mac OS X Programming by Mark Dalrymple 2011 - Chapter 20 - Multithreading
Now that I have successfully connected my MacBook to the MiP robot over Bluetooth Low Energy (BLE), I need to think about what my next steps should be. My current thoughts are:
- Continue with the heart rate monitor based OS X Cocoa GUI sample.
- Switch to using my NRF51822 development board as a BLE controller and write code using the mbed SDK.
- Jump ahead and connect a mbed controller directly to the MiP using the UART.
- Take what I have learned to build a Console OS X sample.
My current plans are to take the last path and build a console based sample to run on my MacBook. My goal with this sample is to develop a C API using the OS X Core Bluetooth Foundation classes as the transport. Later I can port this API to run on a mbed board using the UART as the transport instead.
Even though it isn't very useful I have uploaded my modified version of the Heart Rate Monitor sample to https://github.com/adamgreen/MiP/tree/master/OSX_CocoaSample. It will allow people to see some of the code snippets from my previous posts in context of the whole program. I plan to start code development on a more useful OS X sample in the near future.
Today, I made pretty good progress on getting my MacBook Air to communicate with the MiP via BLE. I accomplished my goal of sending it the 0x14 request which asks the MiP to return the build date for it's firmware image.
2015-03-19 23:19:02.234 HeartRateMonitor[91837:303] Get MiP Version Command Response (0x14)
2015-03-19 23:19:02.234 HeartRateMonitor[91837:303] Year = 14
2015-03-19 23:19:02.235 HeartRateMonitor[91837:303] Month = 3
2015-03-19 23:19:02.235 HeartRateMonitor[91837:303] Day = 22
2015-03-19 23:19:02.235 HeartRateMonitor[91837:303] Revision = 2
The response text indicates that the firmware was built on March 22nd, 2014 and this was the 2nd build from that day.
The user is able to select the MiP to which a connection should be made and then press the connect button. That action will cause the following selector to be called as the scan sheet/dialog is closed.
/*
 This method is called when Scan sheet is closed. Initiate connection to selected MiP robot.
*/
- (void)sheetDidEnd:(NSWindow *)sheet returnCode:(NSInteger)returnCode contextInfo:(void *)contextInfo
{
    [self stopScan];
    if( returnCode == NSAlertDefaultReturn )
    {
        NSIndexSet *indexes = [self.arrayController selectionIndexes];
        if ([indexes count] != 0)
        {
            NSUInteger anIndex = [indexes firstIndex];
            peripheral = [self.heartRateMonitors objectAtIndex:anIndex];
            [peripheral retain];
            [indicatorButton setHidden:FALSE];
            [progressIndicator setHidden:FALSE];
            [progressIndicator startAnimation:self];
            [connectButton setTitle:@"Cancel"];
            [manager connectPeripheral:peripheral options:nil];
        }
    }
}
That code contains the necessary call to [manager connectPeripheral:peripheral options:nil] which actually establishes the connection with the selected MiP robot.
Once the connection is completed, the following selector will be executed:
/*
 Invoked whenever a connection is succesfully created with the peripheral.
 Discover available services on the peripheral
 */
- (void) centralManager:(CBCentralManager *)central didConnectPeripheral:(CBPeripheral *)aPeripheral
{
    characteristicsToFind = 2;
    [aPeripheral setDelegate:self];
    [aPeripheral discoverServices:nil];
    ...
}
This code includes the [aPeripheral discoverServices:nil] call to have the MiP send over all of the BLE services that it supports. For each of these services it calls the following selector.
// These are the services used to send/receive data with the MiP.
#define MIP_RECEIVE_DATA_SERVICE    "ffe0"
#define MIP_SEND_DATA_SERVICE       "ffe5"

/*
 Invoked upon completion of a -[discoverServices:] request.
 Discover available characteristics on interested services
 */
- (void) peripheral:(CBPeripheral *)aPeripheral didDiscoverServices:(NSError *)error
{
    for (CBService *aService in aPeripheral.services)
    {
        NSLog(@"Service found with UUID: %@", aService.UUID);

        /* MiP specific services */
        if ([aService.UUID isEqual:[CBUUID UUIDWithString:@MIP_RECEIVE_DATA_SERVICE]] ||
            [aService.UUID isEqual:[CBUUID UUIDWithString:@MIP_SEND_DATA_SERVICE]])
        {
            [aPeripheral discoverCharacteristics:nil forService:aService];
        }
        ...
    }
}
The two main MiP services that we care about are MIP_RECEIVE_DATA_SERVICE (ffe0) and MIP_SEND_DATA_SERVICE (ffe5). For these two services, the [aPeripheral discoverCharacteristics:nil forService:aService] call will be made to iterate over each of the characteristics in the service. For each characteristic, the following selector will be executed:
// Characteristic of MIP_RECEIVE_DATA_SERVICE which receives data from MiP.
// The controller can register for notifications on this characteristic.
#define MIP_RECEIVE_DATA_NOTIFY_CHARACTERISTIC "ffe4"
// Characteristic of MIP_SEND_DATA_SERVICE to which data is sent to MiP.
#define MIP_SEND_DATA_WRITE_CHARACTERISTIC "ffe9"

/*
 Invoked upon completion of a -[discoverCharacteristics:forService:] request.
 Perform appropriate operations on interested characteristics
 */
- (void) peripheral:(CBPeripheral *)aPeripheral didDiscoverCharacteristicsForService:(CBService *)service error:(NSError *)error
{
    /* MiP Receive Data Service. */
    if ([service.UUID isEqual:[CBUUID UUIDWithString:@MIP_RECEIVE_DATA_SERVICE]])
    {
        for (CBCharacteristic *aChar in service.characteristics)
        {
            /* Set notification on received data. */
            if ([aChar.UUID isEqual:[CBUUID UUIDWithString:@MIP_RECEIVE_DATA_NOTIFY_CHARACTERISTIC]])
            {
                [peripheral setNotifyValue:YES forCharacteristic:aChar];
                characteristicsToFind--;
                NSLog(@"Found a Receive Data Notify Characteristic");
            }
        }
    }

    /* MiP Send Data Service. */
    if ([service.UUID isEqual:[CBUUID UUIDWithString:@MIP_SEND_DATA_SERVICE]])
    {
        for (CBCharacteristic *aChar in service.characteristics)
        {
            /* Remember Send Data Characteristic pointer. */
            if ([aChar.UUID isEqual:[CBUUID UUIDWithString:@MIP_SEND_DATA_WRITE_CHARACTERISTIC]])
            {
                sendDataWriteCharacteristic = aChar;
                NSLog(@"Found a Send Data Write Characteristic");
                characteristicsToFind--;
            }
        }
    }
    ...
    if (characteristicsToFind == 0)
    {
        uint8_t cmd = MIP_CMD_GET_SOFTWARE_VERSION;
        NSData* cmdData = [NSData dataWithBytes:(void*)&cmd length:sizeof(cmd)];
        [aPeripheral writeValue:cmdData forCharacteristic:sendDataWriteCharacteristic type:CBCharacteristicWriteWithResponse];
        characteristicsToFind = -1;
    }
}
Once the MIP_RECEIVE_DATA_NOTIFY_CHARACTERISTIC (ffe4) characteristic is found, the [peripheral setNotifyValue:YES forCharacteristic:aChar] call is made. This asks the Core Bluetooth framework to request that the MiP send a notification to the MacBook anytime there is a new receive data to be read. Such notifications will cause the peripheral:didUpdateValueForCharacteristic:error: selector to be called. This selector will be discussed shortly.
When the MIP_SEND_DATA_SERVICE (ffe9) characteristic is found, the characteristic pointer is saved so that we can later use it to send requests to the MiP.
Once both of those characteristics have been found, we can use them to send the first command MIP_CMD_GET_SOFTWARE_VERSION (0x14) to the MiP and wait for its response. The response will be sent to the following selector because we asked for notifications on the MIP_RECEIVE_DATA_NOTIFY_CHARACTERISTIC.
/*
 Invoked upon completion of a -[readValueForCharacteristic:] request or on the reception of a notification/indication.
 */
- (void) peripheral:(CBPeripheral *)aPeripheral didUpdateValueForCharacteristic:(CBCharacteristic *)characteristic error:(NSError *)error
{
    ...
    /* Response from MiP command has been received. */
    else if ([characteristic.UUID isEqual:[CBUUID UUIDWithString:@MIP_RECEIVE_DATA_NOTIFY_CHARACTERISTIC]])
    {
        const uint8_t* pResponseBytes = characteristic.value.bytes;
        NSUInteger responseLength = [characteristic.value length];
        if ((responseLength & 1) != 0)
        {
            /* Expect the response to be hexadecimal text with two characters per digit. */
            return;
        }
        /* Allocate a buffer to hold the actual bytes of the response which are parsed from hex data. */
        responseLength /= 2;
        uint8_t* pResponse = malloc(responseLength);
        if (!pResponse)
        {
            return;
        }
        /* Convert hexadecimal string into raw byte response. */
        for (int i = 0, j = 0 ; i < responseLength ; i++, j+=2)
        {
            pResponse[i] = parseHexDigit(pResponseBytes[j]) << 4 | parseHexDigit(pResponseBytes[j+1]);
        }

        if (pResponse[0] == MIP_CMD_GET_SOFTWARE_VERSION)
        {
            NSLog(@"Get MiP Version Command Response (0x%02X)", pResponse[0]);
            NSLog(@"Year = %u", pResponse[1]);
            NSLog(@"Month = %u", pResponse[2]);
            NSLog(@"Day = %u", pResponse[3]);
            NSLog(@"Revision = %u", pResponse[4]);
        }
        else
        {
            NSLog(@"Response buffer = %@", [[[NSString alloc] initWithData:characteristic.value encoding:NSUTF8StringEncoding] autorelease]);
        }

        free(pResponse);
    }
}
The most complicated part of this code is due to the fact that the response data sent back from the MiP is represented as hexadecimal text. This means that there are 2 hex digits for each byte of the response. The conversion code allocates a buffer big enough for that data, pResponse, and then parses the hex digits into it. The first byte of the response will match the command which caused this response to be generated. There is then code to interpret the date from the MIP_CMD_GET_SOFTWARE_VERSION response and log it to the debug console. There is also code to dump the raw hexadecimal text for any other received data packets. It turns out that every 30 seconds, the MiP does send the following packet as well:
2015-03-19 23:19:29.943 HeartRateMonitor[91837:303] Response buffer = 796A06
This is a status packet. It indicates the battery level (0x6A) and the current position of being leaned back on its kickstand (0x06).
Last night I finished reading through Apple's Heart Rate Monitor Sample source code to get a feel for what I would need to change to have it communicate with the MiP instead. It seemed like it wouldn't take too much to get it to discover and connect to MiP robots instead of heart rate monitors.
I used the following code to have OS X Core Bluetooth framework look for BLE devices which advertise themselves as supporting the 0xfff0 service as the MiP does. Note: The MiP advertises itself as support the 0xfff0 and 0xffb0 as documented here but this isn't one of the services that we will later use to actually communicate with the MiP. There are other services that we will use for that but they aren't advertised in the limited space given to these BLE broadcast packets.
#define MIP_BROADCAST_SERVICE1 "fff0"

/*
 Request CBCentralManager to scan for WowWee MiP via one of the two services that it broadcasts.
 */
- (void) startScan
{
    [manager scanForPeripheralsWithServices:[NSArray arrayWithObject:[CBUUID UUIDWithString:@MIP_BROADCAST_SERVICE1]] options:nil];
}
When OS X's Core Bluetooth framework discovers BLE devices supporting the 0xfff0 service, it will call the centralManager:didDiscoverPeripheral:advertisementData:RSSI: selector. In the implementation of this selector we can look at the first two bytes of the ManufacturerData advertisement data to make sure that it contains 0x00 0x05 as documented here. Devices which don't match can be ignored as they are probably another WowWee product but not a MiP robot.
#define MIP_MANUFACTURER_DATA_TYPE "\x00\x05"
/*
Invoked when the central discovers heart rate peripheral while scanning.
*/
- (void) centralManager:(CBCentralManager *)central didDiscoverPeripheral:(CBPeripheral *)aPeripheral advertisementData:(NSDictionary *)advertisementData RSSI:(NSNumber *)RSSI
{
/* Check the manufacturing data to make sure that the first two bytes are 0x00 0x05 to indicate that it is a MiP device. */
NSData* manufacturerDataObject = [advertisementData objectForKey:CBAdvertisementDataManufacturerDataKey];
uint8_t manufacturerData[2];
[manufacturerDataObject getBytes:manufacturerData length:sizeof(manufacturerData)];
if (0 != memcmp(manufacturerData, MIP_MANUFACTURER_DATA_TYPE, sizeof(manufacturerData)))
{
return;
}
NSMutableArray *peripherals = [self mutableArrayValueForKey:@"heartRateMonitors"];
if( ![self.heartRateMonitors containsObject:aPeripheral] )
[peripherals addObject:aPeripheral];
/* Connect to first MiP device found. */
if(autoConnect)
{
NSLog(@"Auto connecting");
peripheral = aPeripheral;
[peripheral retain];
[indicatorButton setHidden:FALSE];
[progressIndicator setHidden:FALSE];
[progressIndicator startAnimation:self];
[connectButton setTitle:@"Cancel"];
[manager connectPeripheral:peripheral options:nil];
}
NSLog(@"didDiscoverPeripheral: Name: %@", aPeripheral.name);
NSLog(@"didDiscoverPeripheral: Advertisment Data: %@", advertisementData);
NSLog(@"didDiscoverPeripheral: RSSI: %@", RSSI);
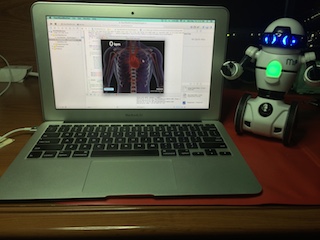
}The following photo shows OS X discovering my MiP.
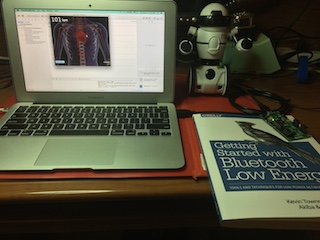
The next photo shows OS X connected to my MiP. You will notice that the light in MiP's chest has turned green to indicate that it is now connected.
I got my first BLE sample running on the MacBook Air. I pulled down Apple's CoreBluetooth: Heart Rate Monitor Sample and built it. It successfully connected to a heart rate monitor sample running on a NRF51822 development board that I already had sitting on my desk.
My goal is now to combine the code in this Heart Rate Monitor Sample with the existing OS X console based MiP sample found here on github and have it connect to the MiP instead. With that goal in mind I will spend some time this evening reading the source code of both samples.
My first hacking attempt will be via the Bluetooth Low Energy (BLE) communication channel. In the future I want to use the built-in UART communication channel to interface with a microcontroller mounted directly to the MiP robot. However using BLE to control the MiP robot directly from my OS X based MacBook Air initially will have a few benefits:
- I don't need to take the new robot apart immediately to gain access to the internal UART port.
- It is easier to debug and troubleshoot any misinterpretations that I make when reading the MiP BLE protocol documentation if the code is running directly on my laptop.
While I have connected BLE peripherals to my phone before, I haven't done so with my MacBook Air. Should it support code that I would write to interface with the MiP via BLE? I think so:
- My MacBook Air indicates that its Bluetooth hardware has a LMP version of 6 which is supposed to be new enough to support BLE according to this website.
- I am running version 10.9.5 of the Macintosh operating system. From what I have read in the Apple documentation, this version should support the required Core Bluetooth framework.
- I already have the latest 6.2 version of Xcode installed on my MacBook Air so I should be ready to start some BLE coding.