The following is for creating our Smarter Home network and appliances.
Network Prerequisites are:
- Layer 2 Network Switches
- Network Gateway is
192.168.1.5 - Network DNS server is
192.168.1.5(Note: your Gateway hardware should enable you to a configure DNS server(s), like a UniFi USG Gateway, so set the following: primary DNS192.168.1.254which will be your PiHole server IP address; and, secondary DNS1.1.1.1which is a backup Cloudfare DNS server in the event your PiHole server 192.168.1.254 fails or os down) - Network DHCP server is
192.168.1.5 - A DDNS service is fully configured and enabled (I recommend you use the free Synology DDNS service)
- A ExpressVPN account (or any preferred VPN provider) is valid and its smart DNS feature is working (public IP registration is working with your DDNS provider)
Other Prerequisites are:
- Synology NAS, or linux variant of a NAS, is fully configured as per SYNOBUILD
- UniFi network is fully configured as per UNIFIBUILD
- Proxmox node fully configured as per PROXMOX-NODE BUILDING
- Conbee II or Raspbee Zigbee Gateway available from Phoscon.de
Tasks to be performed are:
This page is about installing Proxmox LXC's and configuring appliances for your Smart Home network. Software tools like Home Assistant (Hassio), Node-RED, deCONZ, Phoscon and stuff.
Standard practice is to build our LXC's on Unbuntu 18.04. Proxmox itself ships with a set of basic templates and to download a prebuilt OS distribution use the graphical interface typhoon-01 > local > content > templates and select and download the following templates:
ubuntu-18.04-standard.
With unprivileged LXC containers you will have issues with UIDs (user id) and GIDs (group id) permissions with bind mounted shared data. All of the UIDs and GIDs are mapped to a different number range than on the host machine, usually root (uid 0) became uid 100000, 1 will be 100001 and so on.
However you will soon realise that every file and directory will be mapped to "nobody" (uid 65534). This isn't acceptable for host mounted shared data resources. For shared data you want to access the directory with the same - unprivileged - uid as it's using on other LXC machines.
The fix is to change the UID and GID mapping. So in our build we will create a new users/groups:
- user
media(uid 1605) and groupmedialab(gid 65605) accessible to unprivileged LXC containers (i.e Jellyfin, NZBGet, Deluge, Sonarr, Radarr, LazyLibrarian, Flexget); - user
storm(uid 1606) and grouphomelab(gid 65606) accessible to unprivileged LXC containers (i.e Syncthing, Nextcloud, Unifi etc); - user
typhoon(uid 1607) and groupprivatelab(gid 65606) accessible to unprivileged LXC containers (i.e all things private, Home Assistant, CCTV ).
For our Home Assistant network we use user typhoon (uid 1607) and group ptivatelab (gid 65607).
Also because Synology new Group ID's are in ranges above 65536, outside of Proxmox ID map range, we must pass through our Medialab (gid 65605), Homelab (gid 65606) and Privatelab (gid 65607) Group GID's mapped 1:1.
This is achieved in three parts during the course of creating your new media LXC's.
To change a container mapping we change the container UID and GID in the file /etc/pve/lxc/container-id.conf after you create a new container. Simply use Proxmox CLI typhoon-01 > >_ Shell and type the following:
# User media | Group privatelab
echo -e "lxc.idmap: u 0 100000 1607
lxc.idmap: g 0 100000 100
lxc.idmap: u 1607 1607 1
lxc.idmap: g 100 100 1
lxc.idmap: u 1608 101608 63928
lxc.idmap: g 101 100101 65435
# Below are our Synology NAS Group GID's (i.e privatelab) in range from 65604 > 65704
lxc.idmap: u 65604 65604 100
lxc.idmap: g 65604 65604 100" >> /etc/pve/lxc/container-id.conf
Next we have to allow the LXC to actually do the mapping on the host. Since LXC creates the container using root, we have to allow root to use these new uids in the container.
To achieve this we need to add lines to /etc/subuid (users) and /etc/subgid (groups). So we need to define two ranges: one where the system IDs (i.e root uid 0) of the container can be mapped to an arbitrary range on the host for security reasons, and another where Synology GIDs above 65536 of the container can be mapped to the same GIDs on the host. That's why we have the following lines in the /etc/subuid and /etc/subgid files.
Simply use Proxmox CLI typhoon-01 > >_ Shell and type the following (NOTE: Only needs to be performed ONCE on each host (i.e typhoon-01/02/03)):
grep -qxF 'root:65604:100' /etc/subuid || echo 'root:65604:100' >> /etc/subuid &&
grep -qxF 'root:65604:100' /etc/subgid || echo 'root:65604:100' >> /etc/subgid &&
grep -qxF 'root:100:1' /etc/subgid || echo 'root:100:1' >> /etc/subgid &&
grep -qxF 'root:1607:1' /etc/subuid || echo 'root:1607:1' >> /etc/subuid
The above code adds a ID map range from 65604 > 65704 on the container to the same range on the host. Next ID maps gid100 (default linux users group) and uid1607 (username typhoon) on the container to the same range on the host.
We need to create a typhoon user in all privatelab LXC's which require shared data (NFS NAS shares). After logging into the LXC container type the following:
(A) To create a user without a Home folder
groupadd -g 65607 privatelab &&
useradd -u 1607 -g privatelab -M typhoon
(B) To create a user with a Home folder
groupadd -g 65607 privatelab &&
useradd -u 1607 -g privatelab -m typhoon
Note: We do not need to create a new user group because users is a default linux group with GID value 100.
I use a USB Zigbee device called a Conbee2 by phoscon.de. Its a universal Zigbee USB gateway device which most importantly is a cloud free solution. It works with most opular zigbee automation Systems.
You will need a Raspberry Pi to host your Conbee Zigbee device.
Use a prebuilt SDCard image from the phoscon website. The image contains the pre-installed deCONZ software as well as the Phoscon App. Follow the instructions HERE using the Raspbian Buster Headless image file.
Connect your Pi Host to your LAN network and power-on.
By default your Phoscon device uses DHCP to obtain a IPv4 address. We need a static IPv4 address.
The process involves:
- Using your UniFi controller to assign the LAN port which your Phoscon LAN cable is plugged to VLAN LAN-IoT (VLAN110) and reserve a static IPv4 of 192.168.110.139
- Edit the hosts network configuration file to set a Static IPv4 address; or,
- Use UniFi to assign a LAN port to VLAN LAN-IoT (VLAN110) and reserve a static IPv4 of 192.168.110.139
The second method maybe the easiest. Simply run our script to automatically edit your Phoscon host IPv4 address. Steps to follow are:
A) SSH Log into your Phoscon device Use SSH and log into your Phoscon device. The default credentials are:
Username: pi
Password: raspbeegw
In the SSH shell type and execute the following to set a static IPv4 address. The script will prompt for user input:
bash -c "$(wget -qLO - https://github.com/ahuacate/proxmox-lxc-smarthome/raw/master/scripts/phoscon_static_ip.sh)"
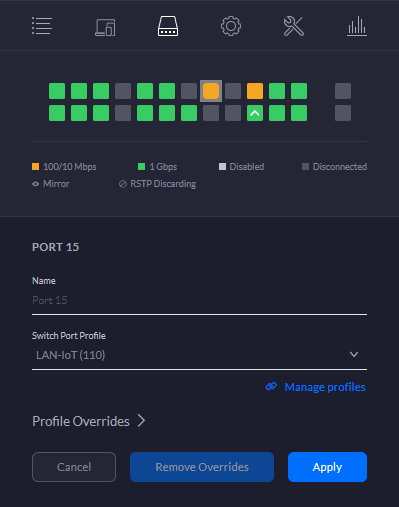
B) Assign your witch LAN port to VLAN LAN-IoT (VLAN110)
Go to your UniFi controller devices > choose switch (i.e UniFi Switch 24/48) > Edit LAN port your Phoscon device is connected to > Switch Port Profile > LAN-IoT(110) and click Apply
SSH Log into your Phoscon device (ssh pi@192.168.110.139). The default credentials are:
Username: pi
Password: raspbeegw
and type the following:
sudo apt upgrade -y deconz
If you have issues with your SDCard maybe a quick fix is to fully wipe/erase the SDCard before Step 2.01.
Method A - Diskpart (Windows) Start a command prompt, and start the DISKPART console. List all of your disks by typing LIST DISK, then select the proper disk with SELECT DISK # (where # is the SD card). You can then type CLEAN to clear the partition table on the card, effectively blanking it. MAKE SURE YOU SELECTED THE PROPER DISK BEFORE RUNNING THE CLEAN COMMAND!
Coming soon.
Here we create a Home Assistant ( also known as Hass.io, HA) which is a home automation that puts local control and privacy first. Read about it here.
To make life easy we use the proven and dependable whiskerz007 setup scripts to install Hass.io modified to install on Ubuntu 18.04 instead of Debian 10.
To create a new Ubuntu 18.04 LXC container on Proxmox and setup Hass.io to run inside of it, run the following in a SSH connection or use the Proxmox WebGUI shell Proxmox Datacenter > typhoon-01 > >_ Shell and type the following:
bash -c "$(wget -qLO - https://github.com/ahuacate/proxmox-lxc-smarthome/raw/master/scripts/hassio_create_container.sh)"
During the setup process you will be prompted for inputs to configure your new Hassio LXC (i.e IPv4 address, CTID, gateway, disk size, password).
Your default login password was set during the rapid installation process. If you did'nt change the default password here is your console login details.
Username: root
Password: ahuacate
To change your default root password use the CLI command passwd.
Home Assistant will be available at http://192.168.110.131:8123
Node-RED is a programming tool for wiring together hardware devices, APIs and online services in new and interesting ways.
It provides a browser-based editor that makes it easy to wire together flows using the wide range of nodes in the palette that can be deployed to its runtime in a single-click.
To make life easy we use Node-Red authors installation script for Pi hardware. This script will work on any Debian-based operating system, including Ubuntu and fixes any dependency issues.
To create a new Ubuntu 18.04 LXC container on Proxmox and setup Node-Red to run inside of it, run the following in a SSH connection or use the Proxmox WebGUI shell Proxmox Datacenter > typhoon-01 > >_ Shell and type the following:
bash -c "$(wget -qLO - https://github.com/ahuacate/proxmox-lxc-smarthome/raw/master/scripts/nodered_create_container.sh)"
During the setup process you will be prompted for inputs to configure your new Node-Red LXC (i.e IPv4 address, CTID, gateway, disk size, password).
Your default login password was set during the rapid installation process. If you did'nt change the default password here is your console login details.
Username: root
Password: ahuacate
To change your default root password use the CLI command passwd.
Home Assistant will be available at http://192.168.110.132:1880