Home
Welcome to the DynamixelArduino wiki!
This Arduino library is use to drive Dynamixel servo, using halfDuplexSerial object to communicate (available here : https://github.com/akira215/HalfDuplexSerial-for-Arduino. This lib could either use Arduino built in UART, using a direction pin to switch between Tx & Rx (hardHalfDuplexSerial class : 3 wire connection) or use softHalfDuplex class, using only one wire (directy connected with Dynamixel servo.
The library is divided in a main class dxl and two derivated class dxlAx and dxlMx depending on servo to be driven.
No additional harware is required, since the SoftHalfDuplexSerial library commute Tx and Rx data on one pin. Just one connection is required with Dynamixel data line. As described in SoftHalfDuplexSerial library, the chosen pin should support change interrupts:
- 0n the Mega and Mega 2560 only the following can be used for RX: 10, 11, 12, 13, 14, 15, 50, 51, 52, 53, A8 (62), A9 (63), A10 (64), A11 (65), A12 (66), A13 (67), A14 (68), A15 (69).
- On the Leonardo and Micro only the following can be used for RX: 8, 9, 10, 11, 14 (MISO), 15 (SCK), 16 (MOSI). Please check the datasheet of your board for this limitation. In addition, Dynamixel servo should be grounded with the Arduino board. The power supply for Dynamixel servo is 9~12V and should be grounded with the Arduino board. The baudrate is limitated to 57 600 or 115 200 bps using a 16MHz Arduino board.
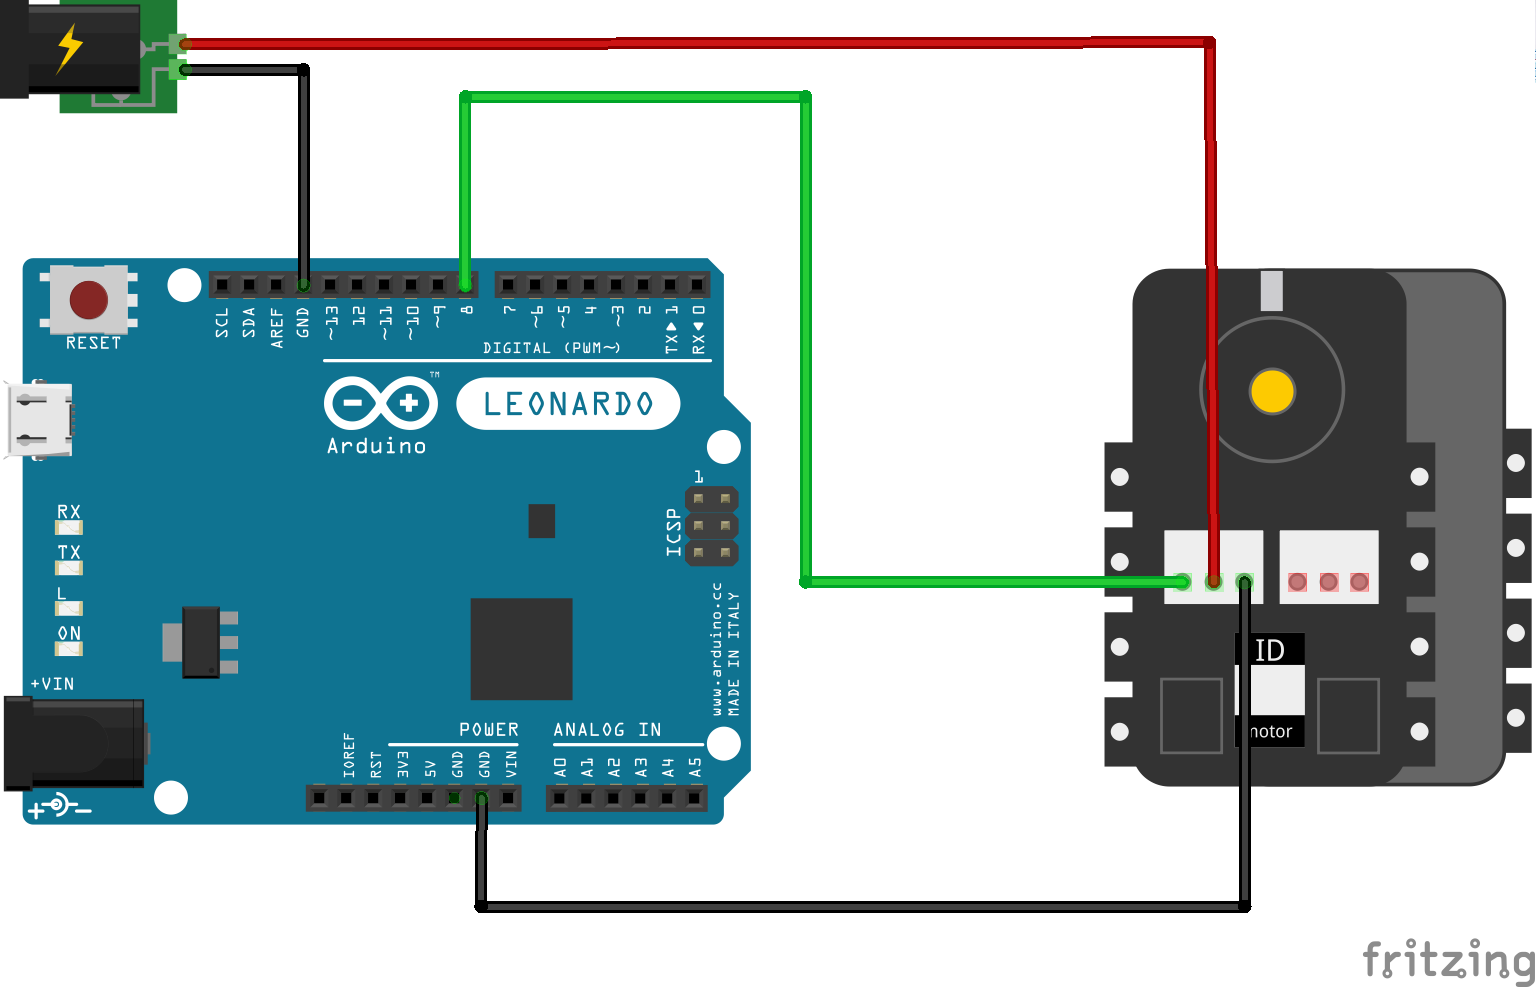
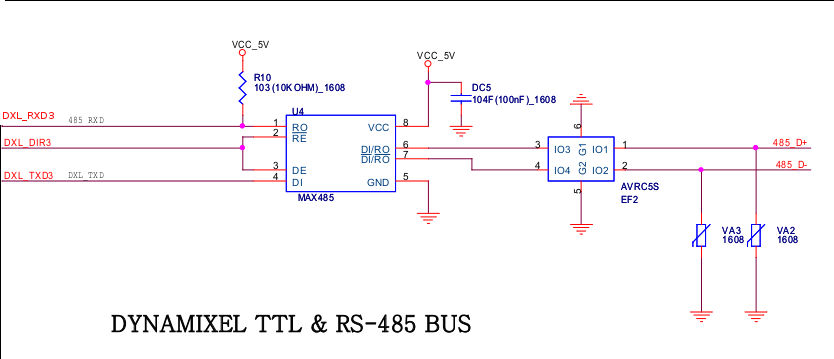
3 wires are used to communicate : UART Tx, UART Rx and an additional direction pin, which will be put to high TTL level only during transmitting. This could be useful to drive a MAX485 for example, or a tri state buffer if TTL level dynamixel servo. The baudrate is limitated to 400 000 bps using a 16MHz Arduino board.
Just as all Arduino library, you should put all the file of the repository in your arduino-x-x-x/libraries/ folder. Create a new directory (name it DynamixelArduino for example) and copy the files. The best way to do this is to create a local repository in the new directory, and to clone the github repository of DynamixelArduino. That way, you will be able to update it just by pulling the new version.
At first, simply construct a dxl object
dxl dxlCom(&port);
The only argument of the constructor is a pointer of the port to be used to communicate.
Take care thatin case of hardSerialDuplexSerial, instances are already constructed in HardSerialDuplexSerial.cpp (hdSerialx). Dir pin should be setup (using hdSerialx.setDirPin(xx)) before calling the begin method.
Then you will have to initiate the communication by
dxlCom.begin(57600);
The argument is the baudrate of communication with the servo(s). Please check that the servo have been set up with the same baudrate.
Once this two steps done, all the method of the class could be called.
return the error of the last communication (Tx or Rx). The error could be test using mask(getError() & DXL_ERR_VOLTAGE). Check the constant documentation to understand error code.
ping the servo specified by ID. The return value is the error (same as getError()). To check if the communication is available for servo ID 1, do if(dxlCom.ping(1) == DXL_ERR_SUCCESS).
Execute action written in REG_WRITE servo register. This allow you to write several action in the REG_WRITE servo register and then trigger is using this method. See Dynamixel protocol documentation. The return value is the error code.
Reset the servo to factory default setting. The return value is the error code. Take care that the ID of the servo will be set back to 1 after that operation
Reboot the servo. The return value is the error code.
The return value is the model number (two bytes value). You can check the error by calling dxlCom.getError() just after this instruction.
The return value is the firmware of the servo (one bytes value). You can check the error by calling dxlCom.getError() just after this instruction.
The return value is the error code. The ID of the servo will be set to newID
The return value is the ID of the servo. It is not useful, you should prefer dxl::ping() method which is faster.
The return value is the error code. Take care that baudrate it is not the baudrate in bps. Check the Dynamixel protocol documentation for more information.
The return value is the baudrate, check Dynamixel protocol documentation to convert this value in bps.
The return value is the error code. The return delay time is the delay between last packet is received by the servo and its answer. Check Dynamixel protocol documentation for more information.
The return value is the current return delay time of the servo.
The return value is the error code. This method restrict the allowable angle of the servo. As it is written in servo EEPROM, it will stay even if the servo is shutdown. Chack Dynamixel documentation to convert angle value to degrees.
Same method as above, except that it will restrict CounterClockWise angle.
The return value is the current ClockWise angle limit of the servo.
The return value is the current CounterClockWise angle limit of the servo.
The return value is the error code. The servo will go to Alarm if it temperature run over the value set by this method
The return value is the max temperature store in the servo EEPROM.
The return value is the error code. It set the min voltage of the servo. If the power supply ran down this value, servo will set an Alarm. Voltage should be the value in Volt x 10.
The return value is the min voltage. You should divided it by 10 to get it in Volt.
Same as setMinVoltage, for max value.
Same as readMinVoltage, for max value.
The return value is the error code. It set the max torque of the servo. If the load is greater than this value, servo will run to Alarm. Check Dynamixel documentation to convert the torque in physical units.
The return value is the max torque set in the servo. Check Dynamixel documentation to convert the torque in physical units.
The return value is the error code. The status is the way of the servo to communicate with the PC. (0 : No return against all commands (Except PING Command), 1 : Return only for the READ command,2 : Return for all commands). The library will not check the status return level and will rise error if servo doesn respond.
The return value is status return level of the servo (explained hereabove).
The return value is the error code. Check Dynamixel documentation to understand the status value (different error will turn on the embedded led).
The return value is the current status. Check Dynamixel documentation to understand the status value.
The return value is the error code. The status argument is the same as for the AlarmLed.
The return value is the current status. Check Dynamixel documentation to understand the status value.
The return value is the error code. The servo will not move until Status is set to true.
The return value is the current torque status.
The return value is the error code. If Status is true, the embedded led will turn on.
The return value is the status of the embedded led. (true : led is on, false : led is off)
The return value is the error code. Check Dynamixel documentation to understand compliance margin & slope.
Check Dynamixel documentation to understand compliance margin & slope.
The return value is the error code. Check Dynamixel documentation to understand compliance margin & slope.
Check Dynamixel documentation to understand compliance margin & slope.
The return value is the error code. Check Dynamixel documentation to understand compliance margin & slope.
Check Dynamixel documentation to understand compliance margin & slope.
The return value is the error code. Check Dynamixel documentation to understand compliance margin & slope.
Check Dynamixel documentation to understand compliance margin & slope.
The return value is the error code. Set the position to be reach by the servo. If the torque is enable, the servo will start to move as soon as it will receive the instruction.
The return value is the error code. This method is provided for convenience.It act exactly like dxlCom.setMovingSpeed(1,xxx); dxlCom.setGoalPosition(1,xxx);, except that the communication is a little faster with this method. Check Dynamixel documentation to convert angle argument to degrees.
The return value is the error code. This method set the moving speed of the servo. The servo will keep this speed unless it is rebooted, turn off, or another speed is set. Check Dynamixel documentation to convert value in physical unit.
The return value is the error code. This method set the torque of the servo. The servo will keep this torque unless it is rebooted, turn off, or another torque is set.Check Dynamixel documentation to convert value in physical unit.
The return value is the present position of the servo. Check Dynamixel documentation to convert value in physical unit.
The return value is the present speed of the servo. Check Dynamixel documentation to convert value in physical unit.
The return value is the present load of the servo. Check Dynamixel documentation to convert value in physical unit.
The return value is the present voltage of the servo. Divided the result by 10 to get it in Volt.
The return value is the present temperature of the servo in Celsius.
If the return is true, the servo has some instruction in REG_REGISTER. To trigger it, call dxl::action(ID)
If the return is true,the servo is moving.
The return value is the error code. when set to true, no writing in EEPROM will be allow. To reset it, simply call the function with false argument. Alternalively, as this register is store in servo RAM, simply turn off the servo and turn it on again (or reboot it).
Return if EEPROM lock is activated or not.
The return value is the error code.The punch value drive the way the servo keep its position in the compliance margin (current drive). Check Dynamixel documentation for more information.
Return the punch value. Check Dynamixel documentation for more information.
unsigned short readDxl(const byte ID, const byte dxlAddress, byte *result, const byte nByteToBeRead);
Read operation will be stored in result
unsigned short writeDxl(const byte ID, const byte dxlCommand, const byte *params, const byte nByteToBeWritten)
unsigned short writeDxlData(const byte ID, const byte dxlAddress, const byte *params, const byte nByteToBeWritten)
unsigned short writeDxlRegData(const byte ID, const byte dxlAddress, const byte *params, const byte nByteToBeWritten )
You can customize the library to drive other servo. It has been written for AX Dynamixel model, but shoul work with MX TTL series, except a few commands (PID control of MX series vs Compliance for AX series).
For convenience, all the adress register & protocol command have been put in a separate file DynamixelArduinoConfig.h. To tweak it with your servo, simply edit it, but take care of the value you enter : invalid address could drive to unpredictable results.
DynamixelMonitor.ino is provided with the library to illustrate how to use. To drive servo, open Serial Monitor in Arduino IDE and send command (upper part of the window):
-
ID2change PC operation to servo ID 2 for example -
pingwill ping servo (ID previously entered, by default PC will operate servo ID 1) -
actionwill drive the reg command of the servo (see dynamixel doc) -
rebootwill reboot servo (ID previously entered, by default PC will operate servo ID 1) -
modelwill return the servo model -
firmwarewill return the servo firmware -
setID3will set the servo ID (the one operated by the PC) to ID 3 -
led1will turn on the led ("led0" to turn off) -
move100will move the servo to an angle of 100 (see dynamixel doc). It will also print the present position of servo during the movement. -
speed300will set the speed to 300 (see dynamixel doc). Note that in DynamixelArduino lib provide a dxl::setGoalPositionAtSpeed(ID, position, speed) method -
torque20will set up the servo torque to 20 (see dynamixel doc) -
voltagewill return the voltage of the servo (to be divided by 10 to get it in Volt) -
temperaturewill return the temperature of the servo (in celsius) -
regmove100will load an reg action. It has been provide to illustrate how to use advanced use of the lib (type 'action' to trigger the reg action)
All the command send in the serial monitor should be follow by a hit on the enter key. Please not that there is no space between command and arguments The result of the command (including catching error) is return in the serial monitor.