


A project to work with flask REST api with docker and the mysql database manager!
Table of Contents
Sin hacer uso de librerías o funciones nativas. Hacer un programa que tomando una palabra o párrafo:
- Contar cuántas vocales hay.
- Reemplazar las vocales por la vocal consecutiva (ejemplo: “hacer” se cambia a “hecir”).
Sin hacer uso de librerías o funciones nativas. Escribe un programa el cual tomando un conjunto de datos con sus atributos (Figura A):
- Ordenar los datos de acuerdo al nivel de prioridad (padre, hijo).
- Utilizar un método llamado show() que permita visualizar los datos ordenados.
- Utilizar un método llamado addData() que permita ingresar un nuevo dato (o conjunto de datos) y ajustar necesario para colocar el dato en la posición adecuada.
De los ejercicios anteriores:
- Escribe las pruebas unitarias necesarias.
{
    "DataA": {
                "name": "One name",
                "Level": "One",
                "Priority": "Highest",
                "SubdataA": {
                            "name": "One nameSubdataA",
                            "Level": "One",
                            "Priority": "Highest",
                            },
                "SubdataA2": {
                            "name": "One nameSubdataA2",
                            "Level": "Two",
                            "Priority": "High",
                            "SubdataAA": {
                                        "name": "One nameSubdataAA",
                                        "Level": "One",
                                        "Priority": "Highest",
                                        }
                            }
    },

    "DataB": {
            "name": "One nameB",
            "Level": "Two",
            "Priority": "Highest",
            "SubdataB":
                    {
                        "name": "One nameSubdataB",
                        "Level": "One",
                        "Priority": "Highest",
                    }
        }
}"Priority": "Highest, High, Medium, Low, Lowest" "Level": "One, two....",
"DataC": {
"name":"One nameC"
"Level": "One",
"Priority": "High",
}
Realiza el esquema DB y normaliza como creas conveniente para lo siguiente:
- Aplicación para gestionar una flota de vehículos, en donde una persona puede tener n vehículos asignados pero solo puede manejar uno. Cada asignación de vehículo tiene una fecha de expiración.
Haciendo uso del ejercicio anterior, utiliza un ORM (de tu preferencia) para realizar el modelado y migraciones correspondientes.
- Al realizar el modelado contempla los diversos escenarios del ejercicio anterior (es decir, anexar nuevos vehículos a una persona, las fechas de expiración, etc).
- Desde tu perspectiva, qué mejoras implementarías?
Basado en la siguiente HU (Historia de usuario), define las pruebas a realizar:
- Como Cliente, quiero suscribirme a un canal Premium por períodos flexibles de tiempo por medio del sitio web.
De los ejercicios de la sección A y B:
- ¿Que powerup(mejora) desarrollarias y por que?.
- Ejecuta un analizador de sintaxis Flake8 y el analizador de complejidad, del
resultado obtenido:
- Explica que mejoras harías a tu código?.
- Qué estándar utilizaste para la evaluación del sintaxis?.
This section should list any major frameworks that you built your project using. Leave any add-ons/plugins for the acknowledgements section. Here are a few examples.
The Python SQL Toolkit and Object Relational Mapper SQLAlchemy is the Python SQL toolkit and Object Relational Mapper that gives application developers the full power and flexibility of SQL.
Flask-SQLAlchemy is an extension for Flask that adds support for SQLAlchemy to your application. It aims to simplify using SQLAlchemy with Flask by providing useful defaults and extra helpers that make it easier to accomplish common tasks.
JSON Web Tokens (or JWTs) provide a means of transmitting information from the client to the server in a stateless, secure way. On the server, JWTs are generated by signing user information via a secret key, which are then securely stored on the client. This form of auth works well with modern, single page applications.
With their streamlined API client, you can quickly and easily send REST, SOAP, GraphQL, and GRPC requests directly within Insomnia. Link to visit insomnia website: - Link
Postman is a collaboration platform for API development. Postman's features simplify each step of building an API and streamline collaboration so you can create better APIs—faster. Link to visit postman website: - Link
For this project you need to have Docker and Docker installed
- Link to install Docker engine: Linux - Windows or Mac
- After installing docker engine install docker compose Linux Windows Mac
- Contar cuántas vocales hay.
- Reemplazar las vocales por la vocal consecutiva (ejemplo: “hacer” se cambia a “hecir”).
- Ordenar los datos de acuerdo al nivel de prioridad (padre, hijo).
- Utilizar un método llamado show() que permita visualizar los datos ordenados.
- Utilizar un método llamado addData() que permita ingresar un nuevo dato (o conjunto de datos) y ajustar necesario para colocar el dato en la posición adecuada.
- Las principales entidades a guardar seran: vehiculos, conductores y asignaciones
- Se elaborá una tabla para cada entidad
- La tabla que hará las relaciones entre conductores y vehiculos será la tabla de asignaciones por lo que contendrá las llaves foraneas de cada entidad
- Un conductor puede tener asignado varios autos pero un auto puede estar asignado a un solo conductor
- La llave primaria será un objeto de tipo UUIDType que será la llave con la que relacionaremos con los vehiculos a cada conductor
- El email empresarial del conductor será una llave unica que lo identificará junto a su id (Elegiremos el email por su facilidad de memorizar y manejar)
- Tendremos un valor único que es el Número de Identificación Vehicular VIN (Vehicle Identification Number) consta de 17 caracteres alfanuméricos
- La tabla contendrá otros datos del conductor como nombre, fecha de nacimiento (dob), tipo de crdencial con la que cuenta, telefono etc.
- La llave primaria será un objeto de tipo UUIDType que será la llave con la que relacionaremos con los conductores a cada vehiculo
- Tendremos un valor único que es el Número de Identificación Vehicular VIN (Vehicle Identification Number) consta de 17 caracteres alfanuméricos
- La tabla contendrá otros datos del vehiculo como: marca, modelo, maxima carga permitida, tipo de vehiculo y otras
- La llave primaria será un objeto de tipo UUIDType
- Relacionaremos dos llaves foraneas (llave foranea de vehicle y driver)
- Las asignaciones son unicas es decir no se puede repetir una asignacion con mismo id de vehiculo y driver
- La tabla contendrá otros datos de la asignacion como: fecha, si ya ha expirado, notas, área etc.
-
To obtain my repository you must create a folder in a desired directory and within this folder open a terminal or use cmd in the case of windows.
-
Clone the repo
git clone git@github.com:aldomatus/envio-click.git -
Move to envio_click directory
cd envio_click/A/A2 -
Build Docker container
docker build -t fleet_local:local_latest . ; -
Build Docker container
docker build -t fleet_local:local_latest . ; -
Run Docker container
docker run --rm -d -it --env-file=.env -v ${PWD}:/usr/src/app -p 5022:5000 --name fleet_local fleet_local:local_latest; -
To see the logs at runtime
docker logs -f fleet_local; -
If all goes well, our application should already be executing the app.py file with python using the mysql database, now we just have to check by entering the following link in our browser:
http://localhost:5000/ -
You should have a response like this:
{ "message": "Welcome to Envio Click ® API", "success": true } - we add our environment variables from flask
- We run the requirements file so that our libraries are installed
- We expose the port to use which is 5000
- With CMD we start Flask
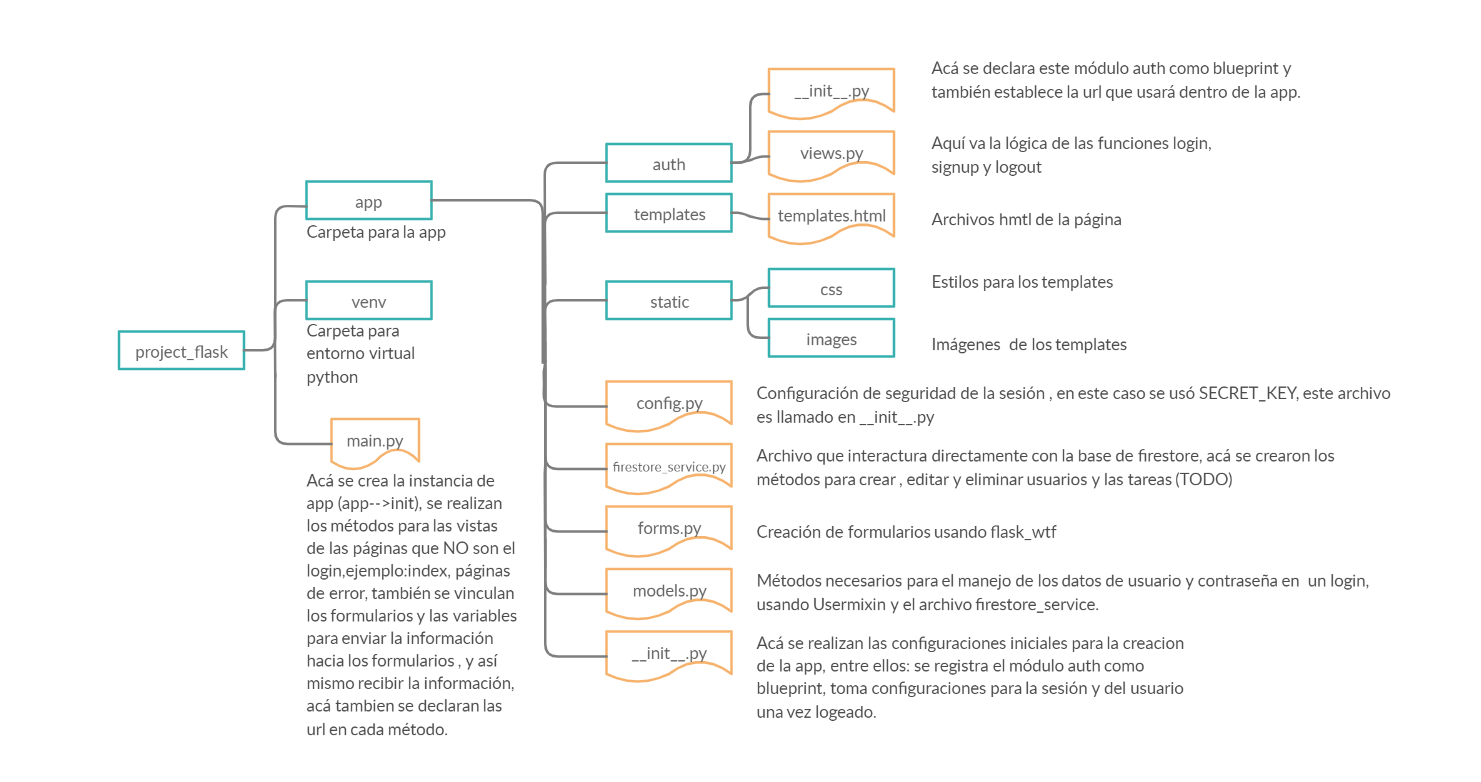
- The blue squares represent folders and the yellow figures are the files
- Fork the Project
- Create your Feature Branch (
git checkout -b feature/envioclickFeature) - Commit your Changes (
git commit -m 'Add some envioclickFeature') - Push to the Branch (
git push origin feature/envioclickFeature) - Open a Pull Request
Sin hacer uso de librerías o funciones nativas. Hacer un programa que tomando una palabra o párrafo:
def vowel_counter(my_string):
    counter = 0
    for letter in my_string:
        if letter in 'aeiouAEIOU':
            counter += 1
    return counter


def change_vowels(my_string):
    new_string = ''
    vowels = ('a', 'e', 'i', 'o', 'u', 'A', 'E', 'I', 'O', 'U')
    for letter in my_string:
        if letter in vowels:
            index = 0
            for vowel in vowels:
                if vowel == letter:
                    break
                index += 1
            try:
                if letter == 'u':
                    new_string += 'a'
                else:
                    new_string += vowels[index + 1]
            except IndexError:
                new_string += vowels[5]

        else:
            new_string += letter
    return new_string


if __name__ == '__main__':
    my_string = str(input("Enter your string: "))
    print(f'Your string has {vowel_counter(my_string)} vowels')

    my_new_string = (change_vowels(my_string))
    print(f'Your changed string: {my_new_string}')
Sin hacer uso de librerías o funciones nativas. Escribe un programa el cual tomando un conjunto de datos con sus atributos (Figura A):
aldo@aldo-hp:~/Documents/envio_click$ /bin/python3.9 /home/aldo/Documents/envio_click/A/A2.py
__________             _____      __________________      ______
___  ____/_________   ____(_)_______  ____/__  /__(_)________  /__
__  __/  __  __ \_ | / /_  /_  __ \  /    __  /__  /_  ___/_  //_/
_  /___  _  / / /_ |/ /_  / / /_/ / /___  _  / _  / / /__ _  ,<
/_____/  /_/ /_/_____/ /_/  \____/\____/  /_/  /_/  \___/ /_/|_|

1 - Show dictionary
2 - Add a name
3 - Exit
Enter your choice: 2

█████ █████ █████ █████ █████ █████ █████
DataA
        One nameA
                One nameSubdataA
                One nameSubdataA2
                        One nameSubdataAA
                                One nameSubdataAAA
DataB
        One nameB
                One nameSubdataB
DataC
        One nameC
                One nameSubdataC
█████ █████ █████ █████ █████ █████ █████


Press enter to continue operations...
Nos solicitará el nivel y la ruta para llegar al nombre a cambiar, en este caso está en el tercer nivel con la ruta [1][2][1]
aldo@aldo-hp:~/Documents/envio_click$ /bin/python3.9 /home/aldo/Documents/envio_click/A/A2.py
__________             _____      __________________      ______
___  ____/_________   ____(_)_______  ____/__  /__(_)________  /__
__  __/  __  __ \_ | / /_  /_  __ \  /    __  /__  /_  ___/_  //_/
_  /___  _  / / /_ |/ /_  / / /_/ / /___  _  / _  / / /__ _  ,<
/_____/  /_/ /_/_____/ /_/  \____/\____/  /_/  /_/  \___/ /_/|_|

1 - Show dictionary
2 - Add a name
3 - Exit
Enter your choice: 2

█████ █████ █████ █████ █████ █████ █████
DataA
        One nameA
                One nameSubdataA
                One nameSubdataA2
                   --> One nameSubdataAA
                                One nameSubdataAAA
DataB
        One nameB
                One nameSubdataB
DataC
        One nameC
                One nameSubdataC
█████ █████ █████ █████ █████ █████ █████


Enter your key name: name
Enter your value: envioclick
Enter your level: 3

Enter your route:
Enter the number of layer[1]:1
Enter the number of layer[2]:2
Enter the number of layer[3]:1
Sending show2


█████ █████ █████ █████ █████ █████ █████
DataA
        One nameA
                One nameSubdataA
                One nameSubdataA2
                        envioclick
                                One nameSubdataAAA
DataB
        One nameB
                One nameSubdataB
DataC
        One nameC
                One nameSubdataC
█████ █████ █████ █████ █████ █████ █████

Press enter to continue operations...


For the construction of the database, the relationship entity model was made with which the relationships between each table were deduced.

Para la construccion de la base de datos se tomaron en cuenta los siguientes aspectos:

Descripción:

Descripción:

Descripción:
Flask
flask-sqlalchemy
mysql-connector
alembic
sqlalchemy-utils
pytz
werkzeug
unidecode
requests
gunicorn
newrelicCreate the dockerfile that will have the necessary instructions to create a Python image that will later be converted into a single application.
FROM python:3.8.5-slim-buster

RUN apt install tzdata
RUN cp /usr/share/zoneinfo/America/Mexico_City /etc/localtime
RUN echo "America/Mexico_City" >  /etc/timezone
RUN apt-get -y update \
    && apt-get install -y \
        libffi-dev \
        libgdk-pixbuf2.0-0 \
        libpango1.0-0 \
        python-dev \
        python-lxml \
        shared-mime-info \
        libcairo2 \
    && apt-get -y clean

WORKDIR /usr/src/app
ENV PYTHONDONTWRITEBYTECODE 1
ENV PYTHONUNBUFFERED 1

COPY requirements.txt /usr/src/app/requirements.txt
RUN pip install -r requirements.txt

COPY . /usr/src/app

ENTRYPOINT ["/bin/sh","/usr/src/app/entrypoint.sh"]
This file contains our environment variables that will be read by the dockerfile.
FLASK_APP=app/__init__.py
FLASK_ENV=development
SECRET_KEY=
FLASK_DEBUG=1

SESSION_COOKIE_NAME=aldomatus_

SQLALCHEMY_ECHO=False
SQLALCHEMY_TRACK_MODIFICATIONS=False

SQLALCHEMY_DATABASE_URI=mysql+mysqlconnector://<user>:<password>@<ip>/fleet
SQLALCHEMY_DATABASE_URI_ALEMBIC=mysql+mysqlconnector://<user>:<password>@<ip>/fleet

NEW_RELIC_CONFIG_FILE=newrelic.ini
NEW_RELIC_MONITOR_MODE=false
Blueprints: they are a series of routes that we can integrate into our application but in another directory that is, it will allow me to modulate the application into small applications that do specific things such as authentication or the welcome part, or if we have a task dashboard for Example we would also create a blueprint for the specific tasks and it is easier to handle.
With this base you can make any flask code, modify the API and adapt it to your projects. It is important that you study the docker code to understand what is behind each file in both the Docker
@drivers.route("/", methods=['POST'])
def post_driver():
    try:
        if request.get_json():
            if create_driver_expedient(request.get_json()):
                e = get_driver_expedient(request.json['email'])
                message = f'Driver {e.email} has been created'
                print(message)
                return jsonify(success=True,message=message), 201
            else:
                return jsonify(success=False, message=f"Driver {request.json['email']} is already registered"), 409
    except Exception as e:
        print(e)
        return jsonify(success=False), 400
Fake log file for testing 🧪🧪🧪
{
"name": "Ricardo",
"first_lastname":"Montaño",
"second_lastname":"García",
"email":"ricardo.m@gmail.com",
"phone":"9512377979",
"credential_type":"C",
"dob": "1990-01-12"
}


@vehicles.route("/", methods=['POST'])
def post_vehicle():
    try:
        if request.get_json():
            if create_vehicle_expedient(request.get_json()):
                e = get_vehicle_expedient(request.json['VIN'])
                print(f'Vehicle register {e.VIN} has been created')
                return jsonify(success=True, VIN_vehicle=e.VIN), 201
            else:
                return jsonify(success=False, message=f"Vehicle {request.json['VIN']} is already registered"), 409
    except Exception as e:
        print(e)
        return jsonify(success=False), 400
Fake log file for testing 🧪🧪🧪
{
"model": "AX100",
"brand": "SUZUKI",
"vehicle_type": "Motorcycle",
"maximum_laded_weight": 20,
"VIN":"1HGBR41JXMM109125"
}


@assignments.route("/", methods=['POST'])
def post_assignment():
    try:
        if request.get_json():
            assignment = create_assignment_expedient(request.get_json())
            if assignment[1]:
                e = get_assignment_expedient(assignment[0]['driver_id'], assignment[0]['vehicle_id'])
                print(f'Assignment with driver: {str(e.driver_id)} and {str(e.vehicle_id)} has been created')
                return jsonify(success = True, message=f"Assignment with driver: {assignment[0]['driver_id']} and vehicle: {assignment[0]['vehicle_id']} has been registered"), 201
            else:
                return jsonify(success=False, message=f"Assignment with driver: {request.get_json()['driver_email']} and vehicle: {request.get_json()['VIN']}is already registered"), 409
    except Exception as e:
        print(e)
        return jsonify(success=False), 400
Fake log file for testing 🧪🧪🧪
{

"VIN": "1HGBR41JXMM109125",
"driver_email":"aldo.matus@envioclick.com",
"notes": "Tecnologia",
"area":"Monterrey",
"expiration_date": "2022-03-13",
"is_expired": false

}


@assignments.route("/get_assignment/<driver_email>", methods=['GET'])
def get_assignment_driver(driver_email):
    try:
        assignments = get_driver_assignments(driver_email)
        if assignments:
            print(f"{driver_email} assignments successfully obtained")
            return jsonify(success = True, data=assignments), 200
        else:
            return jsonify(success=False, message=f"Driver {driver_email} has no assigned vehicles"), 409
    except Exception as e:
        print(e)
        return jsonify(success=False, message='Something has gone wrong!'), 400
endpoint for testing 🧪🧪🧪
http://localhost:5022/assignments/get_assignment/aldo.matus@envioclick.com

@assignments.route("/cancel_assignment/<driver_email>/<VIN>", methods=['PUT'])
def cancel_assignment_driver(driver_email, VIN):
    try:
        assignments = cancel_driver_assignments(driver_email, VIN)
        if assignments:
            print(f"Assignment {driver_email} and {VIN} canceled")
            return jsonify(success = True, assignment_canceled = assignments), 200
        else:
            return jsonify(success=False, message=f"Driver {driver_email} has no assigned vehicles"), 409
    except Exception as e:
        print(e)
        return jsonify(success=False, message='something has gone wrong!'), 400
endpoint for testing 🧪🧪🧪
http://localhost:5022/assignments/cancel_assignment/aldomatusm111@gmail.com/1HGBH41JXMN109122

Se crearon test para los endpoints de creacion [POST] de obtención de datos [GET] y edición de datos [PUT].
En este primer test nos aseguramos de la creación de un driver y un vehicle (un chofer y un vehículo) 🚚🧔
import unittest
import requests
class ApiTest(unittest.TestCase):
    API_URL = "http://172.17.0.1:5022"
    DRIVERS_URL = "{}/drivers/".format(API_URL)
    VEHICLES_URL = "{}/vehicles/".format(API_URL)
    ASSIGNMENTS_URL = "{}/assignments/".format(API_URL)

    DRIVER_OBJ = {
	    "name": "Usertest",
        "first_lastname": "lastnameTest",
        "second_lastname": "lastnameTest",
        "email": "test@envioclick.com",
        "phone": "000000000",
        "credential_type": "C",
		"dob": "1990-01-01"
                }

    VEHICLE_OBJ = {
        "model": "Testmodel",
        "brand": "Testbrand",
        "vehicle_type": "TestType",
        "maximum_laded_weight": 20,
        "VIN":"TESTR41JXMM109125"
                }


    def test_create_driver(self):
        r = requests.post(ApiTest.DRIVERS_URL, json=ApiTest.DRIVER_OBJ)
        self.assertEqual(r.status_code, 201)


    def test_create_vehicle(self):
        r = requests.post(ApiTest.VEHICLES_URL, json=ApiTest.VEHICLE_OBJ)
        self.assertEqual(r.status_code, 201)

if __name__ == '__main__':
unittest.main()En este primer test nos aseguramos de la creación de un driver y un vehicle (un chofer y un vehículo)
import unittest
import requests
import time
class ApiTest(unittest.TestCase):
    API_URL = "http://172.17.0.1:5022"
    ASSIGNMENTS_URL = "{}/assignments/".format(API_URL)

    ASSIGNMENTS_OBJ = {

        "VIN": "TESTR41JXMM109125",
        "driver_email":"test@envioclick.com",
        "notes": "Test",
        "area":"TestArea",
        "expiration_date": "2022-03-13",
        "is_expired": False
				}


    def test_create_assignments(self):
        r = requests.post(ApiTest.ASSIGNMENTS_URL, json=ApiTest.ASSIGNMENTS_OBJ)
        self.assertEqual(r.status_code, 201)


if __name__ == '__main__':
unittest.main()En este primer test nos aseguramos de la creación de un driver y un vehicle (un chofer y un vehículo)
import unittest
import requests
import time


class ApiTest(unittest.TestCase):
    API_URL = "http://172.17.0.1:5022"
    ASSIGNMENTS_URL = "{}/assignments/".format(API_URL)
    DRIVER_EMAIL = 'test@envioclick.com'
    VEHICLE_VIN = 'TESTR41JXMM109125'


    def test_cancel_assignments(self):
        CANCEL_DRIVER_ASSIGNMENTS = "{}cancel_assignment/{}/{}".format(ApiTest.ASSIGNMENTS_URL, ApiTest.DRIVER_EMAIL, ApiTest.VEHICLE_VIN)
        r = requests.put(CANCEL_DRIVER_ASSIGNMENTS)
        self.assertEqual(r.status_code, 200)


if __name__ == '__main__':
unittest.main()docker exec -it fleet_local python -m unittest api_test.py;
docker exec -it fleet_local python -m unittest api_assignments_test.py
docker exec -it fleet_local python -m unittest api_assignment_cancel_test.py Para el ejercicio B hice la mejora de cron, en el que instalé un cron en el contenedor de Docker para eliminar los eventos expirados en los que la fecha a partir del hoy han expirado, este cron se ejecutaría cada día.
Se instalan las librerias en el kernel 🐳:
RUN apt-get -y update \
    && apt-get install -y \
        libffi-dev \
        libgdk-pixbuf2.0-0 \
        libpango1.0-0 \
        python-dev \
        python-lxml \
        shared-mime-info \
        libcairo2 \
        cron \
rsyslog \ADD events-cron /etc/cron.d/hello-cron
RUN chmod 0644 /etc/cron.d/hello-cron
RUN crontab /etc/cron.d/hello-cron
RUN touch /var/log/cron.log
RUN chmod +x /usr/src/app/entrypoint.sh@assignments.cli.command("update_expired_assignments")
def update_expired_event():
print('[{}] Start updating expired assignments'.format(datetime.datetime.now(tz=tz).strftime("%d/%m/%Y %H:%M:%S")))
if update_expired_assignments():
print('[{}] End updating expired assignments'.format(datetime.datetime.now(tz=tz).strftime("%d/%m/%Y %H:%M:%S")))
else:
print('[{}] Something has gone wrong!'.format(datetime.datetime.now(tz=tz).strftime("%d/%m/%Y %H:%M:%S")))La funcion nos trae las asignaciones con fechas pasadas a la de hoy y con el is_expired = False para marcarlas como expiradas (is_expired = True)
def update_expired_assignments():
    try:
        assignments = db_session.query(Assignment).filter(and_(Assignment.expiration_date < datetime.datetime.now(tz=tz).replace(tzinfo=None), Assignment.is_expired==0)).all()
        if assignments:
            for assignment in assignments:
                print(f'Expired assignment: {assignment.driver_id} {assignment.vehicle_id} | {assignment.expiration_date}')
                assignment.is_expired = True
        db_session.commit()
        return True

    except Exception as e:
        print('No expired assignments | ', e)
return NoneSHELL=/bin/bash
BASH_ENV=/root/project_env.sh
# Update the expired assignments every day
0 3 * * * root cd /usr/src/app && /usr/local/bin/flask assignments update_expired_assignments >> /var/log/cron.log 2>&1docker exec -it fleet_local flask assignments update_expired_assignmentsContributions are what make the open source community such an amazing place to be learn, inspire, and create. Any contributions you make are greatly appreciated.
Distributed under the MIT License. See LICENSE for more information.
Aldo Matus - Linkedin Facebook
Project Link: Repository