Proteinarium is a multi-sample protein-protein interaction (PPI) tool to identify clusters of samples with shared networks.
Read about Proteinarium in our publication in Genomics!
Please cite our publication if you use Proteinarium:
Armanious D, Schuster J, Tollefson GA, et al. Proteinarium: Multi-sample protein-protein interaction analysis and visualization tool [published online ahead of print, 2020 Jul 20]. Genomics. 2020;S0888-7543(20)30305-0. doi:10.1016/j.ygeno.2020.07.028
Simply download Proteinarium.zip and unzip its contents into a folder of your choosing. It contains the precompiled Proteinarium.jar file and two helper files: one for Mac OS X/Unix environments, and another for Windows environments. You can download Graphical User Interface (GUI) version from this link, ProteinariumGUIversion.zip.
Java 1.8, Java 9, or Java 10 must be installed in order to run Proteinarium. The Proteinarium GUI requires JavaFX to be installed in addition to Java. Java 1.8 comes with JavaFX as part of the JDK and JRE packages.
We've recorded two video tutorials that show how to download and run Proteinarium using the command line and graphical user interfaces. Click the video thumbnails below to watch them.

If you are a new user looking to analyze or visualize a dataset for the first time, we recommend the following steps:
- Install Proteinarium as described above
- Create the Group 1 gene set file,
group1.txtthat Proteinarium will use. This is just a text file with one line per sample in the data set. Each line has the format<Sample Identifier> = <HGNC Symbol 1>, <HGNC Symbol 2>, ..., <HGNC Symbol n>for a sample withngenes. - If you wish to analyze or visualize a second gene set, for example if you have cases and controls, create the Group 2 gene set file
group2.txtas in Step 2. - Create a configuration file
config.txtwith the following contents:
group1GeneSetFile = group1.txt
group2GeneSetFile = group2.txt
# Only include the above line with group2GeneSetFile if you have created the corresponding file and wish to analyze it.
projectName = Project Name Here
The <arguments> is config=config.txt
The most reliable way to run Proteinarium is to run the following command:
java -jar <path to Proteinarium.jar> <arguments>This will work regardless of what operating system you are using, so long as you jave Java 1.8 or above installed. The helper files simply invoke java -jar Proteinarium.jar along with any additional arguments you passed in from the command line.
Open up a terminal, navigate to the folder containing Proteinarium.jar, and execute:
./proteinarium.sh <arguments>Open a command prompt, navigate to the folder containing Proteinarium.jar, and execute:
proteinarium.bat <arguments>The <arguments> are allowed to take one of the following forms:
- Show help:
-hor--help - Show available configuration options:
-oor--options - Show default configuration options:
-dor--default-configNote: you can use the output of this command to generate an easy-to-modify configuration file. - Specify the configuration file:
config=<configuration file>where<configuration file>is the path to a text file containing all configuration options for this run of Proteinarium - Set the configuration options directly:
group1GeneSetFile=<value> projectName=<value> maxPathLength=<value> ...This option is provided primarily for scripting purposes; it is instead recommended to specify a configuration file as detailed above.
For a complete list of configuration options and explanations of how they affect Proteinarium, refer to Configuration.
All output files go to the folder specified by the outputDirectory configuration option. By default, this goes to a folder called output in the same directory that you run Proteinarium from.
- <projectName>_ClusterAnalyses.csv: cluster analysis files
- <projectName>_Dendrogram.png: dendrogram image
- <projectName>_Dendrogram.txt: representation of the dendrogram in Newick tree format Note: if the entry is a single gene list, the above output files will not be generated. The output on the single sample will still be available as described below.
To analyze and visualize any cluster or individual sample from the dendrogram, enter <cluster or sample ID> (branch number) on the command line (ex: C12).
The corresponding analysis information and images will be available in the \</outputDirectory\>/</cluster or /sample ID\> folder. For example, if one were to analyze cluster C12 with default configuration options, the output would be located in /output/C12/. The following output files are generated:
- <cluster or sample ID>_Dendrogram.txt
Then, for each of the five possible output networks--Group 1, Group 2, [Group 1 + Group 2], [Group 1 - Group 2], [Group 2 - Group 1], three files are generated to summarize that network.
For example:
- <cluster or sample ID>_Group1_GeneSet.txt: list of genes in the network and information about which input set they originated from (i.e. from Group 1, Group 2, or imputed from the interactome) and on how many samples the gene was found
- <cluster or sample ID>_Group1_Interactions.txt: network interaction matrix
- <cluster or sample ID>_Group1.png: image of the network
To view the summary information for a particular cluster or sample, enter "info <cluster ID>" (ex: info C87) into the command line. The following information will be displayed:
- Average Distance (Height)
- Bootstrapping Confidence
- Total Number of Samples
- Number in Group 1 (number of samples)
- Number in Group 2 (number of samples)
- p-value (Fisher Exact test for Group 1 and Group 2)
- Group 1 and Group 2 Clustering Coefficient
- Group 1 Clustering Coefficient
- Group 2 Clustering Coefficient
- Group 1 minus Group 2 Clustering Coefficient
- Group 2 minus Group 1 Clustering Coefficient
- Group 1 Patients (Sample IDs of the individuals)
- Group 2 Patients (Sample IDs of the individuals) Note: the above information is available for all patients at any time in the <projectName>_ClusterAnalyses.csv output file.
-
Create the Gene Set File 1. This must be a text file with one line per sample. Each line has the format = <HGNC Symbol 1>, <HGNC Symbol 2>, ..., for a sample with n seed genes.
-
(Optional) If you wish to analyze a dichotomous phenotype, a second gene set file can be created for Gene Set 2. This file must be formatted the same way as done for Gene Set 1.
-
In the GUI, select File > Home
-
Choose the data files for upload. If you are only analyzing one group or a single sample, leave the Geneset File 2 file field empty. NOTE: If you would like to select new Gene Set Files, click on the “Clear Gene Files” button before selecting new Gene Set Files.
-
Enter a Project Name into the field “Project Name”. If left blank, the program default to the project name “SIM”
-
Before running Proteinarium, confirm or make changes to the program’s configurable parameters. A table with all possible parameters, their definitions and their default settings are provided by selecting Help > Available Configurations.
-
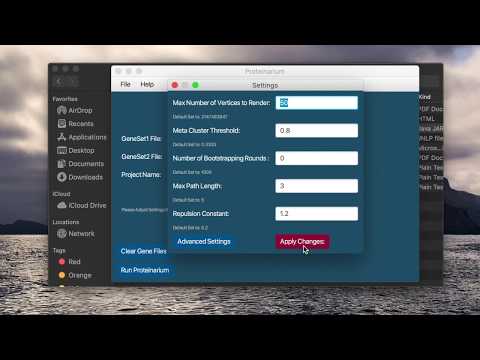
Select File > Settings or “Settings” button to view and change parameters. If any changes are made click “Apply Changes” before exiting. NOTE: The values of the parameters are not all set to the Default values. These are the values used in our testing and validation with bootstrapping turned off (ie 0 iterations).
-
For Advance Settings Select File > Settings and click on the “Advance Settings” button. Once changed click on “Set Settings” and the “Apply Changes” buttons.
-
Once files are uploaded and parameters are set, click “Run Proteinarium”
-
If more than one sample is contained within the input file (s), the dendrogam will be displayed. All output files generated by Proteinarium will be saved to the folder specified by the outputDirectory configuration option. By default, this goes to a folder called “Output” in the same directory as the Proteinarium.jar file.
- <projectName>_ClusterAnalyses.csv: cluster analysis files
- <projectName>_Dendrogram.png: dendrogram image
- <projectName>_Dendrogram.txt: representation of the dendrogram in Newick tree format
-
Running Proteinarium using the GUI for prolonged periods of time can use excess amounts of memory, to avoid this please exit out of the Proteinarium GUI between Proteinarium analyses.
-
When Proteinarium is done running, the GUI will navigate to a new window in which you can input the Cluster/Sample ID for which you are interesting in viewing or obtaining more information.
-
Enter sample ID or branch number (ex: C12) in the space provided.
-
Select either “View Cluster” or “Get Cluster Information”.
-
If “View Cluster” is selected, the corresponding the output files will be available in the <outputDirectory>/<cluster or sample ID> folder. And the following files are generated:
- <cluster or sample ID>_Dendrogram.txt
- For each of the five possible output networks--Group 1, Group 2, [Group 1 + Group 2], [Group 1 - Group 2], [Group 2 - Group 1], three files are generated to summarize that network. For example:
- <cluster or sample ID>_Group1_GeneSet.txt: list of genes in the network and information about which input set they originated from (i.e. from Group 1, Group 2, or imputed from the interactome) and on how many samples the gene was found
- <cluster or sample ID>_Group1_Interactions.txt: network interaction matrix
- <cluster or sample ID>_Group1.png: image of the network
-
If “Get Cluster Information” is selected, the following information will be appended to the file “SystemsOutput.txt” as indicated by the text box of the GUI.
- Average Distance (Height)
- Bootstrapping Confidence
- Total Number of Samples
- Number in Group 1 (number of samples)
- Number in Group 2 (number of samples)
- p-value (Fisher Exact test for Group 1 and Group 2)
- Group 1 and Group 2 Clustering Coefficient
- Group 1 Clustering Coefficient
- Group 2 Clustering Coefficient
- Group 1 minus Group 2 Clustering Coefficient
- Group 2 minus Group 1 Clustering Coefficient
- Group 1 Patients (Sample IDs of the individuals)
- Group 2 Patients (Sample IDs of the individuals)
-
Output files can be opened from the GUI: select File > Open to open a file explorer window.
-
Select File > Settings
-
Change desired parameter values
-
Click Apply Changes
-
Select File > New Analysis to re-run Proteinarium with these new settings
NOTE: Previous data will be overwritten. If you prefer not to overwrite previous data, first select File > Home, make sure gene set files are chosen correctly and change the Project Name. Then adjust parameters with the setting button and click “Run Proteinarium”.