Apache Daffodil™ Extension for Visual Studio Code: v1.3.0
![]()
The Apache Daffodil™ Extension for Visual Studio Code is an extension to the Microsoft® Visual Studio Code (VS Code) editor which enables Data Format Description Language (DFDL) syntax highlighting, code completion, and the interactive debugging of DFDL Schema parsing operations using Apache Daffodil™.
DFDL is a data modeling language used to describe file formats. The DFDL language is a subset of eXtensible Markup Language (XML) Schema Definition (XSD). Just as file formats are rich and complex, so is the modeling language to describe them. Developing DFDL Schemas can be challenging, requiring a lot of iterative development, and testing.
The purpose of Apache Daffodil™ Extension for Visual Studio Code is to ease the burden on DFDL Schema developers, enabling them to develop high quality, DFDL Schemas, in less time. VS Code is free, open source, cross-platform, well-maintained, extensible, and ubiquitous in the developer community. These attributes align well with the Apache Daffodil™ project and the Apache Daffodil™ Extension for Visual Studio Code.
DFDL is rich and complex. Developers using modern code editors expect some degree of built-in language support for the language in which they are developing, and DFDL should be no different. The Apache Daffodil™ Extension for Visual Studio Code provides syntax highlighting to improve the readability and context of the text. In addition, the syntax highlighting provides feedback to the developer indicating the structure and code appear syntactically correct.
The Apache Daffodil™ Extension for Visual Studio Code provides code completion, also known as “Intellisense”, offering context-aware code segment predictions that can dramatically speed up DFDL Schema development by reducing keyboard input, memorization by the developer, and typos.
The Apache Daffodil™ Extension for Visual Studio Code provides a Daffodil Data Parse Debugger which enables the developer to carefully control the execution of Apache Daffodil™ parse operations. Given a DFDL Schema and a target data file, the developer can step through the execution of a parse line by line, or until the parse reaches some developer-defined location, known as a break point, in the DFDL Schema. What is particularly helpful is that the developer can watch the parsed output, known as the "infoset", as it’s being created by the parser, and see where the parser is parsing in the data file. This enables the developer to quickly discover and correct issues, improving DFDL Schema development and testing cycles.
The Apache Daffodil™ Extension for Visual Studio Code provides an integrated data editor. It is akin to a hex editor, but tuned specifically for challenging Daffodil use cases. As an editor designed for Daffodil developers by Daffodil developers, features of the tool will evolve quickly to address the specific needs of the Daffodil community.
The Apache Daffodil™ Extension for Visual Studio Code provides TDML support. TDML is a way of specifying a DFDL schema, input test data, and expected result or expected error/diagnostic messages, all self-contained in an XML file. A TDML file is often useful just to ask a question about how something in DFDL works. For example, when uploading files to the daffodil users mailing list, it may be easier to upload a zip file containing a TDML file, the DFDL Schema file, the input data file, and, optionally, the infoset file. Sending this file to the users mailing list will allow other users to unpack your zip file and run your test case. It becomes even easier if you have multiple test cases. It allows for a level of precision that is often lacking, but also often required when discussing complex data format issues. As such, providing a TDML file along with a bug report is the absolutely best way to demonstrate a problem. You can read more about TDML here on the Apache Daffodil™ website.
This guide assumes VS Code and a Java Runtime Environment (Java 8 or greater) are installed.
- Install VS Code
- Install Java Runtime 8 or greater
- On Linux, glibc 2.31 or greater is required
The Apache Daffodil™ Extension for Visual Studio Code can be installed using one of two methods.
Option 1: Install the Apache Daffodil™ Extension for Visual Studio Code From the Visual Studio Code Extension Marketplace
The Apache Daffodil™ Extension for Visual Studio Code is available in the Visual Studio Code Extension Marketplace.
Option 2: Install the Latest .Vsix File From the Apache Daffodil™ Extension for Visual Studio Code Release Page
The latest .vsix (the file extension used for VS Code extensions) file can also be downloaded from the Apache Daffodil™ Extension for Visual Studio Code releases page and installed by either:
- Using the command-line via
code --install-extension <path-to-downloaded-vsix-file>; or - Using the "Extensions: Install from VSIX" command from within VS Code by opening the Command Palette (Mac = Command+Shift+P, Windows/Linux = Ctrl+Shift+P), and typing
vsixto bring up the command and pointing it at the downloaded.vsixfile.
Since DFDL Schema files end with .xsd (XML Schema Definition or XSD), the editor needs to be informed specifically that DFDL mode is desired over the more general XML mode. The mode is selected in the status bar at the bottom of the editor window.
Auto suggest is triggered using control space or typing the beginning characters of an item. Typing one or more unique characters will further limit the results.
📝 NOTE: Intellisense is context aware, so there is no need to begin a block with <, just start typing the tag name and code completion will automatically handle it as appropriate.
Code completion can be used to add a schema block, with just a couple of keystrokes. Code completion can make short work out of completing a DFDL Format Block, offering context-sensitive suggestions attribute values.
The > or / characters are used to close XML tags. Use tab to select an item from the drop down and to exit double quotes.
Code completion supports creating self-defined dfdl:complextypes and dfdl:simpleTypes.
The tab key can be used to complete an auto-complete item within an XML tag. After auto-complete is triggered, typing the initial character or characters will limit the suggestion results. Inside an XML tag a space or carriage return will trigger a list of context sensitive attribute suggestions.

Install the Apache Daffodil VS Code Extension from the VS Code Marketplace.

Open a schema file in the editor and set the language mode located in the bottom right corner to dfdl.

Click the language in the bottom right of the status bar or type Ctrl+Shift+p and enter 'language mode', then select dfdl from the list of available languages.

Press ctrl+space in the empty editor window. The XML version declaration should appear as the only choice. Select that choice by pressing the enter key.

Press ctrl+space again and the schema choice will show. Press enter to accept the schema choice.

Select nul, or one of the other choices in the choice list. If you select nul for no namespace, you will need to backspace over the null character to remove it. If you want to type in a different namespace choice, remove null and type in your namespace choice followed by a colon ‘:’. If you select a namespace option here, it will be used throughout the schema as a namespace prefix to standard XML elements. The dfdl namespace prefix will automatically be added to dfdl elements. After selecting or writing in a namespace option, press the tab key to move to the end of the schema tag block.

At the end of the schema tag block, you can type ‘>’ to auto-end the schema block. Intellisense will place the end tag character on the schema open tag block, create the schema closing tag, and position the cursor between the tags.

Press ctrl+space to get a list of element type choices available within the schema tags. Select a choice and press enter.

Attributes can be supplied in the sequence open tag. To get a list of attribute choices press space at the cursor position. Intellisense will open a menu that allows a selection of an attribute. If the attribute has predetermined choices a list of those will appear after the attribute is selected.

The separator attribute doesn’t have a specific list of choices. The comma was manually entered to provide a value to the field. Press tab to exit the double quotes. The cursor will be positioned immediately after the ending double quote.

Type space again to choose another attribute, or type / to create a self-closing tag. After typing a slash to close the tag, the cursor will be positioned at the end of the tag. Press enter to continue on the next line.

Press ctrtl+space to get a list of element choices.

A tag can also be closed by typing ‘>’ at the cursor position after the tag.

Closing a tag with a ‘>’ will normally result in a closing tag on a new line and the cursor positioned between the two tags. (If an open tag is split over multiple lines, the closing tag is not moved to the next line. This behavior can be changed based on community input).

Press ctrl+space on the empty line to get a list of element choices available between tags.

Select a choice by pressing enter. In this example the element tag with the attribute name was selected and a value for name entered. Press tab to exit the double quotes after entering a name value. The name attribute doesn’t have a specific list of choices.

Type ctrl+space to get a list of attribute choices for the element tag.

Selecting an attribute that has predetermined choices will supply a list of those choice. Select an item from the list and press enter. End the tag with ‘>’ to get a closing tag on a new line with the cursor positioned between the tags.

On the new line press ctrl+space to get a list of element choices for the element tag.

Select a choice and press ctrl+space to get list of choices for the selected annotation tag set.

Select a choice and press ctrl+space to supply a list of choices available in the appinfo tag set.

Select a choice by pressing enter.

The discriminator test dfdl attribute doesn’t have a specific list of choices. Press tab to exit the double quotes. The cursor will be positioned immediately after the ending double quote.

To add additional attributes to an existing element tag, position the cursor within the opening tag, press ctrl+space, or space to get a list of attribute choices for that tag.

Adding a new line anywhere in the schema and pressing ctrl+space will provide a list of choices available between the tags at the current position.

If a closing tag is deleted or missing, type ‘>’ to re-add the closing tag at the cursor position.

The closing tag will be re-added and cursor will be placed at the end of the line.
XPath expressions can be code completed.
- The Apache Daffodil™ Extension for Visual Studio Code uses a clunky method to auto complete curly braces within quotes. It is anticipated that this will be better addressed in the future. The auto complete method blocks suggestions while typing between the beginning quote, opening curly brace and the closing curly brace, ending quote.
Debugging a DFDL Schema needs both the DFDL Schema to use and a data file to parse. Instead of having to select the DFDL Schema and the data file each time from a file picker, a "launch configuration" can be created, which is a JSON description of the debugging session.
A launch configuration can be created using the Launch Wizard or done manually through the ./vscode/launch.json file
The launch wizard can be accessed two ways, either from the edit window when editing a DFDL schema file as shown below

Or it can be accessed through the Command Palette (Ctrl + Shift + P) and search for Configure launch.json

A new tab will be created with the Launch Config Wizard


Here you can create or edit Daffodil Debugger Config Settings
The drop down under Launch Config will allow you to create a new config and name it or you can select an already created config from the drop down.
The Daffodil Debugger Classpath is for additional classpaths that you would like the debugger to retrieve files from. Use ${workspaceFolder} for files in the VS Code workspace, and use absolute paths for files outside of the workspace.
Under the Data section, you can specify an absolute path to the data input file or leave it as a command and the debugger will ask you each time you run it.
The Debug Server specifies the port that the debug server should be running on.
The Infoset Format gives the user the ability to have their infosets generated as a XML or JSON format.
The Infoset Output Type gives the user the ability to specify a destination for their infoset file being a file placed at the path given by the user, printed out in console, or none for no output of an infoset.
The three checkboxes will open each of the additional views upon running the debugger, those are the
Hex View – Shows daffodil schema in a datafile-hex view
Infoset Diff View – Shows a side-by-side diff of the previous and current infoset file
Infoset View – Shows the infoset file being created in real time as the debugger runs
The TDML Action section allows the user to specify whether a TDML file should be generated, appended to the end of a previously created TDML file, or should not be created.
If set to generate or append, a TDML file name, description, and file path must be given.
Under Program, an absolute path can be given to the DFDL schema file leave it as a command and the debugger will ask you each time you run it.
The Stop On Entry checkbox will make the debugger automatically pause after launching. This allows the user to set breakpoints before running the file through.
The Trace checkbox enables the logging of the Debug Adapter Protocol.
Under Data Editor Settings, there is configurations for Omega Edit, here you can specify the port, log file location, and log level.
The Use Existing Server check box will enable a connection to a Debug Adapter Protocol (DAP) Server
Once all configurations have been completed, they can be saved and a launch.json file will be created.
-
Select
Run -> Open Configurationsfrom the VS Code menubar. This will load alaunch.jsonfile into the editor. There may be existingconfigurations, or it may be empty. -
Press
Add Configuration...and select theDaffodil Debug - Launchoption.
Once the launch.json file has been created it will look something like this
{
  "type": "dfdl",
  "request": "launch",
  "name": "Ask for file name",
  "program": "${command:AskForProgramName}",
  "stopOnEntry": true,
  "data": "${command:AskForDataName}",
  "infosetOutput": {
    "type": "file",
    "path": "${workspaceFolder}/infoset.xml"
  },
  "debugServer": 4711
}
This default configuration will prompt the user to select the DFDL Schema and data files. If desired, the "program" and "data" elements can be mapped specifically to the user's files to avoid being prompted each time.
📝 Note: Use ${workspaceFolder} for files in the VS Code workspace, and use absolute paths for files outside of the workspace.
{
  "type": "dfdl",
  "request": "launch",
  "name": "DFDL parse: My Data",
  "program": "${workspaceFolder}/schema.dfdl.xsd",
  "stopOnEntry": true,
  "data": "/path/to/my/data",
  "infosetOutput": {
    "type": "file",
    "path": "${workspaceFolder}/infoset.xml"
  },
  "debugServer": 4711
}Using the launch profile above a DFDL parse: My Data menu item at the top of the Run and Debug pane (Command-Shift-D) will display. Then press the play button to start the debugging session.
In the Terminal, log output from the DFDL debugger backend service will display. If something is not working as expected, check the output in this Terminal window for hints.
The DFDL Schema file will also be loaded in VS Code and there should be a visible marking at the beginning where the debugger has paused upon entry to the debugging session. Control the debugger using the available VS Code debugger controls such as setting breakpoints, removing breakpoints, continue, step over, step into, and step out.
-
Option 1:
- Open the DFDL Schema file to debug
- From inside the file open the Command Palette (Mac = Command+Shift+P, Windows/Linux = Ctrl+Shift+P)
- Once the command Palette is opened start typing
Daffodil Debug:- Option 1 =
Daffodil Debug: Debug File- This will allow for the user to fully step through the DFDL Schema. Once fully completed, it will produce an infoset to a file namedSCHEMA-infoset.xmlwhich it then opens as well. - Option 2 =
Daffodil Debug: Run File- This will run the DFDL Schema, producing the infoset to a file namedSCHEMA-infoset.xml.
- Option 1 =
-
Option 2:
- Open the schema file to debug
- Click the play button in the top right, two options will be provided:
- Option 1 =
Debug File- This will allow for the user to fully step through the schema (WIP). Once fully completed, it will produce a infoset to a file namedSCHEMA-infoset.xmlwhich it then opens as well. - Option 2 =
Run File- This will run the DFDL Schema, producing the infoset to a file namedSCHEMA-infoset.xmlwhich it then opens as well.
- Option 1 =
Find the infoset tools from the command menu (Mac = Command+Shift+P, Windows/Linux = Ctrl+Shift+P)
Find the hex view from the command menu (Mac = Command+Shift+P, Windows/Linux = Ctrl+Shift+P)
This version of the Apache Daffodil™ Extension for Visual Studio Code includes a new Data Editor. To use the Data Editor, open the VS Code command palette and select Daffodil Debug: Data Editor.

A notification message will appear that informs where the Data Editor will write its logs to. If problems happen, check this log file for clues.

Once the extension is connected to the server, the bottom left corner of the Data Editor shows the version of the Ωedit server powering the editor, and the port its connected to. Hovering over the filled circle shows the CPU load average, the memory usage of the server in bytes, the server session count, the server uptime measured in seconds, and the round trip latency measured in milli-seconds.

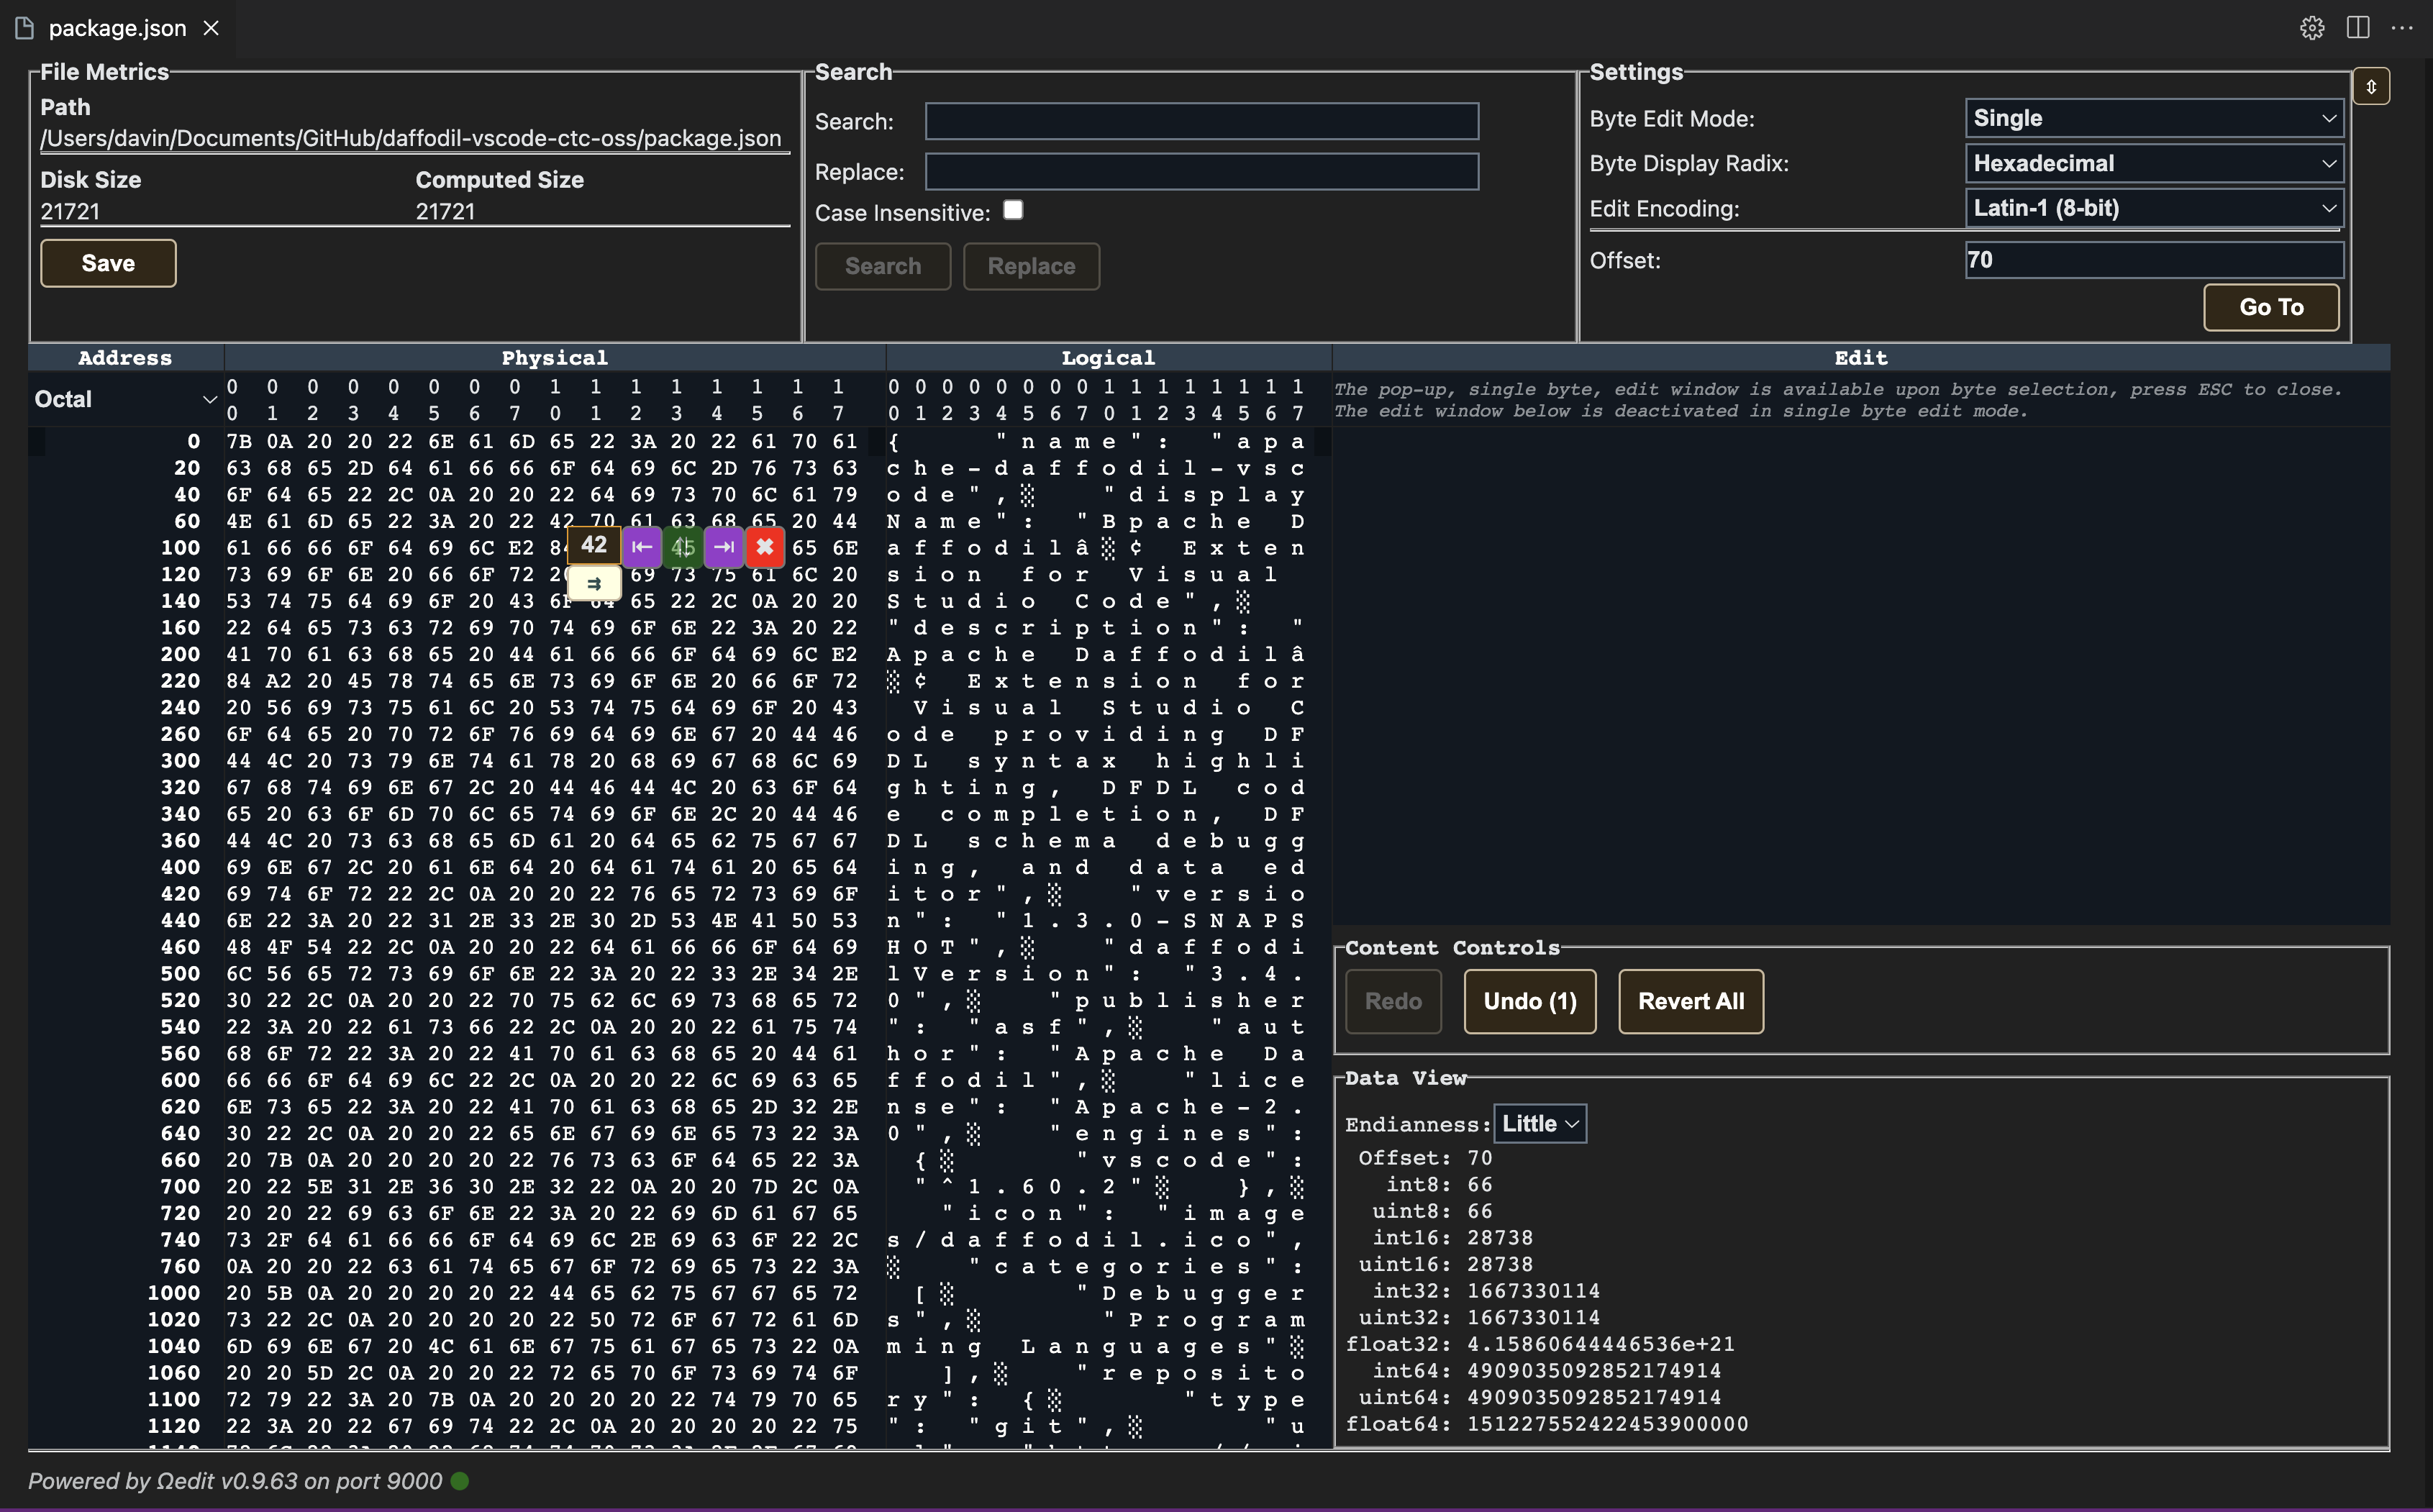
After selecting a file to edit, there will be a table with controls at the top of the Data Editor.

The first section of the table is called File Metrics and it contains the path of the file being edited, its initial size in bytes, and the size as the file is being edited. When changes are committed, the Save button will become enabled, allowing the changes to be saved to file.

The second section of the table is called Search, and it allows for Searching of byte sequences in the given Edit Encoding. If the Edit Encoding can be case-insensitive, a Case Insensitive checkbox will be displayed allowing for that option to be enabled. The found sequences can be examined using the Prev and Next buttons found in this section. Found sequences can also be replaced in the given Edit Encoding by filling in a replacement sequence. Currently all the sequences will be replaced.


The third section of the table is called Settings, and it allows for toggling the Byte Edit Mode from Single to Multiple.
In Single byte edit mode, individual bytes may be deleted, inserted (to the left or to the right of the selected byte), and overwritten in the Ephemeral Edit Window that appears when a byte in the Physical or Logical viewports is clicked. Mouseover the buttons of the Ephemeral Edit Window to determine what each button does. Mouseover the Input Box and it will show the byte offset position in the selected Address Radix. Buttons will become enabled or disabled depending on whether there is valid input in the Input Box or not. Values entered in the Input Box must match the format set by the byte display radix when editing bytes in the Physical viewport or be in Latin-1 (8-bit ASCII) format when editing bytes in the Logical viewport.

In Multiple byte edit mode, a segment of bytes is selected from either the Physical or Logical viewports, then the selected segment of bytes is edited in the Edit viewport using the selected Edit Encoding. Once editing of the selected segment is completed, the Commit button is pressed, and the edited segment replaces the selected segment

Byte addresses can be expressed in hexadecimal, decimal, or octal. The selected Address Radix is also what is used entering an offset into the Offset input. If an offset was entered in the Offset input and the Address Radix is changed, the offset will automatically be converted into the selected radix.


In Single byte edit mode, byte editing can be done in the Physical viewport, or the Logical viewport. The Physical viewport shows the bytes as they are stored in the file and can be represented in Hexadecimal, Decimal, Octal, or Binary depending on the Byte Display Radix. The Logical viewport always shows the bytes as Latin-1. The Data View shows the integer and floating point values of the bytes starting at the selected address. The values in the Data View will be expressed in the selected Endianness (Little or Big).


In Multiple byte edit mode, byte editing can only be done in the Edit viewport using a selection of bytes from the Physical or Logical viewports. The Edit viewport shows the bytes represented in Hexadecimal, Binary, ASCII, Latin-1, UTF-8, or UTF-16LE (UTF-16 Little Endian), depending on the Edit Encoding. Once the editing of that segment is done, the Commit button is pressed, and the edited segment replaces the selected segment in the Physical and Logical viewports.
Regardless of the Byte Edit Mode, changes can be Undoed and Redone using the Undo and Redo buttons. The Revert All button will revert all changes made to the file since it was opened in the Data Editor.


The Data Editor supports light and dark modes. The mode is determined by the VSCode theme. If the VSCode theme is set to a light theme, the Data Editor will be in light mode. If the VSCode theme is set to a dark theme, the Data Editor will be in dark mode.


Users can update the settings for the Data Editor using the launch config file (.vscode/launch.json). The way to add these settings is by doing something like:
{
    "version": "0.2.0",
    "configurations": [
        {
            ...
            "dataEditor": {
                "port": 9001,
                "logFile": "/tmp/dataEditor-9001.log",
                "logLevel": "debug"
            }
        }
    ]
}
If one or more of these items are not set, the items will be set to their default values. Below are the default values:
"dataEditor": {
    "port": 9000,
    "logFile": "${workspaceFolder}/dataEditor-${omegaEditPort}.log",
    "logLevel": "info"
}-
The current editing limit is 1,000,000 bytes. This is due to the amount of memory it takes to encode and display all the bytes in the viewports.
-
Only one Data Editor instance can be opened at one time.
-
Viewport selections do not persist when they lose focus. This is a limitation of implementing the display viewports using textarea elements.
-
Currently Replace will replace all instances of the given search pattern with the replacement pattern.
As of v1.3.0, this feature is minimally viable and will be improving over time. Expect these limitations to be removed in the next release.
📝 Note: The non-printable font being used (░) may appear different on different platforms and OS/font configurations.
To Generate a TDML file, use similar steps for Launching a DFDL Parse Debugging Session:
- Open the DFDL Schema file
- From inside the file, open the Command Palette (Mac = Command+Shift+P, Windows/Linux = Ctrl+Shift+P)
- Once the Command Palette is opened, select the
Daffodil Debug: Generate TDMLcommand - From there, you will be asked to provide the input data file, the TDML test case name, the TDML test case description, and the location/name for the TDML file.
Once the Daffodil Parse has finished, an infoset and a TDML file will be created. The TDML file contains relative paths to the DFDL Schema file, input data file, and infoset file. When creating an archive for these files, preserve the directory structure in the archive.
To Append a new test case to an existing TDML file, use similar steps for Generating a TDML file:
- Open the DFDL Schema file
- From inside the file, open the Command Palette (Mac = Command+Shift+P, Windows/Linux = Ctrl+Shift+P)
- Once the Command Palette is opened, select the
Daffodil Debug: Append TDMLcommand - From there, you will be asked to provide the input data file, the TDML test case name, the TDML test case description, and the TDML file
Once the Daffodil Parse has finished, an infoset will be created, and a test case will be added to the existing TDML file. The TDML test case name OR description can be shared between test cases, but no two test cases should share TDML test case names and descriptions. To create an archive for a TDML file with multiple test cases, the same guidelines for creating an archive from a TDML file created from a 'Generate TDML' operation should be followed. All DFDL schema files, input data files, the TDML file, and, optionally, the infosets should be added to the archive. Additionally, any directory structure should be preserved in the archive to allow for the relative paths in the TDML file to be resolved.
When running a zip archive created from another user, extract the archive into your workspace folder. If there is an infoset in the zip archive that you wish to compare with your infoset, make sure that the infoset from the zip archive is not located at the same place as the default infoset for the Daffodil Parse that will be run when executing a test case from the TDML file. This is because the Daffodil Parse run by executing the TDML test case uses the default location for its infoset and will overwrite anything that already exists there.
To Execute a test case from a TDML file, use the following steps:
- Open a DFDL Schema file
- From inside the file, open the Command Palette (Mac = Command+Shift+P, Windows/Linux = Ctrl+Shift+P)
- Once the Command Palette is opened, select the
Daffodil Debug: Execute TDMLcommand - From there, you will be asked to provide the TDML file, TDML test case name, and TDML test case description
A Daffodil Parse will then be launched. The DFDL Schema file and input data file to be used is determined by the selected test case in the TDML file. The infoset that is generated from this parse can optionally be compared to an infoset included in the zip archive the TDML file was extracted from.
A TDML file is comprised of Test Cases. Each test case describes a DFDL parse operation and points to the inputs and outputs of the DFDL parse operation. Inputs - DFDL Schema file and input data file Outputs - Infoset file
Additionally, each Test Case should be uniquely identified by the combination of its name and description. Currently, this is not enforced, and any duplications will never be selectable by the TDML Execute operation.
Below is a Sample TDML file with a single Test Case along with XPath expressions describing where each item can be found inside of a Test Case.
<?xml version="1.0" encoding="UTF-8" standalone="yes"?>
<ns1:testSuite xmlns:ns1="http://www.ibm.com/xmlns/dfdl/testData" xmlns:ns2="http://www.ogf.org/dfdl/dfdl-1.0/" xmlns:ns3="urn:ogf:dfdl:2013:imp:daffodil.apache.org:2018:ext" xmlns:ns4="http://www.ogf.org/dfdl/dfdl-1.0/extensions" xmlns:xs="http://www.w3.org/2001/XMLSchema" xmlns:ns6="urn:ogf:dfdl:2013:imp:daffodil.apache.org:2018:int" suiteName="Default Test Case" defaultRoundTrip="onePass">
  <ns1:parserTestCase name="Default Test Case" root="file" model="png.dfdl.xsd" roundTrip="onePass" description="Generated by DFDL VSCode Extension">
    <ns1:document>
      <ns1:documentPart type="file">di4zg8Kie.png</ns1:documentPart>
    </ns1:document>
    <ns1:infoset>
      <ns1:dfdlInfoset type="file">png-infoset.xml</ns1:dfdlInfoset>
    </ns1:infoset>
  </ns1:parserTestCase>
</ns1:testSuite>
/ns1:testSuite/ns1:parserTestCase/@model contains the relative path to the DFDL Schema file. This path is relative to the location of the TDML file
/ns1:testSuite/ns1:parserTestCase/@name contains the name of the Test Case
/ns1:testSuite/ns1:parserTestCase/@description contains a description of the Test Case
/ns1:testSuite/ns1:parserTestCase/ns1:document/ns1:documentPart/text() contains the relative path to the input data file. This path is relative to the location of the TDML file
/ns1:testSuite/ns1:parserTestCase/ns1:infoset/ns1:dfdlInfoset/text() contains the relative path to the infoset file created with the parameters of this test case. This path is relative to the location of the TDML file
If problems are encountered or new features are desired, create tickets here.
If additional help or guidance on using Daffodil and its tooling is needed, please engage with the community on mailing lists and/or review the archives.