This is the firmware for the Atreus keyboard.
Notice: this codebase should be considered deprecated; the recommendation going forward is to use the QMK firmware instead. However, this codebase is still of interest to people who want to read the codebase since it is much simpler and easier to understand than TMK, where the support for additional keyboards and many advanced features make the code difficult to read. The Menelaus firmware written in Microscheme may also be interesting.
This branch is specific to the Atreus variant that uses the
A-Star Micro. Earlier versions
used the Teensy 2; these should
use the teensy2 branch of this repository.
Only a handful of punctuation marks (and no digits) are available unshifted, and all the modifiers are on the bottom row:
 q     w     e     r     t       ||       y     u     i     o    p
 a     s     d     f     g       ||       h     j     k     l    ;
 z     x     c     v     b       ||       n     m     ,     .    /
esc   tab  super shift bksp ctrl || alt space  fn     -     '  enter
The numbers and most of the punctuation are on the fn layer with a numpad-style arrangement under the right hand:
 !     @     {     }     |       ||     pgup    7     8     9    *
 #     $     (     )     `       ||     pgdn    4     5     6    +
 %     ^     [     ]     ~       ||       &     1     2     3    \
L2  insert super shift bksp ctrl || alt space   fn    .     0    =
The L2 key switches it to the function layer, and tapping L0 here
brings it back to the first layer.
insert home up   end   pgup      ||      up     F7    F8    F9   F10
 del   left down right pgdn      ||     down    F4    F5    F6   F11
                                 ||             F1    F2    F3   F12
           super shift bksp ctrl || alt space   L0             reset
If you want easier access to the arrow keys, you can try the
qwerty_alt layout, which puts them on the fn layer:
 !    @     up     {    }        ||     pgup    7     8     9    *
 #  left   down  right  $        ||     pgdn    4     5     6    +
 [    ]      (     )    &        ||       `     1     2     3    \
L2  insert super shift bksp ctrl || alt space   fn    .     0    =
Further alternate layouts are included; see "Customizing Layout" below for making your own.
- colemak
- softdvorak (assumes the OS is set to dvorak, and shuffles punctuation accordingly)
- hardwaredvorak (lets you type in dvorak even if the OS is set to qwerty)
- multidvorak (combines softdvorak and hardwaredvorak)
On Debian-based systems:
$ sudo apt-get install avrdude gcc-avr avr-libc
Some linux-based systems will need a udev rule to grant permissions to the USB device for uploading firmware.
$ sudo make udev
On Mac OS X with Homebrew:
$ brew tap osx-cross/avr
$ brew install avr-libc
$ brew install avrdude --with-usb
If you don't want to use Homebrew you can instead download Crosspack for AVR.
Run make upload with the keyboard plugged in, and then activate the
bootloader with reset (see below). Depending on your OS, it may expose
the USB device somewhere other than the default of /dev/ttyACM0; if
so you can run make upload USB=/dev/cu.usbmodem1411 etc. If you idle
in the bootloader for 8 seconds without uploading, the controller will
exit the bootloader and return to normal operation.
If the upload does not complete, check the permissions on the USB
device and ensure it's writeable by your user. You may need to run
sudo make udev on some Linux-based systems to install a udev rule if
the permissions aren't right.
You can identify the USB device like so:
$ ls /dev > /tmp/dev-off # run this while the device is unplugged
$ ls /dev > /tmp/dev-on # run this while the device is in bootloader mode
$ diff /tmp/dev-off /tmp/dev-on
To use another C layout, copy it to layout.h; for example cp multidvorak.h layout.h.
Usually you won't be able to upload the firmware from a virtualized
OS; the virtualization interferes with the USB connection. However,
you can compile the .hex file on a virtualized OS and take the hex
file to a physical host and upload it with avrdude without
installing the full compiler toolchain.
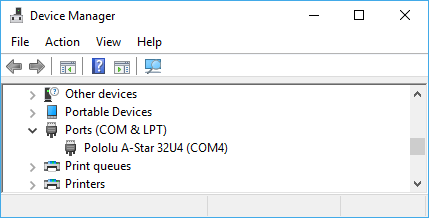
Start by installing the A-Star drivers, as documented by Pololu. Once the driver is installed and the device is plugged in, you can determine the correct port setting by resetting the controller and looking at the "Ports (COM & LPT)" section of the Windows Device Manager; it should show up as "Pololu A-Star Micro 32U4" if you check within 8 seconds of initiating a reset.
You can install the whole development toolchain using
WinAVR to compile using make upload [...] with the instructions above.
However, if the whole compiler setup is too complicated, it's also possible to download a precompiled firmware containing the default layout and uploading it with the simpler AVRDUDESS.
These are the steps to using AVRDUDESS:
- pick "avr109" as the programmer
- select "ATmega32u4" from the MCU section in the upper left
- select the port in the upper left as found in the device manager
- choose the .hex file you downloaded in the "flash" section
- reset the microcontroller so that the LED is gently pulsing
- press "go" under "flash"
If you've already got the firmware loaded on the controller, you
should have a key bound to reset; typically this is activated by
jumping to layer 2 (fn+ESC) and then hitting enter.
If your board has never before had
the firmware uploaded, you will
have to hard reset by connecting the RST pin to ground twice in
under a second to jump to the bootloader. (This requires removing the
back panel.) For older models, RST and ground are exposed with
hookup wire poking out of the bottom of the board, but for newer
models they are the sixth and seventh pin down on the right-side row
of microcontroller pins. For first-time uploads, hit reset before
running make upload.
If you are hacking the lower-level logic of the firmware, the reset
key might not be reachable (due to bugs in layer functionality, etc)
and you will have to initiate a manual reset as per above with the RST pin.
Sometimes it can be tricky to get the timing right with the hard reset; it can take a few attempts when you are first uploading the firmware to a fresh board.
This is the pinout for the PCB-based Atreus using an A-Star microcontroller. (Mark 3 onwards.) The Teensy 2 variants use a different pinout.
Outputs:
|------------+----+----+----+----|
| row number |  0 |  1 |  2 |  3 |
|------------+----+----+----+----|
| pin number | D0 | D1 | D3 | D2 |
|------------+----+----+----+----|
Inputs:
|---------------+----+----+----+----+----+----+----+----+----+----+----|
| column number |  0 |  1 |  2 |  3 |  4 |  5 |  6 |  7 |  8 |  9 | 10 |
|---------------+----+----+----+----+----+----+----+----+----+----+----|
| pin number    | B7 | B6 | F7 | F6 | B6 | D4 | E6 | B4 | B5 | C6 | D7 |
|---------------+----+----+----+----+----+----+----+----+----+----+----|
If you soldered the PCB in upside down, never fear! This can be fixed
in the firmware without removing the switches and resoldering. Simply
run make SWAPCOLUMNS=yes USB=... to use a reversed pinout
configuration. A
pre-compiled firmware
with the columns swapped is also available. You may need to run make clean before using this option.
Layouts in C are arrays of integers. For basic key presses, use the
keycodes defined in usb_keyboard.h. For modified key presses use the
CTRL(), SHIFT(), ALT() and GUI() macros from atreus.c. These
may be stacked for holding down multiple modifiers together. Layouts
can also include references to functions to execute. Place a void
function pointer in the layout_functions array and use the
FUNCTION() macro providing the index of the function, and that
keypress will cause the function to be invoked.
The layouts pointer should be set to an array of layouts. Every scan
through the keyboard matrix will set the current layout to the
current_layout_numberth element of the layouts array. To make a
keybinding that changes the current layout use the LAYER() macro.
However, most functions will be called the final pass where each
keypress is looked up in the currently active layout. That means if
you have a function that changes the current layout, it needs to run
sooner so it can affect regular keycode lookups. The PRE_FUNCTION()
macro will trigger functions that run on a separate pre-invoke pass
before the rest of the keycodes are looked up, so this is how
layer-changing functions should be defined. There is also a
per_cycle function you can define which will run once per completed
scan.
Since the microcontroller has a limited number of pins, the switches are wired in a matrix where each has its positive contact connected to those in the same row and its negative contact wired in with those above and below it. Reading the state of the switches can only happen a row at a time: a single row (output) pin is brought low, and all the column inputs are read. Any of them that read low are recorded as a keypress. Low voltage is used to for pressed keys because each input pin has a built-in pullup resistor.
However, because of the electrical properties of switches, it's necessary to go through a debouncing process as the switches settle. This means taking a few scans over the matrix and waiting until you get N successive reads of the same state before counting any single keypress or release as legitimate.
There seem to be issues with avrdude uploading the firmware from Ubuntu 14.04.
Occasionally there are issues when switching layers that a key pressed in one layer briefly sends a keycode for the layer you're switching to.
Copyright © 2014-2016 Phil Hagelberg and contributors
Released under the GNU GPL version 3.