laser not burning #299
Comments
|
@murph1480 check PWM params. After update my cnc to 1.1f grbl I checked the same stuff. Problem was in PWM value. For old siftware there are about 200 for max power, after update 6000. laser 12 V 2.5 W |
|
K. How do I go about finding that?? I'm literally brand new to this
…On Mar 14, 2018 15:48, "vovpff" ***@***.***> wrote:
@murph1480 <https://github.com/murph1480> check PWM params. After update
my cnc to 1.1f grbl I checked the same stuff. Problem was in PWM value. For
old siftware there are about 200 for max power, after update 6000. laser 12
V 2.5 W
—
You are receiving this because you were mentioned.
Reply to this email directly, view it on GitHub
<#299 (comment)>,
or mute the thread
<https://github.com/notifications/unsubscribe-auth/AjlN2h1q_w0RgET9RXfoZpoAE81IyZIsks5teZAagaJpZM4SnR-Y>
.
|
|
@murph1480 S-MIN and S-MAX |

|
I suggest to configure grbl $30 to 255 and $31 to 0 then use S-MIN S-MAX as 0-255 See: #285 |
|
Awesome I'll try that once I get the right firm ware set. After I updated
to 1.1 I've lost all commands.
Grbl controller shows alarm instead of port opened. The laser software
shows zero commands for the cnc settings. Not sure why the updated hex file
isn't installing the machine control settings I'll follow up with a photo
of the software I have for my cnc
. I'm wondering if I have the wrong software
…On Mar 15, 2018 03:55, "arkypita" ***@***.***> wrote:
I suggest to configure grbl $30 to 255 and $31 to 0 then use S-MIN S-MAX
as 0-255
https://github.com/gnea/grbl/wiki/Grbl-v1.1-Configuration#
30---max-spindle-speed-rpm
#285 <#285>
—
You are receiving this because you were mentioned.
Reply to this email directly, view it on GitHub
<#299 (comment)>,
or mute the thread
<https://github.com/notifications/unsubscribe-auth/AjlN2rBnHw5tOxODUCQFnRCoMwm_SG5cks5tejqMgaJpZM4SnR-Y>
.
|
|
@murph1480 type After that you can change parameters by typing |
|
I did all the changes you suggested and it's still not burning. I'm running
a program right now and nothing. I'm wondering if my circuit board is not
working
…On Mar 16, 2018 01:30, "vovpff" ***@***.***> wrote:
@murph1480 <https://github.com/murph1480> type $$ in console. I must
receive message like this:
$0=10 (step pulse, usec)
$1=25 (step idle delay, msec)
$2=0 (step port invert mask:00000000)
$3=5 (dir port invert mask:00000101)
$4=0 (step enable invert, bool)
$5=0 (limit pins invert, bool)
$6=0 (probe pin invert, bool)
$10=3 (status report mask:00000011)
$11=0.010 (junction deviation, mm)
$12=0.002 (arc tolerance, mm)
$13=0 (report inches, bool)
$20=0 (soft limits, bool)
$21=0 (hard limits, bool)
$22=0 (homing cycle, bool)
$23=0 (homing dir invert mask:00000000)
$24=25.000 (homing feed, mm/min)
$25=500.000 (homing seek, mm/min)
$26=250 (homing debounce, msec)
$27=1.000 (homing pull-off, mm)
$100=800.000 (x, step/mm)
$101=800.000 (y, step/mm)
$102=800.000 (z, step/mm)
$110=5000.000 (x max rate, mm/min)
$111=5000.000 (y max rate, mm/min)
$112=500.000 (z max rate, mm/min)
$120=50.000 (x accel, mm/sec^2)
$121=50.000 (y accel, mm/sec^2)
$122=10.000 (z accel, mm/sec^2)
$130=200.000 (x max travel, mm)
$131=200.000 (y max travel, mm)
$132=200.000 (z max travel, mm)
After that you can change parameters by typing $xxx=yyy. xxx - number of
parameter. yyy must be adjusted for your CNC machine.
—
You are receiving this because you were mentioned.
Reply to this email directly, view it on GitHub
<#299 (comment)>,
or mute the thread
<https://github.com/notifications/unsubscribe-auth/AjlN2kd-3fNi0sKVaPYJr1k-LQTV0Q4Yks5te2odgaJpZM4SnR-Y>
.
|
|
@murph1480 unplug laser module and check voltage at connector pins. |
|
You should have a command such as $30 and $31 to enable laser mode |
|
Still not burning after that command. It seems to be the firmware that's
causing the issue. 0.9 and 1.1
…On Mon, Mar 26, 2018, 06:13 Icemanhpg, ***@***.***> wrote:
You should have a command such as $30 and $31 to enable laser mode
—
You are receiving this because you were mentioned.
Reply to this email directly, view it on GitHub
<#299 (comment)>,
or mute the thread
<https://github.com/notifications/unsubscribe-auth/AjlN2s3ke6RgytqkK53UJ_nkNSHviFNIks5tiNtggaJpZM4SnR-Y>
.
|
|
Did you change your pin layout after changing to 1.1? The signal pin should be D11 now. |
|
No.
I'm lost on all of this. As I'm not using the arduino board. It's the
woodpecker 0.9 grbl control board.
…On Mon, Mar 26, 2018, 10:06 Icemanhpg, ***@***.***> wrote:
Did you change your pin layout after changing to 1.1? The signal pin
should be D11 now.
—
You are receiving this because you were mentioned.
Reply to this email directly, view it on GitHub
<#299 (comment)>,
or mute the thread
<https://github.com/notifications/unsubscribe-auth/AjlN2rjGMKhGgKbgUL7J7ZPAaem44BD5ks5tiRIIgaJpZM4SnR-Y>
.
|
|
Doesnt matter which board it is.. If it uses GRBL you will have to flash the Arduino Board. It is like upgrading your windowas software. doesnt matter which computer it is is till needs to be upgraded. |
|
K and I keep trying to do that with the newest hex file through xloader and
then It literally has no settings. So I must be missing a step
…On Mon, Mar 26, 2018, 10:36 Icemanhpg, ***@***.***> wrote:
Doesnt matter which board it is.. If it uses GRBL you will have to flash
the Arduino Board. It is like upgrading your windowas software. doesnt
matter which computer it is is till needs to be upgraded.
—
You are receiving this because you were mentioned.
Reply to this email directly, view it on GitHub
<#299 (comment)>,
or mute the thread
<https://github.com/notifications/unsubscribe-auth/AjlN2i7G-DMqrR-KI6wkEnHvFIIlTjMlks5tiRj-gaJpZM4SnR-Y>
.
|
|
Would you be able to send me a step by step process??
…On Mon, Mar 26, 2018, 10:42 Robert Drewniak, ***@***.***> wrote:
K and I keep trying to do that with the newest hex file through xloader
and then It literally has no settings. So I must be missing a step
On Mon, Mar 26, 2018, 10:36 Icemanhpg, ***@***.***> wrote:
> Doesnt matter which board it is.. If it uses GRBL you will have to flash
> the Arduino Board. It is like upgrading your windowas software. doesnt
> matter which computer it is is till needs to be upgraded.
>
> —
> You are receiving this because you were mentioned.
> Reply to this email directly, view it on GitHub
> <#299 (comment)>,
> or mute the thread
> <https://github.com/notifications/unsubscribe-auth/AjlN2i7G-DMqrR-KI6wkEnHvFIIlTjMlks5tiRj-gaJpZM4SnR-Y>
> .
>
|
|
https://github.com/grbl/grbl/wiki/Flashing-Grbl-to-an-Arduino . It is all explained in the link |
|
All your settings will have to be configured from scratch. So make a note or simply a screenshot. I do not have the current stock settings at hand. |
|
K. Thank You for the link.
So when they have to come from scratch I haven't been able to figure out
how or where to input the controller settings.
So that's where I'm getting lost.
I'm 100% new to all of this so it's all brand new to me.
…On Mon, Mar 26, 2018, 10:47 Icemanhpg, ***@***.***> wrote:
All your settings will have to be configured from scratch. So make a note
or simply a screenshot. I do not have the current stock settings at hand.
—
You are receiving this because you were mentioned.
Reply to this email directly, view it on GitHub
<#299 (comment)>,
or mute the thread
<https://github.com/notifications/unsubscribe-auth/AjlN2rDqkaPMKGA0UM6CObriAJE5ctkLks5tiRuNgaJpZM4SnR-Y>
.
|
|
After you have flashed the Arduino . You can open lasergrbl, Connect to the arduino using the usb connection at 115000 Baud, and in the command line type in $$. This will show you all the command lines. Input your values here. by typing " $+ line number you want to change = and input new value then press enter.you have succesfully updated a value. Do it with all the values that have changed. Then pay attention to values $31 and $32. These are the ones that enable laser mode. Read Arkypita notes on changing these values. Hope this helps |
|
One more info: between 0.9 and 1.1 the grbl team decide to change the pwm base frequency from 8khz to 1khz. This should be not a problem, but some user has reported issues with their laser driver that doesnt work well with lower freq |
|
@murph1480 usually woodpecker board can't be upgraded correct because Chinese guys make some safety tricks.
I have CNC 3018 and only this actions helps me for updating GRBL with correct parameters |
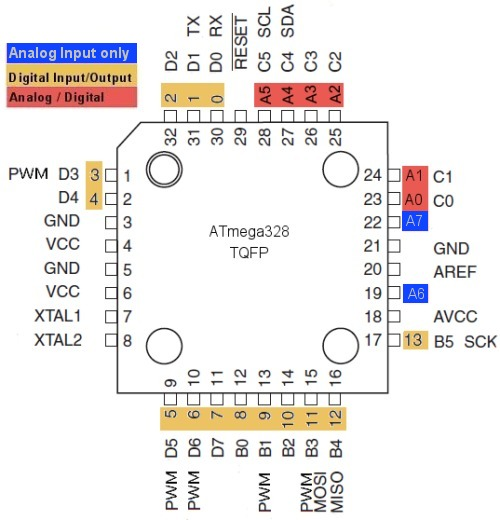
@vovpff really? what safety tricks they made to make this procedure so difficult?! In my opinion the only safety trick could be the lack of arduino bootloader, so you cannot reprogram the chip using usb-serial programmer, but if you solder 6 wire-wrap wires to the atmega (GND, VCC, RESET, SCK, MOSI, MISO) on woodpecker board, you can add an ICSP connector and use ICSP programming. https://www.arduino.cc/en/Tutorial/ArduinoISP
|

From: https://www.youtube.com/watch?v=kJRy3_heliQ
|

|
@arkypita thanks for your solutions but i tried them without result. Greatest for me was replacement of atmega chip. 2$ and 15 minutes |
question regarding the moski 3018 cnc.
I am new to this game and do not have the best computer skills so please keep that in mind as I need to be talked to in Lameman terms.
I have used the laser on 1 project thus far successfully. however after that project was finished the system stopped responding. so I re-freshed the software and reloaded the driver. success the machine is responding properly again. except the g code movements have shifted to mirror commands. left button moves the table right.... ETC. and the laser will turn on but does not burn now, no matter how I focus it I cannot even get it to burn a piece of paper. all of this took place after downloading and installing GRBL 1.1
ive tried searching everywhere on the net for this particular model and how to trouble shoot and much to my dismay I cannot find any assistance other than on here, and being inept to the technical side of computer issues I am lost
anyone able to help me out in the easiest form of assistance??
Murph
The text was updated successfully, but these errors were encountered: