This repository contains a description and solutions for creating a simple automated green garden system.
- 🌐 General Information
- 🛠 Hardware Setup
- 💻 Software Setup
- 🚀 Start-up
- ⚙ Configuration
- 📌 Additional Information
- 💡 Project Genesis
- 🔍 Improvement Concepts
- 📩 Contact
The project aims to create a simple, cost-effective, and accessible system for automatic monitoring and control of the microclimate for plant cultivation in homes or backyard greenhouses. The system is designed to use inexpensive and readily available components. The current version of the system and software allows for data collection from individual sensors such as soil moisture, light intensity, and air temperature and humidity. The system enables climate control through the activation of specific actuators directly affecting the environment/microclimate of the cultivation - the decision-making process uses the collected data applying appropriate data filtering mechanisms. The system allows data accumulation in the InfluxDB database, facilitating easy integration with the 'Grafana' tool for visualizing the collected data.
The hardware configuration should be adjusted according to individual needs
- Central unit: Raspberry Pi
- MicroSD card: Samsung EVO Plus 128 GB A2 V30
- Relays: Relay module
- Air temperature and humidity sensor: DHT11 [HW-036A]
- Light intensity sensor: GY-30 [BH1750FVI]
- Soil moisture sensor (analog - resistive)
- ADC converter: ADS1115
- Step-Down Converter: LM2596
- Power supply: HKW-150-12 (12 V, 150 W)
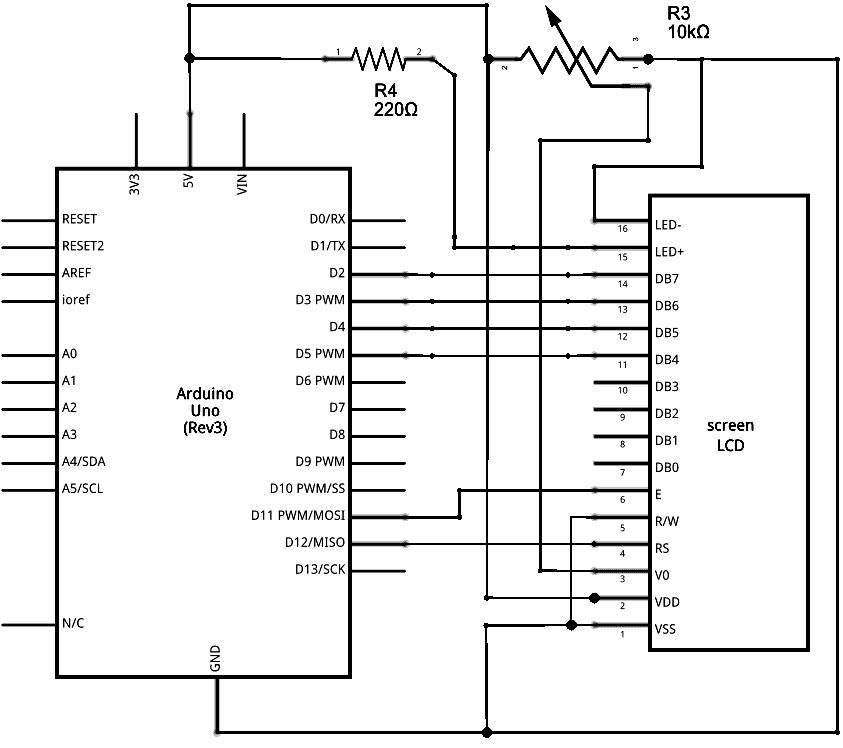
- Display Module: Arduino UNO + 2x16 LCD Display (ADDITIONAL MODULE)
All components of the central unit, such as sensors, actuators, power, etc., should be connected according to the following diagram:

The display module is an optional element connected to the central unit via a USB serial interface, which powers the module and facilitates communication with the central unit.
The Arduino UNO should be connected to the display as per the following diagram:
- Ubuntu 22.04
- Python
- InfluxDB (Optional)
- Grafana (Optional)
- C++
- Install the Ubuntu 22.04 operating system on the Raspberry Pi device (Core version recommended).
- On the Raspberry Pi, install Python version 3.10:
sudo apt update && sudo apt install python3.10 - Install the required libraries listed in the
requirements.txtfile. - Optionally - Install and configure the InfluxDB database and Grafana
(w plikuGrafanaPanelExample.jsonumieszczono przykładową konfigurację panelu grafany).
- Download ArduinoIDE
- Connect the Arduino UNO device to the computer using a USB serial interface.
- Upload the
ArduinoDisplayModule.inofile using ArduinoIDE
- Clone the repository:
git clone https://github.com/arturklimek/smart-green.git - Start the software:
python3 ./main.py
It is recommended to run the software as a system service by creating and deploying an appropriate .service file.
NOTE: Operating the system in harsh conditions requires the development and application of a suitable enclosure and protection for the system components.
The default configuration includes four types of sensors (one of each), three actuators, and three controllers.
Adjust the software configuration to your needs by modifying the config.yaml file.
- The
influxdbsection contains information on the InfluxDB database used for storing sensor data:host- the database server address (default:localhost)port- the database port (default:8086)username- the username used for writing data (default:garden_core_user)password- the password used for writing datadatabase- the name of the database (default:garden)
- The
sensorssection lists the sensors and their configuration, each containing:name- a unique name for each sensortype- the type of sensor, options include:TemperatureSensor,HumiditySensor,SoilMoistureSensor,LightSensorparams- the sensor's configuration parametersread_frequency- the data collection frequency in secondspin- the GPIO pin designation (forTemperatureSensororHumiditySensoronly)i2c_address- the I2C address of the sensor (forSoilMoistureSensororLightSensoronly)
- The
actuatorssection lists the actuators and their configuration, each containing:name- a unique name for each actuatortype- a unique name for each actuator:BaseActuatorparams- the actuator's configuration parametersgpio_pin- the GPIO pin used for controlling the actuatorinitial_state- the initial state of the actuator, eitherTrueorFalse
- The
controllerssection lists the controllers and their configuration, each containing:type- the type of controller, options include:IrrigationController,VentilationController,LightingControllersensors- the list of sensors whose data are used to control the actuator, each identified by the sensor's name and containing its configuration:threshold- the value at which the actuator is activatedcomparison- determines whether activation is triggered by exceeding the value upwards or downwards, options:HIGHERlubLOWER
actuator- specifies the actuator controlled by the controller, identified by its unique nameparams- the controller's configuration parameterscheck_interval- the frequency of controller operation in secondscooldown_period- the minimum time in seconds that must elapse between activationspump_flow_rate- the flow rate of the pump in liters per hour, needed to calculate activation time (forIrrigationControlleronly)water_volume- the desired amount of water to be pumped during one irrigation session (forIrrigationControlleronly)max_lift_height- the maximum lifting height of the pump [optional] (forIrrigationControlleronly)current_lift_height- the current lifting height of the pump [optional] (forIrrigationControlleronly)activation_time- the duration in seconds for which the actuator should be activated upon reaching the trigger conditionstart_hour- the start hour of the period during which the controller operates upon exceeding the trigger threshold (mainly forLightingController)end_hour- the end hour of the period during which the controller operates upon exceeding the trigger threshold (mainly forLightingController)
The program has a built-in logging mechanism; in case of operational issues, debugging the software by analyzing the entries saved in the ./logs directory is recommended.
The project was initiated and designed as part of an engineering thesis. The system was built using physical components and was tested. The entire process of designing and creating the basic version of the system is detailed in the engineering thesis, titled 'Automatic garden control and monitoring system - designing and implementing a system, intelligent garden management tools.'
During the project development, a prototype was created, and test data were collected under real usage conditions. The collected data underwent thorough analysis, leading to the implementation of data filtering mechanisms in the software, including anomaly detection and appropriate decision-making mechanisms based on average values. In the project development process, the test data were also compared with external sources, highlighting the importance of proper sensor placement and protection against external atmospheric influences.
- Development of an enclosure for the system
- Development of proper sensor placement
- Protection of the soil moisture sensor against excessive corrosion
- Introduction of support for a wider variety of sensors
- Introduction of support for multiple sensors of the same type and the ability to make decisions based on data from a group of sensors
- Implementation of power supply from a 230V installation/emergency power supply + solar panel power
We welcome contributions to our project. If you have suggestions or improvements, please fork the repository and submit a pull request.
For support or collaboration, please contact us at artur@aklimek.com.