Zero Touch Provisioning (ZTP) Workflow
This workflow ZTP Solution will configure all access Switches in a branch.
- DHCP Server with option 144 enabled
- TFTP Server with base configuration for switches
In this setup first, each ArubaOS-Switch will receive a base configuration via a DHCP and TFTP Server. Then execute the ztp_start.yml Playbook.
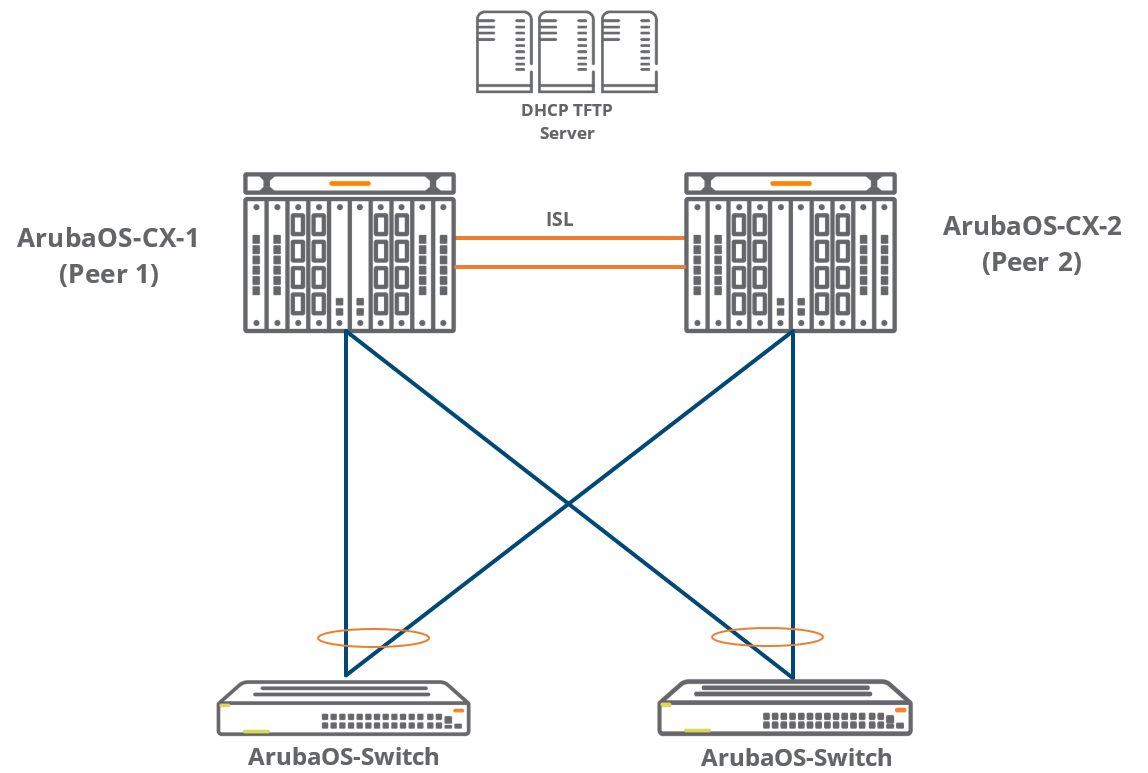
This workflow helps to bring up factory default ArubaOS-Switches connected to fully configured ArubaOS-CX switches. 2 ArubaOS-CX aggregation/core switches are in VSX pair and fully configured. ArubaOS-CX-1 (Peer1 in VSX Pair), will have a downstream access port where the ArubaOS-Switch will connect to. Immediately after connecting to CX pair, ArubaOS-Switch will get base configuration using DHCP option 144. Connections get established and its ready to deploy using Ansible Playbook. Ansible will query ArubaOS-CX-2 for LLDP info, get the ArubaOS-Switch’s DHCP IP address and connect to the switch for further configuration to reach a desired final state.
Before the Ansible playbook will be executed, the environment is in this initial state:
- ArubaOS-CX-1 (Peer1): Has a full configuration including VSX, VLANs, and MCLAG interfaces. Downstream port connected to the ArubaOS-Switch is tagged on a VLAN to receive DHCP address. ArubaOS-CX-1 also has an ISL Link with ArubaOS-CX-2.
- ArubaOS-CX-2 (Peer2): Has a full configuration including VSX, VLANs, and MCLAG interfaces. Downstream port connected to the ArubaOS-Switch is a part of MCLAG. ArubaOS-CX-2 also has an ISL Link with ArubaOS-CX-1.
- Each factory default ArubaOS-Switch will go through the following:
- Initially the switch connects to both CX pairs.
- Switch receives a DHCP IP address through ArubaOS-CX-1
- DHCP option 144 redirects switch to TFTP server
- Switch receives base configuration which has uplink interfaces connected to CX core as trunk ports and reboots.
- The switch will receive a DHCP IP address.
Workflow
Once the ArubaOS-Switch receives the base config and DHCP IP address, the Ansible playbook ztp_start.yml is ready to execute the following steps:
- Ansible playbook will query ArubaOS-CX-2 (Peer2) LLDP information and find mac addresses that match ArubaOS-Switch devices in Ansible Inventory. Once a match is found, save the temporary DHCP IP of each ArubaOS-Switch.
- The Playbook will connect to the temporary IP of each of the Switch for further configuration:
- Login to the ArubaOS-Switch, generate a self-signed certificate, configure admin user and password, enable REST and HTTPS.
- Change Hostname and IP of ArubaOS-Switch to a designated static IP
- Logout of ArubaOS-Switch
- Login to ArubaOS-CX-1 (Peer1)
- Change Downstream Interface to ArubaOS-Switch Description and then change Downstream Interface of ArubaOS-Switch from tagged VLAN access to a member of designated MCLAG
- Logout of ArubaOS-CX-1
Set up your inventory as described in Project Inventory Set Up. Ensure your variables for peer1 and peer2 in the group variable file branch1.yml match the name of the corresponding Peer1 and Peer2 host variable files in your environment. Peer1 is ArubaOS-CX-1 in the VSX Pair and Peer2 is ArubaOS-CX-2.
- Run via: "ansible-playbook ztp_start.yml -e site=branch1" (Assuming current directory is "aruba-switch-ansible" and all pre-configurations have taken place)