This sample demonstrates the following use cases:
- Export requests with their service groups schedule interval, reoccurring interval and their jobs, status.
- Get data list of a complete job
- Get data content and render dashboards. Current version only demos some dashboards of with ACC or BIM360 Issue data. You can extend the sample with dashboards for other data.
- Create new request with any type of schedule interval and service groups.

- APS Account: Learn how to create a APS Account, activate subscription and create an app at this tutorial.
- BIM 360 /ACC Account: must be Account Admin to add the app integration. Learn about provisioning.
- BIM 360 / ACC Data Connector: Ensure Account Insight is available and the user is Account Executive. Check product help for more

- Node.js: basic knowledge with Node.js.
- JavaScript basic knowledge with jQuery, Chart.js and other basic
- ngrok: Routing tool, download here

For using this sample, you need an Autodesk developer credentials. Visit the APS Developer Portal, sign up for an account, then create an app. For this new app, use http://localhost:3000/oauth/callback as Callback URL. Finally take note of the Client ID and Client Secret.
Install NodeJS, version 12 or newer. The older version of Node.js may also work, but not tested..
Clone this project or download it (this nodejs branch only). It's recommended to install GitHub desktop. To clone it via command line, use the following (Terminal on MacOSX/Linux, Git Shell on Windows):
git clone https://github.com/autodesk-platform-services/aps-data-connector-dashboard
Install the required packages using npm install.
ngrok
Run ngrok http 3000 -host-header="localhost:3000" to create a tunnel to your local machine, then copy the address into the APS_WEBHOOK_URL environment variable.
Environment variables
Set the enviroment variables with your APS client id & secret, APS callback url (to get 3-legged token from user logging) and Data Connector callback url (DC_CALLBACK_URL). Callback of Data Connector API is one payload parameter when creating one Data Connector Request. It will will trigger when a job completes, or fails, telling the request id, job id etc. You can decide what you want to do with the sample, or with your own sample. Via command line, navigate to the folder where this repository was cloned and use the following:
Mac OSX/Linux (Terminal)
npm install
export APS_CLIENT_ID=<<YOUR CLIENT ID FROM DEVELOPER PORTAL>>
export APS_CLIENT_SECRET=<<YOUR CLIENT SECRET>>
export APS_CALLBACK_URL=<<your callback url of APS e.g. http://localhost:3000/oauth/callback>>
export DC_CALLBACK_URL=<<"your ngrok address here: e.g. http://abcd1234.ngrok.io/job/callback">>

npm start
Windows (use Node.js command line from Start menu)
npm install
set APS_CLIENT_ID=<<YOUR CLIENT ID FROM DEVELOPER PORTAL>>
set APS_CLIENT_SECRET=<<YOUR CLIENT SECRET>>
set APS_CALLBACK_URL=<<your callback url of APS e.g. http://localhost:3000/oauth/callback>>
set DC_CALLBACK_URL=<<"your ngrok address here: e.g. http://abcd1234.ngrok.io/job/callback">>
Set Socket host at client side Define the socket endpoint same to your host at this line, e.g.
socketio = io('http://localhost:3000');
Finally run the script to start the sample
npm start
OR, set environment variables of launch.json for debugging.
"env": {
    "APS_CLIENT_ID": "your id here",
    "APS_CLIENT_SECRET": "your secret here",
    "APS_CALLBACK_URL": "http://localhost:3000/oauth/callback",
    "DC_CALLBACK_URL": "your ngrok address here: e.g. http://abcd1234.ngrok.io/job/callback"
},-
Open the browser: http://localhost:3000. Please watch the Video for the detail and usage the steps.
-
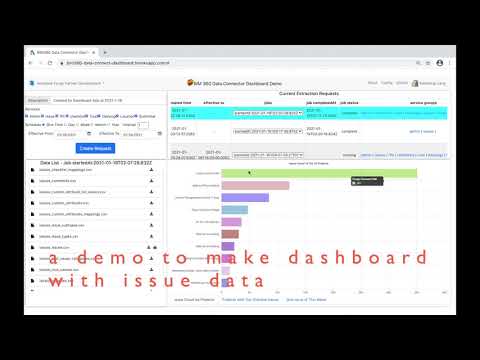
After the user logging succeeds, select a hub. The code will start to extract all requests, and display them in table view. It will show the basic information of the request such as their service groups, schedule interval, reoccurring interval and their jobs, status.
-
If the request is ONE_TIME, it has only one job. If other types, it may have jobs list, select specific job, the status column will indicate if it completes or not.
-
Click one request, the sample will get data list of the selected job of this request. All the data files will be listed in Data List view. It depends on how many service groups that are extracted. Click download icon of the file, it will download the file (csv) to local.
-
To demo the data analysis, this sample produces dashboards with Issue data, so there is another icon ** tachometer** with Issues-Issues.csv. Click this icon, it will generate some dashboards with Issue data. Since some issue data is Id only (such as project id, user id), the code behind actually takes advantage of Admin data.
-
To create a new request, configure the service groups, schedule interval, reoccurring interval, and execute from date, and end date (if schedule interval is not ONE_TIME). Click Create Request button, it will create a new request and refresh the table view.
-
At the beginning right after a new request is created, no job yet. So the job list is empty. Since the job of ONE_TIME will start immediately, the sample will poll status of job list. When it is available, it will notify client side by socket, and refresh the job list of table view. As to other type than ONE_TIME, the execute start time may not happen soon, so the sample does not check job list. The user will have to click hub after some time, depending on when the execute start time will be.
To deploy this application to Heroku, the Callback URL for APS must use your .herokuapp.com address. After clicking on the button below, at the Heroku Create New App page, set your Client ID, Secret and Callback URL for APS.

- The sample also place a hold with Callback feature of Data Connector API. The callback will triggered when a job completes, or fails. You can decide what you want to do with the sample, or with your own sample.
- DC API supports 3-legged token only. And the user must have Admin Executive permission.
- DC API supports callback to get notification when one job is done, in which it will tell request id and job id.
- Extracted data is stored on AWS for 30 days. If you do not want to extract the data of specific time again, ensure to download the data to your own database within 30 days.
- When a request is newly created, it may take a few minutes API could return the jobs list.
- Be careful not to set effectiveFrom, effectiveTo to the past time when you create request.
- If a request is created in UI (Insight>>Data), the default description will be IQ Data Extraction for . To make a shorter string in table view, this sample changes the description to Extraction by UI
- Cannot see my BIM360 or ACC hub: Make sure to provision the APS App Client ID within the BIM 360 Account, learn more here. This requires the Account Admin permission.
Document
Tutorials:
Blogs:
- APS Blog
- Field of View, a BIM focused blog
This sample is licensed under the terms of the MIT License. Please see the LICENSE file for full details.
Xiaodong Liang @coldwood, Developer Advocacy and Support, Autodesk