![]()
Try our simple balenaCloud starter project to set up a Raspberry Pi and LCD or monitor to display any webpage or web-based dashboard. We’re calling it balenaDash! Follow along with our guide to get up and running in under 30 minutes.
- Introduction
- Hardware required
- Using WiFi Connect
- Controlling content
- Automate backlight switching
- Photo slideshow feature
This is the perfect introductory project to try out balenaCloud and see how everything works.
At the most basic level, this project allows you to display any webpage using a lightweight web browser. This means that you can build a device dedicated to showing anything that runs in a normal web browser. It will boot up and automatically and display your content.
Some examples of what you could use this for include:
- Data-centric dashboards using Grafana, Datadog or Humio
- Display for services such as Flightradar24 or Flightaware
- Digital fishtank or jellyfish
- Streaming webcam display
- Digital signage for storefronts
- 24 hour live animated cat display
- Home automation dashboard
Previously, balenaDash supported a photo gallery features such as:
- Instagram photo stream (based on hashtag or user)
- Live digital photo frame feeding from Google Photos or Apple iCloud accounts
We've removed that in version 1.0 and encourage people wanting this functionality to try our new Photo Slideshow project, a project based on balenaDash.
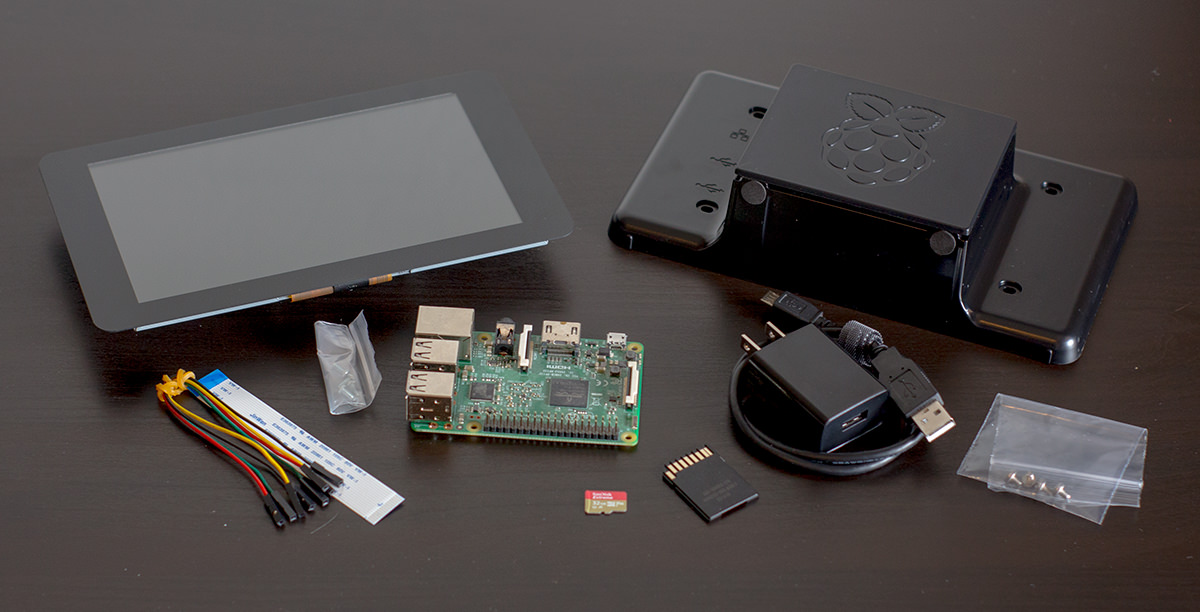
The list of items you’ll need is also included below:
- Raspberry Pi 3B/3B+ (Note: this project will not work with the Pi Zero or older devices with < 1GB RAM)
- 16GB Micro-SD Card (we recommend Sandisk Extreme Pro SD cards)
- Display (any Raspberry Pi display will work for this project)
- Micro-USB cable
- Power supply
- Case (optional)
You can deploy this app to a new balenaCloud fleet in one click using the button below:

Or, you can create a Fleet in your balenaCloud dashboard and balena push this code to it the traditional way. Just be aware that balenaDash requires that you allocate more memory to the GPU. This is achieved by adding (or editing the existing) the Device configuration variable BALENA_HOST_CONFIG_gpu_mem, for this project we recommend setting it to 128.
If you are using the official Raspberry Pi 7 inch display, you can follow this tutorial to assemble and configure the screen.
Depending on the orientation of the majority of your content or photos, you can choose to have the display in horizontal or vertical mode. On Fleet Configuration add a variable called BALENA_HOST_CONFIG_display_lcd_rotate with value 2 for horizontal (180º rotation) or 1 for vertical (90º clockwise rotation). More details about the options for this are available on the Raspberry Pi site.
As from v1.0.0, balenaDash uses the fbcp block.
The PiTFT LCD screens from Adafruit (and others) are supported. In order to use these displays you're required to add additional configuration by setting the FBCP_DISPLAY variable within the dashboard. This variable should be set to one of the values below:
adafruit-hx8357d-pitftadafruit-ili9341-pitftfreeplaytech-waveshare32bwaveshare35b-ili9486tontec-mz61581waveshare-st7789vw-hatwaveshare-st7735s-hatkedei-v63-mpi3501
The following Device Configuration variables might be required for proper scaling and resolutions:
| Name | Value |
|---|---|
| BALENA_HOST_CONFIG_hdmi_cvt | <width> <height> <framerate> <aspect> <margins> <interlace> <rb> e.g 480 320 60 1 0 0 0 |
| BALENA_HOST_CONFIG_hdmi_force_hotplug | 1 |
| BALENA_HOST_CONFIG_hdmi_group | 2 |
| BALENA_HOST_CONFIG_hdmi_mode | 87 |
If your display is not listed above, please check if the fbcp-ili9341 driver that fbcp block uses supports it. PRs are welcomed to add support for further displays in the fbcp block.
The balenaDash project includes wifi-connect which enables your device to operate as a WiFi access point and allow you to join a different WiFi network using captive portal functionality. Although you can specify a WiFi network to join when you first add your device and download the image from the balenaCloud dashboard, there may be situations where you need to change that.
WiFi Connect periodically tests for a functional internet connection. If nothing is found, the device sets itself up as a WiFi access point named balenaDash that you can join with a mobile device.
To use WiFi Connect you need to join the balenaDash network and you should see a captive portal popup. The passphrase is balenaDash. If not, ensure that you remain connected to the balenaDash network and visit the IP address of the device in a browser on port 80. For example http://<ip of balenaDash device>. This will allow you to access WiFi Connect, perform a site survey and join a different WiFi network.
To configure the URL displayed by webkit, set the LAUNCH_URL environment
variable. If nothing is set, balenaDash will display the browser block local webpage.
Your balenaDash device is also running a small webserver on port 8080. The web page can be loaded by navigating your browser to the device's local IP address.
In the 'reported' section you can click 'Refresh' and find out what URL the browser is displaying, whether the GPU is enabled, whether the browser is using kiosk mode, the version of Chromium and the flags being used.
In the 'Request' section you can set the URL, KIOSK mode, enable or disable the GPU and set the browser to automatically refresh on a given interval.
To use automatic backlight switching you’ll need to configure a few service variables for the scheduler service.
ENABLE_BACKLIGHT_TIMER=1
BACKLIGHT_ON=0 8 * * *
BACKLIGHT_OFF=0 23 * * *
The BACKLIGHT_ON and BACKLIGHT_OFF variables accept standard cron syntax; take a look at https://crontab.guru if you’re not familiar. For more instructions check out our blog post.
To change the timezone for the scheduler, set the TZ service variable to something from the TZ database list.
This feature has been removed from balenaDash in v1.0.0. If you want to use the photo slideshow feature, check out the Photo Slideshow project
For a complete tutorial on how to use balenaDash, please check out our blog post at https://www.balena.io/blog/make-a-web-frame-with-raspberry-pi-in-30-minutes/
Want to learn more about what makes balena work? Try one of our masterclasses. Each lesson is a self-contained, deeply detailed walkthrough on core skills to be successful with your next edge project.
Check them out at our docs. Also, reach out to us on the Forums if you need help.