This project provides a method to add objects to the habitat simulator using top-down maps.
Additionally, it provides RGB/Semantic(Instance, Category, Region, Place) top-down maps for Habitat-Sim.
The position on the map can be converted to the position in the habitat-sim scene (vice versa).
After collecting the maps, add objects using the maps with add_object_with_2dmap.py
The source code is developed and tested in the following setting.
- Python 3.7
- habitat-sim 0.2.2
- habitat 0.2.2
To start, we prefer creating the environment using conda:
conda create -n habitat_v22 python=3.7 cmake=3.14.0
conda activate habitat_v22
conda install habitat-sim==0.2.2 withbullet headless -c conda-forge -c aihabitat
cd
mkdir programs
cd programs
git clone --branch stable https://github.com/facebookresearch/habitat-lab.git habitat-lab-v22
cd habitat-lab-v22
git checkout tags/v0.2.2
pip install -e .
Please make sure you have up-to-date NVIDIA drivers supporting CUDA 10.1 at least.
Most of the scripts in this code build the environments assuming that the datasets are in habitat-lab/data/ folder.
The recommended folder structure of habitat-lab:
habitat-lab
  └── data
    └── object_datasets
    └── scene_datasets
      └── gibson_semantic.scene_dataset_config.json
      └── mp3d.scene_dataset_config.json
      └── hm3d_annotated_basis.scene_dataset_config.json
      └── gibson
        └── *.glb, *.navmeshs
      └── mp3d
        └── *.glb, *.navmeshs
      └── hm3d
        └── *.glb, *.navmeshs
Download the above data Here.


You can download the generated top down maps Here
and object data Here.
The objects are adapted to habitat from ShapeNetCore.
After collecting the map, play with it using play_with_2dmap.py
- You can use 'w/a/s/d' buttons to move an agent in the simulator.
- Double click the map and press 'm' to move to the clicked position.
- Press 'n' to move random point in the map.
- Press 'v' to see next house.
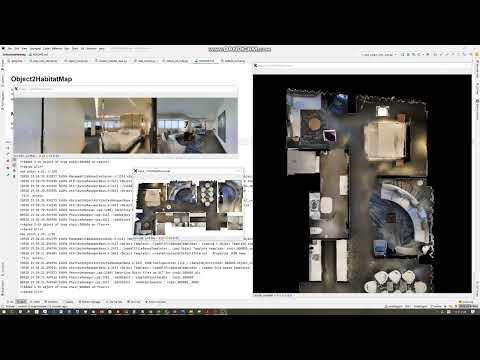
See the below youtube video for knowing how to add objects using the maps.
- Use "manual" command to manually add objects on the map.
- Otherwise, the code will automatically add objects on the environment.
- Double click the map and press 'm' to move to the clicked position.
- You can use 'w/a/s/d' buttons to move an agent in the simulator.
- Press 'n' to move random point in the map.
- Press '8' to see prev house.
- Press '9' to see next house.
- Press 'i' to add an object to the clicked position.
- Press 'z' to remove the recently added object.
- Press 'c' to remove all the objects.
- Press 's' to save the added objects.
- Press 'l' to load the objects from file.
- Press 'q' to quit.
- Press 'h' to see the help.
- You can change the object rotation by pressing '0 - = p [ ]' buttons.
- You can change the object position by pressing 'l ; ', . / ' buttons.
If you use habitat map in your research, please use the following BibTeX entry.
@misc{kim2022habitatmap,
  author =       {Nuri Kim},
  title =        {Object2HabitatMap},
  howpublished = {\url{https://github.com/bareblackfoot/Object2HabitatMap}},
  year =         {2022}
}