User Guide
This is the general setup and use guide for the Digigurdy.
(This guide covers version 2.5 of the code. Some features may not be present--or may have changed--since the last update of this doc.)
If you're coming here to upgrade your Digi-Gurdy's code, head on over here for instructions on uploading one of the pre-compiled builds. It's a pretty simple process with your computer, and there's even a video from John Dingley walking through it.
The (post-October '22) gurdies use a USB-B (the square-kind of plug that printers use) plug to attach to a USB power source.
In addition to a standard USB charger or battery, the Digi-Gurdy also includes a built-in power bank. To use it, you’ll need to buy an unprotected 18650 battery (unprotected is important, protected batteries are a little too big), unscrew the cover to pull out the power bank, and install the battery. It charges with a microUSB cable, and should provide around 15 hours of play on a charge.
USB-C and newer tablets and phones should also be able to power a Digi-gurdy. It consumes about 130/240mA (MIDI/Trigger mode), well below the 500mA USB standard. However, some devices aren’t designed to power devices out of their charging port and won’t be able to do it. Older iPads with lightning connectors, for example, can’t power the gurdy on their own. For devices like these, there are “camera adapters” that give you ports to plug in the Digi-Gurdy and a power cable into your tablet/device, and these should work.
There's no on/off switch: powering it turns it on, and unplugging the power turns it off. The Trigger/Tsunami will power on and off internally depending on whether or not you're using it.
After powering up the gurdy, you'll get the startup menu. If this is your first time running a new version, under option 4 is an option to "Reset All Settings". This clears the memory of the gurdy and sets some defaults, and this is recommended after updating your gurdy to prevent possible buggy behavior. It will erase any saved presets: fair warning.
The Digi-gurdy is a MIDI controller. It connects to a MIDI sampler/synthesizer (like the BS-16i app on iOS, or Garageband on a Mac) to actually make sound. There's two ways to connect your gurdy via MIDI:
-
USB - in addition to power, the USB cable also sends standard MIDI on it. If you're plugging the gurdy into an iPad, computer, etc. for power, you can also receive MIDI through it.
-
MIDI socket - on the gurdy is a standard 5-pin MIDI-OUT socket. Any MIDI device with a MIDI-IN should be able to accept it.
- Bluetooth - a common use for this socket is for a Bluetooth MIDI adapter. These little things are available for about $50 USD online and are great for using in combination with the built-in power bank, giving you a way to use it essentially wire-free, with a phone/tablet providing the audio.
It's not recommended to use Bluetooth headphones/earbuds for playing. You'll find that the delay is noticeable. MIDI is very little data compared to audio, and that's why Bluetooth MIDI works with hardly any delay, but audio doesn't. You're welcome to try, and there are low-latency codecs, but in my experience they either aren't low enough or the audio quality is poor (low-latency audio is a gaming feature). I find wired headphones to my phone in my pocket along with Bluetooth MIDI to be the simplest, most-wireless solution.
It has been reported by at least one user that AirPods with and Apple device is low enough in latency to be acceptable. Your mileage may vary!
The closest thing Digigurdy has to a "standard" MIDI sampler is BS-16i, available for iOS. It offers lots of features and it's inexpensive and works nicely with Bluetooth MIDI or USB.
Michael Coene on Facebook shared what he does to use his Windows-based PC for playback. See here.
With MIDI you can set the channels to make any sounds you want. The gurdy soundfont (plus some others you might want to play with) is here, in this repository. Many thanks to the MIDIgurdy project that originally created these and released them for public use.
Your sampler (like BS-16i) may also come with many more sounds to experiment with.
The Digigurdy uses these channels:
- High Melody
- Low Melody
- Trompette
- Drone
- Buzz
- Key-click
If your gurdy has a Tsunami or Trigger wav sampler built-in (models from digigurdy.com have Tirggers built-in starting around March 2023), it can output audio directly to headphones or powered speakers.
The Tsunami and Trigger supply line-level audio. It is not powerful enough to run large speakers on its own and powered/amplified speakers are recommended for anything larger than headphones.
On this repository are zip files for the Tsunami and Trigger, which contain the wav files and configuration files necessary for it work. To install them, remove the microSD card from the Tsunami/Trigger, attach it to computer, delete every file on the card, and copy the contents of the mono or stereo folder inside the zip file (whichever one is there) directly onto the microSD card. Don't copy the mono/stereo directory itself, just the contents inside it. Then eject the card and re-insert it into the Tsunami/Trigger board.
NOTE: If you are installing your own Trigger unit, it must have updated firmware (1.3 or higher). Older firmware versions are confirmed to not work.
Not all Digi-Gurdies have all of the buttons shown here (they are mentioned below). Don't worry! See the next section for "hidden" key combinations which give you access to many of them. All of the options are available to you whether or not you have these extra keys, either as keycombos or from the pause menu.
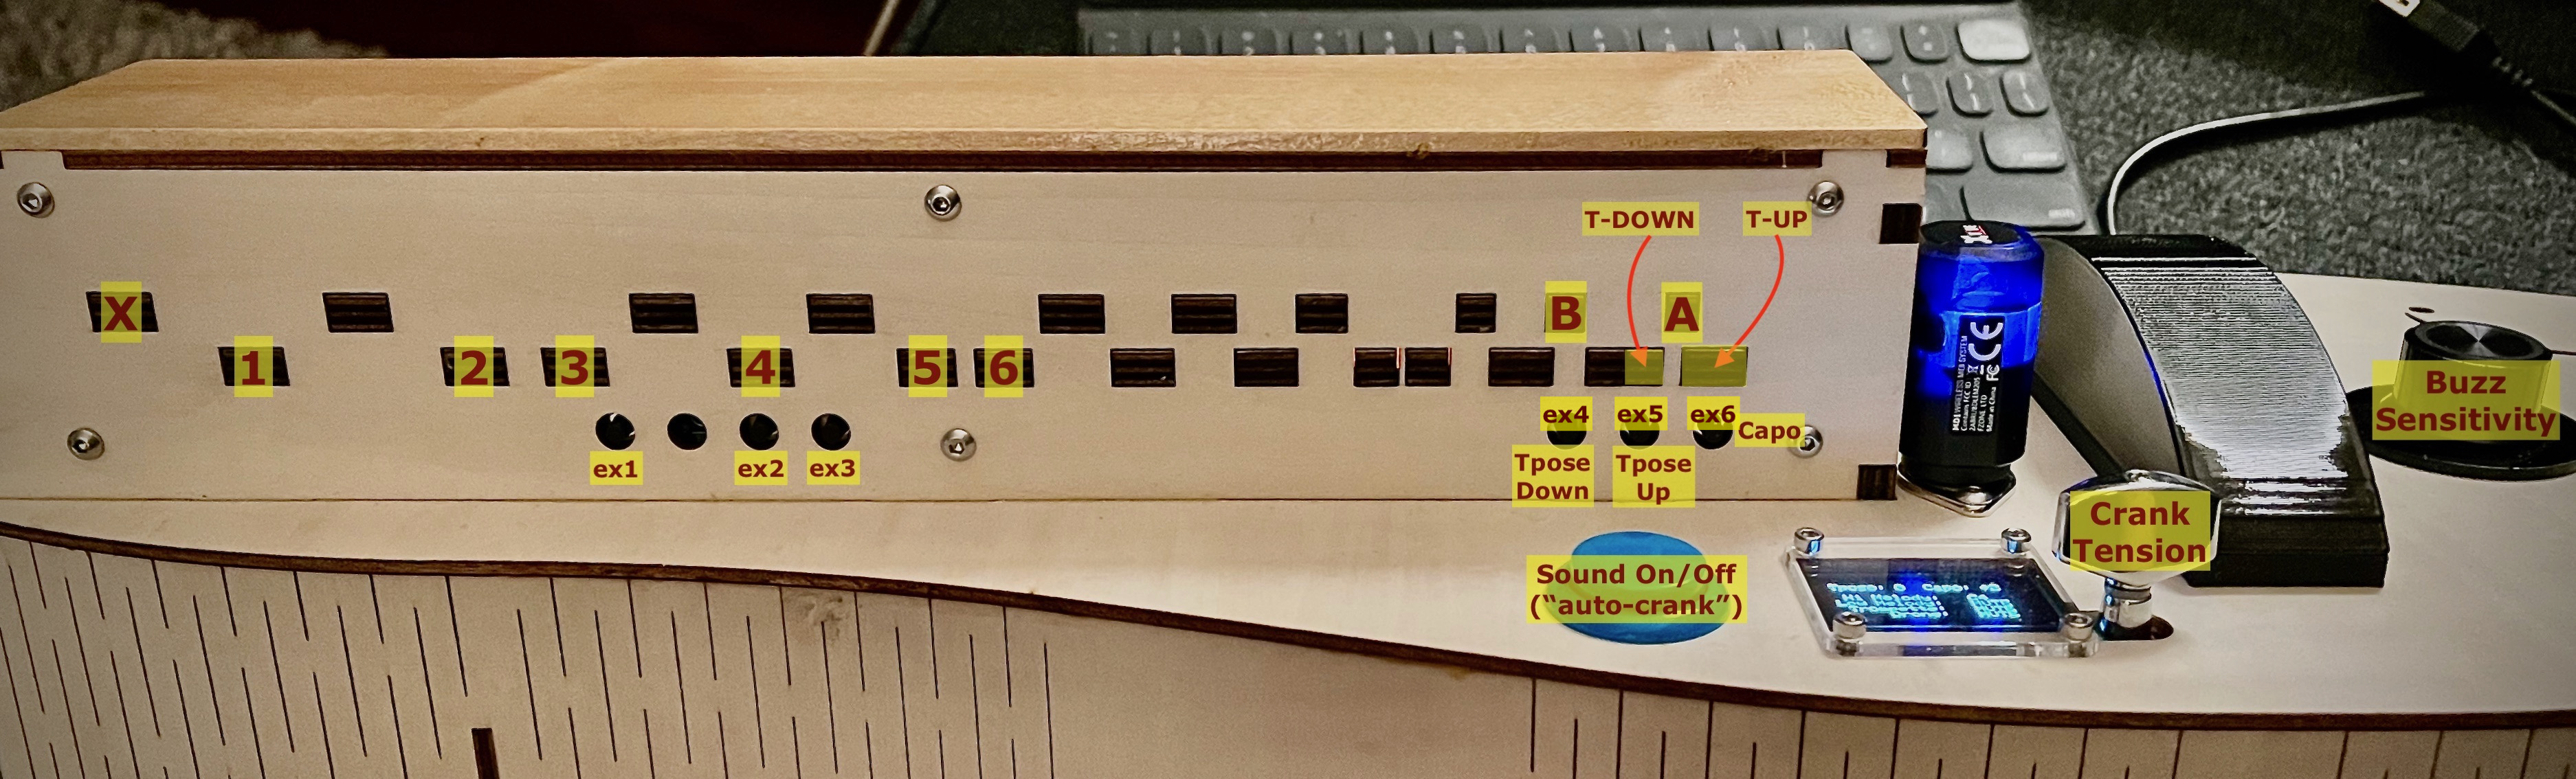
- 1-6 Keys - For selecting menu items
- X Key - This backs out of most menus
- A & B Keys - These are used in the pause menu, and also for the key combos below
- Tpose Up/Down, Capo (the earliest models do not have these buttons) - During play these are for transposing the strings and cycling through capo options (more on those options below)
-
EX1-EX3 (geared-crank models do not have these buttons) - These buttons have configurable behavior, but by default:
- EX1 opens the pause menu during play
- EX2 cycles through melody string muting combinations
- EX3 cycles through drone/trompette muting combinations
- Auto-crank (a.k.a. the "big button") - This button activates the strings on/off as if you were cranking.
- Buzz Sensitivity (portable models without cranks don't have this) - This knob adjusts how quickly you need to crank to generate a trompette buzz/coup. It may have an LED on it that lights up when you're buzzing (pre-accessory pedal units had these).
There are "secret" keybox key combinations which were used on older models that didn't have all the EX and transpose/capo buttons. They are still available:
-
X + Aopens up the pause menu during play -
X + Bcycles through capo options -
1 + T-UP/DOWNtransposes up/down -
X + T-UP/DOWNvolume up/down
If you have a geared crank, after the startup screens, the gurdy will detect if the crank is attached. Do not move the crank during this, as it may disrupt the test. If you do, you can re-run the detection again from the pause menu.
Upon startup you'll need to load or choose a tuning to use. More on that below.
After connecting to your MIDI sampler (or attaching a speaker to your Tsunami audio output socket), you're ready to go! It works like a (convenient, in-tune) hurdy gurdy 😄. Crank-on or hit the auto-crank button to play. By default the current note being played by the (high) melody string is displayed on-screen along with the note on a treble-clef staff. When not playing, a status screen shows your current transpose, capo, tuning, and any muted strings.
(Optical cranks only:) If you're using the crank, the volume will vary slightly according to how fast you crank (like an actual gurdy would).
Cranking very fast will cause the buzz/coup to activate. At any time you can adjust the sensitivity of the buzzing with the knob. With the knob turned fully clockwise (lowest sensitivity), buzzing is effectively disabled.
(Only post-Nov. 2022 gurdies include an accessory socket) If you are using a vibrato accessory pedal and it's turned on (see the "Other Options" section below), this will adjust the intensity of the modulation effect of your MIDI sampler, which in BS-16i produces a vibrato effect on the melody string channels.
During play you can adjust the string transposition with the Tpose buttons (or the key combo) by semitones (half-steps) one octave up and down from the tuning you chose. You can also capo the drone/trompette strings up by one or two whole steps (much like real capos on a gurdy would allow) with the Capo button or key combo.
EX button options are also available during play, such as muting certain strings on-the-fly. (Optical crank models only)
The pause menus can be accessed by pressing X+A, or possibly an EX button (EX1 by default). Any notes being played will stop.
The pause menu is where all the other setting options of the Digigurdy are accessed. In all menus, selections are made with the 1-6 and X keys and are labeled on-screen. While in the main pause menu, the A & B keys also cycle through muting combinations.
The Load menu allows you to load one of four preset tunings for G/C and D/G gurdies, as well as up to four custom tunings you can create yourself for easy access.
The Save menu is for saving your current setup to one of four save slots. In addition to the tuning of each string, the current transpose/capo and volume of each string/channel is also saved in the slot. Mute settings are not part of the tuning settings.
Note: setting a tuning (as described below) does NOT save it! You need to save your setup separately if you want to keep it for later.
The Tuning menu allows you to adjust the tuning of the strings/channels and adjust the volume. Tuning can be done in two ways: guided or manually.
For guided tuning, select G/C or D/C to get started, and follow the prompts. For each string you'll be offered a set of choices that work well with each other and could be found on real hurdy gurdies.
This gives you full control of the tuning of all four strings and the buzz sound (the keyclick note is not adjustable). You can choose a guided tuning and then adjust it here afterwards, or go straight here and choose your tuning directly.
All six channels can be volume-adjusted independently. This is the MIDI volume (a number between 0 and 127), which is separate from the channel volume (how loud that channel could possibly be at max MIDI volume) in BS-16i or MIDI sampler. The default used here is 70.
If your MIDI sampler gives you volume control, you usually won't have to adjust this volume.
(Tsunami/Trigger models:) volume control applies to the Tsunami as well. Internally the 0-127 volume choice is converted to the values Tsunami uses automatically. Volume 112 is line-level output (as loud as the WAV file actually is). Higher than that is over-driven.
Pressing the "6" button from the main Tuning menu (there is no 6 option listed) gets you to my secret fun page! Here you can add a second tone to any string, either a fourth, a fifth, or an octave below. If you save to a slot while any of these are on, they will save to the slot as well.
If you don't save to a slot, your settings here just go away when restarting.
Are they useful? I don't know. Do they sound cool? Some of them (try the octave one)! Are they fun to play with? Sure!!!
Miscellaneous options are available here:
- Crank Detection (Geared-crank models) - select this to re-run the crank detection routine. If you want to dock/un-dock your gurdy from the body, detach/attach it first and then select this option.
- EX Button Configuration - see below.
- Screen Configuration - see below.
- Input/Output Configuration - see below.
- About Digigurdy - the title/about screen, as well as a simple thank-you screen to people that have particularly helped on this project. Click the
Xbutton to move through the screens.
The three EX buttons can be configured to perform a variety of different functions according to your need. These settings are saved immediately and persist over reboots, and are separate from the tuning save slots. Clearing EEPROM resets these settings.
New in 2.4: the transpose and capo buttons are also configurable buttons and show up as EX4, EX5, and EX6 in this menu.
New in 2.5: the auto-crank button is also configurable now, and shows up as "Big" in this menu.
EX button functions available:
- Open the Pause Menu
- Cycle through melody string muting combinations
- Cycle through drone and trompette muting combinations
- Toggle drone mute
- Toggle trompette mute
- Turn volume down
- Turn volume up
- Transpose down
- Transpose up
- Cycle through 0, +2, +4 semitone capo
- Auto-crank (sound on/off)
New in v2.2.0 are improved configuration options for the display:
- Notation - choose between different note/pitch notations:
- Scientific/ABC - middle C = C4.
- Solfege/DoReMi - "fixed-do" solfrege, Middle C displays as "Do4".
- Combo - notes are printed in both notations. Middle C displays as "C4/DO4".
- Enable/Disable Buzz Indicator - if enabled, a thin rectangle border will flash on the screen when a buzz is occurring. This is a persistent setting and acts as an alternative to the buzz LED feature for models without one.
- Choose Play Screen - choose between six displays while the gurdy is playing:
- A large (ABC) note bitmap + a staff showing the note
- A large printed text note (matches notation) + a staff
- Only the note bitmap, centered
- Only the printed note, centered
- Only the staff, centered
- Blank
- Secondary Output - in addition to USB MIDI, you can choose between a second output of your MIDI-OUT port, or optionally a Trigger/Tsunami audio socket.
- MIDI Melody Vibrato - When using MIDI a constant modulation value can be sent on the melody strings, meant to simulate a vibrato on the keys. You can adjust how much to send (if any) here. I personally use a value of 16 if you want to try it. Default is 0.
- Buzz LED - if your gurdy supports and uses the LED buzz/coup indicator, you can turn it on or off here. This is also a persistent setting. If you don't have LED support compiled in to your version of the code, this option won't appear at all.
- Accessory Pedal - if your gurdy supports an accessory pedal jack, you can activate it here. This is off by default every time you turn your gurdy on, because it will cause strange behavior if activated without a pedal plugged in. If you don't have pedal suport compiled in to your version of the code, this option won't appear.
The "Help" selection will take you to a QR code. This can be scanned with any smartphone, and gives you a link to this User Guide.
When you first turn on the gurdy, the startup screen has its own Other Options menu with startup-only options:
- Clear EEPROM - this clears all save slots and sets the EX buttons and various persistent options back to defaults. This is also recommended after updating your Digigurdy code, because changes may have been made to the memory structure.
- Scene Control - BS-16i allows you to save your settings into profiles called "scenes". This is handy for having a setup for a gurdy sound, a setup for a bagpipe or some other instrument, a setting for particular music, and so on. BS-16i can be configured to switch between these scenes automatically when it receives a particular MIDI signal. If scene control is turned on, the Digigurdy will send this signal when switching to a saved or preset tuning. By setting this up, you can automatically switch between "instruments" or whole setups by simply selecting your tuning. This setting persists across reboots.
- How it works: in BS-16i, create a "scene". Choose the instruments and effects you want, etc.
- Under the Settings->Scenes->Assignment menu, assign it to a number. 0-3 correspond with the four preset tunings on the gurdy, and tunings 4-7 correspond with the four saved tuning slots.
- Under Settings->CoreMIDI, turn on the "Switch Scenes with Program Change" feature. You can either use Omni, or Channel 1 (Digigurdy will send on channel 1).
- Finally, in the Digigurdy options screen, enable Scene Control.