Bogus Premium
![]() Bogus is a great open-source tool for generating realistic-but-fake data for the .NET platform.
Bogus is a great open-source tool for generating realistic-but-fake data for the .NET platform.
The open-source world is a wonderful place but it's not without issues. It's common to see open-source projects abandoned for various reasons. It takes a lot of hard work and dedication to keep an open-source project moving forward.
As developers, we want to use high-quality tools to get work done. Bogus is one of those high-quality tools. We want a sustainable long-term plan to keep it that way. That's why Bogus has a commercial subscription add-on called Bogus Premium that offers more datasets, advanced features, and productivity tools to help you get more work done quickly.
And hey, what better way to support your favorite OSS project and get something new and shiny in return? 😎
With an active Bogus Premium license, you get access to:
| Feature | Bogus | Bogus Premium | |
|---|---|---|---|
Bogus |
✔️ | ✔️ | The always free and open-source fake data generator for .NET. |
| Data Sets | |||
Bogus.Healthcare |
❌ | ✔️ | A dataset for the Healthcare industry. Generate fake medical records, injuries, diagnosis, and drug dosages. Especially helpful in HIPAA regulated environments. |
Bogus.Hollywood |
❌ | ✔️ | A dataset for the Entertainment industry. Generate movie titles, tag lines, and genres. Data used in this library is sourced from Kaggle and used with permission from TMDb. |
Bogus.Locations |
❌ | ✔️ | A dataset that contains real geographical information for places and things. Create fake GPS points and paths. Helpful for creating geodesic data for location-based aware apps. |
Bogus.Text |
❌ | ✔️ | A dataset that contains historical texts in the public domain. Create fake sentences from famous speeches, classic books, and law. |
| Tooling | |||
Bogus.Tools.Analyzer |
❌ | ✔️ | A Roslyn Analyzer and Code Fixer to generate and detect missing .RuleFor rules at compile time. Be sure to check your IDE compatibility here.
|
Save time and be more productive! Have your IDE write Bogus code for you!
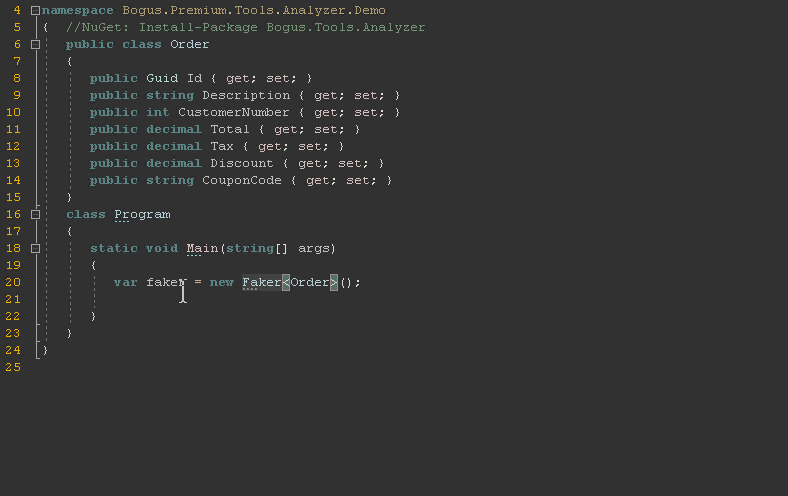
The Bogus.Tools.Analyzer requires an IDE that supports Roslyn C# analyzers.
Note: All Bogus Premium Data Sets work across all operating systems and IDEs wherever the minimum .NET runtimes are supported. The Bogus.Tools.Analzyer is the only NuGet package that requires an IDE that supports the Roslyn C# analyzer compiler platform.
The table below shows the minimum IDE requirements for the Bogus.Tools.Analzyer NuGet package.
Bogus.Tools.Analzyer |
Windows | Mac | Linux | Notes |
|---|---|---|---|---|
| JetBrains Rider 2018.3 | ✔️ | ✔️ | ✔️ | Install Bogus.Tools.Analyzer like any other NuGet package. |
| Visual Studio Code | ✔️ | ✔️ | ✔️ | See setup notes here. |
| Visual Studio 2017 | ✔️ | Install Bogus.Tools.Analzyer like any other NuGet package. |
||
| Visual Studio 2019 | ✔️ | Install Bogus.Tools.Analzyer like any other NuGet package. |
||
| Visual Studio 2022 | ✔️ | Install Bogus.Tools.Analzyer like any other NuGet package. |
||
| Visual Studio for Mac 2017 (7.8) | ✔️ | Requires <Analyzer /> in .csproj file. See setup notes here.
|
||
| LINQPad | ❌ |
- 💡 Pro Tip: You can use the following the
Bogus.Premium.Testproject to test yourBogus.Tools.Analyzerintegration. https://github.com/bchavez/Bogus.Premium.Test
So what are you waiting for? Get a premium license now and help support this really cool project! 😄 Over time, we plan on adding more data sets and tooling.
You can purchase a Bogus Premium subscription license at the following link:
Licenses are sold by Bit Armory Inc (Brian's small software business). After you enter your payment details and confirm the subscription you will receive an email with a Bogus.Premium.LicenseKey file attachment. You use the Bogus.Premium.LicenseKey to activate Bogus Premium features. Continue reading below on how to activate Bogus Premium features with your Bogus.Premium.LicenseKey file.
There are two ways to activate Bogus Premium:
Your Bogus.Premium.LicenseKey file is attached to the email you receive. Place the Bogus.Premium.LicenseKey file in the your root project folder. By default, the Bogus.Premium.LicenseKey can be placed in any parent folder along the path to Bogus.dll.
For example, given the full path to C:\Projects\MyApp\bin\Debug\Bogus.dll, the license file discovery will be sought in:
C:\Projects\MyApp\bin\Debug\C:\Projects\MyApp\bin\C:\Projects\MyApp\C:\Projects\C:\
In the example above, placing the Bogus.Premium.LicenseKey file in any folder shown above will activate premium features. That's it!
Simply set the license key anywhere in your project code where you use Bogus:
Bogus.Premium.License.LicenseTo = "My Company"
Bogus.Premium.License.LicenseKey = "32fjxNYLQas..."
Note: This method only works with extended datasets. This method of activation will not work or activate Bogus.Tools.Analyzer. To get Bogus.Tools.Analzyer to work you should use the recommended LicenseKey file method outlined in Method 1.
Install the Bogus.Tools.Analyzer package like you would any other C# analyzer. Edit your .csproj file with the following code:
<ItemGroup>
  <PackageReference Include="Bogus.Tools.Analyzer" Version="25.0.4" PrivateAssets="All"/>
</ItemGroup>- 💡 Pro Tip: You can use the following the
Bogus.Premium.Testproject to test yourBogus.Tools.Analyzerintegration. https://github.com/bchavez/Bogus.Premium.Test
Be sure to place the Bogus.Premium.LicenseKey file anywhere along your project path as outlined in Method 1. That's it!
If you are using Visual Studio for Mac continue with the following steps below.
If you're using Visual Studio for Mac, you'll need to modify your .csproj with a little extra kick.
- Make sure you have a NuGet reference to
Bogus.Tools.Analzyer(ie:dotnet add package Bogus.Tools.Analyzer). - Restore packages (ie:
dotnet restore). - Open and edit your
.csproj. - Add the following code:
<ItemGroup>
  <Analyzer Include="$(NugetPackageRoot)/bogus.tools.analyzer/25.0.4/analyzers/dotnet/cs/Bogus.Tools.Analyzer.dll" />
</ItemGroup>
- Replace
25.0.4with the current version of the analyzer in the snippet above. - Open the
Terminalapp on your Mac and verify the path toBogus.Tools.Analyzer.dllexists. For reference, the$(NugetPackageRoot)resolves to/Users/ACCOUNT/.nuget/packages/. - Make sure to place the
Bogus.Premium.LicenseKeyfile anywhere along your project path as outlined in Method 1 above. - Start Visual Studio for Mac; open your project and the analyzer should work!
If you have any issues, feel free to contact Brian at bchavez@bitarmory.com.
-
Visual Studio Code
v1.34or higher -
C# for Visual Studio Code (powered by OmniSharp) extension
v1.19.1or higher. ⚠️ VS Code Linux users only: Full Mono installv5.20.1or higher.
Visual Studio Code users need to explicitly enable Enable Roslyn Analyzers in OmniSharp extension settings page. Please verify you have the C# for Visual Studio Code extension installed with v1.19.1 or higher. To Enable Roslyn Analyzers, please see the instructions below:

- Select the Extensions Icon (
Ctrl+Shift+X). - Select the Manage / Gear Icon for
C# for Visual Studio Codeextension. - Click Configure Extension Settings.
- Locate and enable
Omnisharp: Enable Roslyn Analyzers. - Save settings and close Visual Studio Code.
- Add the
Bogus.Tools.Analzyerpackage to your project.dotnet add package Bogus.Tools.Analyzer
- Place the
Bogus.Premium.LicenseKeyfile anywhere along your project path as outlined in Method 1.
That's it!
NOTE: If you're using Visual Studio Code on Linux, read below for an extra configuration step.
If you're running Visual Studio Code on Linux:
- You'll need to install a full version of Mono here
v5.20.1or higher.apt install mono-devel
The reason is VS Code's OmniSharp plugin for Linux ships with an embedded version of Mono that is not fully complete. When a full version of Mono is installed on Linux, OmniSharp will use the full version installed on the system; not the embedded incomplete Mono shipped with the extension.
You are buying the ability to use the premium NuGet packages that extend Bogus with extra datasets and features. Premium licenses are billed annually/yearly per developer.
Click here and enter your information. Instructions to get your license key to activate the premium features will be emailed and are outlined above.
A license is required for each developer on the team that uses Bogus Premium NuGet packages and tools.
If you have a large development team or you don't want to manage per developer licenses and prefer a site license that will cover all developers in a company. Contact bchavez@bitarmory.com or keybase.io/bchavez for more information.
Your license lasts for one year beginning at the time of purchase. License renewal is necessary to continue using Bogus' premium features and datasets. You will be billed annually unless you cancel ahead of time before your renewal date. If you need help canceling your premium license subscription, contact bchavez@bitarmory.com or keybase.io/bchavez. Canceled or revoked licenses are enforced by NuGet package updates.
As long as you hold an active and paid license, you can use your existing license on any number of build agents.
Contact Brian via email (bchavez@bitarmory.com) or keybase.io/bchavez with any questions you have about purchasing Bogus Premium.