Purpose:
Application Gateway TLS is very well documented in Azure Docs. Enabling end to end TLS on Azure Application Gateway
Azure Firewall inspection is very well documented in Azure Docs. Azure Firewall TLS inspection
But using them together is documented conceptually but not at an implementation level. And there are a lot of nuances in this configuration. Firewall, App Gateway for virtual networks
Scope:
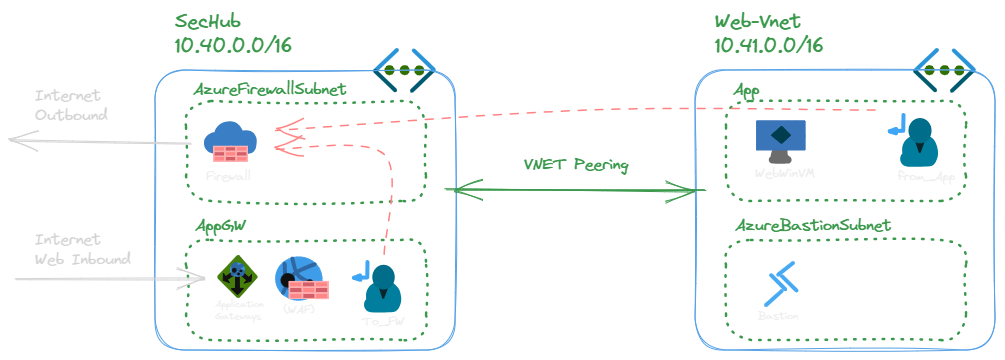
- Allow inbound on port 80 and 443 to the web app on the backend which is displaying the environment variables. Note that port 80 and 443 are inspected at AppGW (WAF) and Azure Firewall (IDPS)
- Route tables enable bi-directional flow for Azure Firewall inspection and by the end of this lab is using 0/0 (default route) to inspect all outbound traffic through the Firewall
- Once 0/0 is implemented, Bastion must be used to access the backend WebVM from an administrative perspective. There is no public IP on the Web VM.
- The Web VM has tools installed for examining the flow: Wireshark and Fiddler.
Required:
- Public DNS Domain in which you can control A records
- Public SSL certificate with intermediate files (cannot use Let's Encrypt)
- A self signed certificate for Application Gateway is ok, but not used in this lab and there are additional steps on your client to make self signed certs work.
- Azure Firewall Premium. Inspection is only available in the Premium SKU
- Application Gateway WAF V2
Once the script completes, get the Application Gateway Public IP Address and form full URL
Write-Host "http://$((Get-AzPublicIpAddress -ResourceGroupName TestAppGw9 -Name appGW_PublicIpAddress).IpAddress)/cgi-bin/env.pl"In this lab, I am using Digicert Geotrust TLS certificate. You can use a self-signed certificate or your own Enterprise PKI infrastructure if available to you. Otherwise you will have to buy a certificate. SSLS has a free-trial period in which you can buy a cheap certificate and return the certificate in the trial period. 30-day trial (ssls.com)
- With Digicert they make it easy to get your certificate, intermediate and root certificate. Download these from your certificate issuer:
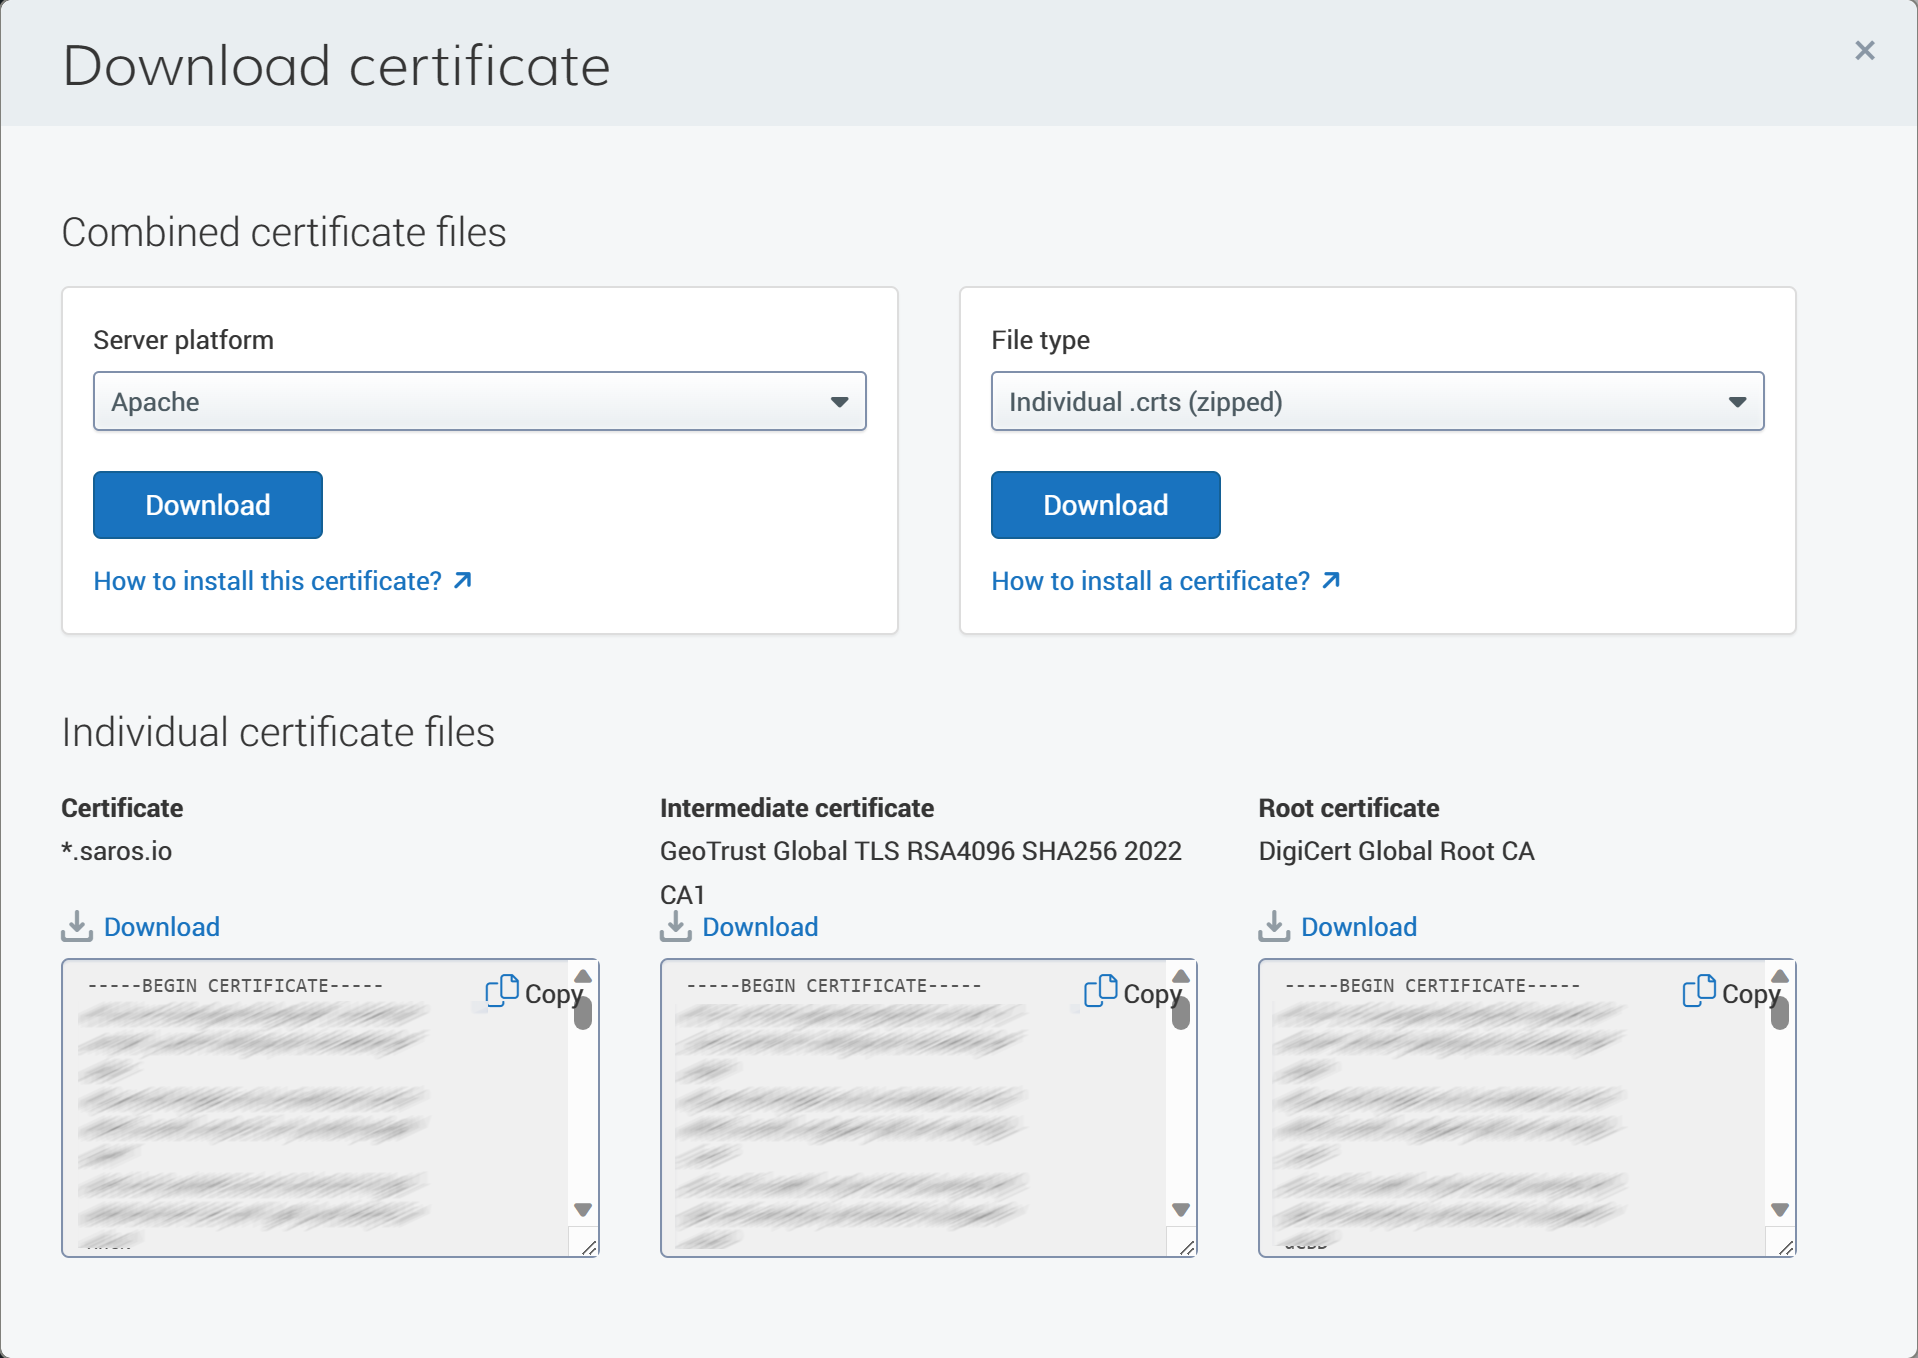
- Combine the certificate and intermediate certificate PEM files into one file. Note that the certificate should come first and then the intermediate certificate:
---- BEGIN CERTIFICATE ---- certificate data ---- END CERTIFICATE ---- ----- BEGIN CERTIFICATE ---- intermediate certificate ---- END CERTIFICATE ----
-
Find your key file. This is a separate file you used to create the public key with your issuer. It will end in .key
-
Create PFX from PEM file (replace names with your certificate info)
PFX format is required by Application Gateway. The PFX must have a password associated with it.
openssl pkcs12 -inkey saros.io.key -in saros.io.pem -export -out saros.io.pfx- Create CER from Root Certificate PEM file (replace names with your certificate info)
CER format is required by Application Gateway to specify the Root Certificate
openssl x509 -inform PEM -in '.\DigiCert Global Root CA.pem' -outform DER -out digicert.cerThe Web Server is running Windows Server 2022 (mostly for default Edge installation). However, it is not running IIS. Instead a windows version of Apache is installed. If you want to use Linux Apache instead, that is fine, the configuration is not 1:1 but should be very similar to a standard Linux Apache setup.
The Apache server is configured to run Perl and a script is installed by default that dumps all the web server environment variables.
You can test the Web Server from Edge on the Windows Server from localhost: http://localhost/cgi-bin/env.pl
This will also work from the Application Gateway front-end on port 80 via the front end IP.
- To setup the certificates so that we can enable TLS:
Upload your certificates here: C:\httpd\Apache24\conf\ssl
server.crt = formatted as PEM with server certificate + intermediate certificate chain server.key = key file
Note the certificates path/filename are specified in this file but do not need to be changed unless your certificate filenames differ.
C:\httpd\Apache24\conf\extra\httpd-ahssl.conf
- Finally, Restart Apache so the new certs are loaded.
Restart-Service ApacheSo, we have port 80 working via Application Gateway and localhost on the Web Server. We have port 443 working via localhost on the Web server.
Now let's get port 443 working from Application Gateway to the Web Server.
NOTE: we are not going to send traffic through the Azure Firewall just yet. Let's build towards that.
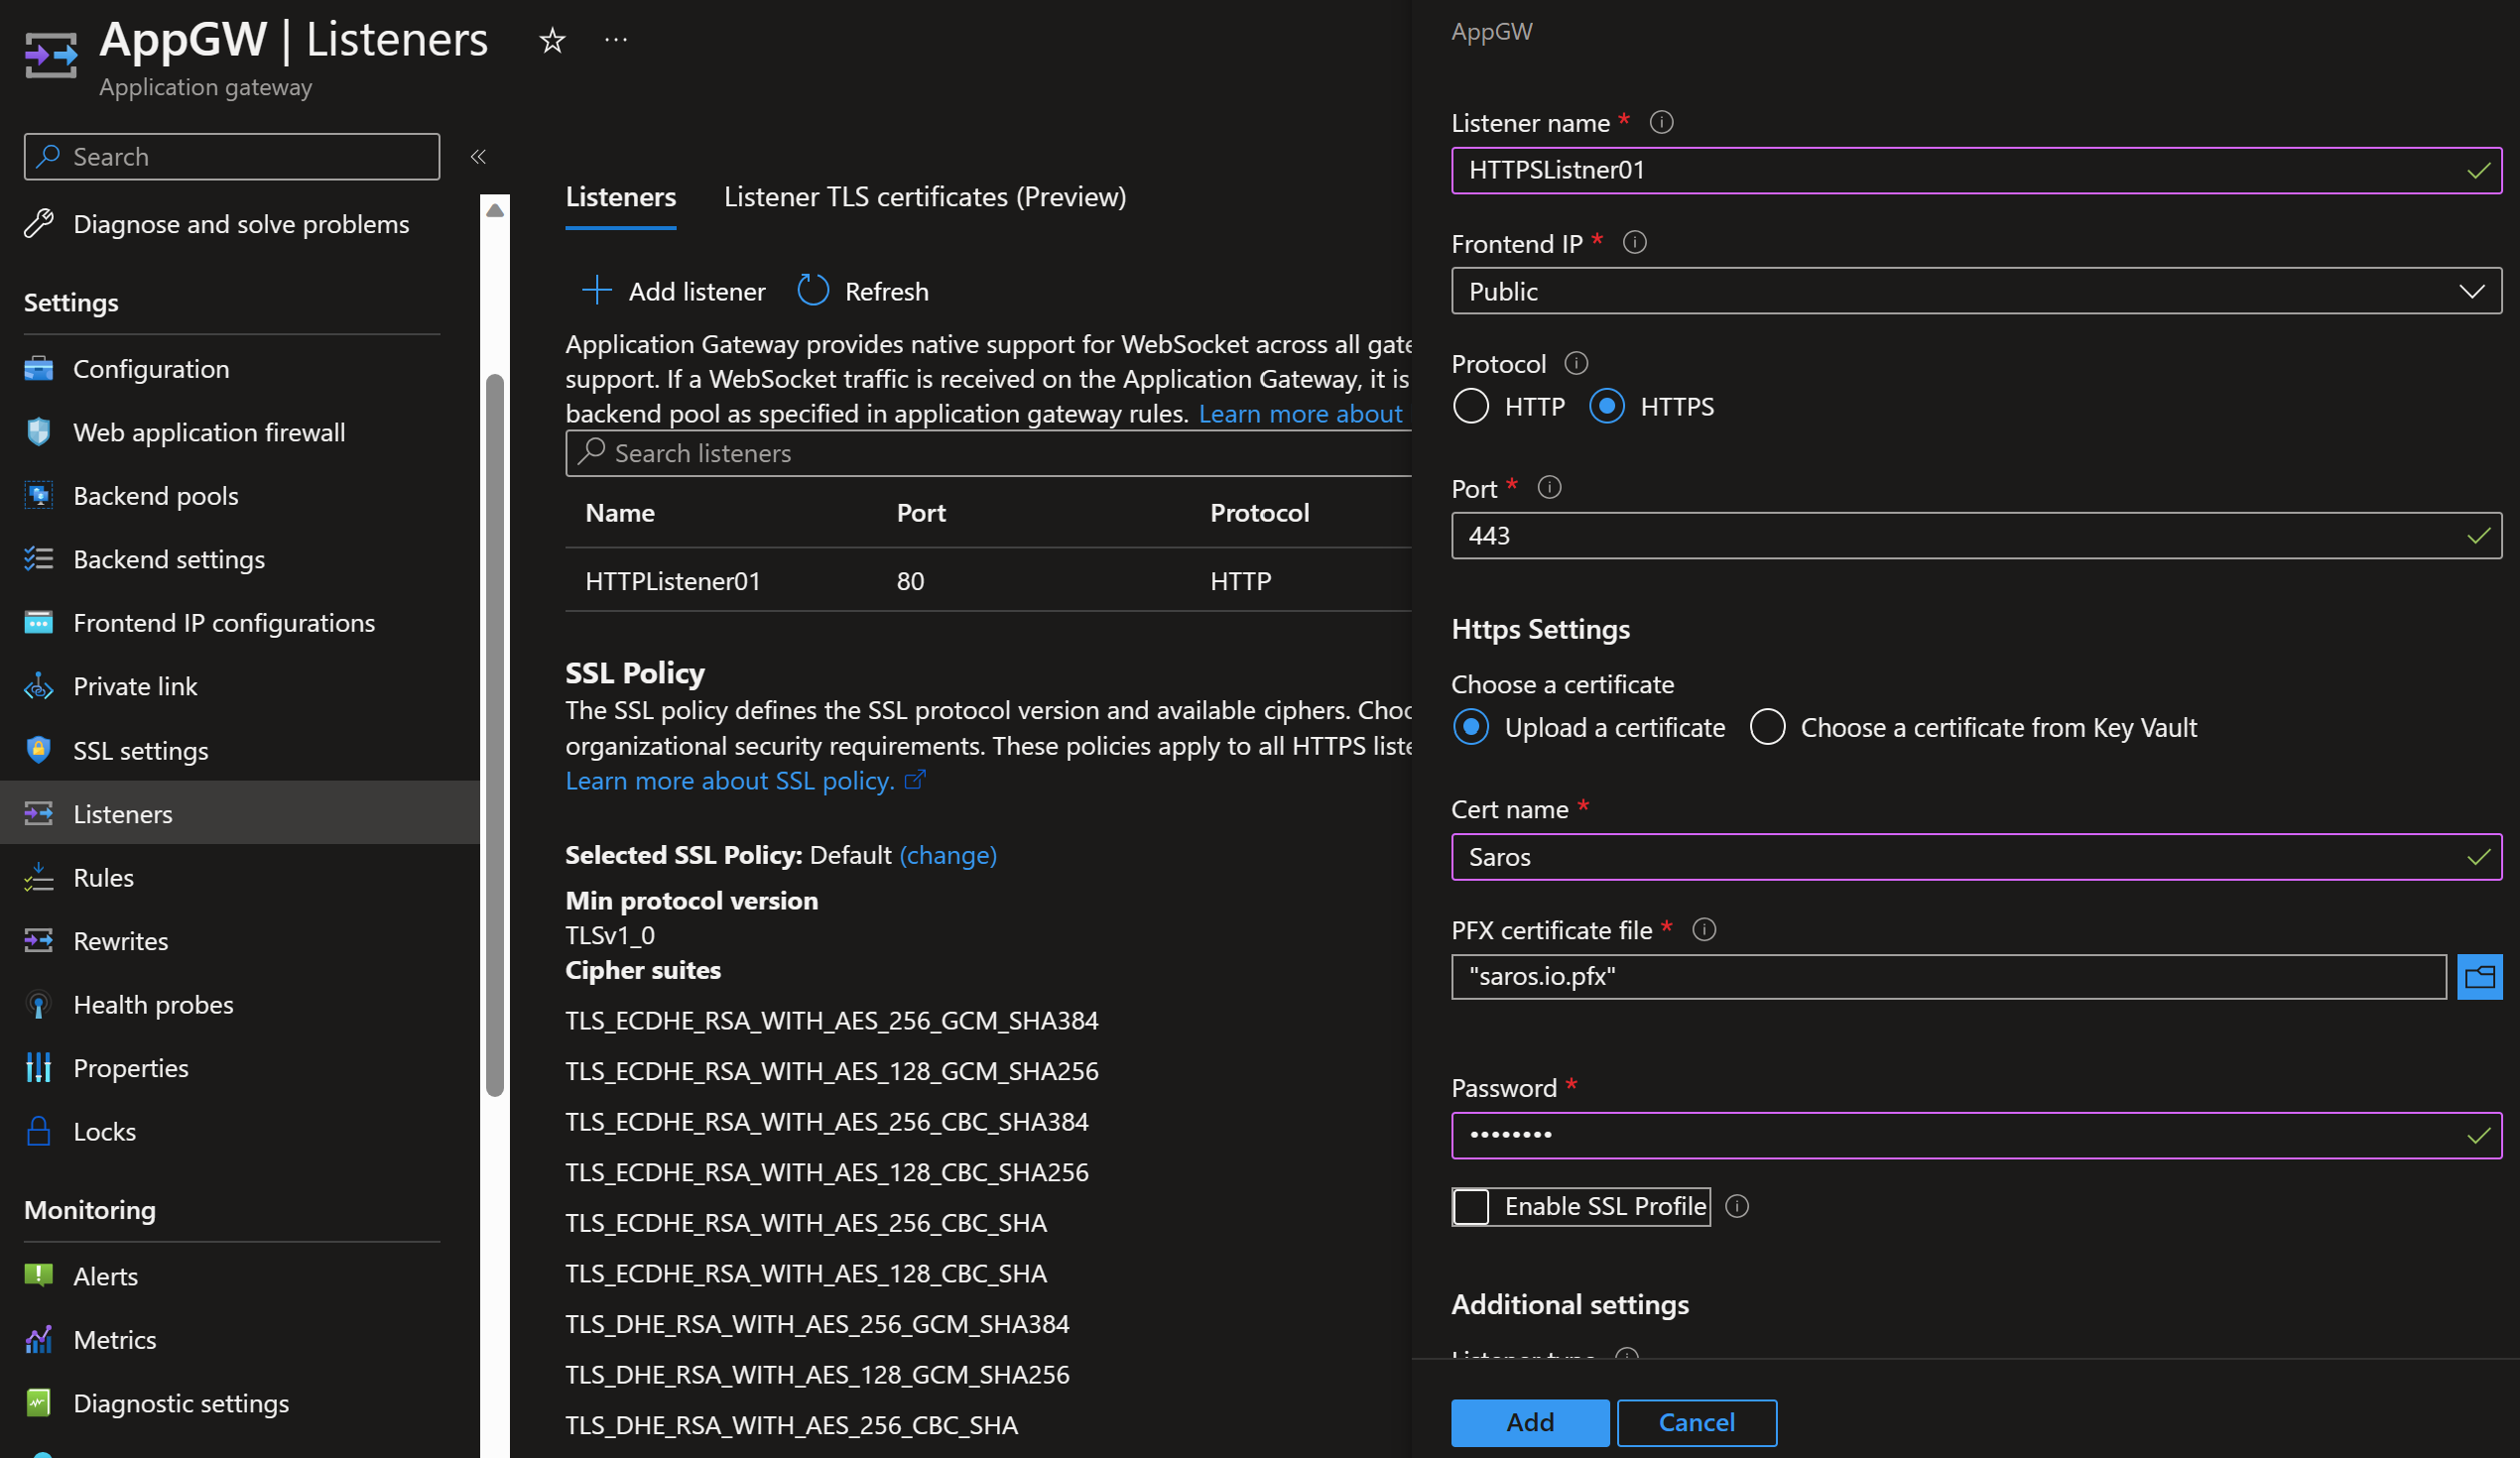
- Add HTTPS Listener
We already have an http listener on port 80, we now need a listener on port 443. Once you set HTTPS, you will need to upload a certificate in pfx format. This was created earlier. You can also use KeyVault to store the certificate and load it here from KeyVault. Note the PFX file requires a password.
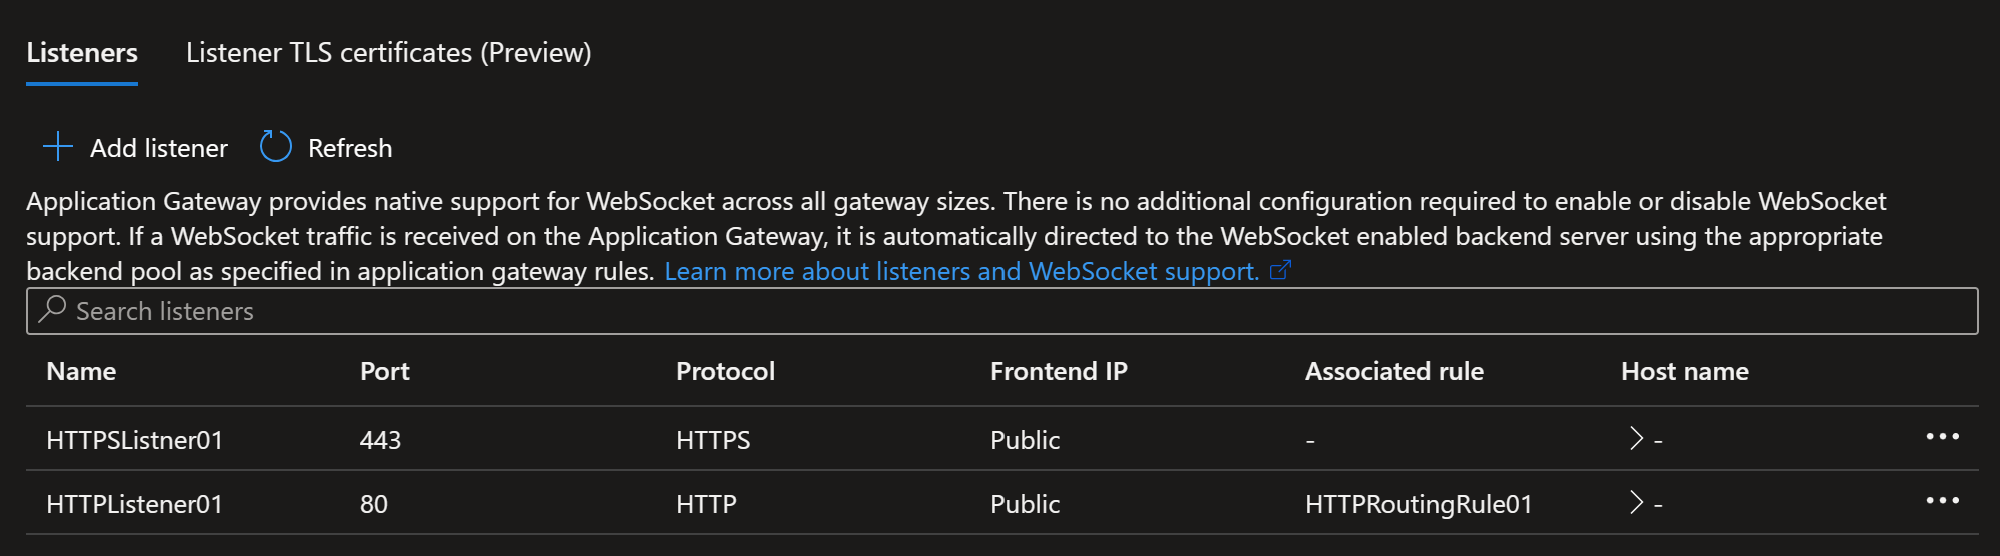
Once you click add, the Application Gateway will update and you will have two listeners as pictured below.
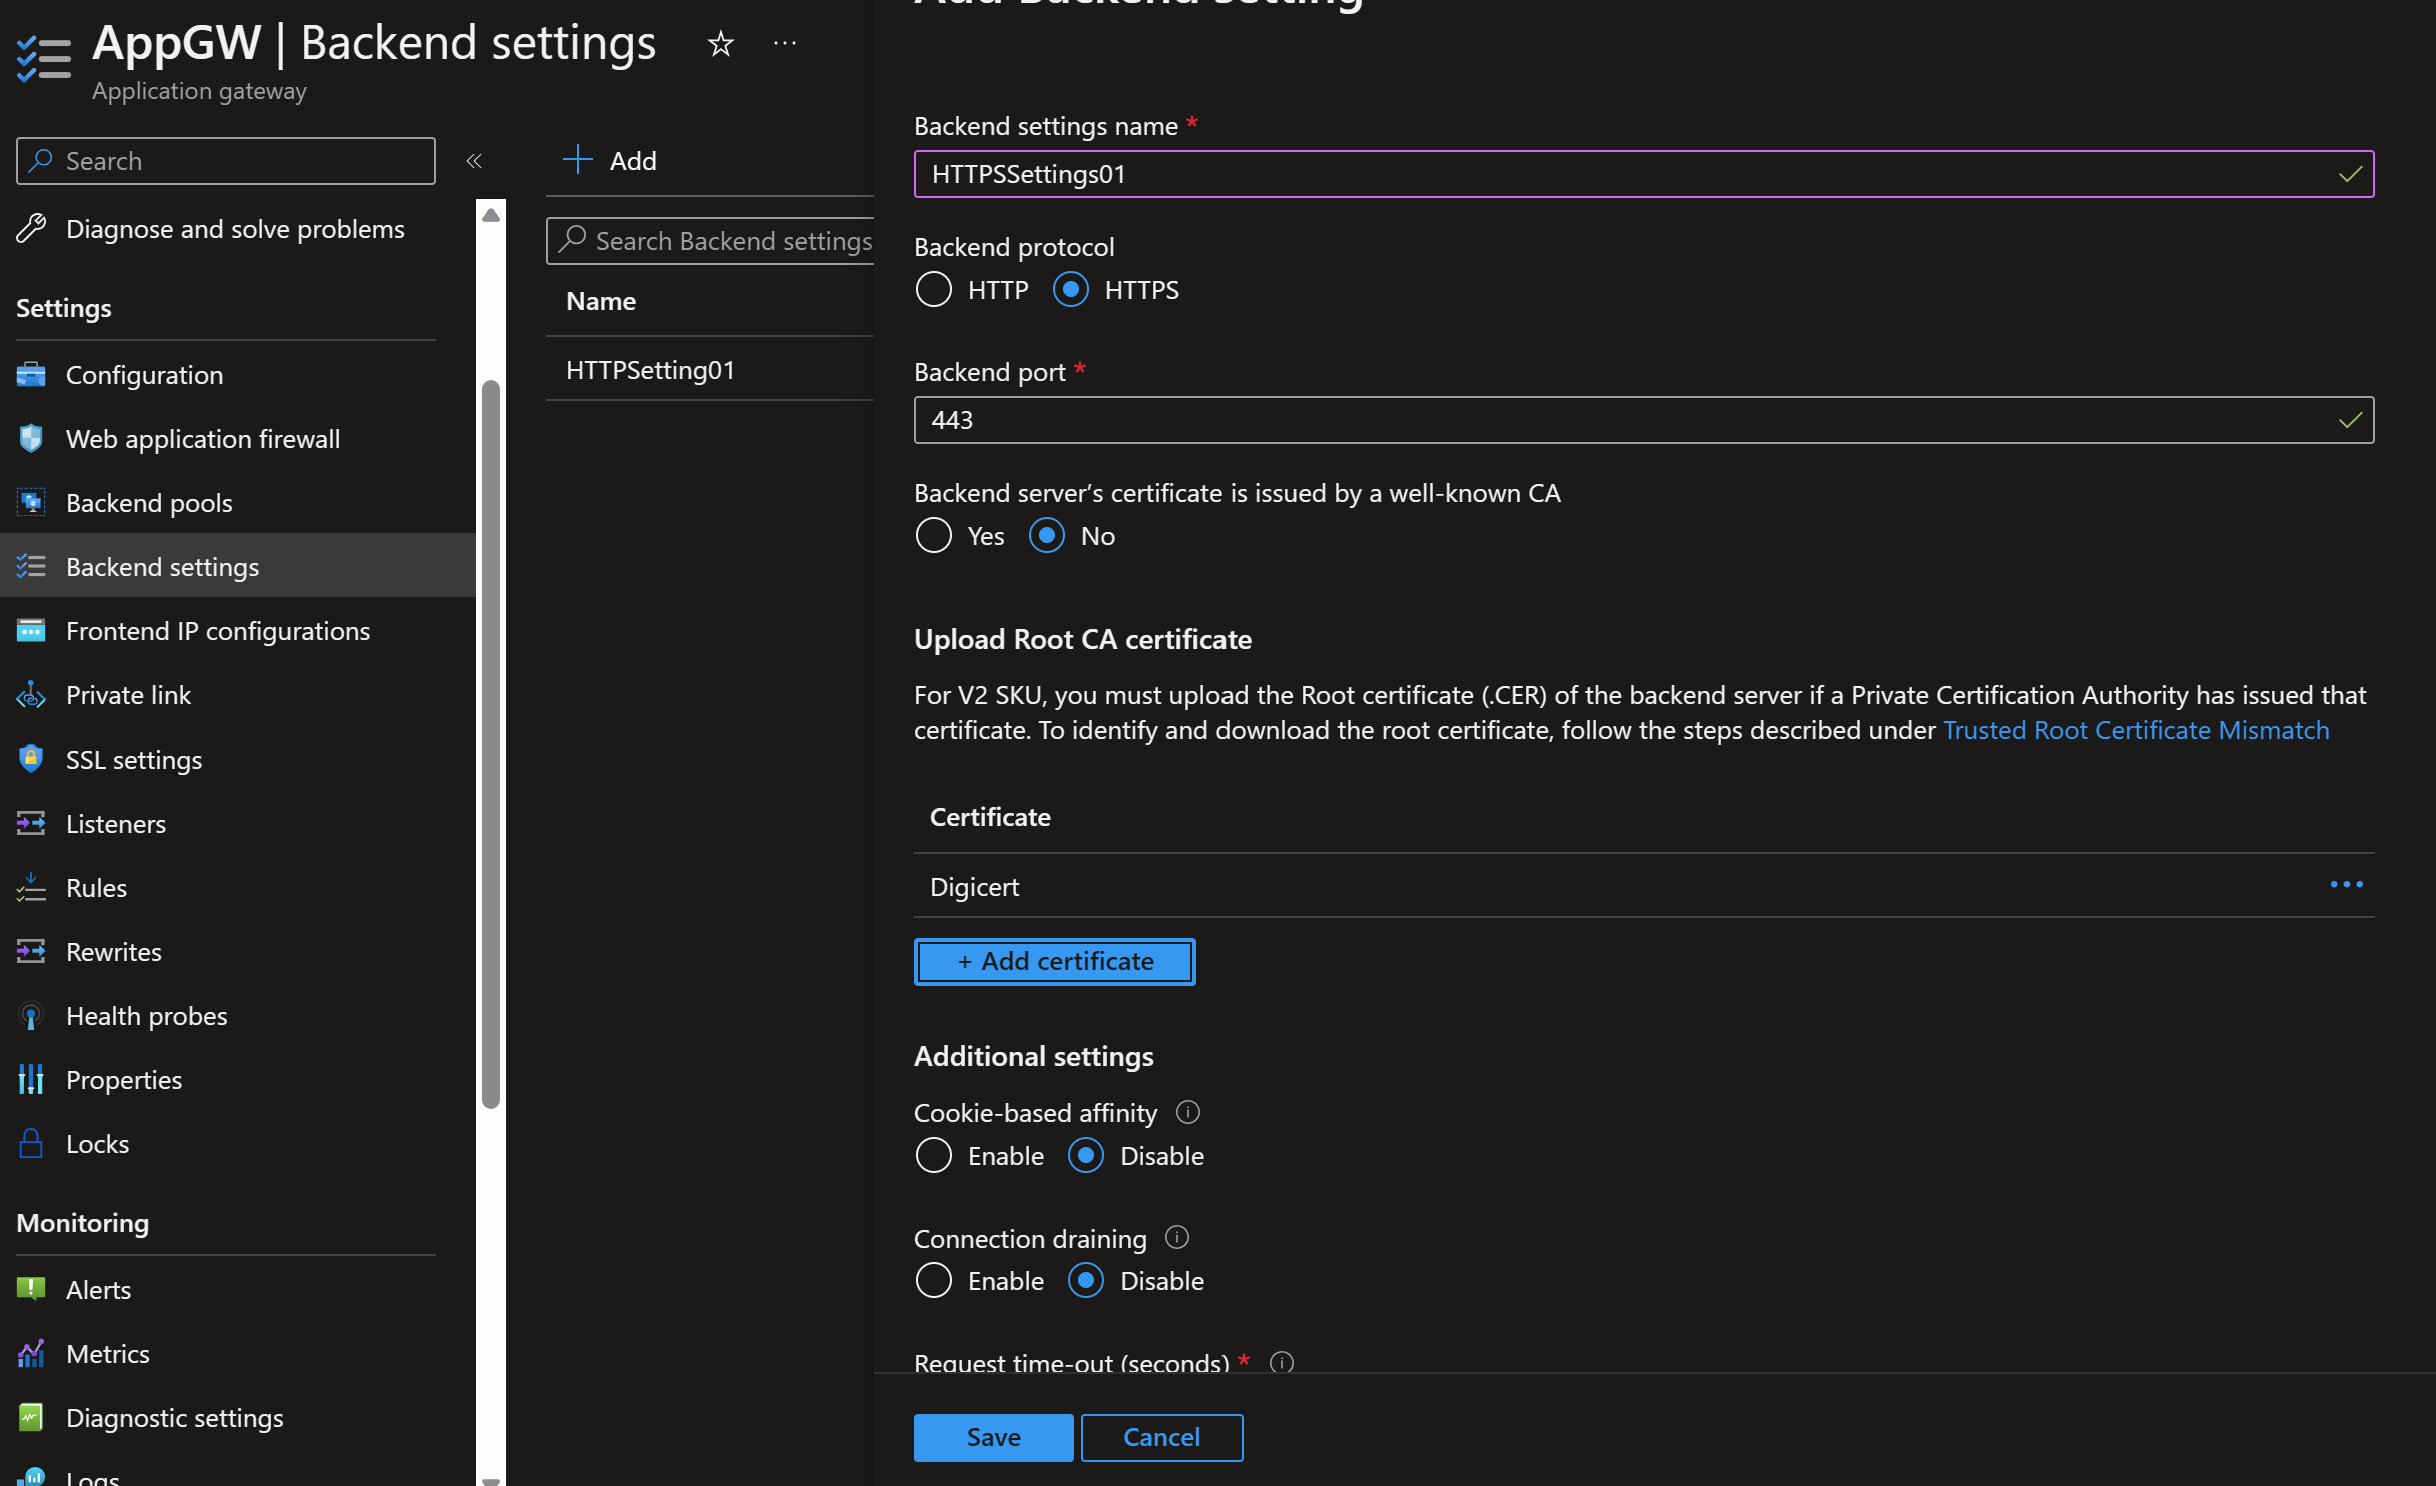
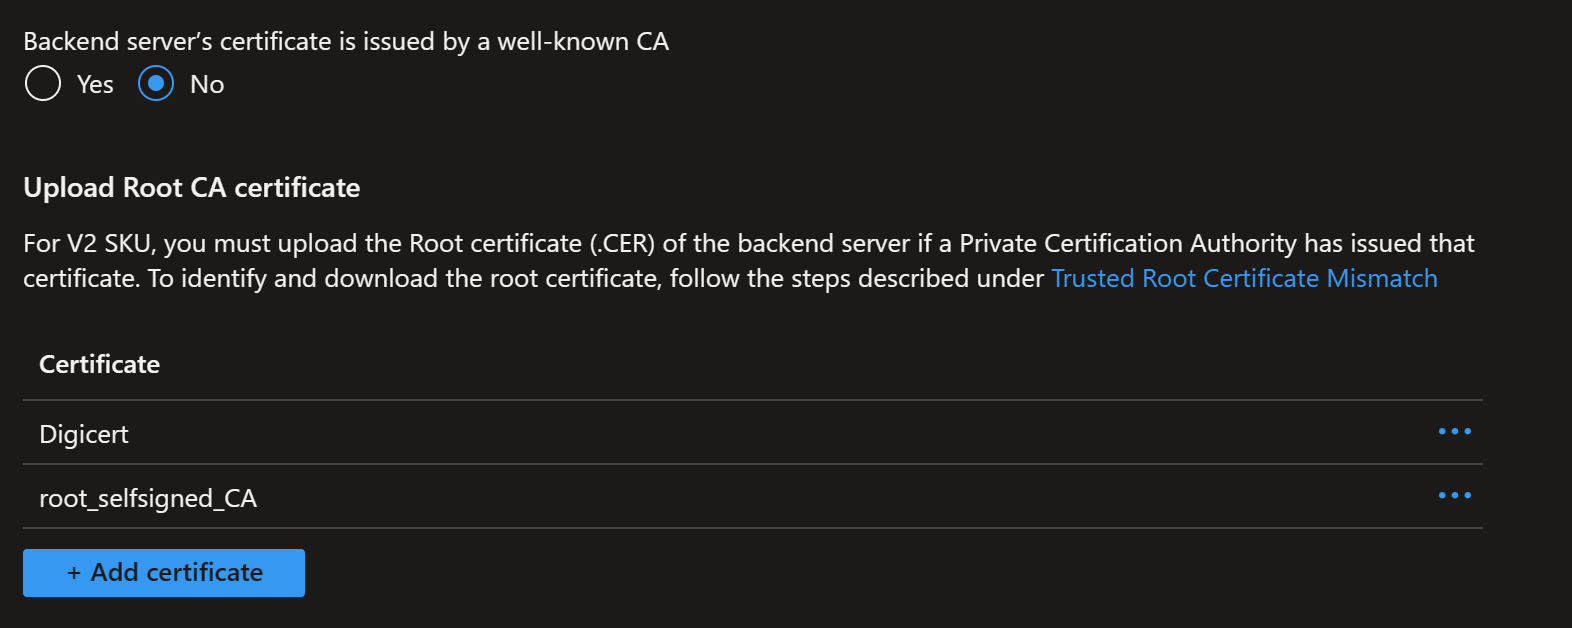
- Add the Backend settings on port 443 and using HTTPS. Instead of using well known CAa, select No. With Digicert the well known CA would work by validating the key over the internet, but we will also need to add the Azure Firewall Root CA here which will invalidate the well known CA setting. So at this step add your root CA in CER format (created in an earlier step).
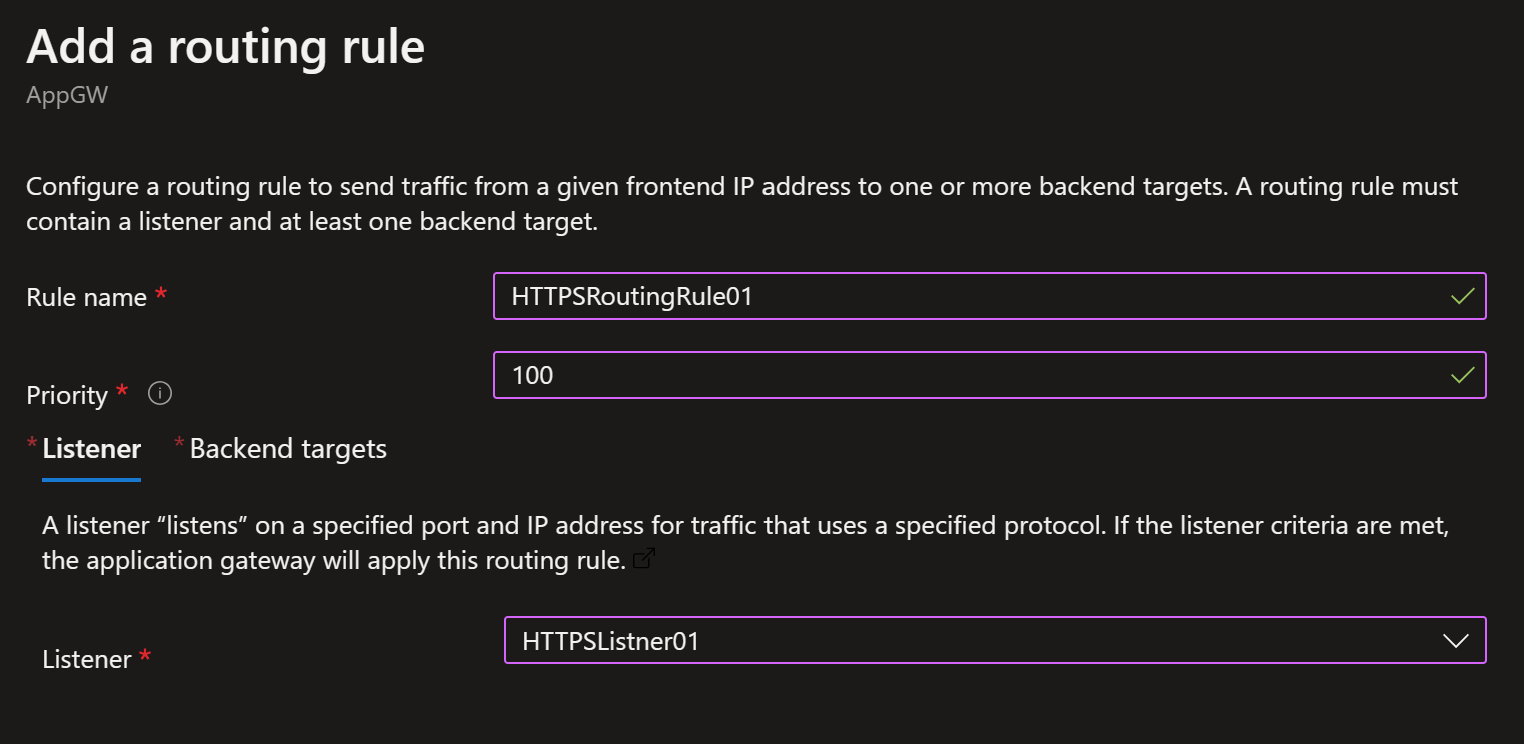
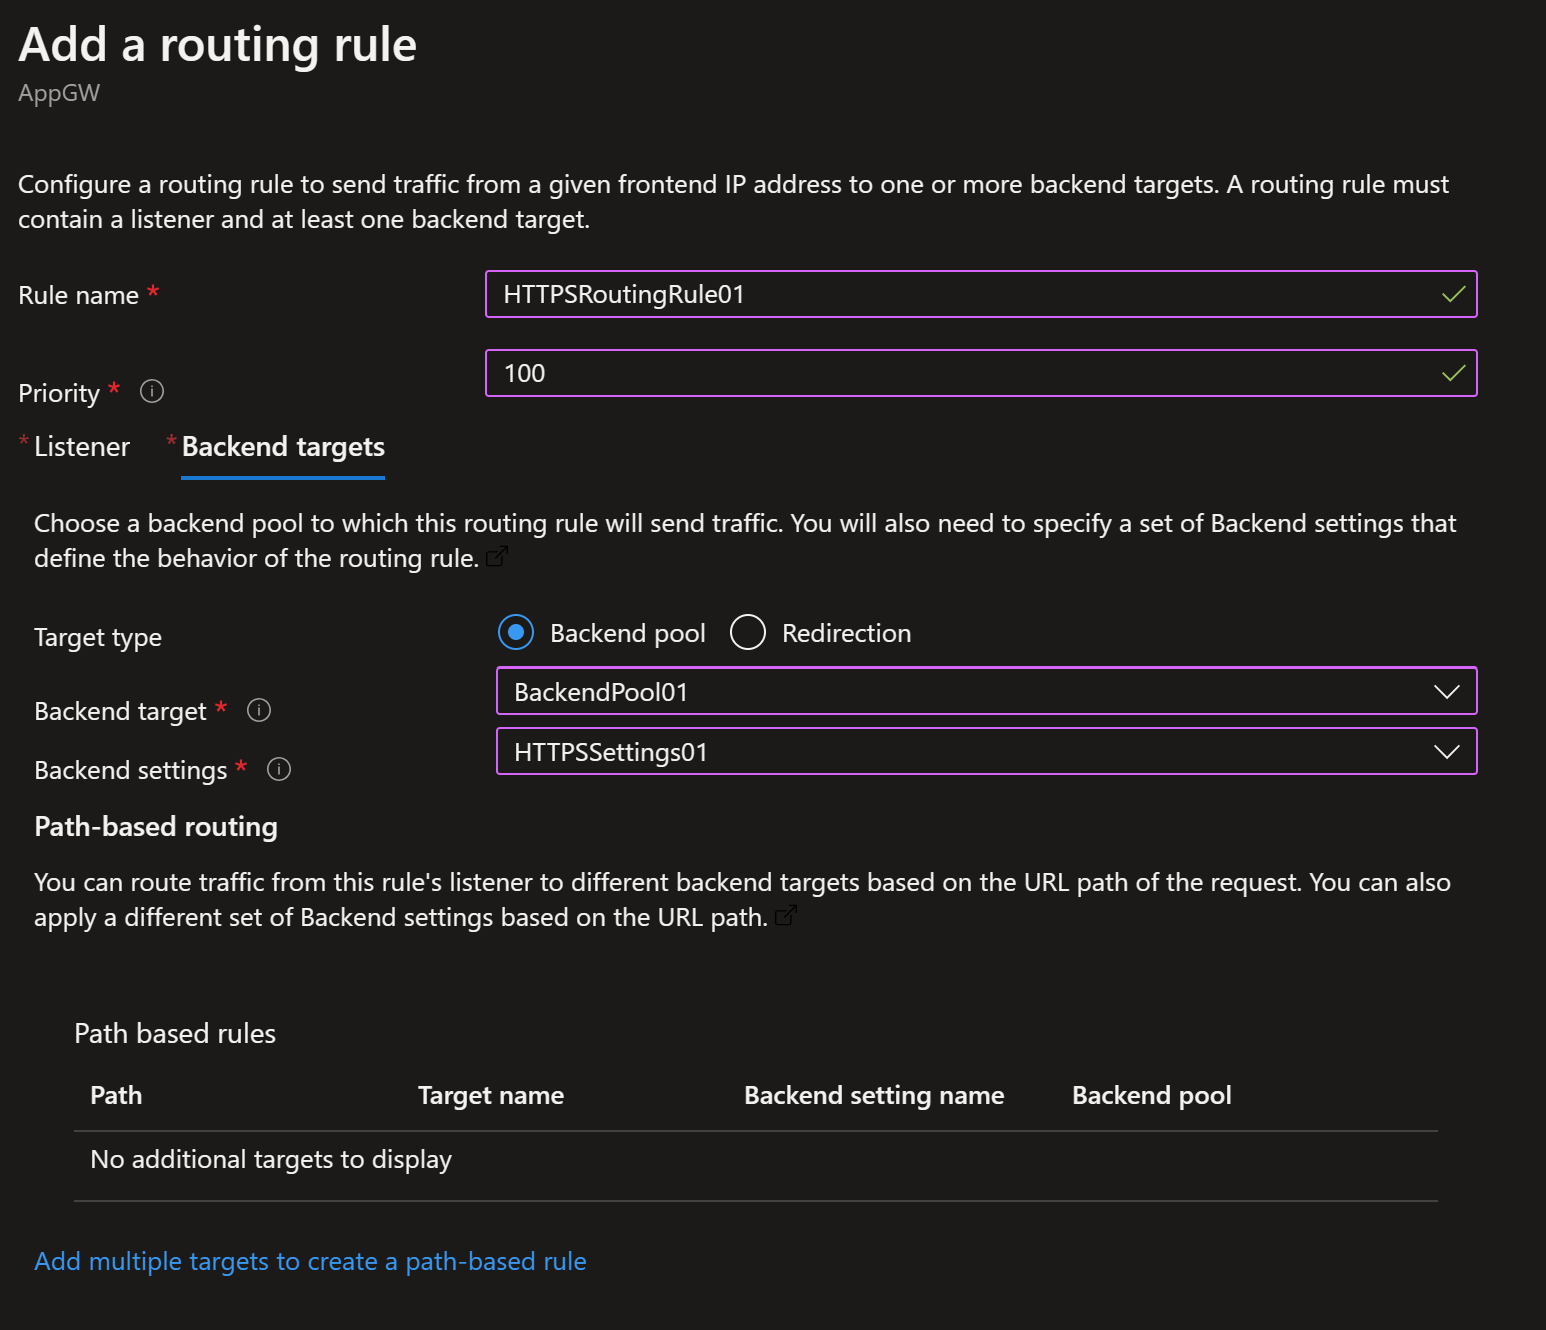
- Add a routing rule for HTTPS (see below examples)
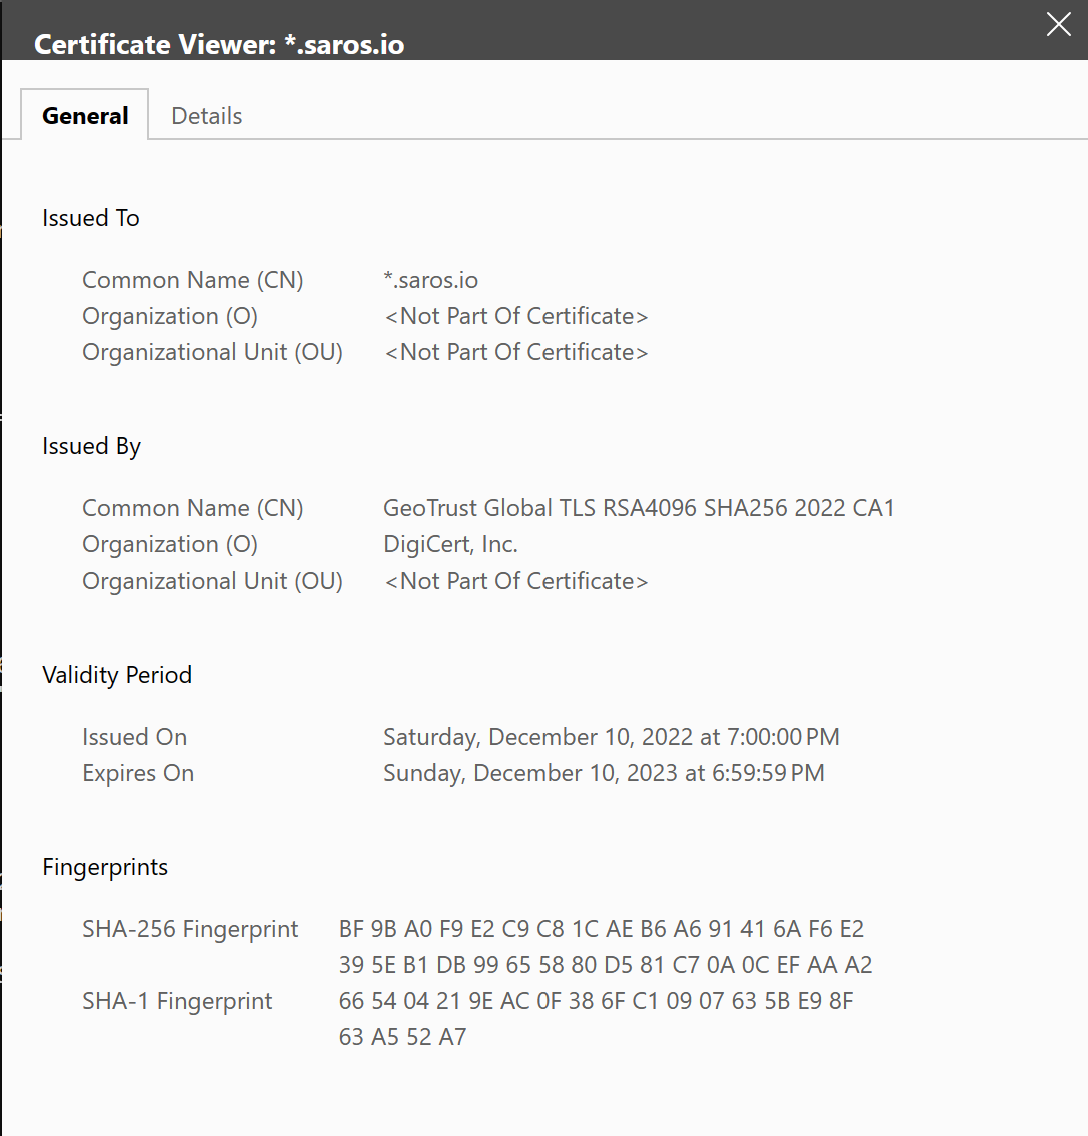
- Update your DNS provider so that you have a FQDN which is valid against the certificate CN name. So for example if your certificate CN=*.saros.io, which is a wildcard for all sub-domains under saros.io, then you need a DNS entry setting a sub-domain to create the FQDN. In this case, I am using CloudFlare and set APP as the sub-domain. So the FQDN is app.saros.io which matches the CN of the certificate I have which is CN=*saros.io.

-
At this point you should be able to test end to end TLS from Application Gateway to the Web Server. Using your URL in place of my specific example go to:
and check the certificate details in the browser to ensure you are using your certificate.
You should also have a list of all the HTTPS headers on the web page. Here is an example list. Note that I have masked the X-Forwarded-For for my IP address.
HTTP_HOST="app.saros.io" HTTP_USER_AGENT="Mozilla/5.0 (Windows NT 10.0; Win64; x64) AppleWebKit/537.36 (KHTML, like Gecko) Chrome/114.0.0.0 Safari/537.36 Edg/114.0.1823.67" HTTP_X_FORWARDED_FOR="67.0.0.0:15700" HTTP_X_FORWARDED_PORT="443" HTTP_X_FORWARDED_PROTO="https" HTTP_X_ORIGINAL_HOST="app.saros.io" HTTP_X_ORIGINAL_URL="/cgi-bin/env.pl" REMOTE_ADDR="10.40.1.6" REMOTE_PORT="56402" REQUEST_METHOD="GET" REQUEST_URI="/cgi-bin/env.pl" SERVER_ADDR="10.41.0.4" SERVER_NAME="app.saros.io" SERVER_PORT="443" SERVER_PROTOCOL="HTTP/1.1" SERVER_SOFTWARE="Apache/2.4.55 (Win64) OpenSSL/1.1.1s" SSL_CIPHER="ECDHE-RSA-AES256-GCM-SHA384" SSL_CIPHER_ALGKEYSIZE="256" SSL_CIPHER_EXPORT="false" SSL_CIPHER_USEKEYSIZE="256" SSL_CLIENT_VERIFY="NONE" SSL_PROTOCOL="TLSv1.2" SSL_SERVER_A_KEY="rsaEncryption" SSL_SERVER_A_SIG="sha256WithRSAEncryption" SSL_SERVER_I_DN="CN=GeoTrust Global TLS RSA4096 SHA256 2022 CA1,O=DigiCert, Inc.,C=US" SSL_SERVER_I_DN_C="US" SSL_SERVER_I_DN_CN="GeoTrust Global TLS RSA4096 SHA256 2022 CA1" SSL_SERVER_I_DN_O="DigiCert, Inc." SSL_SERVER_M_SERIAL="0DF94B0F9D2D6DB7BE1E91CBCB39BA51" SSL_SERVER_SAN_DNS_0=".saros.io" SSL_SERVER_S_DN="CN=.saros.io" SSL_SERVER_S_DN_CN="*.saros.io" SSL_SERVER_V_END="Dec 10 23:59:59 2023 GMT" SSL_SERVER_V_START="Dec 11 00:00:00 2022 GMT" SSL_TLS_SNI="app.saros.io"
Now let's walk the packets between the browser -> Application Gateway -> Web Server
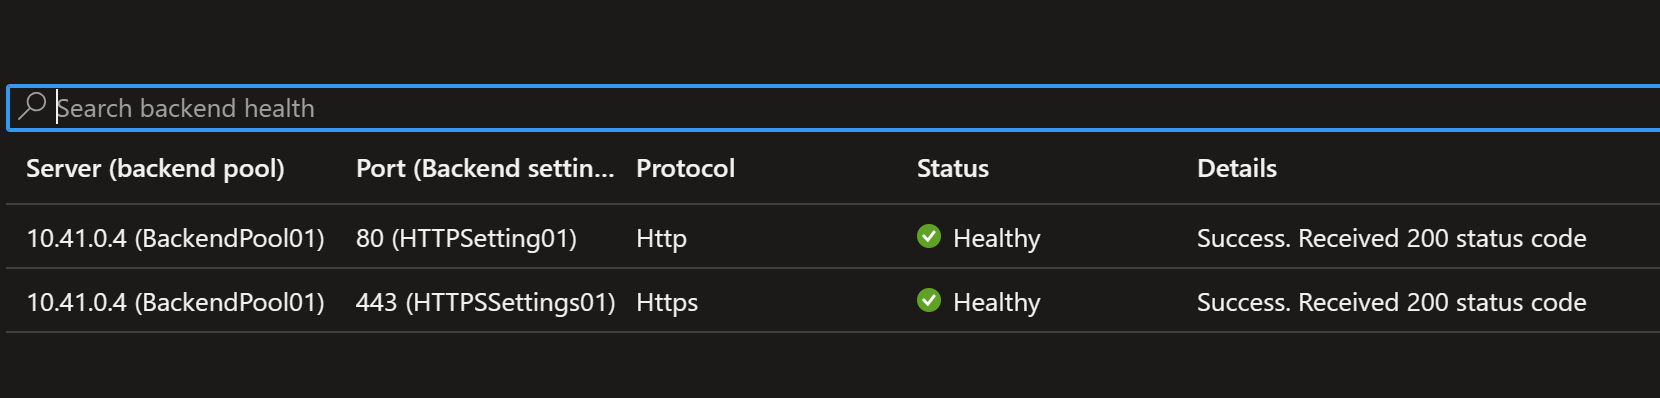
Note we have not introduced the firewall yet or any custom routing. It is purely the Application Gateway pointing to the back end web server.
Also note that the back end is healthy without an explicit probe set. Its not required since the backend pool per the deployment is set to the IP address of the backend Web Server. Since that IP is directly routable to the web server and the listener knows which back end port we are accessing, the health probe can figure out by itself whether the back end is healthy or not.
So the routing is very simple. In the server variables you can see the tuples here: REMOTE_ADDR="10.40.1.6" REMOTE_PORT="56402" SERVER_ADDR="10.41.0.4" SERVER_PORT="443" HTTP_X_FORWARDED_FOR="67.0.0.0:15700" HTTP_X_FORWARDED_PORT="443"
NOTE: X-Forwarded-For is set correctly, but I obscured it so as not to publish my public IP address
But the important thing here is that the web server does not see the client. It see's the ephemeral private IP of the Application Gateway as the source. Packets from the web server are therefore returned to the Application Gateway and the Application Gateway proxies results back to the original requester IP. However, the web server does have access to the requestor IP via X-Forwarded-For in the header.
Let's add the Firewall into the mix. To do that we need to force the traffic at the SDN level to route through the firewall.
Existing UDRs have been created in the deployment but not associated with any subnet.
The route table To_FW has a destination CIDR of 10.41.0.0/24 which is the CIDR of the web server backend subnet. Any traffic destined to 10.41.0.4 (the web server private IP) will be forced to the next hop IP of the route table. The next hop happens to be the private IP of the Azure Firewall.
So think about this. The backend of the Application Gateway has the private IP of the Web Server. So the Application Gateway tries to send data traffic and health traffic to that address. But the UDR will force that traffic leaving the hidden NIC of the Application Gateway to the Firewall front end.
But wait, we know from the packet walk above, the Web Server receives the private IP of the Application Gateway as the source. The Web Server knows nothing of the Azure Firewall. So if we do not send the traffic back to the Azure Firewall, traffic will route symmetrically around the Azure Firewall. This is not what we want. So we need another UDR on the Web Server subnet that forces traffic back to the Azure firewall private IP based on the destination of the Application Gateway CIDR which is equal to the subnet we defined in the Virtual Network subnet. In this case 10.40.1.0/24.
So let's assign some UDR's and see the results.
- First assign: To_FW route table and associate with the Application Gateway subnet
- Second assign: From_Web and associate with Web Server subnet

Now with the bi-directional UDR's traffic will flow symmetrically. Another option, we will see later on is SNAT. With SNAT do we still need the UDR?
Also note right now we are relying on the Allow-All rule in Azure Firewall Network Rules (which was deployed by default). We are not using any application rules (which will always SNAT). So we will test the above soon.
But for right now traffic is working because Network Rules take precedence over Application Rules and all IP traffic is allowed.
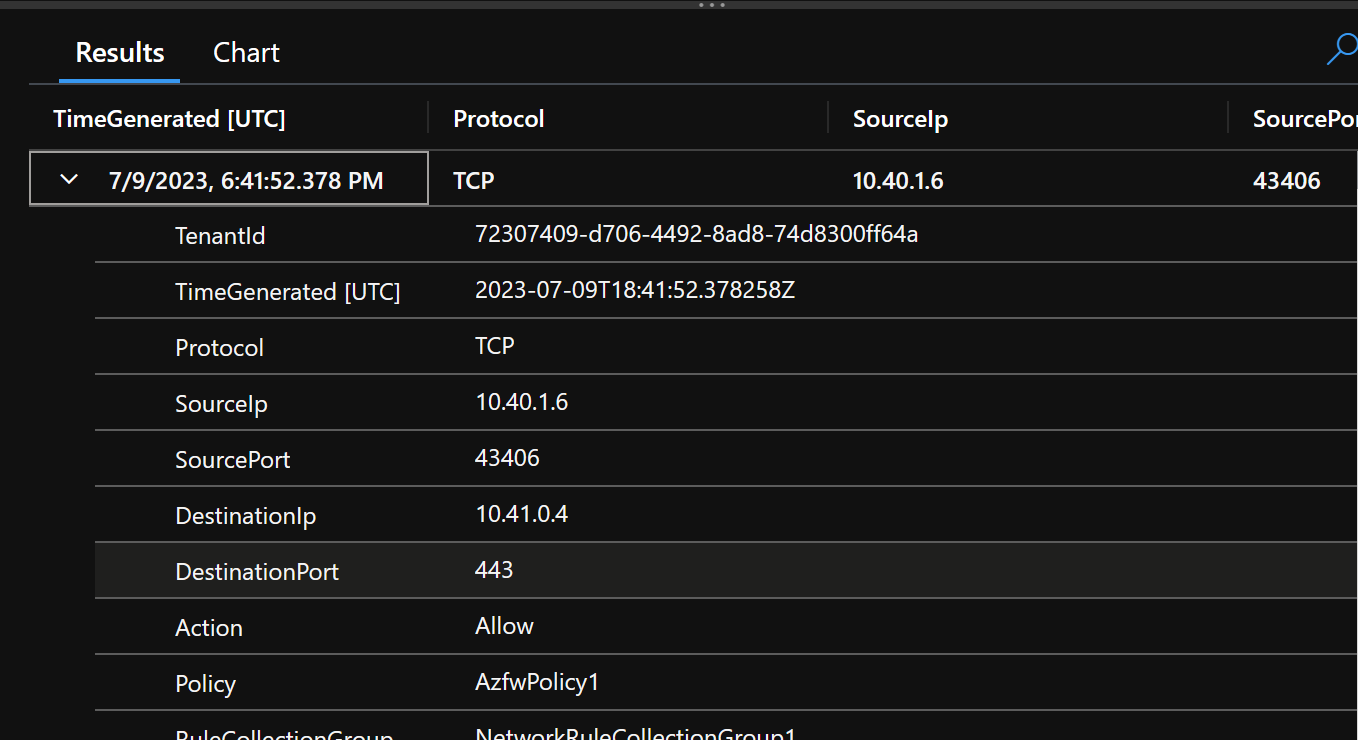
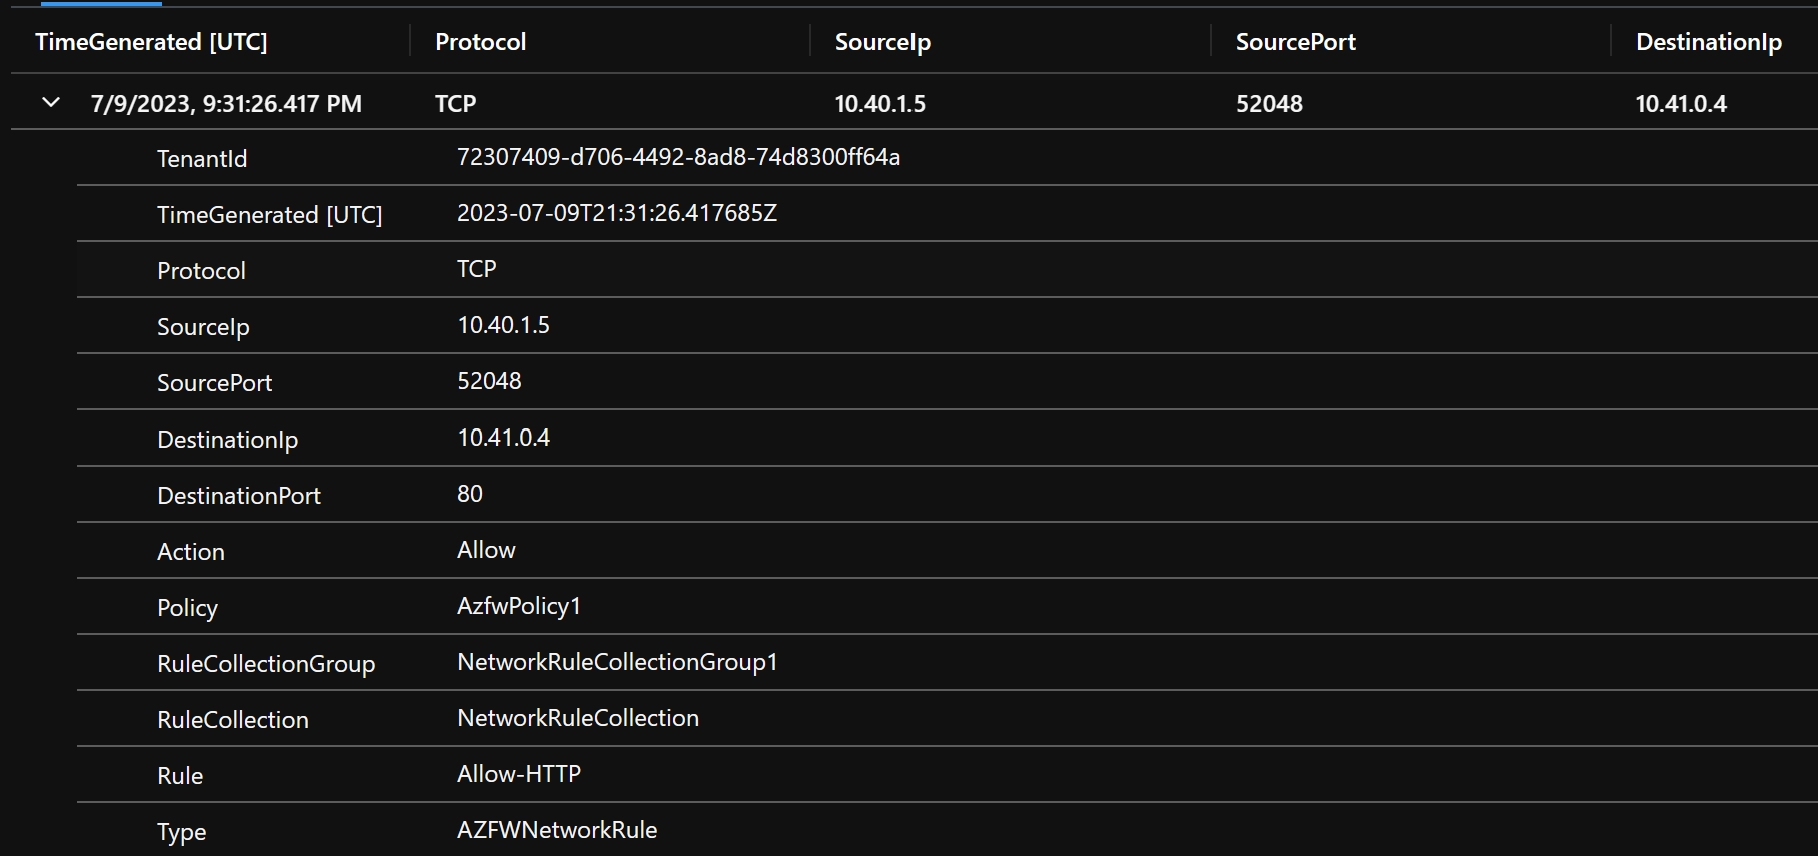
Another way to verify source/destination and that we are utilizing the Azure Firewall is to look at the Azure Firewall Logs for Network Rules (Firewall logging is also on by default). Here you can see we are indeed routing through the Firewall. But we are not inspecting traffic yet.
// Network rule logs `` // Packets that matched Network rules. Both packet and rule metadata is displayed. AZFWNetworkRule | order by TimeGenerated
So as with the first packet walk the flow looks the same to the Web Server. But we are now traversing through a firewall.
Let's take a look this time through Wireshark.
Set a Wireshark Filter as below and start the capture. And then access the Web Server from your browser through the URL you set up earlier.
ip.addr == 10.40.1.0/24 && ip.dst_host == 10.41.0.4
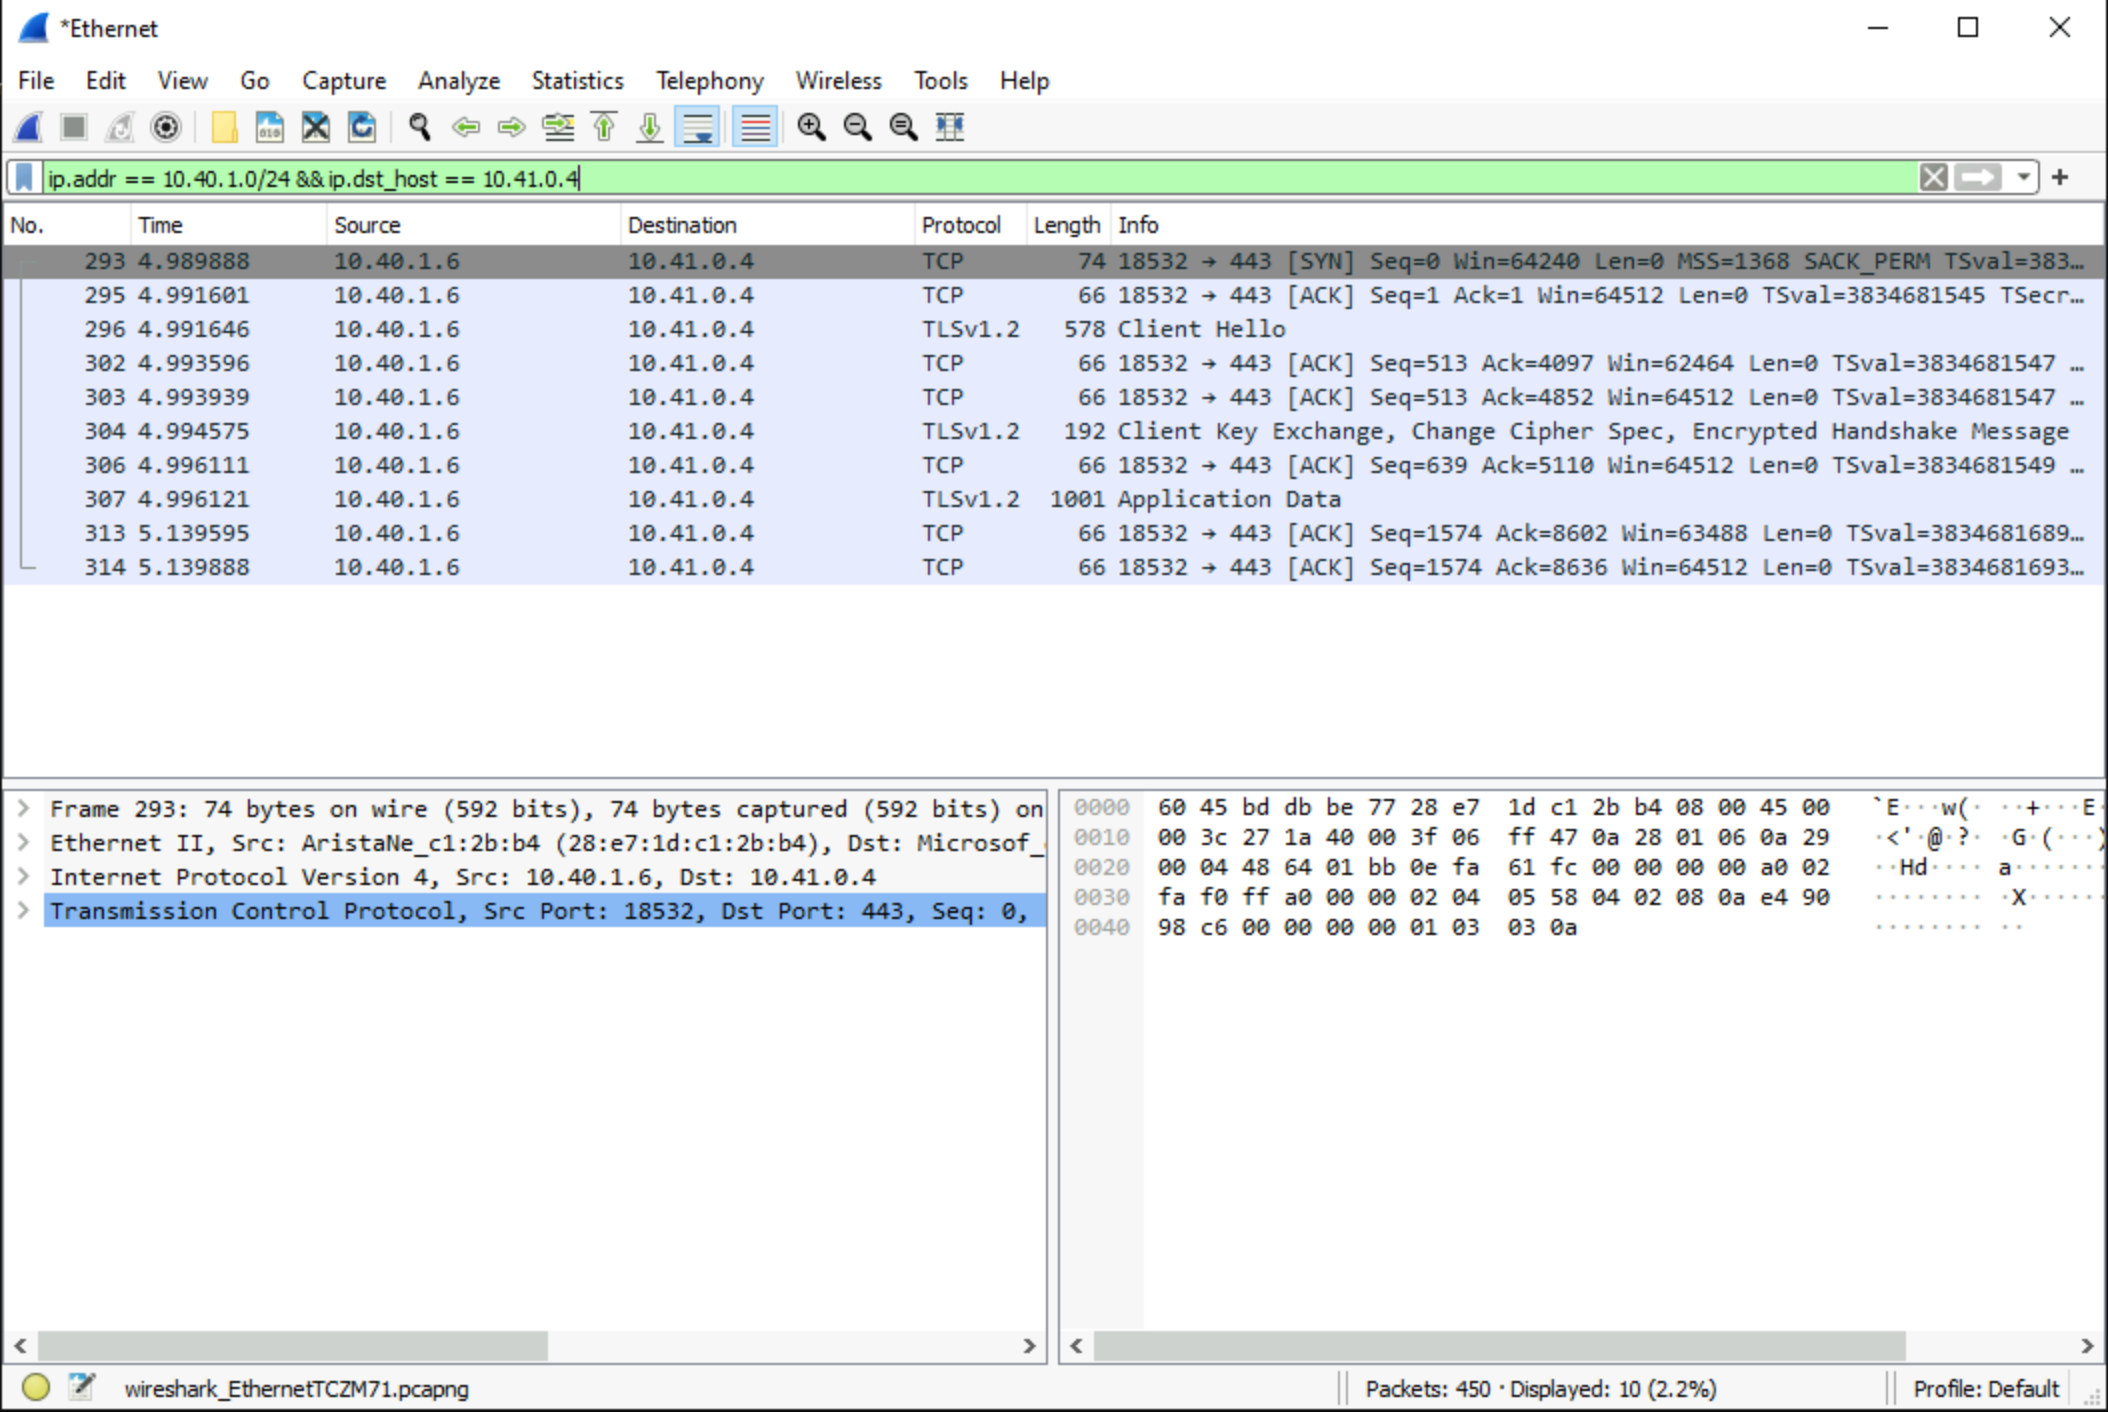
Here you can see the same results as we saw with the environment variables in the first packet walk. The VM see's the ephemeral private IP of the Application Gateway.
Now we are going to turn on TLS in Azure Firewall and then configure the Application Gateway to work with Azure Firewall. This article provides a good overview of the certificates required to make this happen: Zero-trust network for web applications with Azure Firewall and Application Gateway
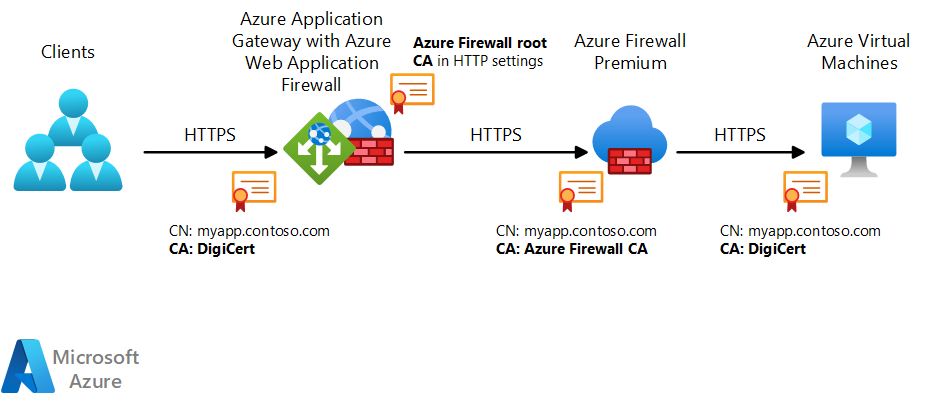
Here you can see that Application Gateway needs the public cert with the publicly signed CA. But the Application Gateway also requires the signed CA from the Firewall (which in this case will be a self signed cert). The Azure Firewall will have a self signed CN based on the same CN of the public cert in the Application Gateway. And finally the back end Web VM will have the same public CN and publicly signed CA as the front end of the Application Gateway. The Application Gateway will see the Firewall certificate as valid since the Application Gateway has a signed root certificate for the intermediate certificate in the Azure Firewall. So the Application Gateway back end process trusts the Azure Firewall. The traffic is re-encrypted with the firewall intermediate certificate that is provided to the Application Gateway. The Firewall will receive the encrypted traffic, decrypt it and pass it through the IDPS engine to look for signature hits against the header and body and log or block that traffic based on the IDPS setting. If the traffic is not blocked, it is re-encrypted with the Web servers certificate. When the traffic is received by the Web Server, it is decrypted and processed by the back end server.
Let's enable the Azure Firewall certificate.
- Generate the Self Signed Certificate for Azure Firewall. Note that the Self Signed certificate CN must match the front-end Application Gateway domain name. It is recommended that the front end SSL certificate and Web Server certificate is a wildcard certificate.
First you will need this file in directory in which you will generate the certificate.
openssl.cnf
[ req ]
default_bits        = 4096
distinguished_name  = req_distinguished_name
string_mask         = utf8only
default_md          = sha512

[ req_distinguished_name ]
countryName                     = Country Name (2 letter code)
stateOrProvinceName             = State or Province Name
localityName                    = Locality Name
0.organizationName              = Organization Name
organizationalUnitName          = Organizational Unit Name
commonName                      = Common Name
emailAddress                    = Email Address

[ rootCA_ext ]
subjectKeyIdentifier = hash
authorityKeyIdentifier = keyid:always,issuer
basicConstraints = critical, CA:true
keyUsage = critical, digitalSignature, cRLSign, keyCertSign

[ interCA_ext ]
subjectKeyIdentifier = hash
authorityKeyIdentifier = keyid:always,issuer
basicConstraints = critical, CA:true, pathlen:1
keyUsage = critical, digitalSignature, cRLSign, keyCertSign

[ server_ext ]
subjectKeyIdentifier = hash
authorityKeyIdentifier = keyid:always,issuer
basicConstraints = critical, CA:false
keyUsage = critical, digitalSignature
extendedKeyUsage = serverAuth
- Then we will run the Powershell below to generate the certificates.
PowerShell - cert.ps1
Note openssl is not installed by default in Windows. However, the .exe is installed with Git. So if you have Git installed, add /program files/git/usr/bin to your path and you can run the below commands in Windows, otherwise use Linux.
# Create root CA
openssl req -x509 -new -nodes -newkey rsa:4096 -keyout rootCA.key -sha256 -days 3650 -out rootCA.crt -subj '/C=US/ST=US/O=Saros/CN=app.saros.io' -config openssl.cnf -extensions rootCA_ext

# Create intermediate CA request
openssl req -new -nodes -newkey rsa:4096 -keyout interCA.key -sha256 -out interCA.csr -subj '/C=US/ST=US/O=Saros/CN=app.saros.io'

# Sign on the intermediate CA
openssl x509 -req -in interCA.csr -CA rootCA.crt -CAkey rootCA.key -CAcreateserial -out interCA.crt -days 3650 -sha256 -extfile openssl.cnf -extensions interCA_ext

# Export the intermediate CA into PFX
openssl pkcs12 -export -out interCA.pfx -inkey interCA.key -in interCA.crt -password 'pass:'
The following certificate files will be generated:
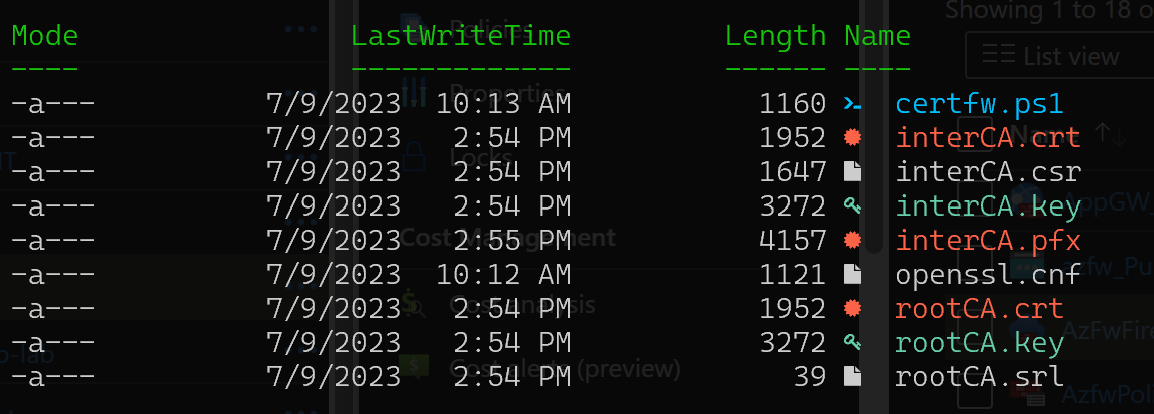
The necessary file at this step is: interCA.pfx which will go to Keyvault Certificates. And will be consumed by Azure Firewall TLS Inspection.
NOTE: The managed identity necessary for the Azure Firewall to consume the certificate is already deployed. However, you will not have access to the certificate data by default. There is not an easy way to deploy the user client ID via automation. So we will do this manually.
So under Access Policies in the Key Vault, please add your identity manually in Access Policies
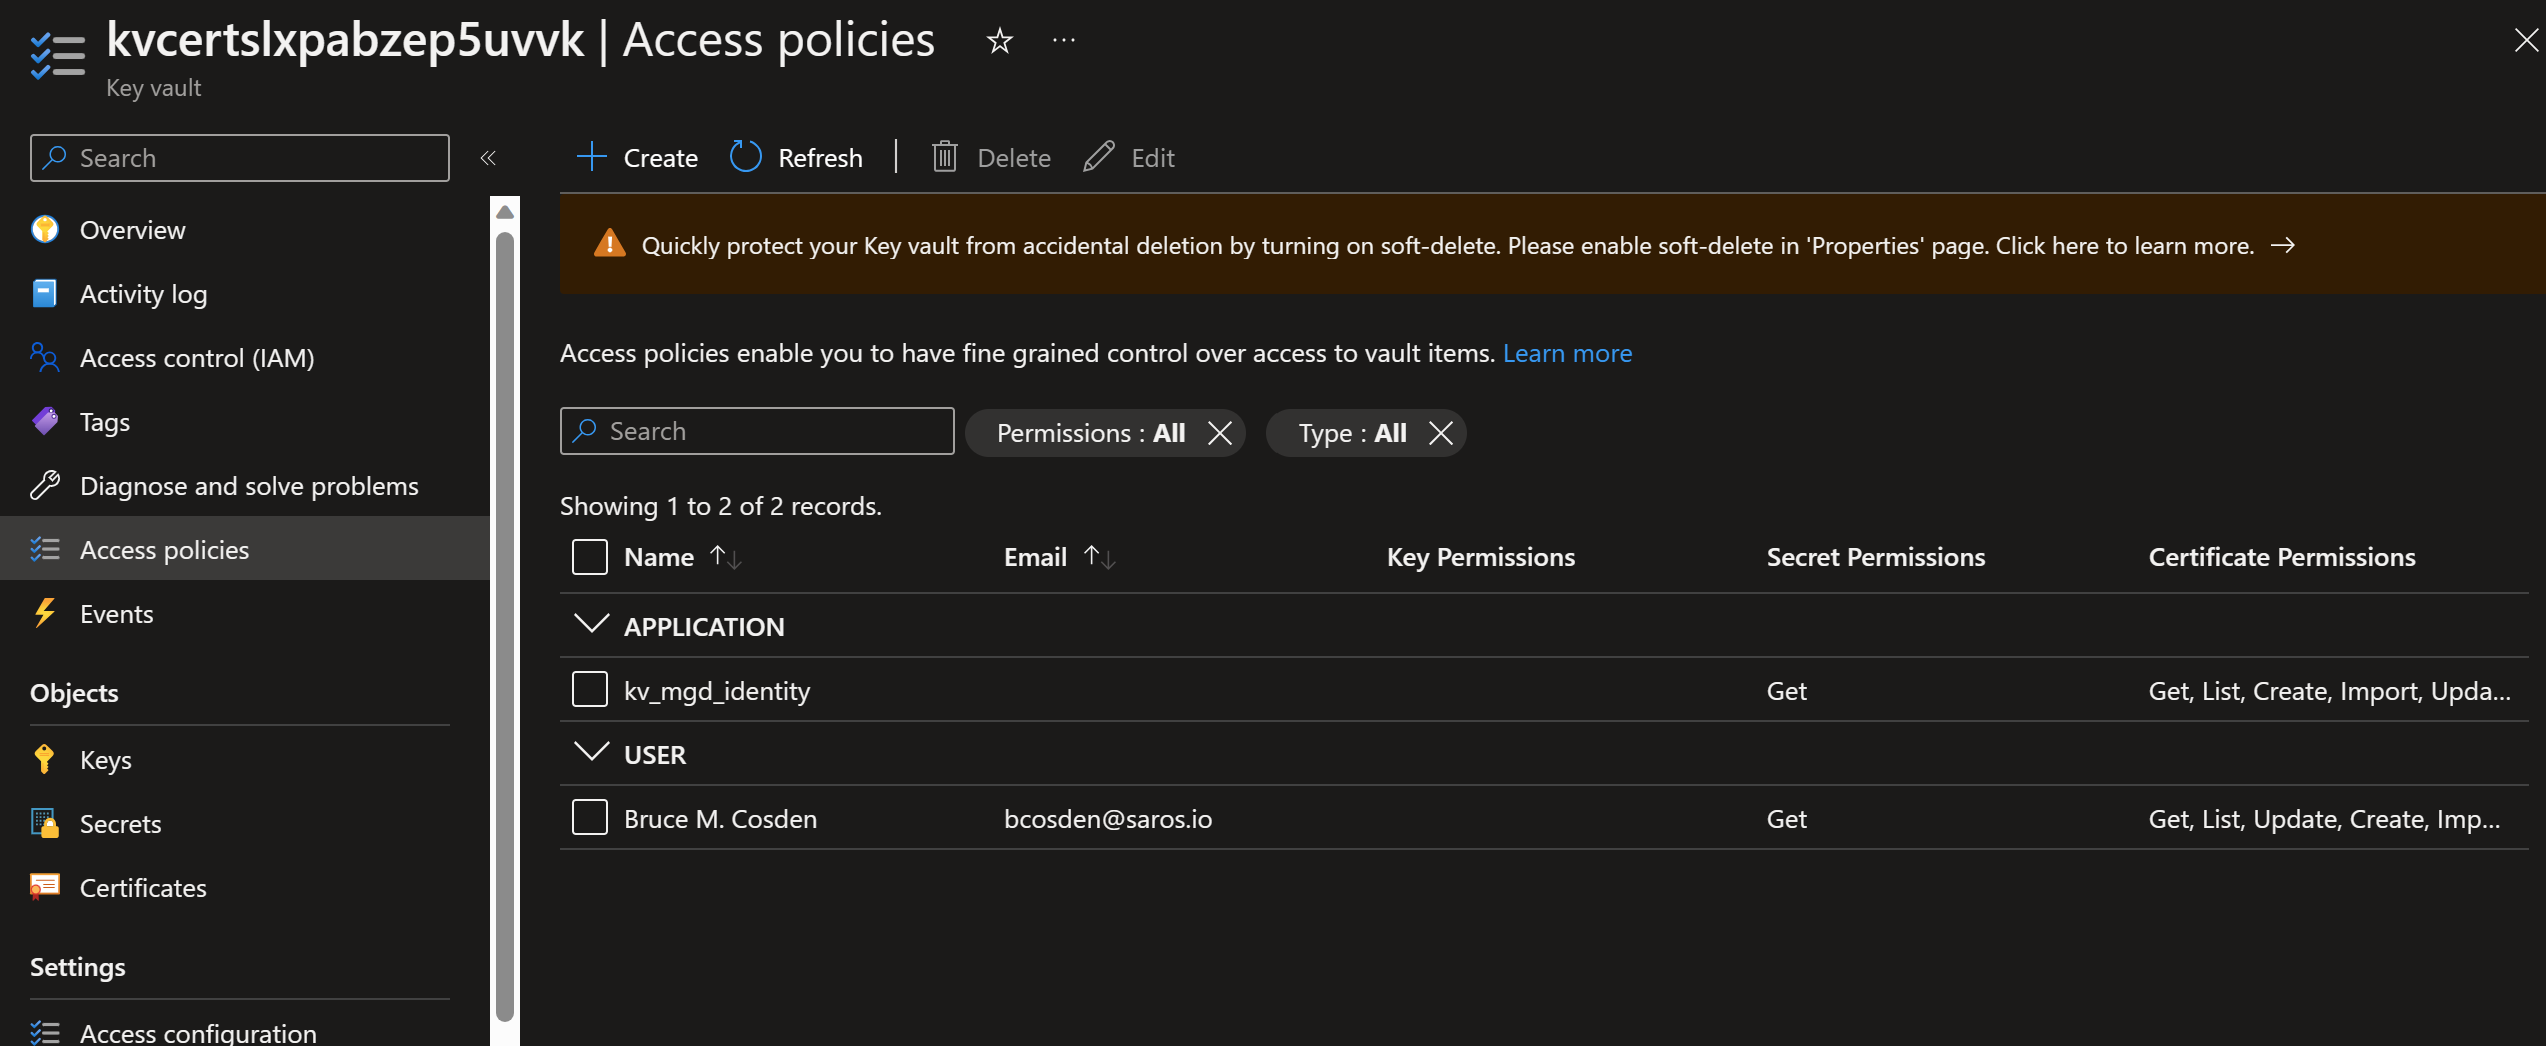
With the following settings:
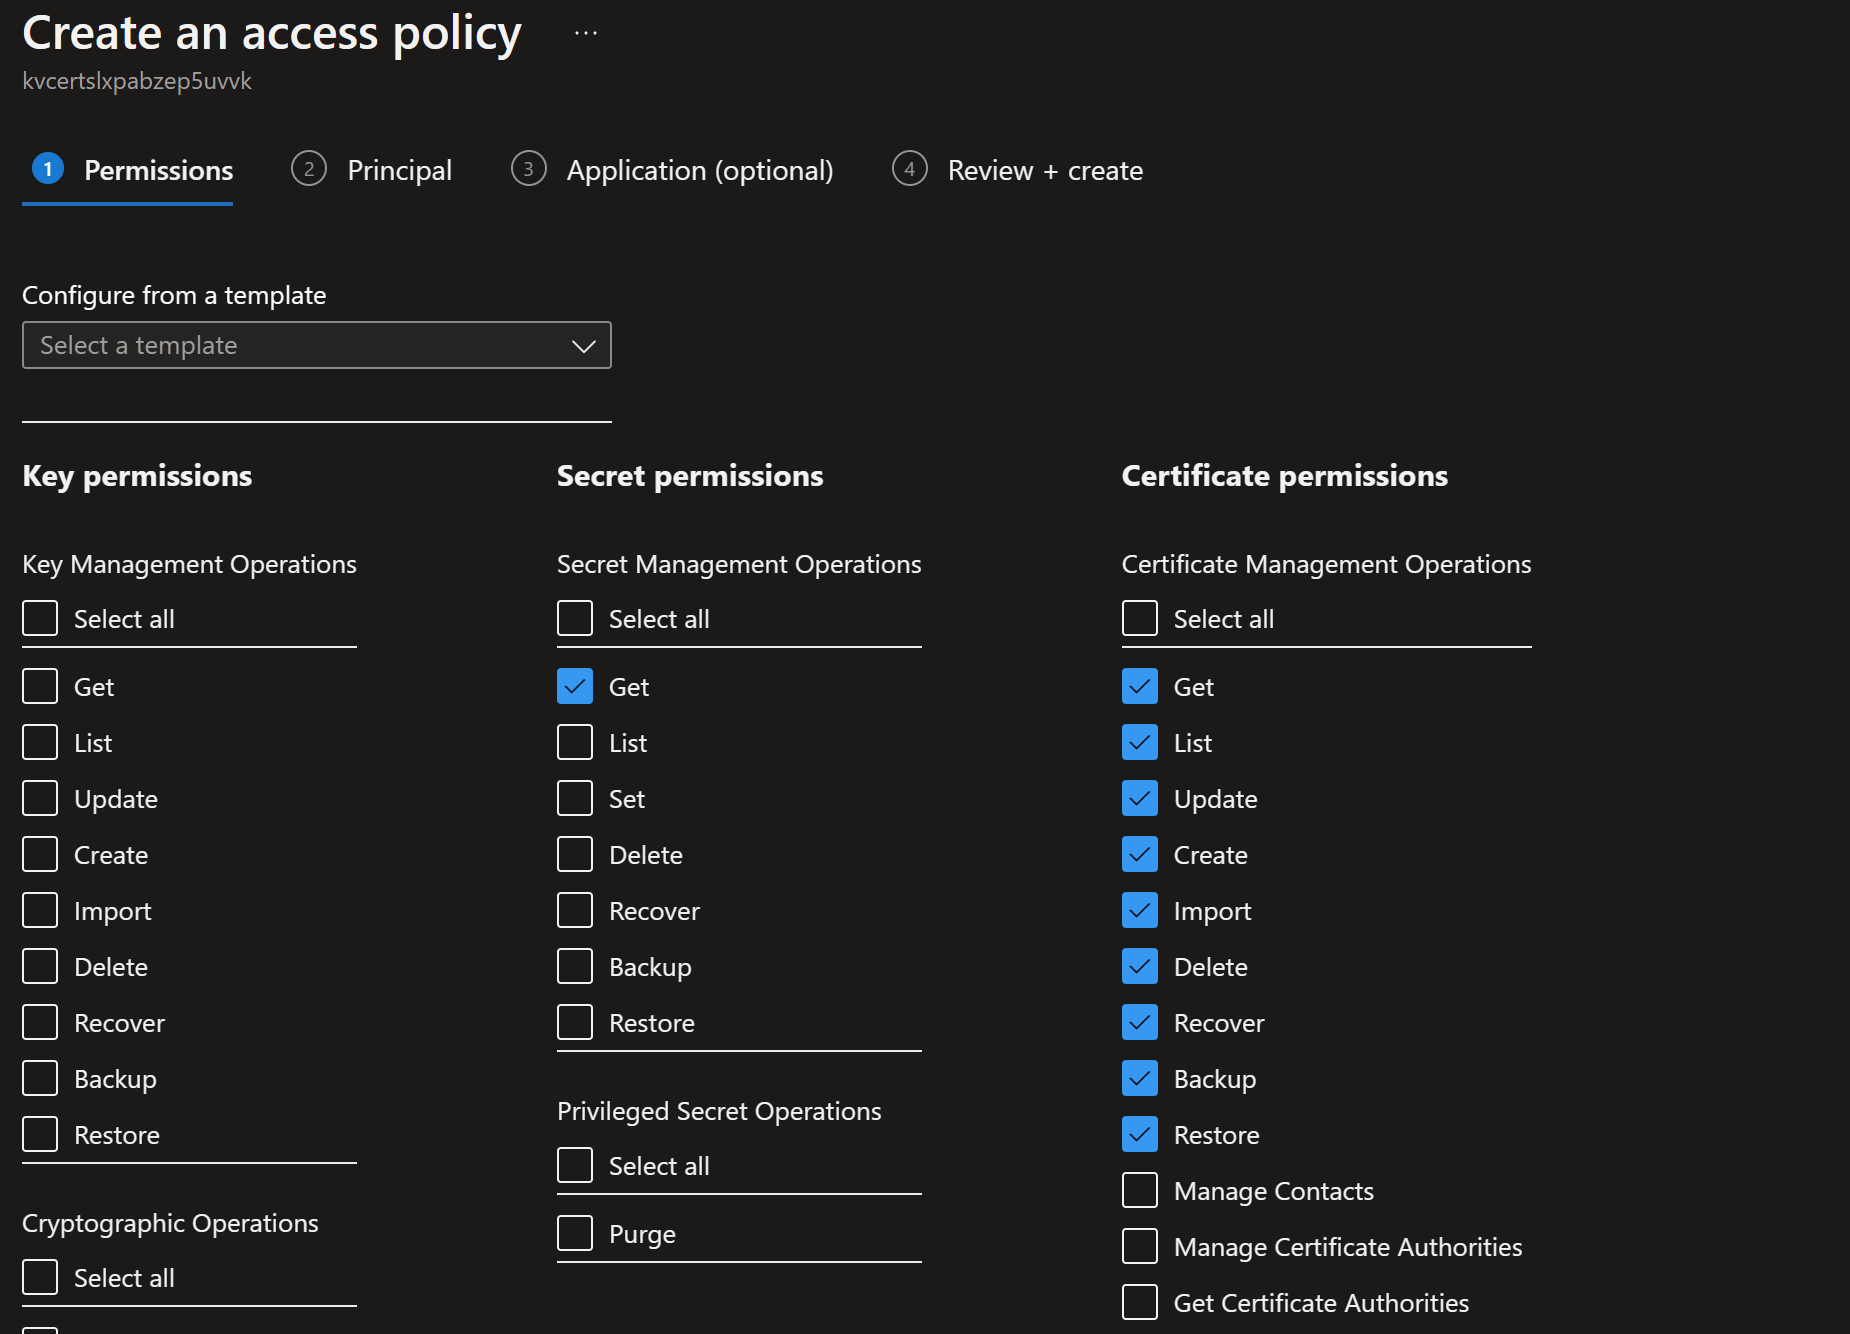
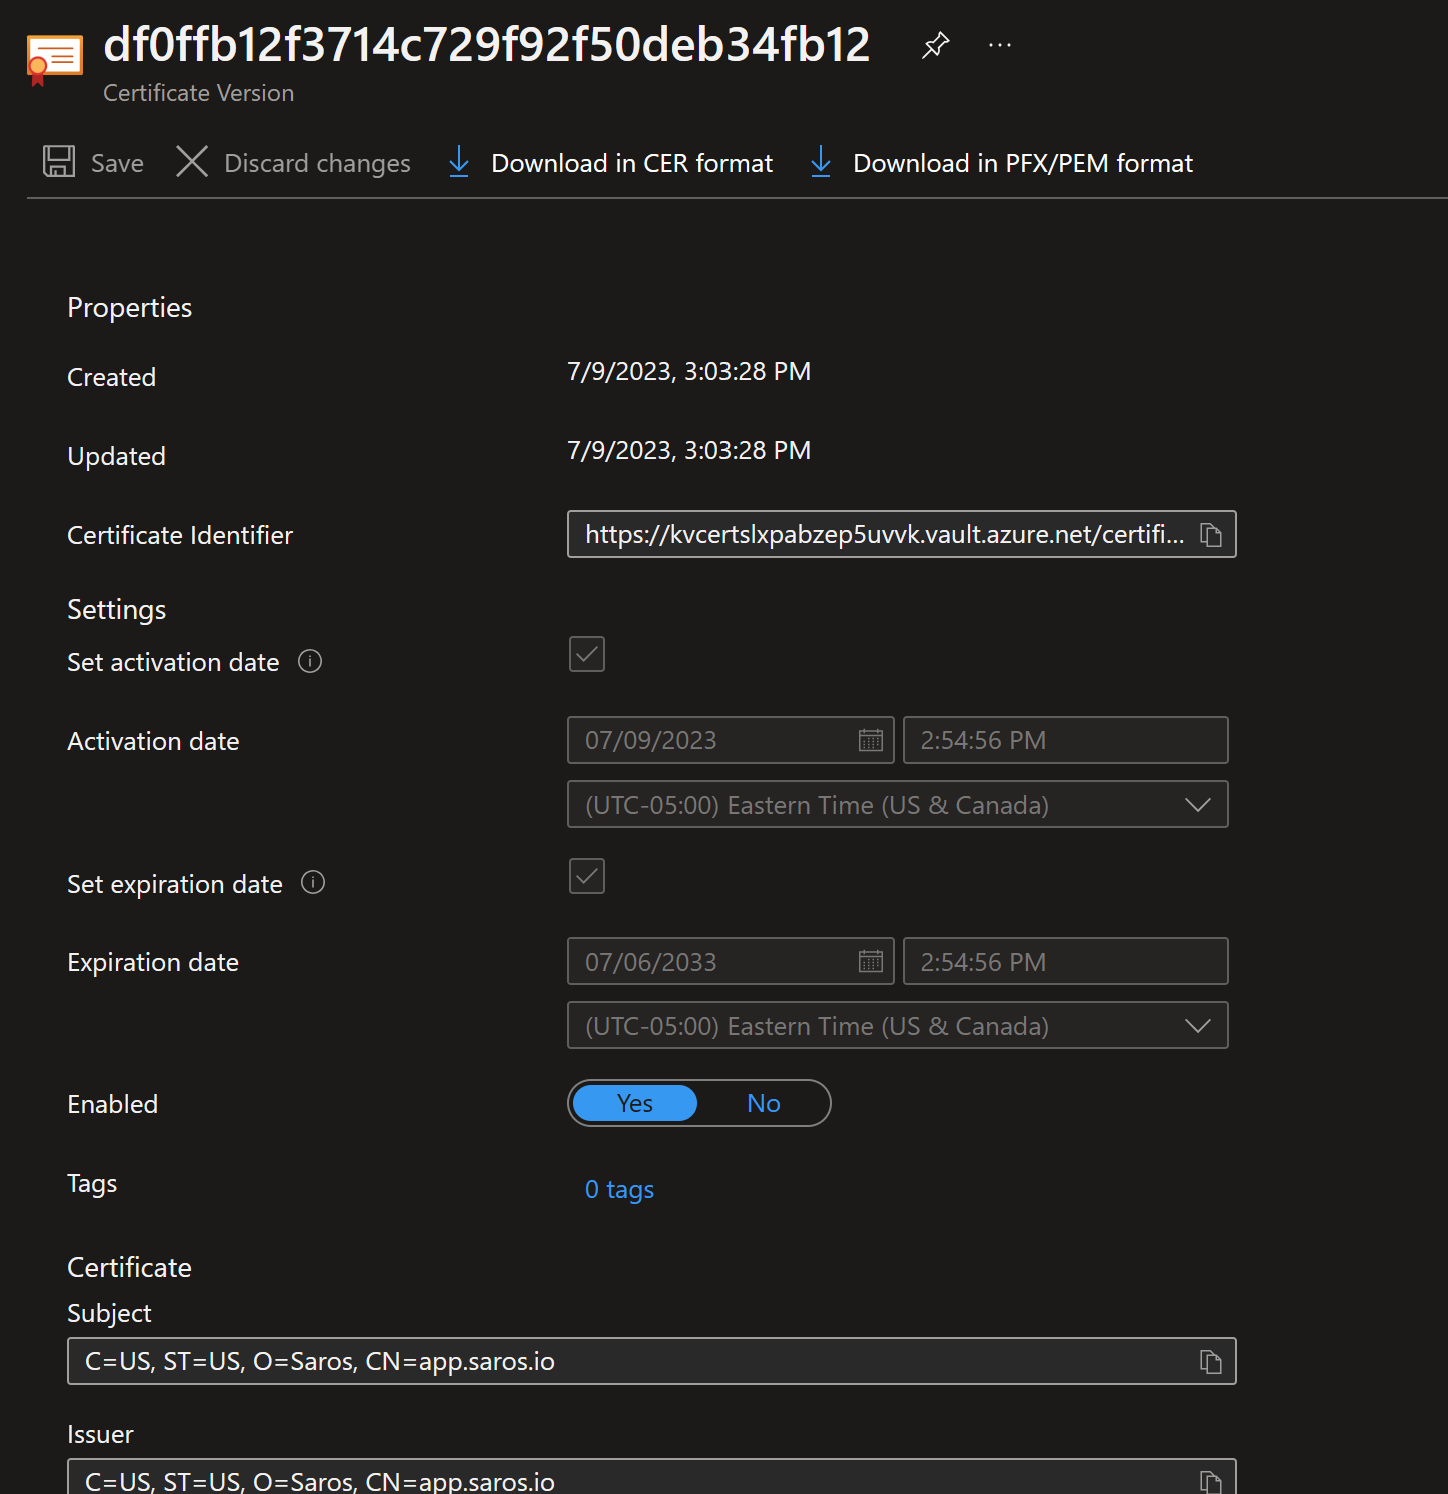
- Import the certificate created above into the Key Vault. This must be the pfx file that was generated above.
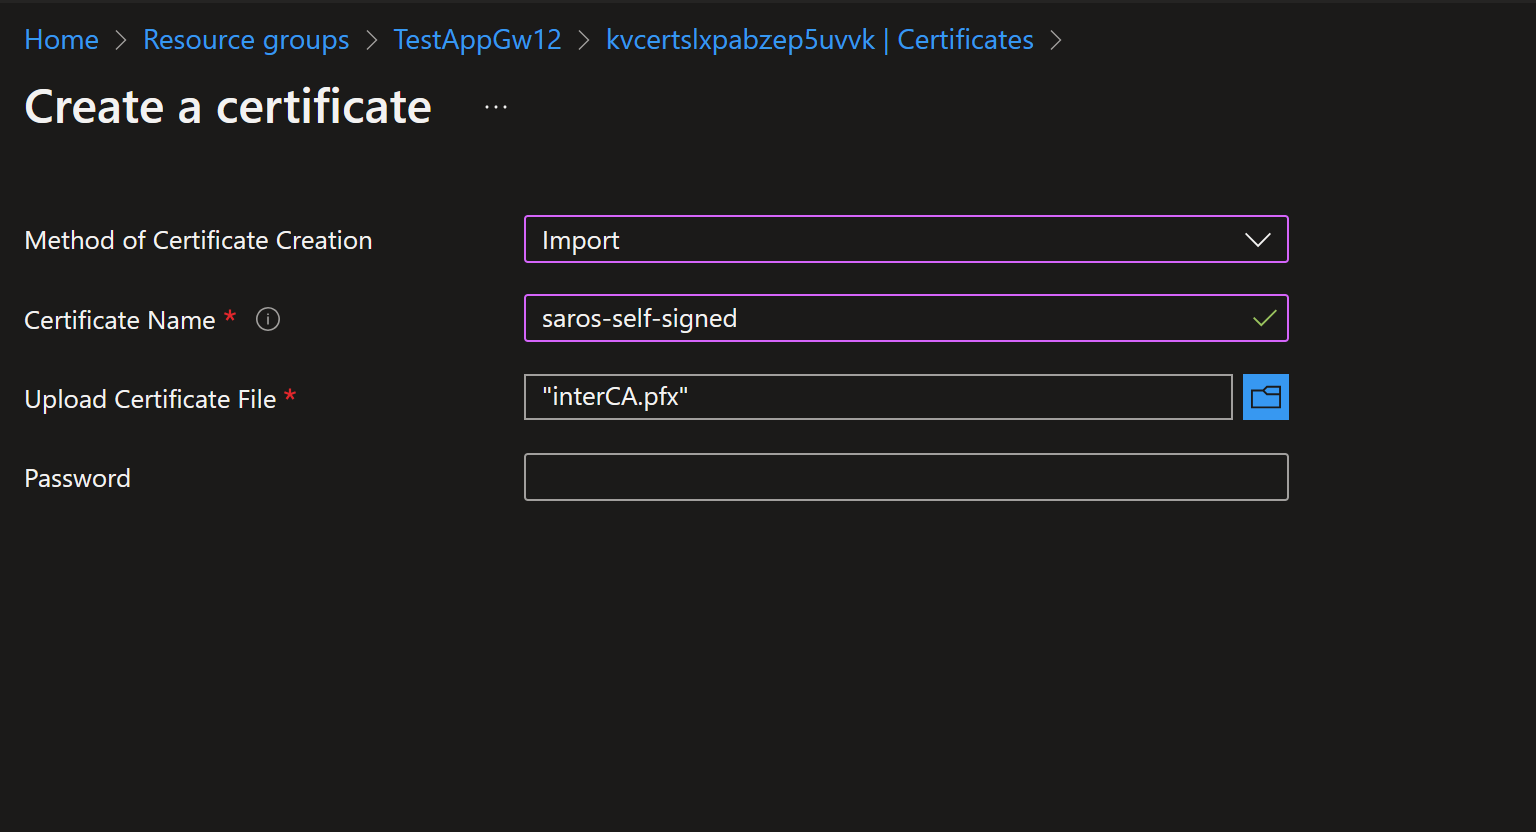
Once imported, click on the certificate and you should see the certificate information at the bottom. The CN should match the Application Gateway front end CN.
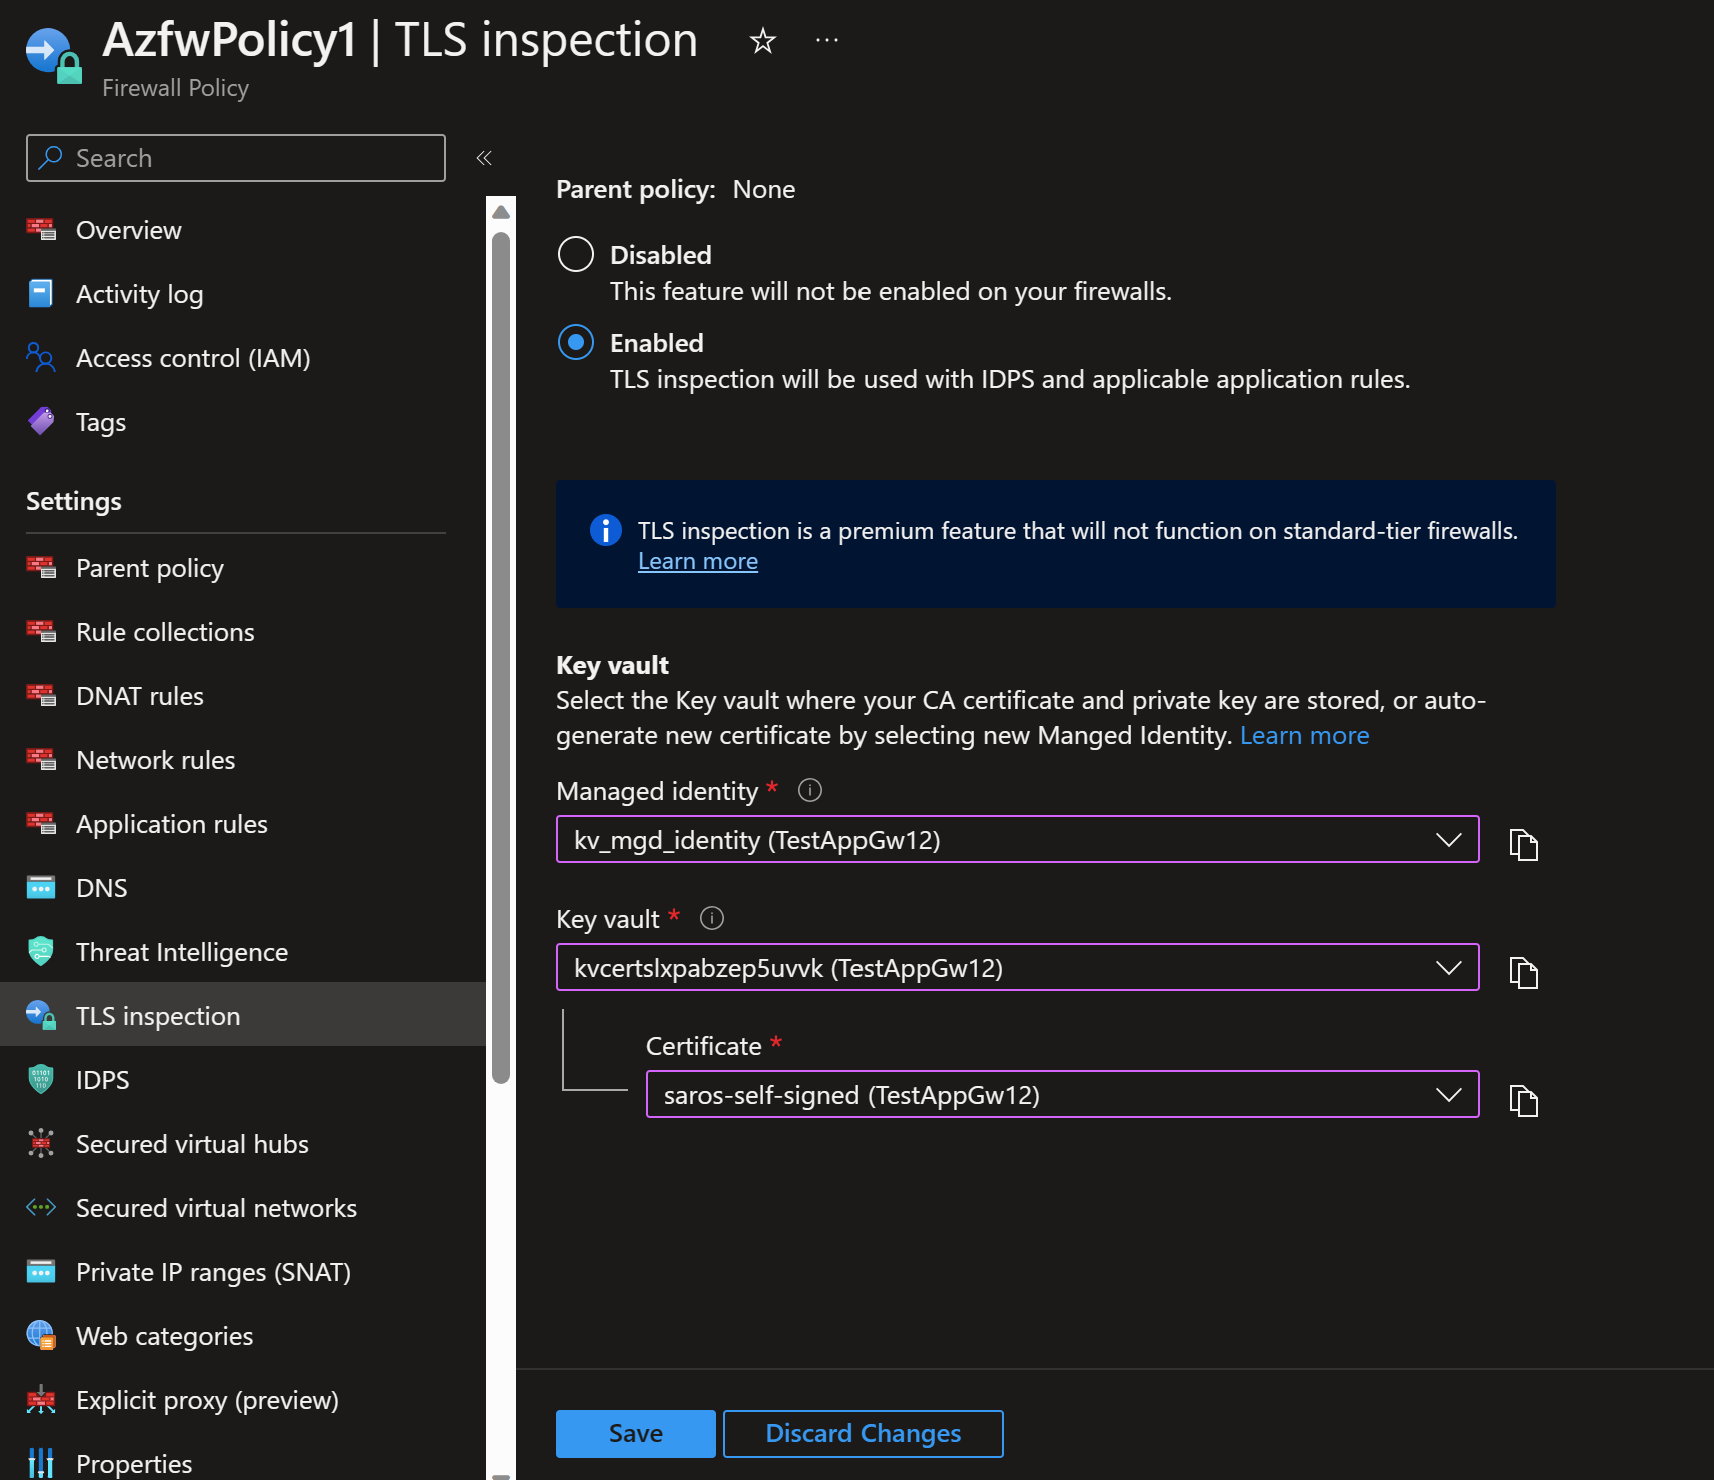
- Now that the certificate is installed in the KeyVault, we can add the certificate to the Azure Firewall TLS Inspection.
If you look at your Application Gateway at this point the back end is unhealthy. So let's fix it. So before we change the Application Gateway, lets add a custom private DNS zone. Why? Well, keep in mind we are doing end to end TLS. Which means the back end needs to be validated as well. If we keep the back end pool using an IP address, then we cannot validate the domain with SNI (Server Name Indication).
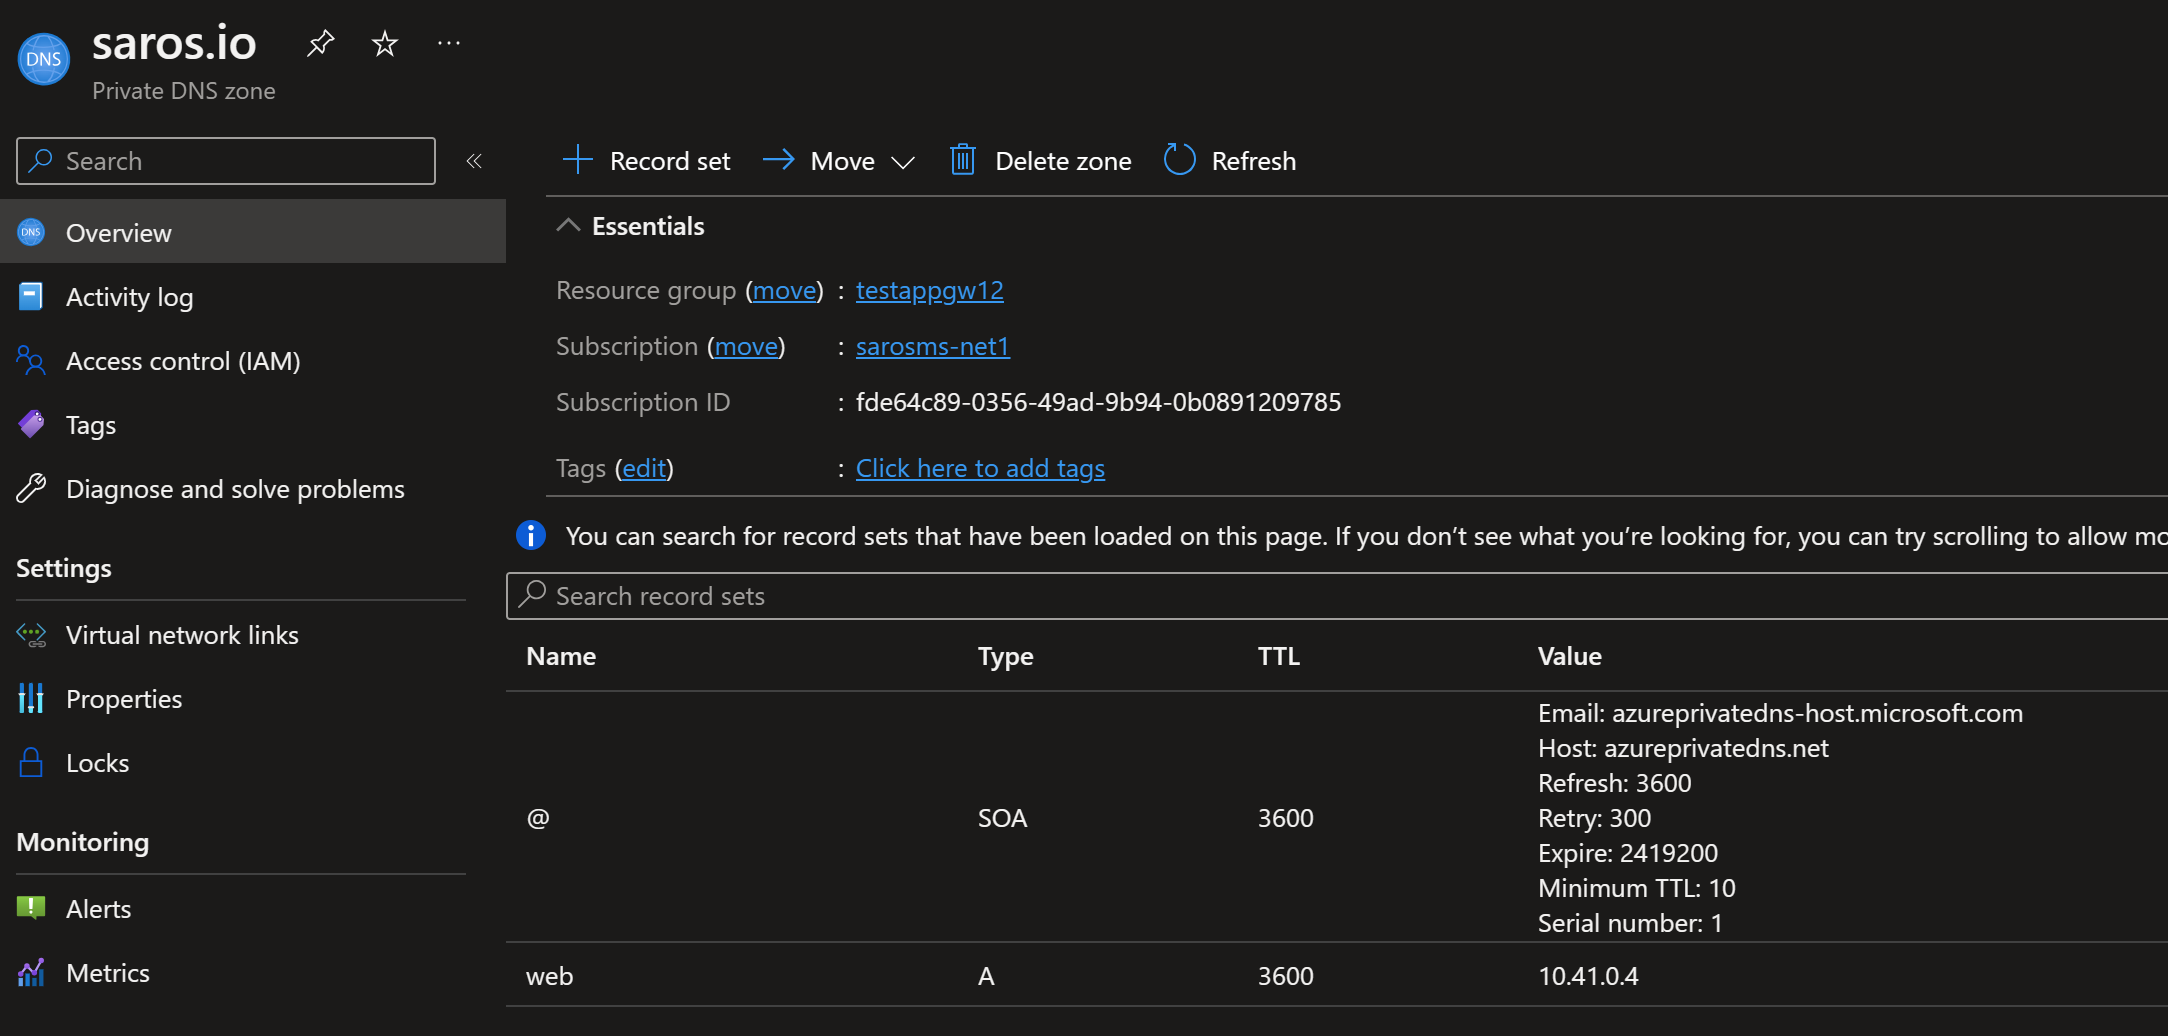
- Create a Private DNS Zone in Azure with the domain name that matches the CN of the public certificate on the Web Server.
- Create a record set to create a FQDN for the back end web server. In this case, I created web.saros.io for the backend. The IP should be the private IP address of the web server.
ok, I get it, it is confusing. The front end is app.saros.io and the backend is web.saros.io. It should be the other way around. Well, it depends on perspective. In this case app means Application Gateway and web means Web Server. That is my story and I am sticking to it ;)
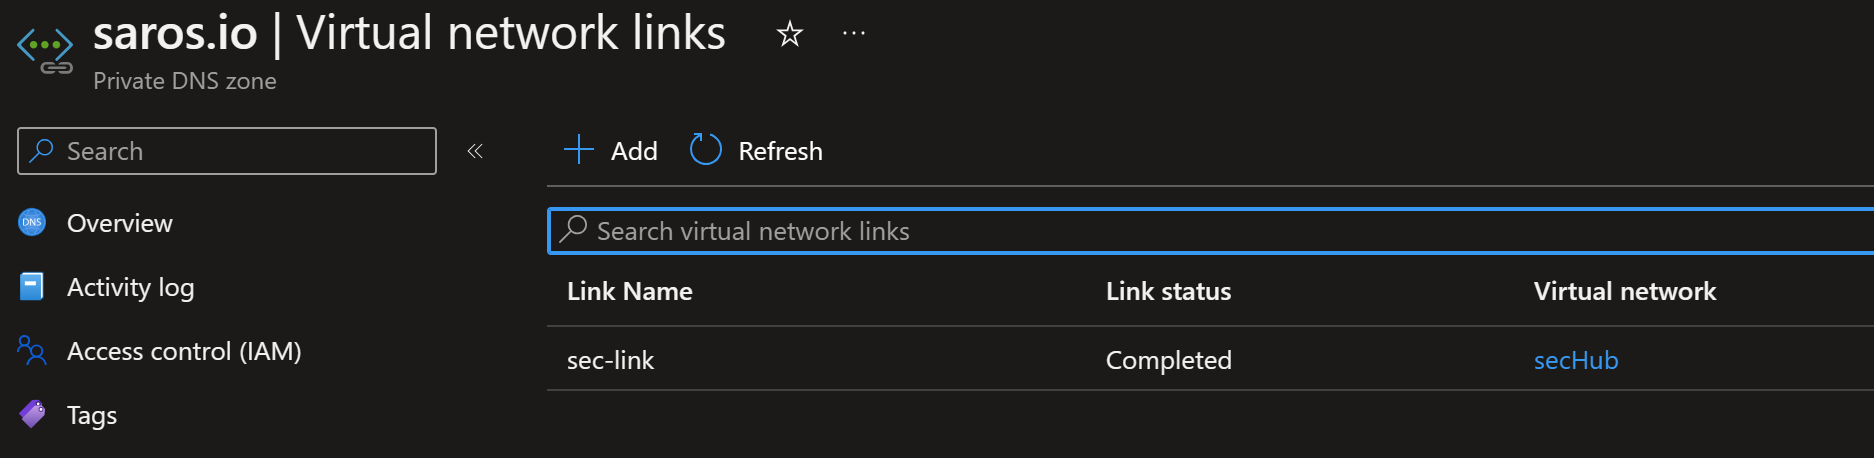
- Then we link the DNS private zone to the Virtual Networks in which it needs to be resolved. In this case the Application Gateway and Firewall Virtual Network.
Wait, what about the web-Vnet, does that need to resolve itself? Maybe, you could create a link to the web Vnet as well. But in this lab we are going to use the Azure Firewall DNS proxy. So the Web Server will resolve any FQDN's required via the Azure Firewall.
Let's fix that now while we are at it.
So in the Azure Firewall DNS settings you can see the deployment already set the DNS proxy settings. The proxy is not required, but set here just as an exercise. However enabling DNS and using Azure Default DNS is required. You will not be able to set FQDN's in Azure Firewall Application Rules without this setting.
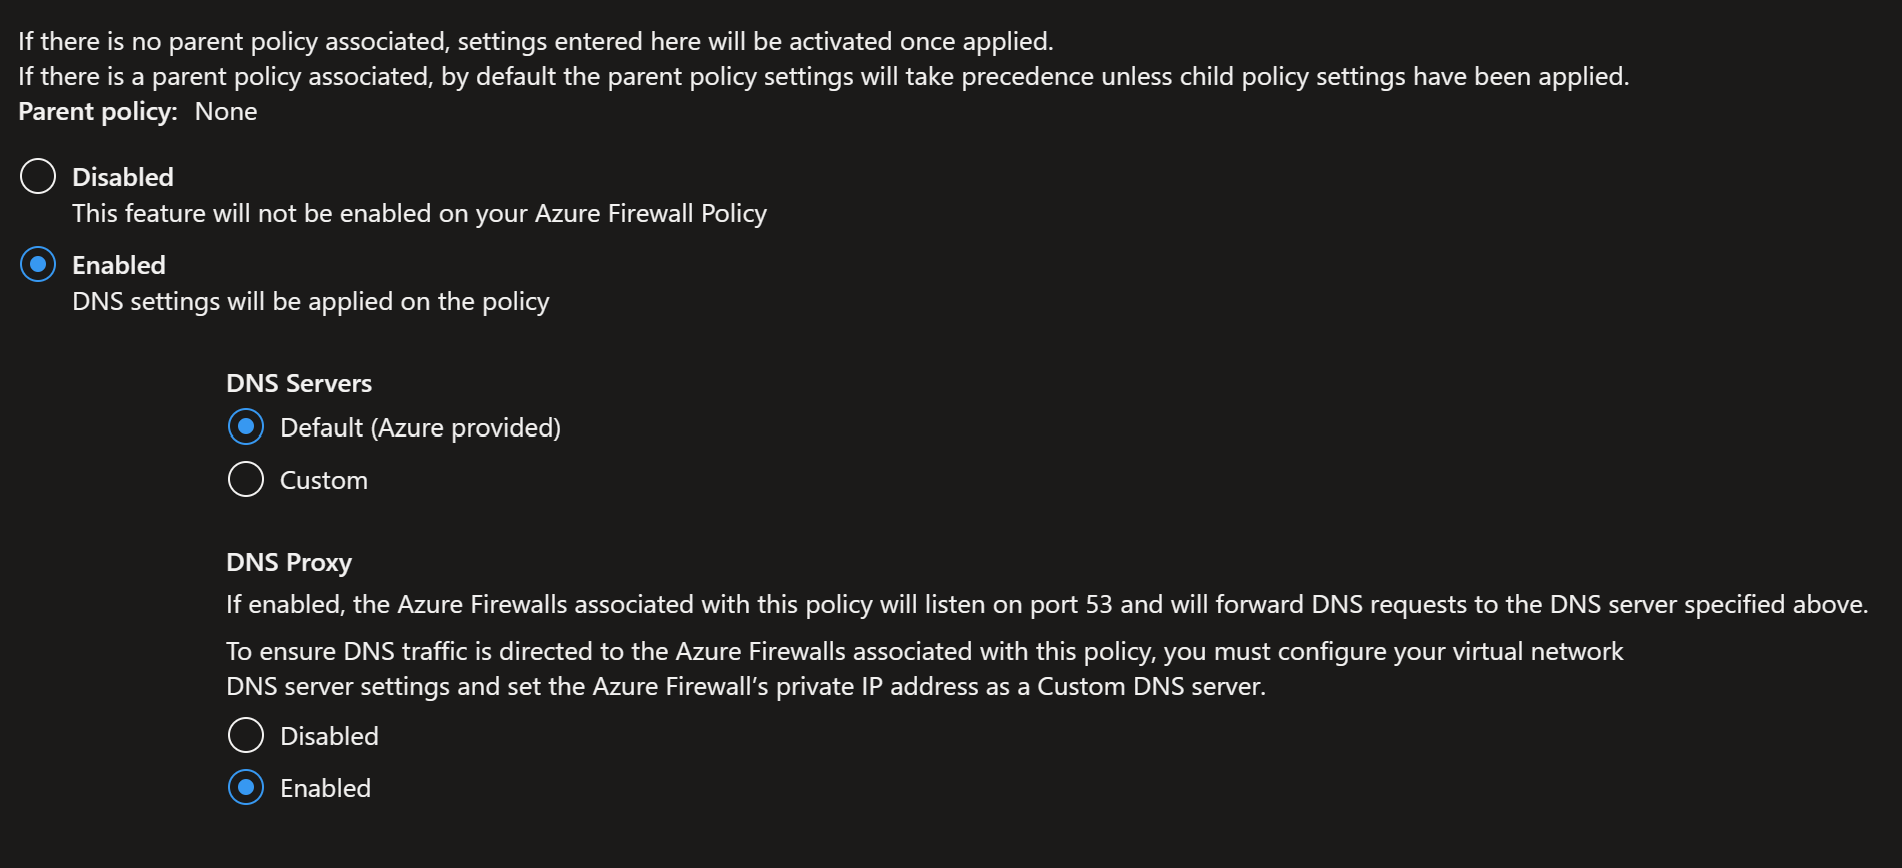
- But in the web-Vnet -> DNS server settings, let's change the DNS servers to use the Azure Firewall private IP address for resolution.

Ok now, let's get back to the Application Gateway settings.
- Now we need to add the rootCA certificate of the Azure Firewall self signed certificates to the Application Gateway.
First, let's create the certificate in the right format. Previously when you created the self signed certificate for Azure Firewall a number of certs were generated. One of them is the rootCA.crt. This file is what will be used, but needs to be in the cer format. To do that run this command:
openssl x509 -inform PEM -in .\rootCA.crt -outform DER -out rootCA.cerNow, in the previous screen in Application Gateway, where you added the Digicert CA in the backend settings, you will now add another certificate by clicking on the add certificate button. Then add your rootCA.cer file here. And save.
- Override the host name
We are going to pick from the back end target, because we are going to update the backend target to a FQDN in the next step.
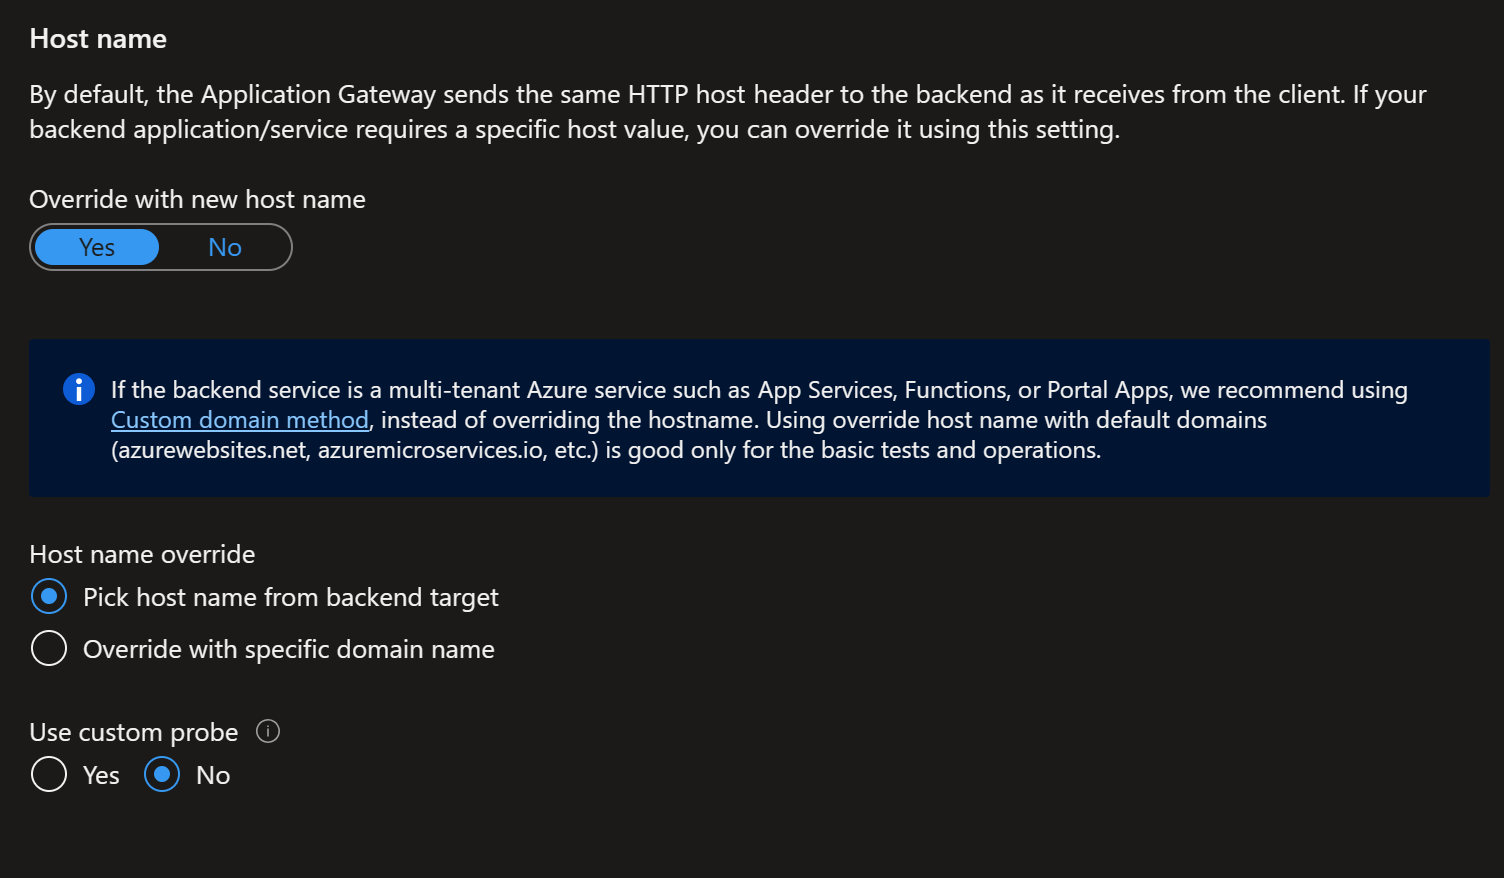
and click save
- Now we can update the back end pool to use a FQDN.
Go back to back end pool settings in Application Gateway and change the IP address to the FQDN of the host plus private DNS zone you created.
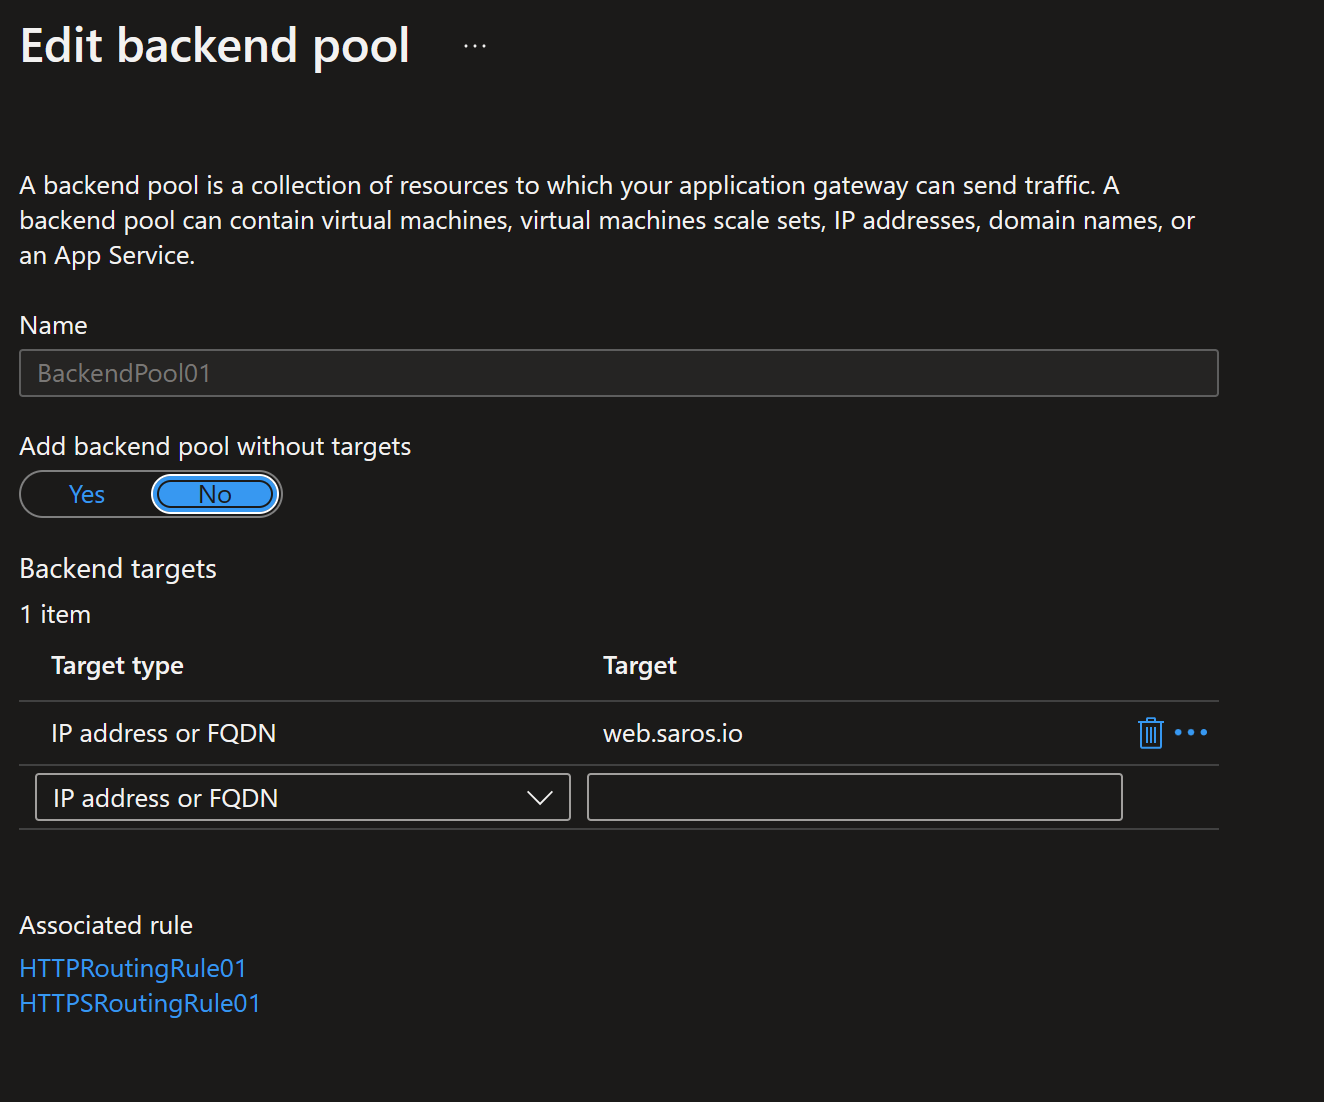
and save.
Ok, we are really close here. But first we need to update the rules to start inspecting traffic properly.
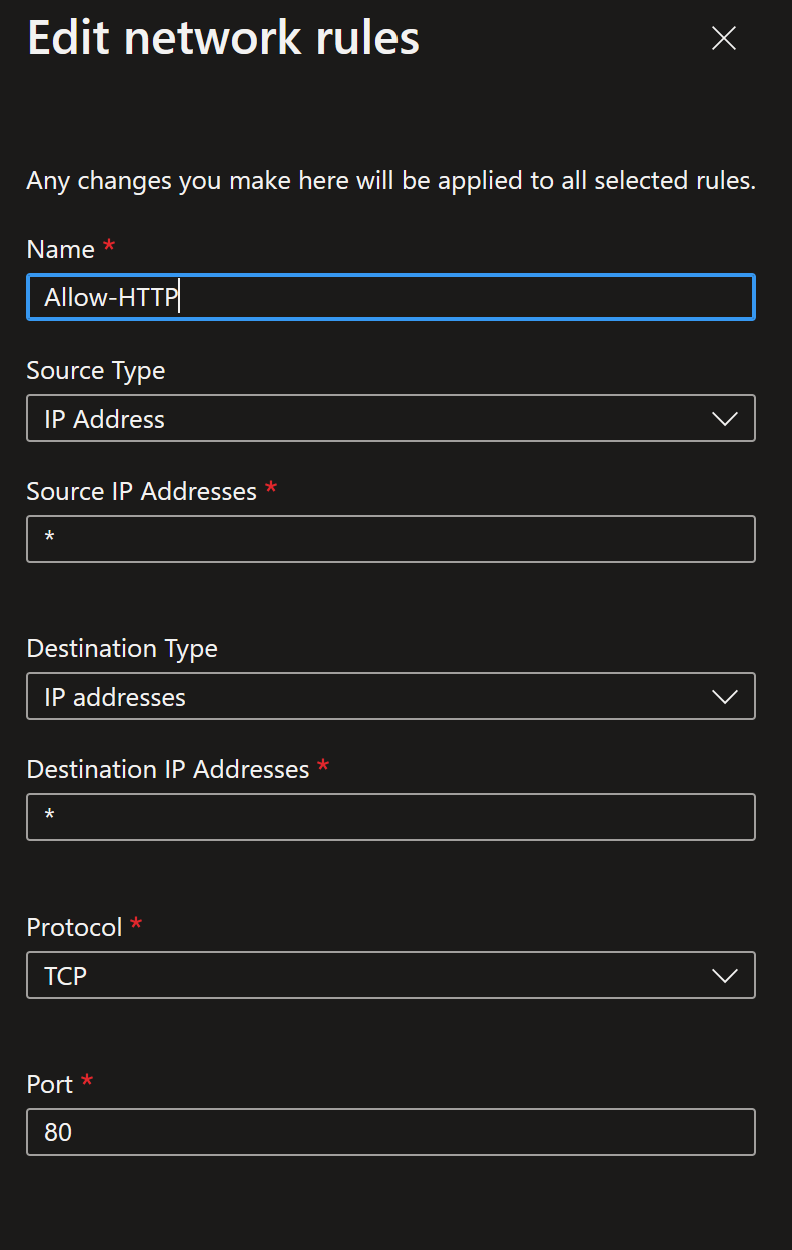
Currently, we have an Allow-All network rule. But we need an allow rule in the network rules for the port 80, http traffic. Since this does not use SNI or use certificates, we don't need application rules for port 80. This traffic is already inspected since it is unencrypted.
- So let's change the Allow-All rule to the following:
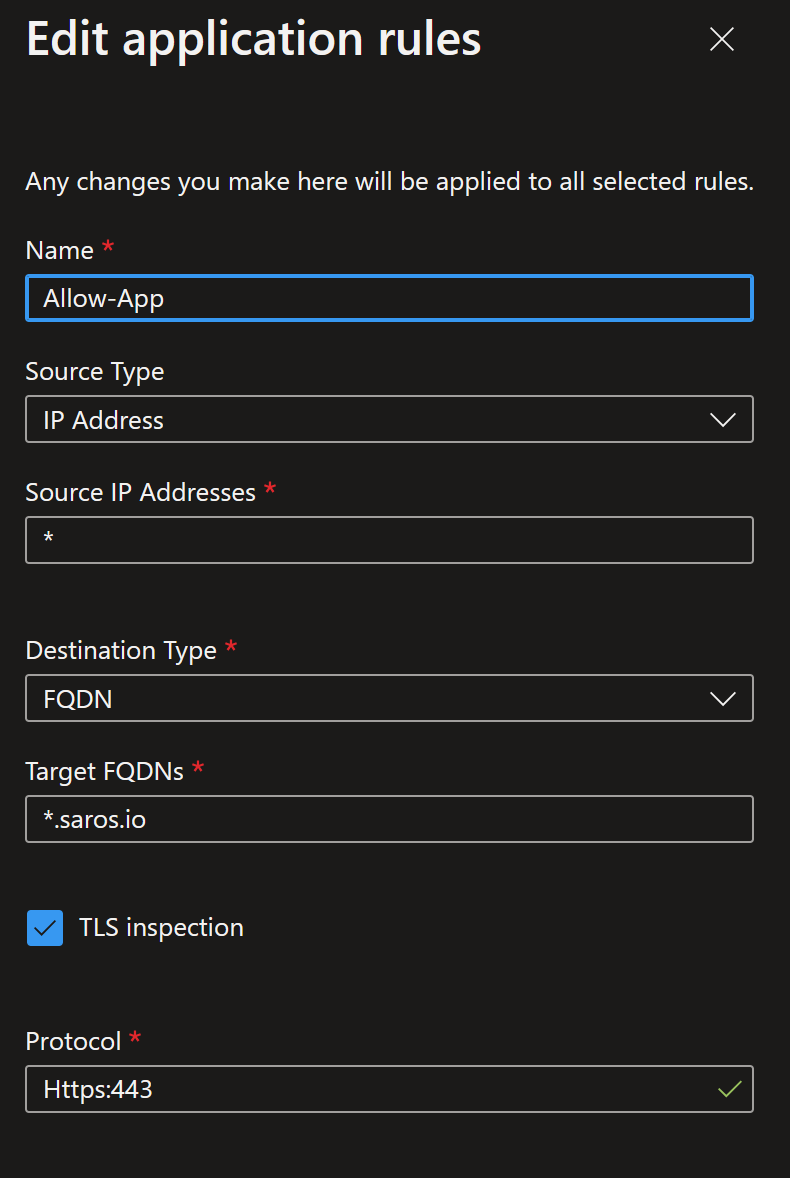
 2. And now let's add an application rule. Now we will specify the FQDN and that TLS Inspection is required for port 443. Enter the application rule as follows:
Once the firewall rules complete, after a few minutes, the Application Gateway backend should be healthy. And you should be able to access the Web Server via port 80 or port 443. And after a few more minutes, you should start seeing data in the Firewall Logs.
Note if the backend is not becoming healthy, check out this troubleshooting guide for some ideas on what may be happening: Troubleshoot backend health issues in Azure Application Gateway
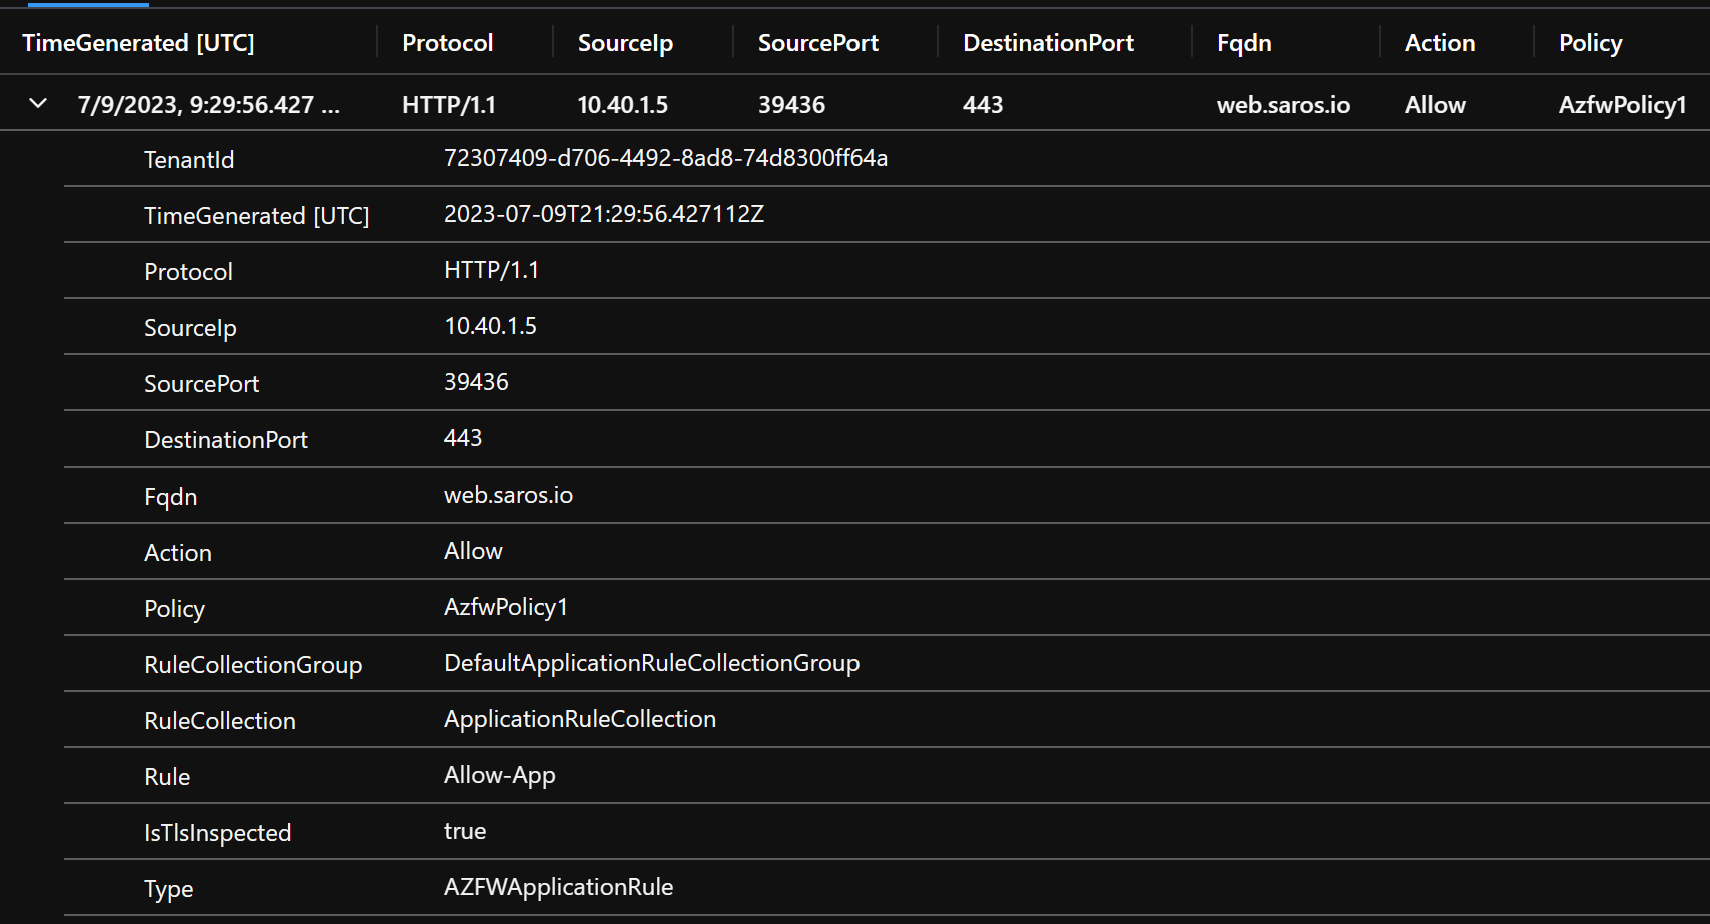
In the Application Rule you will see the source of the Application Gateway ephemeral private IP and destination is the FQDN. You should also see the IsTlsInspected value is true which means this transaction through the firewall is being decrypted and inspected by the Firewall.
AZFWApplicationRule | order by TimeGenerated
The network rule log does not specify inspection. But you can verify it is being inspected in the IDPS Log data. Once IDPS data is generated against the web site. You can simulate an attack yourself or just wait a few days and the Internet will do its thing.
AZFWNetworkRule | order by TimeGenerated
Another key note here is if you load the web application and look at the web server environment variables, the source IP is the firewall ephemeral private IP range. Which means SNAT is occurring on private traffic. Which means the Web Server see's the source IP as the Firewall and not the Application Gateway anymore. Which finally means, you can in theory turn off the UDR on the Web Server subnet and the traffic flow will still work. You can try that on your own, but we are not going to do that since we are going to update the UDR in the next step.
HTTP_HOST="web.saros.io:443" HTTP_X_FORWARDED_FOR="10.40.1.6" HTTP_X_FORWARDED_PORT="443" HTTP_X_FORWARDED_PROTO="https" HTTP_X_ORIGINAL_HOST="app.saros.io" REMOTE_ADDR="10.40.0.5" REMOTE_PORT="13708" SERVER_ADDR="10.41.0.4"
Also of interest, note that our X-Forwarded-For is the Application Gateway. So as long as the WAF is logging traffic you can still traceback to the original requestor IP. But the Firewall and the Web Server have no idea who the original requestor is.
And note that the HTTP host is the FQDN of the private DNS zone while the original host is the front end FQDN specified in the Application Gateway.
- Inspect all outbound from Web server to internet
- WAF policy settings available
- KQL for viewing and correlating log data
- Tie in to MITRE