Call History Gadget Installation Guide
This gadget displays an agent’s call history throughout the day. Each contact in the history can be called back with a single click. A tally of the agent’s inbound/outbound calls and duration is tracked at the top of the gadget. The history can be sorted by clicking on the header of any of the columns. The history is reset at the start of each day.
| Platform | Version | Supported Browser |
|---|---|---|
| UCCX | 10.5 | FF ESR 24+, IE 9+ |
| UCCX | 10.6 | FF ESR 24+, IE 9+ |
| UCCX | 11.0 | FF ESR 24+, IE 9+ |
| UCCX | 11.5 | FF ESR 24+, IE 9+, Chrome |
| UCCE | 10.X | Not Tested |
| UCCE | 11.0 | FF ESR 24+, IE 9+ |
| UCCE | 11.5 | Not Tested |
Note: Finesse 11.6 has a built in call history gadget that. Please see the release notes for more information: Release Notes
The versions listed above with browser versions have been tested. Please let me know if you have success with other versions and I can update accordingly. Support is on a best effort basis. If you believe you have run into a software bug, please open an issue in Github and I will be notified. If you are having issues getting the gadget working after reviewing the troubleshooting section, please contact me via email or CIsco Spark at: bmcallis@cisco.com. Please include the following details:
- CCX, PCCE, or CCE
- Version:
- Browser and version:
- gadget Deployment: on finesse or external server
- error messages or screenshots.
Before deploying this gadget create a not ready reason code in the Finesse Administration for call back purposes. This reason code will be used if the agent is in a ready state when clicking the call back button in the gadget. You will need to obtain the reason code ID. Unfortunately, this doesn’t match the “reason code” in the Finesse Administration. A quick way to determine the ID is to load the following URL in your browser. This pulls a list of not ready reasons using the Finesse web API:
https://<finesse hostname or ip>:8445/finesse/api/ReasonCodes?category=NOT_READY When prompted enter a UCCX admin username/password
The reason code ID is located in the URI element as pictured here:
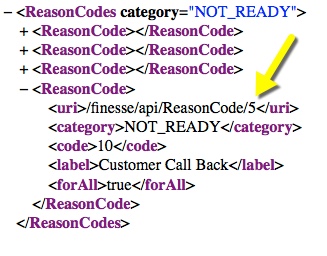
For this example I am using reason code 5.
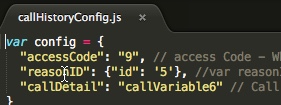
In the latest version of the Call History Gadget, customer specific settings have moved to a new config file called: callHistoryConfig.js. This makes updating the gadget much easier moving forward. 3 settings are currently controlled by this config file.
- The reason id captured above
- Access code required to make an outbound call. Ie: 9
- A call variable to include in the detail column of the history. This could be an account number captured by the IVR or similar information.
- Download the latest copy of the gadget from GitHub
- Open
callHistoryConfig.js. Set the values below to match your deployment and save the changes:
- Depending on the version of UCCX/CCE you are running and where the gadget will be installed, the
callHistoryGadget.xmlfile will need to be modified with the proper location of the finesse and jQuery javascript libraries. I have included 3 blocks of commented out code. Uncomment the Finesse and jQuery line that matches your deployment. The example below shows how my lab is configured. I am running UCCX 11.5 with the gadget hosted on an external web server.
    <!-- Uncomment the scripts below for when running 10.5 and earliery -->
    <!-- jQuery 1.5 -->
    <!-- <script type="text/javascript" src="jquery-1.9.1.min.js"></script> -->
    <!-- Finesse Library -->
    <!-- <script type="text/javascript" src="finesse-10.5.1.js"></script> -->

    <!-- Uncomment the scripts below for 10.6 and later as a 3rd party gadget -->
    <!-- jQuery when running as a 3rd party gadget -->
    <!-- <script type="text/javascript" src="/desktop/assets/js/jquery.min.js"></script> -->
    <!-- Finesse Library when running as a 3rd party gadget-->
    <!-- <script type="text/javascript" src="/desktop/assets/js/finesse.js"></script> -->

    <!-- Uncomment the scripts below for 10.6 and later and the gadget is hosted on another server -->
    <!-- jQuery when running as a 3rd party gadget -->
    <script type="text/javascript" src="https://uccx.chilab.cisco.com:8445/desktop/assets/js/jquery.min.js"></script>
    <!-- Finesse Library when running as a 3rd party gadget-->
<script type="text/javascript" src="https://uccx.chilab.cisco.com:8445/desktop/assets/js/finesse.js"></script>- Gadgets can be installed on your own web server or directly on the Finesse server. In order to install on the Finesse server follow these steps:
- If you have never installed gadgets on the system before, the 3rdpartygadget account password must first be set. This is done by connecting to the uccx server via SSH and running the following command:
utils reset_3rdpartygadget_password - Once the password has been set SFTP to the UCCX server with with the username: 3rdpartygadget and the password set in the previous step. filezilla (windows) or transmit (mac) are two of my preferred SFTP clients.
- Upload the
callHistoryGadgetfolder into thefilesdirectory.
- If you have never installed gadgets on the system before, the 3rdpartygadget account password must first be set. This is done by connecting to the uccx server via SSH and running the following command:
- Next we will update the Finesse layout to point to the new gadget. Load the Finesse administration by going to:
https://<hostname or ip>:8445/cfadmin/- If your team’s are utilizing the default layout, Click on the desktop layout tab. Otherwise, click on the Team Resources tab to edit a specific team's layout.
- I prefer to copy the Desktop Layout XML to a text editor, modify it and then paste it back once you are complete. Where you place the Call History Gadget is your preference. In this example I am placing the gadget under the HOME tab in a column next to the CUIC live data gadgets. If you uploaded the gadget as a instructed above, you can copy the following lines:
  <column>
      <gadgets>
          <gadget>/3rdpartygadget/files/callHistoryGadget/callHistoryGadget.xml</gadget>
      </gadgets>
</column> - Your Finesse layout might not look exactly like this screenshot. The text inside the yellow box are the only lines we need to add. The rest is just for context.

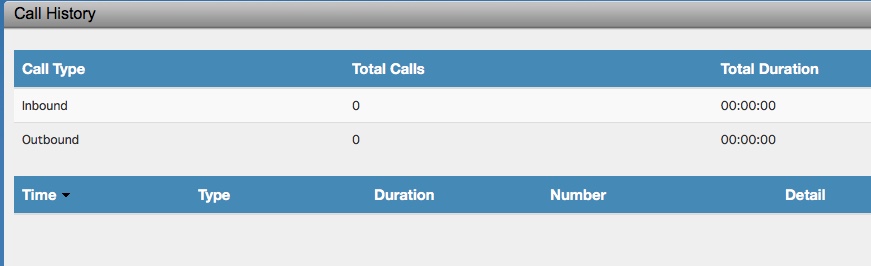
I have found that when the gadget isn't logging calls, it is usually due to the javascript libraries not loading. One quick way to determine this is if the call tallies are displayed during the initial load. If the gadget appears like the image below, it is a good sign that they have loaded properly.
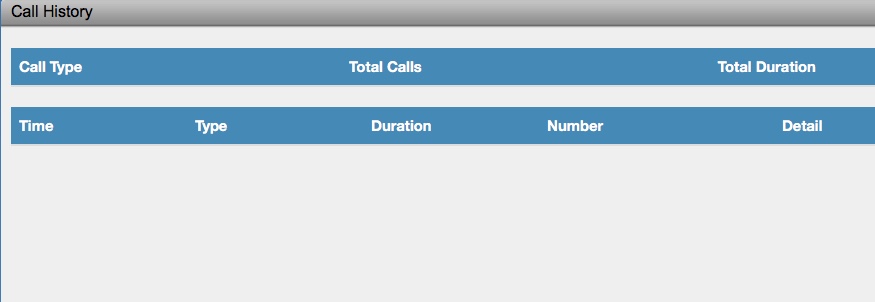
If the table headers are displayed and nothing else, this is an indicator that jQuery didn't load. Below is an example of this. If the call history isn't populating as shown in the screenshot below. This can also be caused by IE running in compatibility mode.
All call history is stored in the browser's local storage. If the browser is closed and re-opened, the history is maintained. If the browser is closed or crashes before a call ends, the history for that call will not be captured. Clearing the browser's cache will clear the agent’s history that had been captured for the day.
If your agent experiences issues with the gadget, use the “Send Error Report” feature within Finesse. This will capture the Agent's browser logs and upload them to the UCCX server. RTMT can be used to pull the logs off of the server. This must be done during the Finesse session that is experiencing issues. If the browser is closed or reset, all useful logs are gone.
The Finesse server caches all gadgets. If updates are made to a gadget either the Finesse Tomcat service must be restarted (not recommended during production!) or the ?nocache flag can be added to the end of the Finesse URL in the browser. For example: https://uccx.chilab.cisco.com:8445/desktop/container/?nocache. The ?nocache flag forces a new version of the gadget to be loaded. After 24 hours Tomcat will automatically update its cached gadgets as well.
If your dial plan is configured for E164 dialing, comment out the following block of code from the callHistoryGadget.js file
     // remove + from +e164 formatted numbers
      if(number[0] === "+"){
        number = number.slice(1);
      }