Room Cards 2X Manual
If you like you can support my work.

Okay let's start from the topbar.
It has 2 sections.
First:

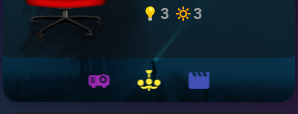
I used swipe cards in this section. First section contains information for house total temperature, total number of lights and house total lux.

The first one is total devices that are at "On" status. To get the total number for the whole house we need to create a sensor for that.
- platform: template
  sensors:
    ev_genel_cihazlar:
      value_template: >-
        {% set lights = ['light.all_house_lights',],
        ['switch.all_house_switches',],['switch.termosifon_plug',],['input_boolean.bedroom_klima',]
        %} {{ expand(lights) | selectattr('state','eq','on') | list |
        count }}
This code has 4 parts
- light.all_house_lights : All the smart light bulbs in my house.
- switch.all_house_switches: All smart switches in my house.
- switch.termosifon_plug : My Water heater.
- input_boolean.bedroom_klima: My Bedroom airconditioner.
As you can see I have 2 separate devices besides my lights and switches which ise my water heater and airconditioner. So I also added them. If you only want lights and switches to be counted then you can remove them.
- platform: template
  sensors:
    ev_genel_cihazlar:
      value_template: >-
        {% set lights = ['light.all_house_lights',],
        ['switch.all_house_switches',],
        %} {{ expand(lights) | selectattr('state','eq','on') | list |
        count }}
To group lights and switches just use the ui. Go to automations>helpers and press +Create Helper. Select Group and then light group. Choose your lights which are connected to Home Assistant. After that your new group sensor will be created. Mine is "light.all_house_lights" in this example. Do the same process for switches.
Okay if you are good to go just copy above code and paste it to your configuration.yaml (or sensor.yaml if you have a separated). Restart Home Assistant and after everything is back you should have a new sensor named sensor.ev_genel_cihazlar(that is the name I have given. If you want something different name it yourself). This sensor will give you the number of total devices that are at "ON" status all over your house.

Second one(Line 74) is the house total temperature.

To get this we need to put create a sensor using our temperature sensors around the house. We need the total number. In my example I have 7 sensors all around my house. So I wrote a simple code to get the total house temperature which is:
- platform: template
  sensors:
    genel_sicaklik:
      value_template: >-
        {% set livingroom = states('sensor.hue_motion_temp_salon') | float %}
        {% set kitchen = states('sensor.hue_motion_temp_mutfak') | float %}
        {% set bedroom = states('sensor.hue_motion_temp_yatak_odasi') | float %}
        {% set office = states('sensor.hue_motion_temp_ofis') | float %}
        {% set dressingroom = states('sensor.hue_motion_temp_soyunma_odasi') | float %}
        {% set bathroom = states('sensor.hue_motion_temp_banyo') | float %}
        {% set antre = states('sensor.hue_motion_antre') | float %}
        {{ ((livingroom + kitchen + bedroom + office + dressingroom + bathroom + antre) / 7) | round(1, default=0) }}
As you can see 7 of my room temperatures have been listed and at the last row it was divided by 7 to get the average number. This code returns a fractional number such as 22.7. If you want this as flat you can use below formula.
- platform: template
  sensors:
    genel_sicaklik:
      value_template: >-
        {% set livingroom = states('sensor.hue_motion_temp_salon') | float(0) %}
        {% set kitchen = states('sensor.hue_motion_temp_mutfak') | float(0) %}
        {% set bedroom = states('sensor.hue_motion_temp_yatak_odasi') | float(0) %}
        {% set office = states('sensor.hue_motion_temp_ofis') | float(0) %}
        {% set dressingroom = states('sensor.hue_motion_temp_soyunma_odasi') | float(0) %}
        {% set bathroom = states('sensor.hue_motion_temp_banyo') | float(0) %}
        {% set antre = states('sensor.hue_motion_antre') | float(0) %}
        {{ ((livingroom + kitchen + bedroom + office + dressingroom + bathroom + antre) / 7) | round(0, default=0) }}
This should give you a flat outcome such as 22 degrees.
Ok the last info here is for the lux value. The code that is to be written to configuration.yaml or sensor yaml is :
- platform: template
  sensors:
    genel_lux:
      value_template: >-
        {% set livingroom = states('sensor.hue_motion_sensor_3_light_level_2') | float %}
        {% set kitchen = states('sensor.hue_motion_sensor_2_light_level') | float %}
        {% set bedroom = states('sensor.light_level_2') | float %}
        {% set office = states('sensor.hue_motion_sensor_3_light_level_3') | float %}
        {% set dressingroom = states('sensor.hue_motion_sensor_1_illuminance') | float %}
        {{ ((livingroom + kitchen + bedroom + office + dressingroom) / 5) | round(1, default=0) }}
If you noticed, although I have 7 rooms with lux sensors in my house, the outcome in the code is being divided into 5. This is because 2 of my sensors are located in rooms where there is not much light in any time of the day, such as my bathroom. In short the bathroom don't have a window and is always dark. So I am only focused on the parts where there is sufficient amount of light during the daytime.
So the first section has beee completed. If we swipe to the other side a new menu comes in front.

This menu has 4 chips.
3 conditional chips and 1 spotify chip.
 First chip is for Lightbar below room cards. It is invisible which means a conditional card is being used. To control the light part I have created an input boolean named "input_boolean.mobile_w_dashboard_lightbar". With this I can open lightbar section below the room cards.

So when the input_boolean.mobile_w_dashboard_lightbar is clicked the lightbar comes in front as in the 1.st picture. When the button is off it goes away.
 This button disables the info section inside the room card. I have created an input boolean named "input_boolean.mobile_w_dashboard_volume" from Create Helper section in helpers on HA menu. This button disables the section seen in the below picture.

When it is off the card size shortens.

This section also holds "Scene cards" so when it is off you want be able to see them as well.

The lightbar can only control smart bulbs. So you might notice that not all of my rooms have smart bulbs. These rooms only have switches so lightbar won't show up on them.

 This button shows the volume control for media players.

Again it is only available in the rooms where there is a suitable media player.
Lightbar and volume controls are two separate menus one under the other. Since both of them are open at the same time will create visual pollution, we will make a small automation to prevent this. With this automation we will make, when one opens, we will ensure that the other is closed.
alias: Room Cards - Mobile W Dashboard -Button Change
description: ""
trigger:
  - platform: state
    entity_id:
      - input_boolean.mobile_w_dashboard_volume
    to: "on"
    id: Volume ON
  - platform: state
    entity_id:
      - input_boolean.mobile_w_dashboard_lightbar
    to: "on"
    id: Lightbar ON
condition: []
action:
  - choose:
      - conditions:
          - condition: trigger
            id: Volume ON
        sequence:
          - service: input_boolean.turn_off
            data: {}
            target:
              entity_id: input_boolean.mobile_w_dashboard_lightbar
      - conditions:
          - condition: trigger
            id: Lightbar ON
        sequence:
          - service: input_boolean.turn_off
            data: {}
            target:
              entity_id: input_boolean.mobile_w_dashboard_volume
mode: single
Now with the help of this automation whenever we press the boolean the other one turns off. Lets suppose we clicked the lightbar then the automation closes the volumebar. To close the lightbar again just press the lightbar chip once more.

 This last spotify button will play the music on the last motion detected rooms media player. To achieve this again we need some elements. First of all create an input boolean named "input_boolean.spotify_play_last_motion_room".
First step:
Create an automation:
alias: Spotify - Play based on room presence
description: ""
trigger:
  - platform: state
    entity_id:
      - input_boolean.spotify_play_last_motion_room
    to: "on"
    id: "on"
condition: []
action:
  - choose:
      - conditions:
          - condition: and
            conditions:
              - condition: trigger
                id: "on"
              - condition: state
                state: Ofis Sensör Motion
                entity_id: sensor.last_motion
        sequence:
          - service: media_player.play_media
            data:
              media_content_id: Shuffle and play lounge mix
              media_content_type: custom
            target:
              entity_id:
                - media_player.office_dot
      - conditions:
          - condition: and
            conditions:
              - condition: trigger
                id: "on"
              - condition: state
                entity_id: sensor.last_motion
                state: Salon Sensör motion
        sequence:
          - service: scene.turn_on
            data: {}
            target:
              entity_id: scene.anfi_ac
          - service: media_player.play_media
            data:
              media_content_id: Shuffle and play lounge mix
              media_content_type: custom
            target:
              entity_id:
                - media_player.berkan_s_echo_dot
      - conditions:
          - condition: and
            conditions:
              - condition: trigger
                id: "on"
              - condition: state
                entity_id: sensor.last_motion
                state: Mutfak Hareket Sensörü motion
        sequence:
          - service: scene.turn_on
            data: {}
            target:
              entity_id: scene.anfi_ac
          - service: media_player.play_media
            data:
              media_content_id: Shuffle and play lounge mix
              media_content_type: custom
            target:
              entity_id: media_player.berkan_s_2nd_echo_dot
      - conditions:
          - condition: and
            conditions:
              - condition: trigger
                id: "on"
              - condition: state
                entity_id: sensor.last_motion
                state: Yatak Odası Sensor Motion
        sequence:
          - service: scene.turn_on
            data: {}
            target:
              entity_id: scene.anfi_ac
          - service: media_player.play_media
            data:
              media_content_id: Shuffle and play lounge mix
              media_content_type: custom
            target:
              entity_id: media_player.bedroom_echo
      - conditions:
          - condition: and
            conditions:
              - condition: trigger
                id: "on"
              - condition: state
                entity_id: sensor.last_motion
                state: Salon Sensör Motion
        sequence:
          - service: scene.turn_on
            data: {}
            target:
              entity_id: scene.anfi_ac
          - service: media_player.play_media
            data:
              media_content_id: Shuffle and play lounge mix
              media_content_type: custom
            target:
              entity_id: media_player.fire_tv_192_168_1_86
      - conditions:
          - condition: and
            conditions:
              - condition: trigger
                id: "on"
              - condition: state
                entity_id: sensor.last_motion
                state: Banyo Sensor Motion
        sequence:
          - service: media_player.play_media
            data:
              media_content_id: Shuffle and play lounge mix
              media_content_type: custom
            target:
              entity_id: media_player.bathroom_dot
    default: []
mode: single
This automation simply gives a command to the appropriate Alexa Media Player to play Lounge Mix album. When the boolean "input_boolean.spotify_play_last_motion_room" is turned on the music will start on the last motion detected room.
Okay but what about the part for the last movement detected room ?
Second Step:
Create a motion sensor group in helpers section. You can include all your motion sensors. In my example newly created group have a name "binary_sensor.hue_motion_sensor". Now enter the below code to your sensor yaml. Remember to change the sensor group name if you named it differently .

- platform: template
  sensors:
    last_motion:
      friendly_name: 'Last Motion'
      value_template: >
        {% set t = expand('binary_sensor.hue_motion_sensor') | map(attribute='last_changed') | max %}
        {% set s = (expand('binary_sensor.hue_motion_sensor') | selectattr('last_changed', 'eq', t) | list)[0] %}
        {% if( s | selectattr('state', 'eq', 'on') ) -%}
        {{s.name}}
        {%- endif %}
After restart you should have a new sensor called "sensor.last_motion" and it will show the last movement detected room.

Now with the newly sensor created and the automation, the spotify button should play the music on the last movement detected room.
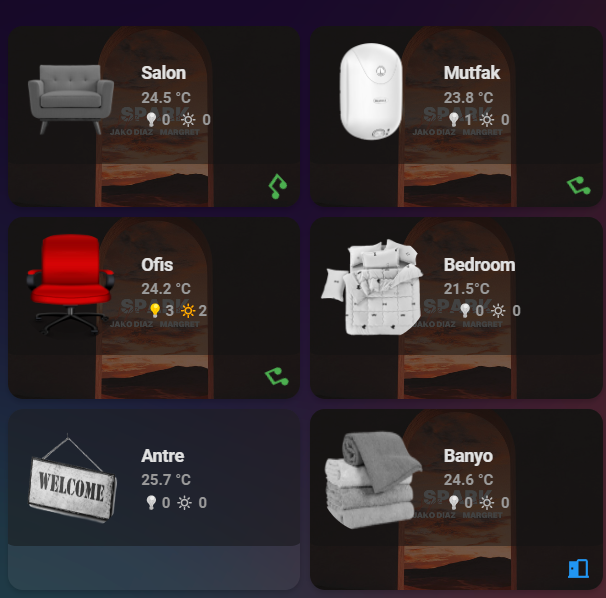
Now we can move to the room cards.
I am using grid layout to align cards.
First card starts from this line inside a vertical-stack-in-card. It has four rows.
- Swipe cards. (starting from line 225)
- Info part (Starting from line 811)
- Light Bar (Starting from line 1016)
- Volume Bar ) Starting from line 1046)
This is the important part. This section has "autoHeight: true" command which lets swipe cards to use "height:" commands individually. This allows swipe cards to expand downwards to different lengths automatically.

This is the place where first swipe cards starts. The first card contains information about the lights and light power that are turned on in the livingroom. The sofa icon also contains entity id for all living rooms lights. So when I press the icon it simply opens all the lights in the living room.

I have also added a double tap capability to the icon. When I do that the media player in the living room will start playing Spotify.


As you can see when the music starts an animated icon will appear and the media art work will cover the room card. To stop the music just double press the music icon.
Second swipe card. Remote controls can be found here. In my setup my projector, volume, hdmi and amplifier can be controlled from here. Because I use a Tuya Ir Remote, it is actually not being supported by Home Assistance but only scene control can be activated. So with this limitation I had to to use tap and double tap actions (Lıne 361 and 367) together to turn on and off the device.
Third Swipe Card is an air conditioner control card. Again because it is a Tuya based controller only "On" and "Off" commands are available which I achieve through tap controls.
Line 606...

Last Swipe Card for activation of the radio channels on Alexa Media Players.
You can move the icons around by editing "mushroom-shape-avatars" margin-top and margin-left commands. Height and width commands changes the icon size.
Okay now we have finished swipe cards section and we now move to the info part. I used two different sections here first one is sensors and the second one is scenes.


You can swipe to the left to access scenes section easily.
As you can see I used conditional cards in this section. This means things like motion movements will only be visible when motion happens.
Ok now this is where I track if Netflix is on. This is an Android TV integration and to track usage I need some templates again. I created a virtual switch here for tracking netflix named "switch.netflix_on_menu". Just copy and paste below code to your configuration.yaml. Although I have a seperate sensor.yaml this time I wrote this to configuration.yaml.
switch:
  - platform: template
    switches:
      netflix_on_menu:
        value_template: "{{ is_state_attr('media_player.fire_tv_192_168_1_86', 'app_id', 'com.netflix.ninja') }}"
        turn_on:
          service: switch.turn_on
          target:
            entity_id: switch.target
        turn_off:
          service: switch.turn_off
          target:
            entity_id: switch.target
Okay this template is quite simple. "media_player.fire_tv_192_168_1_86" is my Android Tv entity. So the formula simply says turn on the switch when "192.168.1.86"(Android TV) is "On" and app_id is "com.netflix.ninja"(Netflix ID). Okay so how do we find the app id? Simple. Turn on your Android TV and launch the application (ex.Netflix). Now go to the developers tool. Go to States. Select your android TV. A menu will open. Scroll down and you will see app_id.

As you can see in the picture it is "com.netflix.ninja" for Netflix.
Okay after restart you will see a new switch named "switch.netflix_on_menu". This switch is turned on when we launch Netflix.
One quick tip. The icon appears even if you are not playing anything and are only in the netflix menu. If you only want the logo to appear when a movie or TV show is playing, you can use the template below.
switch:
  - platform: template
    switches:
      netflix_usage:
        value_template: "{{ is_state('media_player.fire_tv_192_168_1_86', 'playing') and is_state_attr('media_player.fire_tv_192_168_1_86', 'app_id', 'com.netflix.ninja') }}"
        turn_on:
          service: switch.turn_on
          target:
            entity_id: switch.target
        turn_off:
          service: switch.turn_off
          target:
            entity_id: switch.target
Okay so I am tracking tivimate, Amazon prime and youtube on this section. You now know how to do that.
I have added my media player(Alexa Echo dot) here. When it plays something green music icon will rotate in the screen. The rotation is possible with the code on Line 890. I have also added two tap functions to this.
Line 877.... With a single tap to the green music icon, the media player will move to the next track. Line 883... With a double tap to the green music icon, the media player will stop the music.
Second line, Scene section are starting from here.
Lightcard is here. This card is for the livingroom so I need to control all living room lights. To do that just group your kivingroom lights. In my example it is "light.salon". This group controls all my 15 smart bulbs ib my living room so with the slider I can control their brightness. If you want you can also enter color control as well.
Media Player's volume control is here.
Line 1075...
We have opened a vertical stack in line 223 and now this is the end part of this verticak stack which means our first room card.
Okay we have couple of commands here which changes the inline view of our living room(Salon in my example) card. Lets start explaining from the first one.
                {% if is_state('group.salon', 'on') and not
                is_state('media_player.berkan_s_echo_dot', 'playing')  %}
                  background:  url( '/local/room-cards/browsermode5.png' ) no-repeat center 0px;
                  background-position: center;
                  background-repeat: no-repeat;
                  background-size: cover;
                  background-color: rgba(var(--rgb-card-background-color), 0.7);
                  background-blend-mode: overlay;
                  position: relative;
This one is a simple command. It says if the living room lights are on(group.salon 'on') and media player in the living room (media_player.berkan_s_echo_dot) is on any status rather then playing(generally means not playing) use background browsermode5.png(my living room picture) You can change this with your own picture. Just replace this line
/local/room-cards/browsermode5.png'
with yours.So generally if the lights are on and media player is not playing it will show my livingroom picture. This code will center the image.

To know the exact name of the media player for Spotify go to developer tools and choose states and select your Spotify Media Player. A list will appear. Scrool Down and look for source.

                {% elif state_attr('media_player.spotify_berkan_sezer',
                'source') == 'Salon Dot' and
                is_state('media_player.spotify_berkan_sezer', 'playing') %}
                  background-image: url( '{{ state_attr( "media_player.spotify_berkan_sezer", "entity_picture" ) }}' );
Ok now. We use another state. This time if Spotify is playing on Salon Dot(My Alexa Media Player Name) and Spotify itself is playing it will change the background regardless of any circumstance(ex. wont matter if lights are on or off) with Spotify Album art work. Meaning it will change the background with the album cover that is currently playing.

                {% elif state_attr('media_player.spotify_berkan_sezer',
                'source') == 'Everywhere' and
                is_state('media_player.spotify_berkan_sezer', 'playing') %}
                  background-image: url( '{{ state_attr( "media_player.spotify_berkan_sezer", "entity_picture" ) }}' );
Now this line changes the background of the card with Spotify album artwork. But what is the difference from the previous one ? The previous one was only changing the background if only the Spotify source was Salon Dot(my Living Room Media Player name). But Alexa Media Players have a function to play the music all around the house. In my case I have grouped all my media players and have given them the name "Everywhere" group. When I tell my Alexa to play the music on everywhere group it starts to play on every Alexa speaker around the house. So with the above code, if the media player is played on everywhere group the card will show spotify art image.

                {% elif states('sensor.hue_motion_temp_salon')|float < 21 and
                is_state('group.salon', 'off') %}
                  background:  url( '/local/room-cards/coldanimation.gif' ) no-repeat center 0px;
Okay Now a simple template. "sensor.hue_motion_temp_salon" is the entity name of my living rooms temperature sensor. This little template just says "If the living room temperature is under 21(float <21) and the living room lights are off change the background with an animation.

                {% else %}
                  background: rgba(var(--rgb-primary-text-color), 0.035);
{% endif %} height: auto;}If none of these circumstances above apply(% else %) just use a simple background semi transparent color.
So thanks for reading up to here. I have explained nearly everything for the first cards. The other cards are nearly the same with some minor differences. From now on I am only going to explain those differences but again the card structure explained here applies to all other cards.
Second room cards(Mutfak) starts.
There is one major difference here.
                            picture: >
                              {% if is_state('group.mutfak', 'off') and
                              is_state('switch.termosifon_socket', 'on') and
                              is_state('input_boolean.termosifon_dugme', 'off')
                              %}
                                /local/room-cards/waterheater.png
                              {% elif is_state('group.mutfak', 'on') and
                              is_state('input_boolean.termosifon_dugme', 'on')
                              and is_state('switch.termosifon_socket', 'on') %}
                                /local/room-cards/waterheaterred.png
                              {% elif is_state('group.mutfak', 'off') and
                              is_state('input_boolean.termosifon_dugme', 'on')
                              and is_state('switch.termosifon_socket', 'on') %}
                                /local/room-cards/waterheaterred.png
                              {% else %}
                                /local/room-cards/fridge.png
                              {% endif %}
On line 1146 I used a changeable icon. Mutfak means Kitchen. There is water heater in the kitchen. Sometimes I accidentally turn off the heater and as a result I was welcomed with cold water when I intend to take a shower. So to prevent this I wanted to see the heater icon in the card too and used above code. Group mutfak is Kitchen lights, termosifon dugme is Water heater(on and off only) and termosifon dugme is heaters working situation(whether if the heater is boiling the water or not at that moment).
                            card_mod:
                              style: |
                                ha-card {
                                  --icon-size: 88px;
                                  background: none;
                                  background-size: 55px 40px;
                                  {% if is_state('group.mutfak', 'on') or is_state('switch.termosifon_socket', 'on')  %}
                                  {% else %}
                                    filter: grayscale(100%);
                                  {% endif %}
                                }
This line_("or is_state('switch.termosifon_socket', 'on')")_ helps the heater icon remain colored even when the lights are off. So with the help of line 1145 and line 1181 I can see my devices status within the card.
So when the heater is on and the lights are off and not boiling the water, it will display as this:

When the lights and the heater is on but not boiling the water, it will display as :

When the lights are on or off and the boiling water resumes , it will display as:


This is the place for my heater in the kitchen. I can turn it off and on with a simple click to the icon. Due to its status the icons will change too.
This is where ofis room card starts.
This line contains a new media player card. It is based on mushroom media-player-card. Completly transparent card and displays music art work. Media controls such as rewind, forward, stop, play and volume controls exist here.

This is where Bedroom card starts. Bedroom card has one climate card inside for bedroom aircondition. The card is expandable. On line 2181 there is a double tap action to toggle an input boolean named "input_boolean.kaira_expand" I used a conditonal card on Line 2235 for the climate control. The climate control will only show when "input_boolean.kaira_expand" is on "On" status. so if you double click the air conditioner icon the menu will expand within the card. Also single click as written on line 2179 will also turn on the air conditioner.

Where Antre card starts.
Where Banyo card start.
Where Giysi card start
Where Koridor card start.
Last info:
How do I understand if air condition or water heater is active ?
Well I am using a smart plug. When any of the device starts lets say water heater boils the water, it starts to consume a certain amount of electricty. Because my plugs have energy metering I can understand that heater is boiling water. Well again I used an automation and an input boolean here.
The name of the boolean is : input_boolean.termosifon_dugme
and the automation is :
alias: Boolean - Termosifon
description: ""
trigger:
  - platform: numeric_state
    entity_id: sensor.termosifon_priz_energy
    id: "on"
    above: "100"
  - platform: numeric_state
    entity_id: sensor.termosifon_priz_energy
    id: "off"
    below: "100"
condition: []
action:
  - choose:
      - conditions:
          - condition: trigger
            id: "on"
        sequence:
          - service: input_boolean.turn_on
            data: {}
            target:
              entity_id: input_boolean.termosifon_dugme
      - conditions:
          - condition: trigger
            id: "off"
        sequence:
          - service: input_boolean.turn_off
            data: {}
            target:
              entity_id: input_boolean.termosifon_dugme
    default: []
mode: single
So when the smart plug state is above 100w then the boolean will turn on meaning the device is active.
Well hope this helps. I tried to explain every detail of the code ı have written here.
Have a nice day.