This lab is provided as part of AWS Innovate Data Edition, click here to explore the full list of hands-on labs :information_source: You will run this lab in your own AWS account. Please follow directions at the end of the lab to remove resources to avoid future costs.
In this lab we will walk you through creating an NLP-powered search index with Amazon Textract and Amazon Comprehend as an automated content-processing pipeline for storing and analyzing scanned image documents. For pdf document processing, please refer AWS Sample github repository to use Textractor.
This is a labified version of this AWS Blog Post
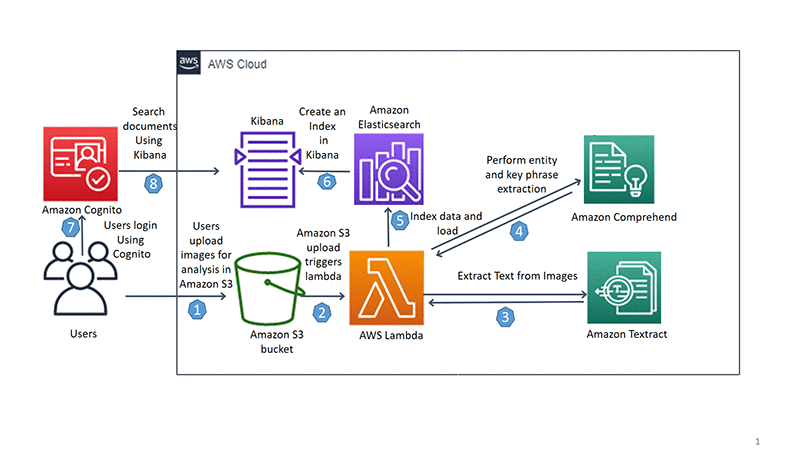
- Users upload OCR image for analysis to Amazon S3.
- Amazon S3 upload triggers AWS Lambda.
- AWS Lambda invokes Amazon Textract to extract text from image.
- AWS Lambda sends the extracted text from image to Amazon Comprehend for entity and key phrase extraction.
- This data is indexed and loaded into Amazon Elasticsearch.
- Kibana gets indexed data.
- Users log into Amazon Cognito.
- Amazon Cognito authenticates to Kibana to search documents.
This solution uses serverless technologies and managed services to be scalable and cost-effective. The services used in this solution include:
- Amazon Textract -- Extracts text and data from scanned documents automatically.
- Amazon Comprehend -- Uses ML to find insights and relationships in text.
- Amazon ES with Kibana -- Searches and visualizes the information.
- Amazon Cognito -- Integrates with Amazon ES and authenticates user access to Kibana. For more information, see Get started with Amazon Elasticsearch Service: Use Amazon Cognito for Kibana access control.
- Amazon S3 -- Stores your documents and allows for central management with fine-tuned access controls.
- AWS Lambda -- Executes code in response to triggers such as changes in data, shifts in system state, or user actions. Because S3 can directly trigger a Lambda function, you can build a variety of real-time serverless data-processing systems.
The first step is to use an AWS CloudFormation template to provision the necessary IAM role and AWS Lambda function to interact with the Amazon S3, AWS Lambda, Amazon Textract, and Amazon Comprehend APIs.
- Launch the AWS CloudFormation template in the US-East-1 (Northern Virginia) Region:
- You will see the below information on the Create stack screen:
Stack name: document-search
CognitoAdminEmail: abc@amazon.com
DOMAINNAME: documentsearchapp.Edit the CognitoAdminEmail with your email address. You will receive your temporary Kibana credentials in an email.
- Scroll down to Capabilities and check both the boxes to provide acknowledgement that AWS CloudFormation will create IAM resources. For more information, see AWS IAM resources.
- Scroll down to Transforms and choose Create Change Set.
The AWS CloudFormation template uses AWS SAM, which simplifies how to define functions and APIs for serverless applications, as well as features for these services like environment variables. When deploying AWS SAM templates in an AWS CloudFormation template, you need to perform a transform step to convert the AWS SAM template.
- Wait a few seconds for the change set to finish computing changes. Your screen should look as follows with Action, Logical Id, Physical Id, Resource Type, and Replacement. Finally, click on the Execute button, which will let AWS CloudFormation launch resources in the background.
- The following screenshot of the Stack Detail page shows the Status of the CloudFormation stack as
CREATE_IN_PROGRESS. Wait up to 20 minutes for the Status to change toCREATE_COMPLETE. In Outputs, copy the value of S3KeyPhraseBucket and KibanaLoginURL.


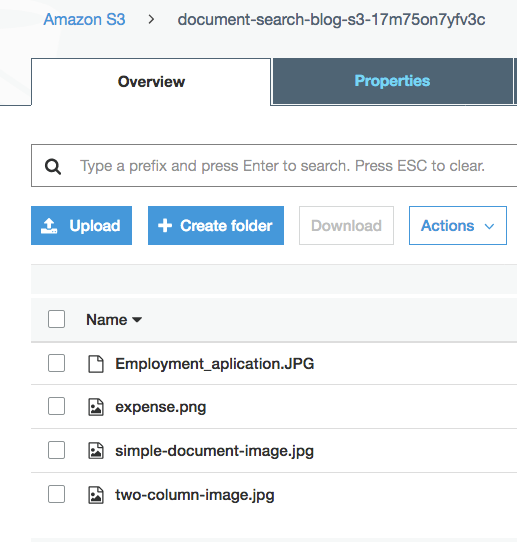
To upload your documents to your newly created S3 bucket in the above step, complete the following:
- Click on the Amazon S3 Bucket URL you copied from the CloudFormation Output.
- Download the example dataset
demo-data.zipfrom the GitHub repo. This dataset contains a variety of images that include forms, a scanned page with paragraphs, and a two-column document. - Unzip the data.
- Upload the files in the demo-data folder to the Amazon S3 bucket starting with
document-search-blog-s3-.
For more information, see How Do I Upload Files and Folders to an S3 Bucket?
After the upload completes, you can see four image files: Employment_application.JPG, expense.png, simple-document-image.jpg, and two-column-image.jpg in the S3 bucket.
Uploading the data to S3 triggers a Lambda S3 event notification to invoke a Lambda function. You can find event triggers configured in your Amazon S3 bucket properties under Advanced settings-> Events. You will see a Lambda function starting with document-search-blog-ComprehendKeyPhraseAnalysis-<Random string>. This Lambda function performs the following:
- Extracts text from images using Amazon Textract.
- Performs key phrase extraction using Amazon Comprehend.
- Searches text using Amazon ES.
The following code example extracts text from images using Amazon Textract:
textract = boto3.client(

service_name='textract',

region_name=region)

#Main lambda handler
def handler(event, context):
    # Get the object from the lambda event and show its content type
       bucket = event['Records'][0]['s3']['bucket']['name']
       key = unquote_plus(event['Records'][0]['s3']['object']['key'])
       s3.Bucket(bucket).download_file(Key=key,Filename='/tmp/{}')
# Read document content and extract text using Textract
with open('/tmp/{}', 'rb') as document:
    imageBytes = bytearray(document.read())
response=textract.analyze_document(Document={'Bytes':imageBytes},FeatureTypes=["TABLES", "FORMS"])
The following code example extracts key phrases using Amazon Comprehend:
#Initializing comprehend
comprehend = boto3.client(service_name='comprehend', region_name=region)
#Detect Keyphrases and Entities
keyphrase_response = comprehend.detect_key_phrases(Text=text, LanguageCode='en')
detect_entity= comprehend.detect_entities(Text=text, LanguageCode='en')
You can index the response received from Amazon Textract and Amazon Comprehend and load it into Amazon ES to create an NLP-powered search index. Refer to the below code:
 #Connection to Elasticsearch

        es=connectES()
#Saving Index to Elastocsearch endpoint in primary lambda handler

        es.index(index="document", doc_type="_doc", body=searchdata)
For more information, see the GitHub repo.
To visualize and search documents using Kibana, perform the following steps.
-
Find the email in your inbox with the subject line "Your temporary password." Check your junk folder if you don't see an email in your inbox.
-
Go to the Kibana login URL copied from the AWS CloudFormation output.
-
Login using your email address as the Username and the temporary password from the confirmation email as the Password. Click on Sign In.
Note: If you didn't receive the email or missed it while deploying AWS CloudFormation, choose Sign up. -
On the next page, enter a new password.
-
On the Kibana landing page, from the menu, choose Discover.
-
On the Management/Kibana page, you will see Step 1 of 2: Define index pattern, for Index pattern, enter
document*. The message "Success! Your index pattern matches 1 index." appears. Choose Next step. Click Create Index Pattern.
After a few seconds, you can see the document index page.
-
Choose Discover from the menu again. In the below screenshot you can see the document attributes.
s3link:s3 location of uploaded documents in S3, KeyPhrases: Key phrases from the documents uploaded in S3, Entity: it can be DATE, PERSON, ORGANIZATION etc, text: raw text from documents, table:tables extracted from documents, and forms:form extracted from documents -
To view specific fields for each entry, hover over the field in the left sidebar and click Add.


This moves the fields to the Selected Fields menu. Your Kibana dashboard formulates data in an easy-to-read format. The following screenshot shows the view after adding Entity.DATE, Entity.Location, Entity.PERSON, S3link and text in the Selected Fields menu:
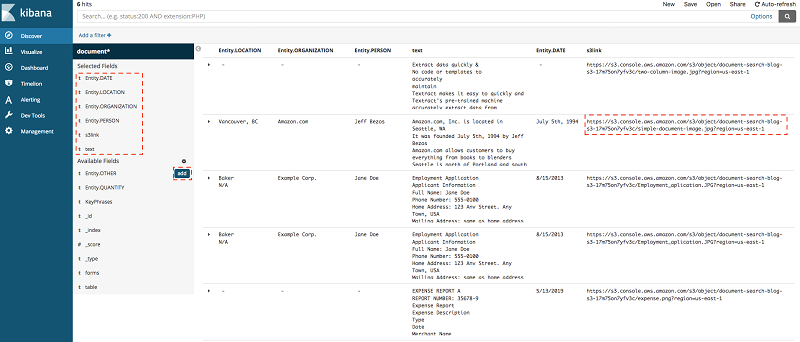
To look at your original document, choose s3link.
Note: You can also add forms and table to view and search tables and forms.
Please help us to provide your feedback here. Participants who complete the surveys from AWS Innovate Online Conference - Data Edition will receive a gift code for USD25 in AWS credits. AWS credits will be sent via email by 30 September, 2021.