Image List

Creating an image list is really simple and begins with creating a <div> that has the attribute data-bb-type="image-list". Each item in the list is another <div> that has the attribute data-bb-type="item". Each item has an image (data-bb-img), a title (data-bb-title), accent text that floats in the top right (data-bb-accent-text), and a description which is the innerHTML of the <div>.
Image lists can be defined as one of 5 different styles specified by the data-bb-style attribute. These styles can be one of default | arrowlist | arrowbuttons | addbuttons | removebuttons. Not specifying this attribute, or specifying default will create an ordinary image list.
<div data-bb-type="screen">
    <div data-bb-type="image-list">
        <div data-bb-type="item" data-bb-img="icon1.png" data-bb-title="Title">Description</div>
        <div data-bb-type="item" data-bb-img="icon2.png" data-bb-title="Title" data-bb-accent-text="Accent Text">Description</div>
        <div data-bb-type="item" data-bb-img="icon3.png" data-bb-title="Title">Description</div>
    </div>
</div>
To add a click event to one of the line items, simply add an onclick event to the <div>
<div data-bb-type="item" onclick="alert('clicked')" data-bb-img="icon9.png" data-bb-title="Title">Description</div> - BlackBerry 5 & 6 - 60 x 60 pixels
- BlackBerry PlayBook & BlackBerry 7 - 70 x 70 pixels
- BlackBerry PlayBook with BB10 styling - 64 x 64 pixels
- BlackBerry 10 - 109 x 109 pixels
An image list can have both headers and line items. A header is declared by creating a <div> with a data-bb-type="header" attribute and the innerHTML contents of the <div> are displayed as the label of the header. Headers have their text centered by default. To left justify your header text add the data-bb-header-justify="left" or to right justify your text add the **data-bb-header-justify="right"**attribute to your image list.
For BlackBerry 10 you can also specify if you want your header to be a solid color, or the default gradient. To use solid headers simply add the data-bb-header-style="solid" attribute to your image list.
<div data-bb-type="image-list" data-bb-header-justify="left" data-bb-header-style="solid">
    <div data-bb-type="header">My Header</div>
    <div data-bb-type="item" data-bb-img="icon9.png" data-bb-title="Title">Description</div>
</div>If you want a simple list without images you can set the data-bb-images="none" attribute on your image list
<div data-bb-type="image-list" data-bb-images="none">

</div>
You can also specify placeholder images that are used for when you don't have an image to represent the list item, or if the url to your list item is broken. This can be done by setting the data-bb-image-placeholder attribute with the path to your placeholder image
<div data-bb-type="screen">
    <div data-bb-type="image-list" data-bb-image-placeholder="placeholder.png">
        <div data-bb-type="item" data-bb-title="Title">No Image</div>
        <div data-bb-type="item" data-bb-img="/unreachable/image.png" data-bb-title="Title">Unreachable</div>
    </div>
</div> 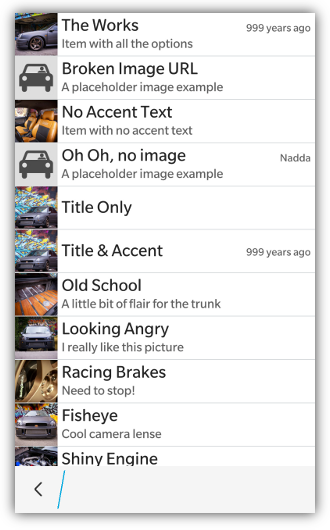
For BlackBerry 10 styling you can also specify a loading image to be used while your remote images are being loaded. This is useful for when your images are being retrieved from a remote server and you want to let the user know that the data is being retrieved. This can be done by setting the data-bb-image-loading attribute with the path to your loading image. Once the image for the list item has been retrieved it will replace the loading image.
<div data-bb-type="screen">
    <div data-bb-type="image-list" data-bb-image-loading="loading.png">
        <div data-bb-type="item" data-bb-title="Title">My Image</div>
        <div data-bb-type="item" data-bb-img="http://long/loading/image.png" data-bb-title="Title">Taking a long time</div>
    </div>
</div> If you want to attach a BlackBerry 10 context menu to your image list you can add the data-bb-context="true" attribute. This will automatically hook up your image list to the press and hold context menu that you have declared for the screen. When the image list item is pressed and held for 667ms it will peek the screen's context menu passing the title and description of the list item along with a handle to the item element. See the Context Menu area for more details of interacting with the menu.
NOTE: The context menu integration with the image list only works on BlackBerry 10
An Arrow list is typically used as a navigation menu. To create an arrow list simply set the data-bb-style="arrowlist" attribute. This will create a right aligned chevron/arrow beside each list item.

An button list is typically used when you want to list information but also have a button on the list item that will perform a different action than clicking the item itself. This type of list can be created by specifying arrowbuttons | addbuttons | removebuttons for the data-bb-style attribute. The arrowbuttons value will create chevron/arrow (>) buttons on the far right of each list item. The addbuttons value will create (+) buttons on the far right of each list item. The removebuttons value will create (-) buttons on the far right of each list item.
To trap the click of this list button you can simply add an onbtnclick event to your list item.
<div data-bb-type="image-list" data-bb-style="addbuttons">
    <div data-bb-type="item" data-bb-img="1.jpg" onbtnclick="addItem()" data-bb-title="Title">Description</div>
    <div data-bb-type="item" data-bb-img="2.jpg" onbtnclick="addItem()" data-bb-title="Title">Description</div>
</div>
Button lists are ONLY supported with BlackBerry 10 styling.


The following JavaScript interfaces are available for dynamically manipulating an Image List after the screen has been added to the DOM
The absolute fastest way to add items to an image list after it has been added to the DOM is by calling the refresh() function. This function takes in an array of item DOMElement(s) that will all be styled in the background and inserted in one chunk. This ensures that there are only 2 layout computations needed to add as many items as you like to a list.
var items = [],
      item;

// Create the item's DOM in a fragment
for (var i = 0; i < 5; i++) {
  item = document.createElement('div');
  item.setAttribute('data-bb-type','item');
  item.setAttribute('data-bb-title','my title');
  item.innerHTML = 'my description';
  item.setAttribute('data-bb-img','foo.png');
  item.onclick = function() {alert('clicked');};
  items.push(item);
}

document.getElementById('mylist').refresh(items);When you want to dynamically show or hide your image list you can call it's show() and hide() functions.
document.getElementById('myList').show();
document.getElementById('myList').hide();As a convenience you can also remove your image list from the screen by calling the remove() function.
document.getElementById('myList').remove();You can retrieve the selected item from a list by using the selected property when the user clicks on an item or button in the list.
var selectedItem = document.getElementById('mylist').selected;The getItems() function returns an array of items currently in the list. This is a disconnected array. Manipulating the array will have no effect on the list.
// Retrieve our list
var items = document.getElementById('mylist').getItems();
alert(items.length);The appendItem( item ) function allows you to add an item to the end of the list.
// Create the item's DOM in a fragment
var item = document.createElement('div');
item.setAttribute('data-bb-type','item');
item.setAttribute('data-bb-title','my title');
item.innerHTML = 'my description';
item.setAttribute('data-bb-img','foo.png');
item.onclick = function() {alert('clicked');};

// Append to list
document.getElementById('mylist').appendItem(item);The insertItemBefore( newItem, existingItem ) function allows you to insert an item before an existing item in the list.
// Create the item's DOM in a fragment
var item = document.createElement('div');
item.setAttribute('data-bb-type','item');
item.setAttribute('data-bb-title','my title');
item.innerHTML = 'my description';
item.setAttribute('data-bb-img','foo.png');
item.onclick = function() {alert('clicked');};

// Retrieve our items in the list
var list = document.getElementById('mylist'),
    items = list.getItems();

// Add our item before the first item in the list
if (items.length > 0) {
    list.insertItemBefore(item, items[0]);
} else {
    list.appendItem(item);
}You can use the clear() function for image lists to quickly clear all the items and reset the scrolling area
document.getElementById('mylist').clear();One common use case scenario is to retrieve the id of an image list item when the user clicks on the item. The below code will show you how you can retrieve the item's id
<div data-bb-type="item" data-bb-img="1.jpg" onbtnclick="alert(this.getAttribute('id'))" data-bb-title="Title"> </div>The following JavaScript interfaces are available for dynamically manipulating an Image List Item after the screen has been added to the DOM
You can retrieve the values for an image list item by using the following functions
getTitle()        // Returns title of item
getDescription()  // Returns the description of the item
getAccentText()   // Returns the accent text of the item
getImage() // Returns the path of the image usedYou can also remove an item from its list by calling the item's remove() function.
var selected = document.getElementById('mylist').selected;
selected.remove();