- 可以啟用一組 Docker Compose 之後,相同資料夾底下的專案都可以在 Docker 上運行相同的 php 版本
- 設定好憑證,可以使用 SSL 的方式進行連線
- 設定好 Nginx 的配置,就可以根據不同 path 導向指定的專案
- 如果好 ngrok 可以把 local 的網址分享給其他人使用
- 最外層有一個
docker-compose.yml的設定檔,所有要使用的服務都會在裡面定義好 - Laravel 專案也會放在這層資料夾中,在啟用 Docker Compose 的時候,會一併把這些專案複製到 Container 裡面,這樣就可以用 Nginx 指向指定專案
docker資料夾是存放 Docker 的設定,包含 PHP, MySQL, Nginx 等
$ tree

.
├── docker-compose.yml
├── laravel_project_1
├── laravel_project_2
├── laravel_project_3
├── laravel_project_4
├── docker
│   ├── mysql
│   ├── nginx
│   │   ├── Dockerfile
│   │   ├── _wildcard.jp.ngrok.io+3-key.pem
│   │   ├── _wildcard.jp.ngrok.io+3.pem
│   │   ├── fastcgi_params
│   │   └── nginx_path.conf
│   └── php-fpm
│ ├── Dockerfile-
Note
 $ brew install mkcert
 $ brew install nss
$ mkcert -install
會顯示訊息顯示產生的憑證位置 (不同作業系統產生的位置不同,請注意顯示的訊息)
Created a new local CA at "/home/{your_username}/.local/share/mkcert"-
開啟 terminal,建立憑證
$ mkcert "*.jp.ngrok.io" local 127.0.0.1 ::1
-
將兩個憑證移動到要放置的目錄
-
預設位置:
/User/<User Name>/_wildcard.jp.ngrok.io+3-key.pemand/User/<User Name>/_wildcard.jp.ngrok.io+3.pem -
將這兩個檔案複製到
docker/nginx/目錄底下,之後docker-compose build就會把憑證放進 Docker Container 內
-
-
-
Note
 $ amazon-linux-extras install epel
 $ yum install epel-release
 $ yum install certbot python-certbot-apache
確認是否安裝成功
certbot -h

-
可以在 Godaddy 上購買一個網域
-
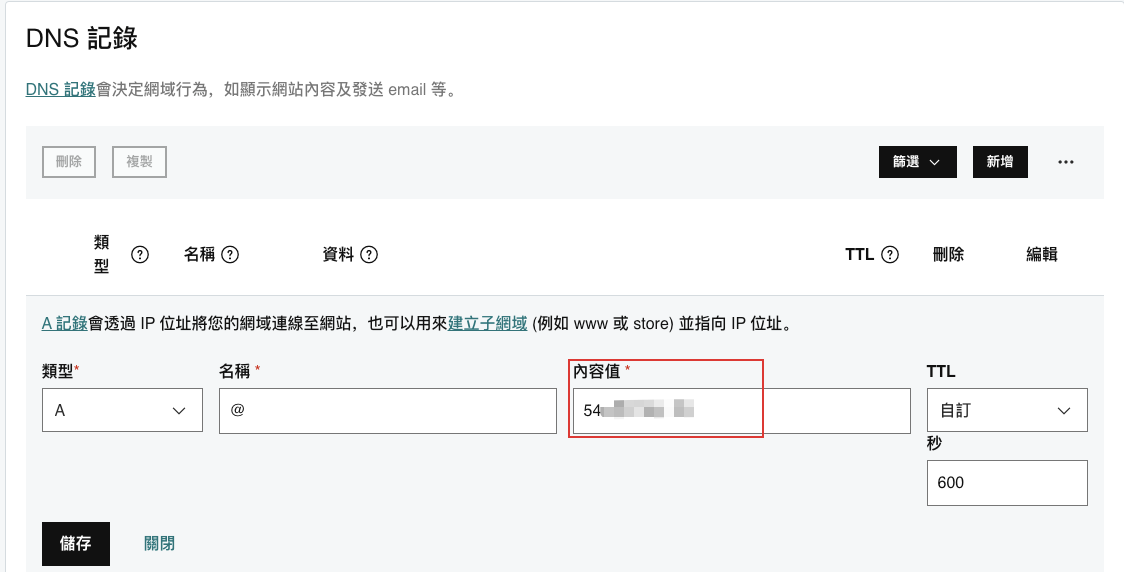
進到設定,選擇剛剛購買的網域的 DNS 設定

-
把 EC2 的 Public IP 複製起來,貼在 DNS A 類型的資料裡面的內容值

-
回到 Terminal,輸入指令建立憑證
-d: 網域名,可以建立多個 domain,用法為:-d doamin1.com -d domain2.com--standalone: 執行單一 webserver 進行驗證certonly: 只產生憑證,讓 Certbot 不要自動產生或修改 Nginx 的設定檔案
$ ./certbot-auto certonly --standalone -d yourdomain.com
-
憑證會被產生在
/etc/letsencrypt/live/{yourdomain.com}底下,記得要用 root 權限進入$ cd /etc/letsencrypt/live/ $ ls -al drwx------ 3 root root 40 12月 29 17:19 . drwxr-xr-x 9 root root 108 1月 8 01:49 .. drwxr-xr-x 2 root root 93 1月 8 01:49 yourdomain.com -rw-r--r-- 1 root root 740 12月 29 17:19 README $ ls -al yourdomain.com drwxr-xr-x 2 root root 93 1月 8 01:49 . drwx------ 3 root root 40 12月 29 17:19 .. lrwxrwxrwx 1 root root 36 1月 8 01:49 cert.pem -> ../../archive/yourdomain.com/cert4.pem lrwxrwxrwx 1 root root 37 1月 8 01:49 chain.pem -> ../../archive/yourdomain.com/chain4.pem lrwxrwxrwx 1 root root 41 1月 8 01:49 fullchain.pem -> ../../archive/yourdomain.com/fullchain4.pem lrwxrwxrwx 1 root root 39 1月 8 01:49 privkey.pem -> ../../archive/yourdomain.com/privkey4.pem -rw-r--r-- 1 root root 692 12月 29 17:19 README
-
開啟 Nginx 設定檔
$ vim /etc/nginx/nginx.conf
-
編輯設定檔內容
server { listen 443 ssl; listen [::]:443 ssl; server_name {yourdomain.com}; # 改成你的網域 root {your root directory}; # 改成你的專案跟目錄 index index.php index.html index.htm ssl_certificate "/etc/letsencrypt/live/yourdomain.com/fullchain.pem"; # 改成你剛剛建立的憑證路徑 ssl_certificate_key "/etc/letsencrypt/live/yourdomain.com/privkey.pem"; # 改成你剛剛建立的憑證路徑 add_header Strict-Transport-Security “max-age=31536000”; ssl_session_cache shared:SSL:1m; ssl_session_timeout 10m; #ssl_ciphers PROFILE=SYSTEM; ssl_prefer_server_ciphers on; ssl_ciphers HIGH:!aNULL:!MD5; # Load configuration files for the default server block. include /etc/nginx/default.d/*.conf; error_page 404 /404.html; location = /40x.html { } error_page 500 502 503 504 /50x.html; location = /50x.html { } } -
檢查配置是否正確
$ nginx -t nginx: the configuration file /etc/nginx/nginx.conf syntax is ok nginx: configuration file /etc/nginx/nginx.conf test is successful -
重啟 Nginx
$ nginx -s reload
-
在 Crontab 裡面設定每三個月自動更新
 # /etc/crontab
 # 每三個月自動更新一次 ssl 憑證
 0 1 1 * * certbot renew --force-renewal && service nginx restart
-
-
$ tree . ├── Dockerfile ├── _wildcard.jp.ngrok.io+3-key.pem ├── _wildcard.jp.ngrok.io+3.pem ├── fastcgi_params └── nginx_path.conf -
 FROM nginx:latest

 # 安裝 vim
 RUN apt update -y
 RUN apt install vim -y

 # 安裝 bash,並且預設用 bash 開啟
 RUN apt install bash
 RUN ln -sf /bin/bash /bin/sh
-
把上一個步驟產生的憑證複製到此資料夾
-
 fastcgi_param  SCRIPT_FILENAME    $request_filename;
 fastcgi_param  QUERY_STRING       $query_string;
 fastcgi_param  REQUEST_METHOD     $request_method;
 fastcgi_param  CONTENT_TYPE       $content_type;
 fastcgi_param  CONTENT_LENGTH     $content_length;

 fastcgi_param  SCRIPT_NAME        $fastcgi_script_name;
 fastcgi_param  REQUEST_URI        $request_uri;
 fastcgi_param  DOCUMENT_URI       $document_uri;
 fastcgi_param  DOCUMENT_ROOT      $document_root;
 fastcgi_param  SERVER_PROTOCOL    $server_protocol;
 fastcgi_param  REQUEST_SCHEME     $scheme;
 fastcgi_param  HTTPS              $https if_not_empty;

 fastcgi_param  GATEWAY_INTERFACE  CGI/1.1;
 fastcgi_param  SERVER_SOFTWARE    nginx/$nginx_version;

 fastcgi_param  REMOTE_ADDR        $remote_addr;
 fastcgi_param  REMOTE_PORT        $remote_port;
 fastcgi_param  SERVER_ADDR        $server_addr;
 fastcgi_param  SERVER_PORT        $server_port;
 fastcgi_param  SERVER_NAME        $server_name;

 # PHP only, required if PHP was built with --enable-force-cgi-redirect
 fastcgi_param  REDIRECT_STATUS    200;
-
 server {
     # 部屬位置
     set $deploy_path "/var/www/html";                      # 專案會放在這個目錄

     # For https
     listen      443 ssl;
     listen      [::]:443 ssl;
     server_name {your_domain};                             # 要修改成你的 domain
     root        $deploy_path/{project}/public;
     index       index.php index.html index.htm;

     ssl_certificate "_wildcard.jp.ngrok.io+3.pem";         # 你的憑證
     ssl_certificate_key "_wildcard.jp.ngrok.io+3-key.pem"; # 你的憑證

     ssl_session_cache shared:SSL:1m;
     ssl_session_timeout  5m;
     ssl_ciphers HIGH:!aNULL:!MD5;
     ssl_prefer_server_ciphers on;

     # Nginx Header
     add_header 'Access-Control-Allow-Origin' '*' always;
     add_header 'Access-Control-Allow-Methods' 'GET,POST,PUT,DELETE,PATCH';
     add_header 'Access-Control-Allow-Headers' 'Authorization, Content-Type';

     location / {
         # First attempt to serve request as file, then
         # as directory, then fall back to index.html
         try_files $uri $uri/ /index.php$is_args$query_string;
     }

     # 定義 service-1 的路徑
     location ^~ /service-1 {
         alias $deploy_path/{your_project_name}/public; # 要改成你設定的專案名稱路徑
         try_files $uri $uri/ @service-1;
         location ~ \.php {
             fastcgi_pass   php-fpm:9000;
             fastcgi_index  index.php;
             fastcgi_split_path_info ^(.+\.php)(.*)$;
             fastcgi_param SCRIPT_FILENAME $request_filename;
             include     fastcgi_params;
         }
     }

     # service-1 的規則
     location @service-1 {
         rewrite /service-1/(.*)$ /service-1/index.php?/$1 last;
     }

     error_page 404 /404.html;
         location = /40x.html {
     }

     error_page 500 502 503 504 /50x.html;
         location = /50x.html {
     }

     location ^~ /.git {
         deny all;
     }

     location ~* \.(htaccess|ini|log|sh|sql|conf|bak|zip)$ {
         deny all;
     }

     error_log /var/log/nginx/error.log;
     access_log /var/log/nginx/access.log;
 }
-
$ tree . ├── Dockerfile -
 FROM php:8.1-fpm

 WORKDIR "/var/www/html"

 # 安裝 vim
 RUN apt update -y
 RUN apt install vim -y

 # 安裝 bash,並且預設用 bash 開啟
 RUN apt install bash
 RUN ln -sf /bin/bash /bin/sh

 # 安裝 php redis 套件
 RUN pecl install redis && docker-php-ext-enable redis

 # 安裝 mysql 套件
 RUN docker-php-ext-install pdo pdo_mysql
version: '3.1'
networks:
  laravel:
    name: larvel
services:
    redis:
        image: 'redis:alpine'
        container_name: redis
        networks:
            - laravel

    mysql:
        image: 'mysql:8.0'
        container_name: mysql
        restart: unless-stopped
        volumes:
            - ./docker/mysql:/var/lib/mysql
        environment:
            - MYSQL_ROOT_PASSWORD=root
            - MYSQL_DATABASE=my_database
            - MYSQL_PASSWORD=root

        # 如果要從 local 的 workbench 連線的話,要連線 3307 port
        # 如果是 laravel 專案要連線,因為是走內網,所以要連線 3306 port
        ports:
            - '3307:3306'
        networks:
            - laravel
    nginx:
        build: docker/nginx
        container_name: nginx
        volumes:
            - '.:/var/www/html'
            - './docker/nginx/nginx_path.conf:/etc/nginx/conf.d/default.conf'
            - './docker/nginx/fastcgi_params:/etc/nginx/fastcgi_params'
            - './docker/nginx/_wildcard.jp.ngrok.io+3-key.pem:/etc/nginx/_wildcard.jp.ngrok.io+3-key.pem'
            - './docker/nginx/_wildcard.jp.ngrok.io+3.pem:/etc/nginx/_wildcard.jp.ngrok.io+3.pem'

        # 如果 local 的 80, 443 被佔用的話,就要另外開 port 去 mapping
        ports:
            - '8080:80'
            - '8443:443'
        depends_on:
            - php
            - mysql
        networks:
            - laravel
    php-fpm:
        build: docker/php-fpm
        working_dir: /var/www/html
        container_name: php
        volumes:
            - '.:/var/www/html'
        networks:
            - laravel
Note
- 如果想要讓 docker container 可以連線到 local 設定的其他服務,可以在
docker-compose.yml設定以下參數- 這個需要 docker 版本在 v20.10 以上才有這個功能
extra_hosts:
  # <你的 local domain>:host-gateway
  - "host.docker.internal:host-gateway"
Note
-
新增一個
xdebug.ini檔[xdebug] zend_extension=xdebug.so xdebug.mode=develop,coverage,debug,profile xdebug.discover_client_host=true xdebug.idekey=docker xdebug.start_with_request=yes xdebug.log=/dev/stdout xdebug.log_level=0 xdebug.client_port=9003 xdebug.client_host={YOUR_COMPUTER_IP}
YOUR_COMPUTER_IP 可以用以下方式取得
-
macOS:
$ ipconfig getifaddr en0
-
Windows with WSL:
$ grep nameserver /etc/resolv.conf | cut -d ' ' -f2
-
Linux (Debian based distros):
$ hostname -I | cut -d ' ' -f1
-
-
在 docker-compose.yml 裡面設定 xdebug 搬移的位置
php-fpm:
build: docker/php-fpm
working_dir: /var/www/html
container_name: php
volumes:
	- '.:/var/www/html'
	- ./docker/php-fpm/xdebug.ini:/usr/local/etc/php/conf.d/docker-php-ext-xdebug.ini # 要新增這行
-
在 php
Dockerfile裡面加入安裝 xdebug# 安裝 xdebug RUN pecl install xdebug \ && docker-php-ext-enable xdebug
-
在 vscode 的
launch.json這定新增記得 pathMappings 要指定到對的專案底下
{
	"name": "Listen for XDebug on Docker",
	"type": "php",
	"request": "launch",
	"port": 9003,
	"pathMappings": {
		"/var/www/html/<專案目錄>": "${workspaceFolder}"
	}
}
$ docker compose build --no-cache

$ docker compose up因為有時候開發會遇到須給其他工程師使用的情況,需要開放讓別人可以連線,因此可以使用 ngrok
以下用付費版本的方式進行
-
開啟檔案
$ sudo vim /etc/hosts
新增 host
# 127.0.0.1 your-domain.com 127.0.0.1 bon-xxx.jp.ngrok.io -
開啟設定檔
$ vim /User/<user_name>/.ngrok2/ngrok.yml
新增設定
 authtoken: <your_ngrok_token>
 region: jp
 tunnels:
   bon-xxx:
     # 因為 local 443 port 被佔用,所以要用 docker-compose.yml 設定的對外 port (ex: 8443)
     addr: https://bon-xxx.jp.ngrok.io:8443
     proto: http
     hostname: bon-xxx.jp.ngrok.io
     host_header: bon-xxx.jp.ngrok.io
-
 # ngrok start <your_tunnel>
 $ ngrok start bon-xxx

 # 就會看到以下資訊
 ngrok by @inconshreveable

 Session Status                online
 Account                       your-account (Plan: Pro)
 Version                       2.3.40
 Region                        Japan (jp)
 Web Interface                 http://127.0.0.1:4040
 Forwarding                    http://bon-xxx.jp.ngrok.io -> https://bon-xxx.jp.ngrok.io:8443
 Forwarding                    https://bon-xxx.jp.ngrok.io -> https://bon-xxx.jp.ngrok.io:8443

 Connections                   ttl     opn     rt1     rt5     p50     p90
                               0       0       0.00    0.00    0.00    0.00
-
-
就可以分享
https://bon-xxx.jp.ngrok.io這段網址給其他人使用 -
但是在自己的 local 端還是要使用
https://bon-xxx.jp.ngrok.io:8443才可以連線
-