Inspired by the work of folks on Tuya-Convert, this guide takes a hardware approach to flashing Tuya IoT modules with custom firmware.
A Chinese company named Tuya offers a free-to-brand turnkey smart home solution to anyone. Using their offer is simple, since everything can be done by clicking through the Tuya web page, from choosing your pre-designed products or pre-programmed wifi-modules (mostly ESP8266) to build your own app. In the end, this has resulted in over 11,000 devices 'made' by over 10,000 vendors using Tuya's firmware and cloud services.
While Tuya-Convert takes an entirely software oriented approach to reflashing firmware on Tuya modules the company has made this increasingly more difficult through firmware updates. In response this guide provides steps involved in hardware flashing a Tuya module through the Arduino IDE after some simple hardware modifications, which should work regardless of Tuya firmware version.
I wanted access to granular data about my energy use and an option to export that data from a smart plug.
Amazon is flooded with affordable smart plugs using Tuya modules and they are incredibly cheap, however at the time of this writing the rebranded Tuya apps and Smart Life IFTTT service do not provide an option to export power consumption data. End users are locked into using Tuya services and at the mercy of what appear to be fly by night companies to contiue providing updates to the apps for their rebranded Tuya devices to stay operational.
Please be sure that you understand what you're doing before using this guide and software. Flashing an alternative firmware and modifying hardware can lead to unexpected behavior and/or render the device unusable so that it might be permanently damaged.

A peek inside one of my Smart Plugs revealed a TYWE2S module operating as the main microcontroller for the device. This is itself an ESP8266/ESP8265 WiFi module which is easily programmed using the Arduino IDE. Further research pointed me to a GitHub effort called Tuya-Convert as a means to upload custom firmware OTA to these generic modules, however it appears from recent forum posts that a vendor firmware update has broken this technique. This left open a hardware hacking approach.
Forum posts here from user PeteKnight outline the steps to reprogramming the TYWE2S module and provide a useful starting point with Arduino code for OTA updates.
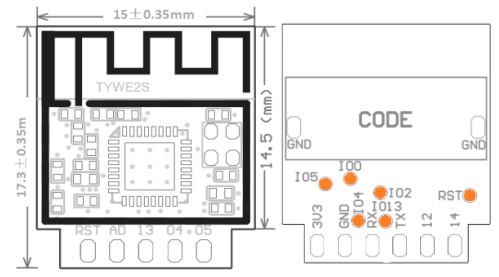
Referencing the diagram pinout above for the TYWE2S my first step was soldering a header to the 3.3V, GND, RX, and TX pins.

Next I soldered a small push button switch directly on the TYWE2S module between GND and the contact 100, which when pressed during boot will put the ESP module into programming mode.

Usually efforts like this take some troubleshooting but reprogramming the board through a USB to TTL connector with the Arduino IDE went smoothly (just be sure not to have the Smart Plug connected to mains power!).

The Arduino code uses a few libraries you will need to download that are available in the Arduino Libraries Manager including ESP8266Wifi, Blynk (from vshymanskyy) or Adafruit_IO_Arduino, and HLW8012 (from xoseperez).

An unmarked IC in the Smart Plug is responsible for measuring power use and communicating that to the ESP module. My best guess is that this is an HLW8012 based on other user comments and the pinout. Modifying the custom firmware to include code from HLW8012 (from xoseperez) seemed to confirm this, though the same code mentioned 230V mains and returned readings with half of the expected wattage. As a quick fix I adjusted the value for VOLTAGE_RESISTOR_UPSTREAM to match results from an unmodified TopGreener Smart Outlet.
To control the device and store data I initially made use of Blynk.io. It is certainly possible to setup a custom web server and by no means is it a requirement to use this service but it helped to make this process a heck of a lot easier. I have also included Arduino code and instructions for connecting to Adafruit IO.
After downloading the Blynk smartphone app and providing an email address to create an account I was able to create a “New Project” which provides a unique Authentication Token over email to place in the Arduino code.


From here it is a matter of adding in various widgets from the “Widget Box” including categories such as controllers, displays, notifications, device management, etc.


I set mine up to include a “Button” to control power (ON/OFF) linked to Virtual Pin 1 in the Arduino Code and two displays for Virtual Pin 5 where the Arduino Code is sharing real time wattage: both a “Labeled Display” to show current wattage and a “SuperChart” to record the real time data which is conveniently available to download as a CSV file.

🚧Under Construction🚧
