Using PiHole is a popular way to filter out ads, malware, and trackers. It is easy to install and has excellent UI. PiHole comes with the built in dnsmasq DNS resolver as well as the lighttpd web server.
For quite a few years, PiHole been doing great job for me. I first installed it, just like many, on RasberryPi 3+ SBC, but later switched to AtomicPI to get a full gigabit NIC and to avoid the imminent failure or RPi's SD card. AtomicPI comes with the on-board eMMC storage, which is way faster and, despite its small size, still is sufficient for my purpose. I could now turn on the logging without worrying about file I/O killing the SD card.
Over the past few years we start seeing DNS-over-TLS (aka "DOT") gaining more popularity. Suffice to say that Android phones now come with so-called "secure DNS" enabled by default, which is a mere DOT.
With the advent of DOT and having mostly Android devices in my home network, I started noticing that PiHole became not up to its task due to the fact that my devices were using the default Google's DOT (8.8.8.8). Thus, the task was to make PiHole relevant again. To my surprise, PiHole developers refuse to add DOT and DOH functionality.
Of course, my knee-jerk reaction was to block Google's DNS on my Ubiquiti firewall, but that would be a lame workaround.
Luckily, there are few hints out there on how to configure DOT. Most notes are generic and require tinkering. Some PiHole users are opting out for using Cloudflare's DOT/DOH gateway. However, if I do not trust my ISP with collecting browsing history of my family (and guests), why would I trust Cloudflare, which is a for-profit company?
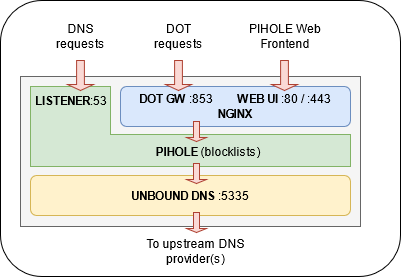
After some research I decided to switch from the default lighttpd webserver to nginx and, why not to install a proper DNS server as well? Switching to UNBOUND is easy. As a result, final design idea could be illustrated as
Throughout this guide I am going to use YourDNSServer and, respectively, YourDNSServerIPaddress for the FQDN and the IP address of my DNS server
There is an easy-to-follow guide on pihole site. Once UNBOUND is installed you can validate it is correctly resolving by running
$ dig @YourDNSServer -p 5335 www.github.com +nocomment

; <<>> DiG 9.11.3-1Ubuntu1.14-Ubuntu <<>> @YourDNSServer -p 5335 www.github.com +nocomment
; (1 server found)
;; global options: +cmd
;www.github.com.                        IN      A
www.github.com.         2101    IN      CNAME   github.com.
github.com.             60      IN      A       140.82.114.3
;; Query time: 15 msec
;; SERVER: YourDNSServer#5335(YourDNSServerIP)
;; WHEN: Wed Apr 07 12:44:59 DST 2021
;; MSG SIZE  rcvd: 73
Note the port number 5335, it is defined in /etc/unbound/unbound.conf. Note that your new shiny DNS server also supports DNSSEC!
It is still worth noting that your upstream resolution to upstream root DNS servers is still unencrypted as of the moment of this writing none of the root servers supports DOT.
The PiHole's guide on installing NGINX is pretty straightforward as well. Note, that for DOT we are going to install a TLS certificate. The obvious side benefit of having a cert would be ability to acces PiHole's UI via secured addess. I used Les's Encrypt, which is quite simple to get installed using these instructions.
Next we are going to follow the example of configuring the DNS-over-TLS gateway using the excellent Mark Boddington's example.
In order for it to work we have to install the NGINX NJS module. First in order to install it on my Ubuntu 18.04 I had to add NGINX's repository to the list of sources by adding the following lines to /etc/apt/sources.list
deb http://nginx.org/packages/mainline/ubuntu/ bionic nginx
deb-src http://nginx.org/packages/mainline/ubuntu/ bionic nginx
and only then running the install
$ sudo apt-get install nginx-module-njs
As a result, my /etc/nginx/dns.d/dot.conf for NGINX DOT gateway now looks as following
stream {
    # DNS logging.  This log file will show the DNS requests geting forwarded to UNBOUND
    log_format  dns   '$remote_addr [$time_local] $protocol "$dns_qname"';
    access_log /var/log/nginx/dns-access.log dns;

    # Include the NJS module.  Get the file from  https://github.com/TuxInvader/nginx-dns/tree/master/njs.d
    js_import /etc/nginx/njs.d/dns/dns.js;

    # The $dns_qname variable can be populated by preread calls, and can be used for DNS routing
    js_set $dns_qname dns.get_qname;

    # DNS upstream pool.  We use the local PIHOLE instance at 127.0.0.1:53.
    # For bypassing PIHOLE and going directly to UNBOUD change the port to 5335
    upstream dns {
        zone dns 64k;
        server 127.0.0.1:53;
    }

    # DNS over TLS (DoT) gateway.  Proxy the traffic onto standard DNS
    # Note that we're re-using the Let's Encrypt certificates
    server {
        listen 853 ssl;
        ssl_certificate /etc/letsencrypt/live/YourDNSServer/fullchain.pem;
        ssl_certificate_key /etc/letsencrypt/live/YourDNSServer/privkey.pem;
        js_preread dns.preread_dns_request;
        proxy_pass dns;
    }
}
Added the call to load NJS modules and referenced the /etc/nginx/dns.d/dot.conf at the bottom of my current NGINX configuration file /etc/nginx/nginx.conf
	user  nginx;
	worker_processes  1;

	error_log  /var/log/nginx/error.log warn;
	pid        /var/run/nginx.pid;

	# This is where we load NJS modules
	load_module modules/ngx_http_js_module.so;
	load_module modules/ngx_stream_js_module.so;

	events {
	    worker_connections  1024;
	}

	http {
	    include       /etc/nginx/mime.types;
	    default_type  application/octet-stream;

	    log_format  main  '$remote_addr - $remote_user [$time_local] "$request" '
	                      '$status $body_bytes_sent "$http_referer" '
	                      '"$http_user_agent" "$http_x_forwarded_for"';

	    access_log  /var/log/nginx/access.log  main;

	    sendfile        on;
	    keepalive_timeout  65;

	    include /etc/nginx/conf.d/*.conf;
	}

  	# now let's add the dot.conf file
	include /etc/nginx/dns.d/dot.conf;
And the resulting NGINX /etc/nginx/conf.d/default.conf file is below. Note the comments explaining few minor tweaks such as 302 redirects, TLS1.2, and H2 settings
        server {
            listen 80 default_server;
            listen [::]:80 default_server;

            server_name YourDNSServer;

            root /var/www/html;

            autoindex off;

            index pihole/index.php index.php index.html index.htm;

            location / {
                expires max;
                try_files $uri $uri/ =404;
            }

            location ~ \.php$ {
                include fastcgi_params;
                fastcgi_param SCRIPT_FILENAME $document_root/$fastcgi_script_name;
                fastcgi_pass unix:/run/php/php7.2-fpm.sock;  # Ensure you use the correct PHP-FPM version here
                fastcgi_param FQDN true;
            }

            location /*.js {
                index pihole/index.js;
            }

            location /admin {
                root /var/www/html;
                index index.php index.html index.htm;
            }

            location ~ /\.ht {
                deny all;
            }

            # turn on the HTTP-to-HTTPS 302 redirect
            if ($host = YourDNSServerIPaddress) {
                return 302 http://YourDNSServer$request_uri;
            }
            return 302 https://YourDNSServer$request_uri;
        }

        #########################################
        # now let's do the same same for port 443
        server {
            # note the http2 verb added here
            listen [::]:443 http2 ssl ipv6only=on;  # Note that we enable H2 support, because why not
            listen 443 ssl http2 default_server;

            server_name YourDNSServer;

            # I always like using the FQDN instead of an IP address
            if ($host = YourDNSServerIPaddress) {
                return 302 https://YourDNSServer$request_uri;
            }
            # Here comes our Let's Encrypt TLS certificate.  These lines were automagically added by Let's Encrypt CERTBOT
            ssl_certificate /etc/letsencrypt/live/YourDNSServer/fullchain.pem;
            ssl_certificate_key /etc/letsencrypt/live/YourDNSServer/privkey.pem;
            include /etc/letsencrypt/options-ssl-nginx.conf;
            ssl_dhparam /etc/letsencrypt/ssl-dhparams.pem;

            # enable TLSv1.2.  I am seeing it negotiating TLS 1.3 when accessing PiHole's UI via the browser
            ssl_protocols TLSv1.2;

            root /var/www/html;

            autoindex off;

            index pihole/index.php index.php index.html index.htm;

            location / {
                expires max;
                try_files $uri $uri/ =404;
            }

            location ~ \.php$ {
                include fastcgi_params;
                fastcgi_param SCRIPT_FILENAME $document_root/$fastcgi_script_name;
                fastcgi_pass unix:/run/php/php7.2-fpm.sock;  # again, ensure you have the correct PHP-FPM version
                fastcgi_param FQDN true;
            }

            location /*.js {
                index pihole/index.js;
            }

            location /admin {
                root /var/www/html;
                index index.php index.html index.htm;
            }

            location ~ /\.ht {
                deny all;
            }
        }
Let us start with installing kdig (enhanced DIG)
$ apt-get install knot-dnsutils
Now we can test our DOT server by executing the following command (P.S. note the +dnssec flag!)
$ kdig -d @YourDNSServerIPaddress  +tls-ca +tls-host=YourDNSServer +dnssec www.whitehouse.gov
;; DEBUG: Querying for owner(www.whitehouse.gov.), class(1), type(1), server(YourDNSServer), port(853), protocol(TCP)
;; DEBUG: TLS, imported 129 system certificates
;; DEBUG: TLS, received certificate hierarchy:
;; DEBUG:  #1, CN=YourDNSServer
;; DEBUG:      SHA-256 PIN: p3oBivTcbQFriXHOAZC3isTsBc3adON/gKYEywQcJqA=
;; DEBUG:  #2, C=US,O=Let's Encrypt,CN=R3
;; DEBUG:      SHA-256 PIN: jQJTbIh0grw0/1TkHSumWb+Fs0Ggogr621gT3PvPKG0=
;; DEBUG:  #3, C=US,O=Internet Security Research Group,CN=ISRG Root X1
;; DEBUG:      SHA-256 PIN: C5+lpZ7tcVwmwQIMcRtPbsQtWLABXhQzejna0wHFr8M=
;; DEBUG: TLS, skipping certificate PIN check
;; DEBUG: TLS, The certificate is trusted.
;; TLS session (TLS1.2)-(ECDHE-SECP256R1)-(RSA-SHA256)-(AES-256-GCM)
;; ->>HEADER<<- opcode: QUERY; status: NOERROR; id: 13706
;; Flags: qr rd ra; QUERY: 1; ANSWER: 4; AUTHORITY: 0; ADDITIONAL: 1

;; EDNS PSEUDOSECTION:
;; Version: 0; flags: do; UDP size: 1472 B; ext-rcode: NOERROR

;; QUESTION SECTION:
;; www.whitehouse.gov.          IN      A

;; ANSWER SECTION:
www.whitehouse.gov.     191     IN      CNAME   wildcard.whitehouse.gov.edgekey.net.
www.whitehouse.gov.     191     IN      RRSIG   CNAME 7 3 300 20210818033924 20210815023924 29448 whitehouse.gov. GenVnmmY/2EnUU1sSRJEl2yj4inwcAstHBw8PH7dzeGHaS9ZhmjkNiZTERc088X8O0Z50c1JDr3LVEr/10rk1cbJCgaQUx2cXb19HOQlrOP06zP7uTDLSAgDQEwQxuuXVNDDDwPauMnUr+OGGL7a/Btyakb1eNGjZUTQQnM1BhM=
wildcard.whitehouse.gov.edgekey.net. 791        IN      CNAME   e4036.dscb.akamaiedge.net.
e4036.dscb.akamaiedge.net.      0       IN      A       23.59.103.244

;; Received 322 B
;; Time 2021-08-15 20:24:14 EDT
;; From @YourDNSServerIPaddress@853(TCP) in 39.1 ms
Note how it uses port 853 and -d switch provides us with the details of TLS handshake.
And, finally, you can also see the list of DOT resolutions by accessing your /var/log/nginx/dns-access.log (that is the log file defined in dot.conf above)
user@YourDNSServer:~$ sudo tail -f /var/log/nginx/dns-access.log
192.168.1.XX [15/Aug/2021:12:36:08 -0400] TCP "mobile-collector.newrelic.com"
192.168.1.XX [15/Aug/2021:12:38:01 -0400] TCP "whoami.akamai.net"
192.168.1.XX [15/Aug/2021:12:40:27 -0400] TCP "api16-normal-c-useast1a.tiktokv.com"
192.168.1.XX [15/Aug/2021:12:41:16 -0400] TCP "v21-us-a.tiktokcdn.com"
...
Note that PI-Hole's UI is not going to list all the servers resolving through your DOT. Instead, PIHOLE's dashboard and reports will show you all those DOT-resolved requests as performed by your DNS server itself.
PLEASE, use [my_github_username AT gmail.com] for any corrections and/or comments