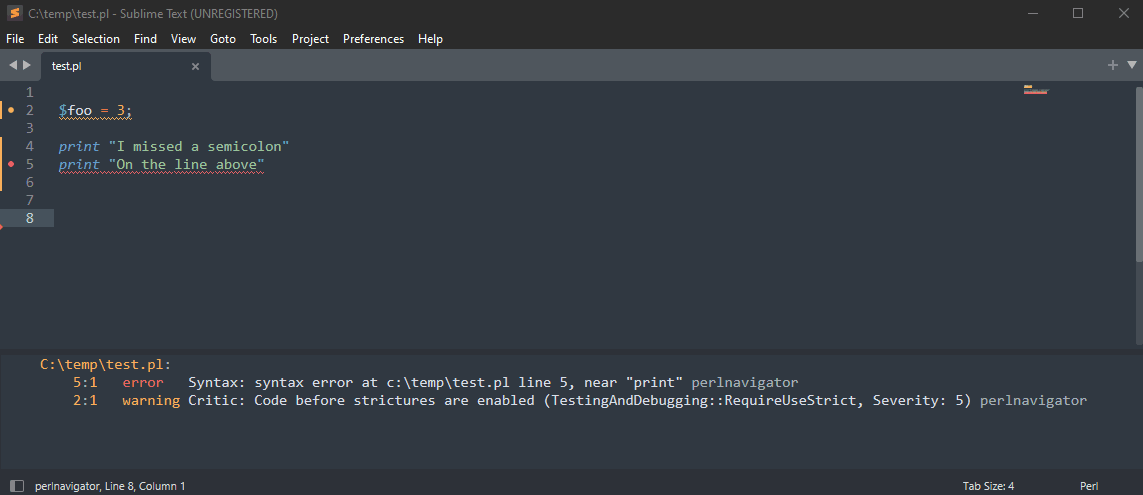
Provides syntax checking, autocompletion, perlcritic, code navigation, hover for Perl.
Implemented as a Language Server using the Microsoft LSP libraries along with Perl doing the syntax checking and parsing.
Works on Windows, MacOS, and Linux. The vscode extension includes everything needed to work, no additional installation should be necessary. Works on almost any version of Perl, tested all the way back to Perl 5.8. Has full support for multi-root workspaces, single file editing, and multiple open windows.
Install the vscode extension from here: https://marketplace.visualstudio.com/items?itemName=bscan.perlnavigator
- Syntax Checking
- Perl Critic static code analysis/suggestions
- Documentation on hover and autocomplete
- Subroutine signatures
- Code Navigation ("Go To Definition") anywhere, including to installed modules and compile-time dependencies
- Code formatting via Perl::Tidy
- Imports cleanup via perlimports
- Outline view
- Smart context-aware autocompletion and navigation
- Hover for more details about objects, subs, and modules
- Syntax highlighting for Object::Pad, Moose, Zydeco, Dancer2, etc.
- Support for Classes including Moo/Moose style classes
Install the VSCode extension and it should just work. All required dependencies are bundled with the extension. Please file a bug report if the Perl Navigator does not work out of the box. Perl::Critic and perlimports are not currently bundled and need to be installed independently, but the remaining features (e.g. navigation, autocomplete, syntax check) do not require it.
If you have a nonstandard install of Perl, please set the setting perlnavigator.perlPath.
The subfolder ./lib will be added to your path automatically.
You can also add additional include paths that will be added to the perl search path (@INC) via perlnavigator.includePaths.
You can use $workspaceFolder in includePaths which will be replaced by the full folder path. If you have a multi-root workspace, each folder will be added to the path.
You should specify a Perl::Critic profile via perlnavigator.perlcriticProfile. You can use $workspaceFolder as a place holder here. If perlcriticProfile is not set, it will check for ~./perlcriticrc.
If that also does not exist, a default profile will be used. This default profile is not very strict.
The default severities are reasonable, (primarily used for coloring the squiggly underlines) but you can change perlnavigator.severity1 through severity5. Allowable options are error, warning, info, and hint.
It is recommended to set perlnavigator.perltidyProfile if you would like customized formatting. Otherwise, the default settings will be used. I might create a default profile at some point.
Perlimports offers additional diagnostics when imports can be cleaned up. When perlimports is enabled, "Format Document" and "Format Selection" will run perlimports in addition to perltidy.
By default, perlimports is not enabled, but the diagnostics (linting) can be enabled with perlimportsLintEnabled, and the tidying can be enabled with perlimportsTidyEnabled.
Perlimports can be customized with a profile using the perlnavigator.perlimportsProfile.
Due to implementation limitations, perlimports requires a saved version of the file you are working on. If any results are unexpected, save the working file and try again.
The easiest way to install is using npm
sudo npm install -g perlnavigator-serverWhich will install as /usr/bin/perlnavigator. This can be used as the command for most editors without any other arguments (i.e. --stdio can be omitted)
Alternatively you can download binary releases for Windows, Linux, and MacOS here: https://github.com/bscan/PerlNavigator/releases
You can also build from source if you prefer.
git clone https://github.com/bscan/PerlNavigator
cd PerlNavigator/
npm run ci-all
cd server/
npx tsc
Sublime Text requires the following minimum settings under LSP settings (modify depending on your install location and editor)
{
    "clients": {
        "perlnavigator": {
            "enabled": true,
            "command": ["node", "C:\\temp\\PerlNavigator\\server\\out\\server.js","--stdio"],
            "selector": "source.perl",
        },
        "settings": {
            // "perlnavigator.perltidyProfile": "~/.perltidyrc",
            // "perlnavigator.perlcriticProfile": "~/.perlcriticrc",
            // "perlnavigator.perlEnvAdd": false, // default: true
            // "perlnavigator.perlEnv": {
            //     "KOHA_CONF": "/home/user/git/KohaCommunity/t/data/koha-conf.xml",
            // },
            // "perlnavigator.perlPath": "~/perl5/perlbrew/perls/perl-5.38.2/bin",
            // "perlnavigator.perlcriticSeverity": 1,
            // "perlnavigator.includePaths": [ "~/git/KohaCommunity", "~/git/KohaCommunity/lib" ],
            // "perlnavigator.perlcriticEnabled": true,
            // "perlnavigator.enableWarnings": true,
        },
    }
}
You can use perl navigator with either lsp-mode or eglot. Eglot is built-in starting with emacs version 29.
The following is a sample configuration file to use the navigator with emacs and a custom perl location. This config uses company-mode, but is not required.
 (setq-default eglot-workspace-configuration
                '((:perlnavigator . (:perlPath
                              "/path/to/perl"
                              :enableWarnings t))))

(with-eval-after-load 'eglot
  (add-to-list 'eglot-server-programs
               `((cperl-mode perl-mode) . ("/path/to/perlnavigator", "--stdio"))))

(global-company-mode)

(add-hook 'cperl-mode-hook 'eglot-ensure)
(add-hook 'perl-mode-hook 'eglot-ensure)You can also use lsp-mode with emacs if you prefer. No special configuration is required for lsp-mode. Perlnavigator is the default Perl language server in lsp-mode. If you have perlnavigator on your path (e,g. because you did sudo npm install -g perlnavigator-server or downloaded an executable from the latest releases), lsp-mode will find the executable automatically.
If you need to configure can use something similar to the following configuration. Additional details here
(use-package lsp-mode
  ...
  :custom (lsp-perlnavigator-executable (expand-file-name "~/path/to/perlnavigator))
  ...)
Neovim requires nvim-lspconfig. An optional, but highly recommended, set of plugins is mason and mason-lspconfig which you can use to automatically install Perl Navigator.
The simplest configuration is the following:
require'lspconfig'.perlnavigator.setup{ cmd = { "perlnavigator" } }A configuration with a number of options set looks some like the following. The depends if you installed globally or not.
require'lspconfig'.perlnavigator.setup{
    cmd = { "perlnavigator" },
    settings = {
      perlnavigator = {
          perlPath = 'perl',
          enableWarnings = true,
          perltidyProfile = '',
          perlcriticProfile = '',
          perlcriticEnabled = true,
      }
    }
}The configuration can be added directly to coc-settings (:CocConfig) like the following:
{
  "languageserver": {
    "perlnavigator": {
      "command": "node",
      "args": [
        "/path/to/PerlNavigator/server/out/server.js",
        "--stdio"
      ],
      "filetypes": ["perl"]
    }
  }
}
Or the coc-perl client extension can be used, simplifying overall configuration.
A simple configuration to enable PerlNavigator, after installing coc-perl (:CocInstall coc-perl), looks like:
{
  "perl.navigator.enable": true,
  "perl.navigator.serverPath": "/path/to/PerlNavigator/server/out/server.js"
}For the Kate editor, you'll need to Configure Kate -> LSP Client and add a config to the User Server Settings. The following is an example config (this example uses the release binaries).
{
  "servers":{
    "perl": {
      "command": ["d:\\Applications\\perlnavigator.exe", "--stdio"],
      "url": "https://github.com/bscan/PerlNavigator",
      "highlightingModeRegex": "^Perl$",
      "settings": {
        "perlnavigator": {
          "perlPath": "perl",
        }
      }
    }
  }
}For the LiteXL editor, you need to download the LSP plugin first. Then in your init.lua file, add something similar to the following.
local lsp = require "plugins.lsp"

lsp.add_server {
  name = "perlnavigator",
  language = "Perl",
  file_patterns = { "%.pl$", "%.pm$" },
  command = { "perlnavigator" },
  settings = {
    perlnavigator = {
      -- The following setting is only needed if you want to set a custom perl path. It already defaults to "perl"
      perlPath = "perl"
    }
  }
}
For those interested in a Raku language server, check out: https://github.com/bscan/RakuNavigator
The Perl Navigator is free software licensed under the MIT License. It has a number of bundled dependencies as well, all of which have their respective open source licenses included. This work is only possible due to Class::Inspector, Devel::Symdump, Perl::Critic, PPI, Perl::Tidy, perlimports, Sub::Util, Perl itself, Microsoft LSP libraries, and ideas from Perl::LanguageServer and PLS.