Getting Started
This tutorial describes creation of simple DlangUI based application.
Examples can be built under Windows, Linux or Mac OSX.
Sample output is shown for Windows.
To build application you will need DMD 2.066 or newer compiler and DUB 0.9.23 or newer.
Ensure that dmd and dub are available in command line.
Both following commands must show help text:
dub --help
dmd --help
In command line, go to some directory where you want to put your new project.
E.g. I'm using directory dlangui-examples.
Use following command to create stub project
dub init helloworld dlangui
Where
- helloworld is name of directory and project
- dlangui is dependency library name
Following directory structure will be created by DUB for our new project:
dlangui-examples
    helloworld
        source           -- directory with .d sources
            app.d        -- main source file
        .gitignore       -- useful when you are planning to put your project into GIT repository
        dub.json         -- DUB project file
Generated app.d file content:
import std.stdio;

void main()
{
    writeln("Edit source/app.d to start your project.");
}
Generated dub.json file content:
{
	"name": "helloworld",
	"description": "A minimal D application.",
	"copyright": "Copyright © 2015, username",
	"authors": ["username"],
	"dependencies": {
		"dlangui": "0.6.11"
	}
}
"dlangui": "0.6.11" is automatically added DlangUI library dependency, and instead of 0.6.11 you will see current version of DlangUI from DUB registry.
Line "dlangui": "0.6.11" can be changed to "dlangui": "~master" for using latest version of DlangUI library (although it's deprecated), or to "dlangui": "~>0.6.11" if you want to use current or newer release version.
Build and run your app - execute following dub run command inside helloworld directory:
cd helloworld
dub run
You will see output similar to
D:\projects\d\dlangui-examples\helloworld>dub run
Fetching derelict-sdl2 1.9.5 (getting selected version)...
Placing derelict-sdl2 1.9.5 to C:\Users\vlopatin\AppData\Roaming\dub\packages\...
Target gl3n 1.0.1 is up to date. Use --force to rebuild.
Target dlib 0.5.2 is up to date. Use --force to rebuild.
Target derelict-util 1.9.1 is up to date. Use --force to rebuild.
Target derelict-ft 1.0.2 is up to date. Use --force to rebuild.
Building derelict-sdl2 1.9.5 configuration "library", build type debug.
Running dmd...
Target derelict-gl3 1.0.12 is up to date. Use --force to rebuild.
Building dlangui 0.6.11 configuration "default", build type debug.
Running dmd...
Building helloworld ~master configuration "application", build type debug.
Compiling using dmd...
Linking...
Copying files for dlangui...
Running .\helloworld.exe
Edit source/app.d to start your project.
DUB fetches project dependencies from repository, then builds application.
Executable will be placed into project directory unless other location is configured in dub.json
Executable name by default matches project name (under Windows, it has .exe extension).
Following line is actually produced by your application
Edit source/app.d to start your project.
Edit file source/app.d - replace its content with following code:
import dlangui;
mixin APP_ENTRY_POINT;
/// entry point for dlangui based application
extern (C) int UIAppMain(string[] args) {
// create window
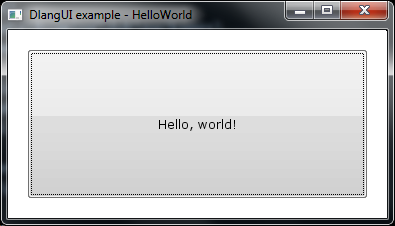
Window window = Platform.instance.createWindow("DlangUI example - HelloWorld", null);
// create some widget to show in window
window.mainWidget = (new Button()).text("Hello, world!"d).margins(Rect(20,20,20,20));
// show window
window.show();
// run message loop
return Platform.instance.enterMessageLoop();
}Now build and run it:
dub run
You will see window with single button stretched to window size.
import dlangui; imports most useful of DlangUI library modules
mixin APP_ENTRY_POINT; this line should appear once in your application. It adds main() function definition which initializes DlangUI components, and then calls UIAppMain function.
extern (C) int UIAppMain(string[] args) is main function for your application. On UIAppMain you already have DlangUI components initialized. Usually you need to create window, put some widget layout to it, show window and then enter event loop. Array args contains application command line parameters. Return value will be used as application result.
UIAppMain contents:
Window window = Platform.instance.createWindow("DlangUI example - HelloWorld", null);This line creates OS window to show GUI inside. Platform.instance is singleton instance of Platform - abstraction layer to hide OS dependent code.
Most important methods of Platform object are createWindow and enterMessageLoop.
Window createWindow(
    dstring windowCaption, // window caption
    Window parent,         // parent window, pass null for main (first) window.
    uint flags = WindowFlag.Resizable, // various flags - bit fields from WindowFlag enum values
    uint width = 0,        // initial window width
    uint height = 0        // initial window height
);
Available window flags:
/// window creation flags
enum WindowFlag : uint {
    /// window can be resized
    Resizable = 1,
    /// window should be shown in fullscreen mode
    Fullscreen = 2,
    /// modal window - grabs input focus
    Modal = 4,
}
If WindowFlag.Resizable is not specified, window size will be calculated automatically based on window content widget size.
Line started with window.mainWidget = assigns content widget for window. You must set content widget before showing the window. Details will be described below.
window.show(); shows the window
return Platform.instance.enterMessageLoop(); runs message loop (will be returned once window is closed).
Most important part in our application is following line.
window.mainWidget = (new Button()).text("Hello, world!"d).margins(Rect(20,20,20,20));We need to set window.mainWidget property to some widget we want to display inside of window.
Widgets are DlangUI classes inherited from dlangui.widgets.widget.Widget which can be show on screen. Some widgets can contain nested widgets. Widgets with main purpose to arrange its children are called Layouts.
There is a set of controls widgets available in DlangUI, most frequently used are:
- TextWidget
- Button
- ImageButton
- TextImageButton
- RadioButton
- CheckBox
In this example we are creating Button widget. We are doing in in single line using chained method calls.
But instead it can be written in following way:
// create button
auto btn = new Button();
// change some properties
btn.text = "Hello, world!"d;
btn.margins = Rect(20,20,20,20);
// use created widget as window content widget
window.mainWidget = btn;
Property text usually corresponds to text shown on widget. For button, it's button label.
Property margin is distance from this widget to other widgets or parent widget bounds. Widget background will be shown using specified margins. Rect struct specifies values for left, top, right, bottom sides. If single value is set to margins or padding property, this value is used for all sides.
Property padding is distance from widget background to its contents. Margins and paddings are similar to ones in CSS.
Other useful properties: textColor, fontSize, alignment, backgroundColor.
Widget class documentation can be found here
Controls classes documentation can be found here.
You can find source code of this project on GitHub
Widget classes have default constructor without parameters.
But often it's more convenient to use constructors with parameters - to set some properties on creation.
First constructor parameter is usually widget ID - string which can be used to find child item in parent, or to distinguish between event sources in shared event (signal) handlers. Can be set to null if you are not planning to access widget by id.
E.g. Button widget constructor takes two parameters: first is ID and second is label text.
Following code
auto btn = new Button("btn1", "Button 1"d); // button with id="btn1" and label "Button 1"is equivalent of
auto btn = new Button(); // button with id="btn1" and label "Button 1"
btn.id = "btn1"d;
btn.text = "Button 1"d;
As well, most of widget properties return widget reference, and therefore can be chained.
auto btn = (new Button("btn1", "Button 1"d)).padding(5).margins(10).textColor(0xFF0000).fontSize(30);can be written instead of
auto btn = new Button("btn1", "Button 1"d);
btn.padding = 5;
btn.margins = 10;
btn.textColor = 0xFF0000;
btn.fontSize = 30;To show several widgets in window, you have to use group widgets, e.g. layouts to arrange them.
DlangUI apps usually don't use fixed layouts with manually pixel-precision placed elements. To support different DPIs and scalability, Layouts are being used.
Layouts in DlangUI are similar to layouts in Android or Qt
Commonly used layouts:
- VerticalLayout - arranges children vertically
- HorizontalLayout - arranges children horizontally
- TableLayout - arranges children in several columns
E.g. we need Create layout as any other widget:
auto vlayout = new VerticalLayout();Then you can add children to it:
vlayout.addChild(new TextWidget(null, "First text item"d));
vlayout.addChild(new TextWidget(null, "Second text item"d));
vlayout.addChild(new TextWidget(null, "Third text item"d));
Then you can use created layout as window content:
window.mainWidget = vlayout;To show how padding, margins and background colors properties work, let's set them for our layout.
vlayout.margins = 20; // distance from window frame to vlayout background
vlayout.padding = 10; // distance from vlayout background bound to child widgets
vlayout.backgroundColor = 0xFFFFC0; // yellow background color 0xAARRGGBB
As well, let's put more widgets into layout - CheckBox and ImageTextButton:
vlayout.addChild(new CheckBox(null, "Check box text"d));
vlayout.addChild(new ImageTextButton(null, "dialog-ok", "Check box text"d));
Final code:
auto vlayout = new VerticalLayout();
vlayout.margins = 20; // distance from window frame to vlayout background
vlayout.padding = 10; // distance from vlayout background bound to child widgets
vlayout.backgroundColor = 0xFFFFC0; // yellow background color

// put some widgets into background
vlayout.addChild(new TextWidget(null, "First text item"d));
vlayout.addChild(new TextWidget(null, "Second text item"d));
vlayout.addChild(new TextWidget(null, "Third text item"d));
vlayout.addChild(new CheckBox(null, "Check box text"d));
vlayout.addChild(new ImageTextButton(null, "dialog-ok", "Check box text"d));

// create some widget to show in window
window.mainWidget = vlayout;
Build and run our application:
dub run
You should see following:

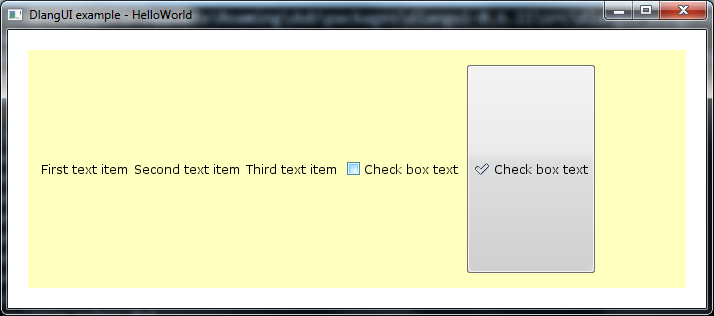
HorizontalLayout is similar to vertical one, but arranges children horizontally. Code:
auto hlayout = new HorizontalLayout();
hlayout.margins = 20; // distance from window frame to vlayout background
hlayout.padding = 10; // distance from vlayout background bound to child widgets
hlayout.backgroundColor = 0xFFFFC0; // yellow background color

// put some widgets into background
hlayout.addChild(new TextWidget(null, "First text item"d));
hlayout.addChild(new TextWidget(null, "Second text item"d));
hlayout.addChild(new TextWidget(null, "Third text item"d));
hlayout.addChild(new CheckBox(null, "Check box text"d));
hlayout.addChild(new ImageTextButton(null, "dialog-ok", "Check box text"d));

// create some widget to show in window
window.mainWidget = hlayout;
Screenshot:
Layouts may be nested - you can add layout as a child to another layout.
E.g., let's add several RadioButtons arranged using HorizontalLayout as child of VerticalLayout
auto vlayout = new VerticalLayout();
vlayout.margins = 20; // distance from window frame to vlayout background
vlayout.padding = 10; // distance from vlayout background bound to child widgets
vlayout.backgroundColor = 0xFFFFC0; // yellow background color

// put some widgets into background
vlayout.addChild(new TextWidget(null, "First text item"d));
vlayout.addChild(new TextWidget(null, "Second text item"d));
vlayout.addChild(new TextWidget(null, "Third text item"d));

// HorizontalLayout inside of VerticalLayout

auto hlayout1 = new HorizontalLayout();
hlayout1.backgroundColor = 0xE0FFFF; // different background for horizontal layout

// put some widgets into background
hlayout1.addChild(new RadioButton(null, "RadioButton1"d));
hlayout1.addChild(new RadioButton(null, "RadioButton2"d));
hlayout1.addChild(new RadioButton(null, "RadioButton3"d));
hlayout1.addChild(new RadioButton(null, "RadioButton4"d));

vlayout.addChild(hlayout1);

// create some widget to show in window
window.mainWidget = vlayout;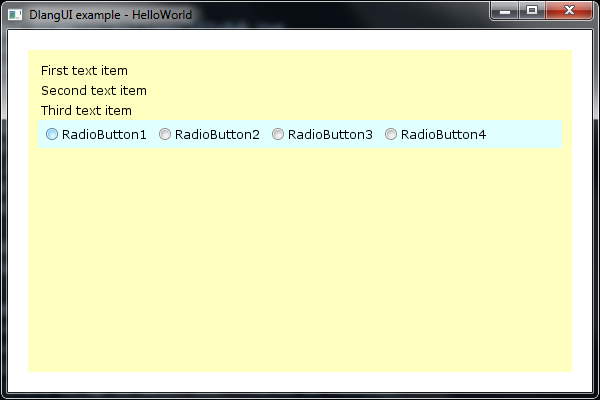
TableLayout is useful if you want to arrange items as a table with several columns and rows.
Create TableLayout, set colCount property to 2 for arranging items into a table with two columns.
New widget type here: ComboBox.
To show nested layouts, add HorizontalLayout with two buttons as last item of TableLayout.
auto tlayout = new TableLayout();
tlayout.colCount = 2;
tlayout.margins = 20; // distance from window frame to vlayout background
tlayout.padding = 10; // distance from vlayout background bound to child widgets
tlayout.backgroundColor = 0xFFFFE0; // yellow background color

tlayout.addChild(new TextWidget(null, "Label 1"d));
tlayout.addChild(new EditLine(null, "Some text for parameter 1"d));
tlayout.addChild(new TextWidget(null, "Label 2"d));
tlayout.addChild(new EditLine(null, "Some text for parameter 2"d));
tlayout.addChild(new TextWidget(null, "Label 3"d));
tlayout.addChild(new ComboBox(null, ["item value 1"d, "item value 2"d, "item value 3"d, "item value 4"d, "item value 5"d, "item value 6"d]));

auto buttons = new HorizontalLayout();
buttons.addChild(new Button(null, "Ok"d));
buttons.addChild(new Button(null, "Cancel"d));
tlayout.addChild(new TextWidget(null, "Some buttons"d));
tlayout.addChild(buttons);

// create some widget to show in window
window.mainWidget = tlayout;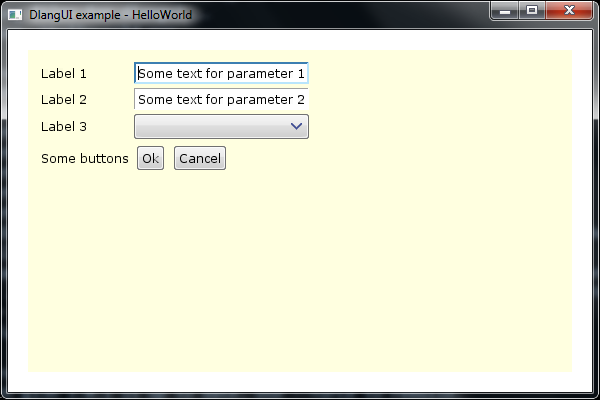
Manual creation of widgets in code is boring.
There is more convenient way to create complex layouts - using DML strings.
DML stands for DlangUI Markup Language, and it's similar to QML used in QtQuick.
Pass string with DML to parseML function to create layout according to your definition.
To create layout similar to one in latest example, use following code:
// create layout from DML
auto layout = parseML(q{
    TableLayout {
        colCount: 2
        margins: 20; padding: 10
        backgroundColor: "#FFFFE0"
        TextWidget { text: "Label 1" }
        EditLine { text: "Some text for parameter 1" }
        TextWidget { text: "Label 2" }
        EditLine { text: "Some text for parameter 2" }
        TextWidget { text: "Label 3" }
        ComboBox { }
        TextWidget { text: "Some buttons" }
        HorizontalLayout {
            Button { text: "Ok" }
            Button { text: "Cancel" }
        }
    }
});

// set window content widget
window.mainWidget = layout;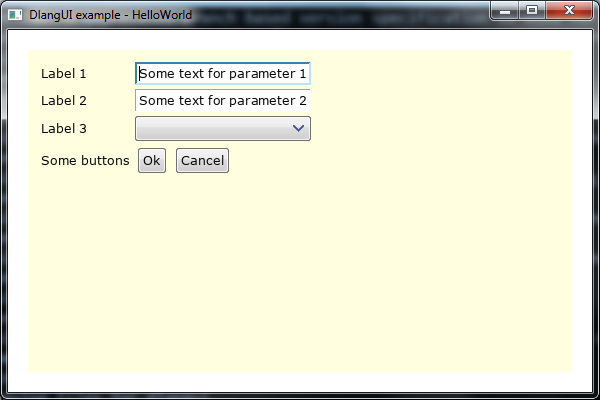
More layouts documentation may be found here
Let's add some actions on button press.
To do something action on events like button click, combobox item selection, tree item selection, editor content change you need to set signal handlers for widgets.
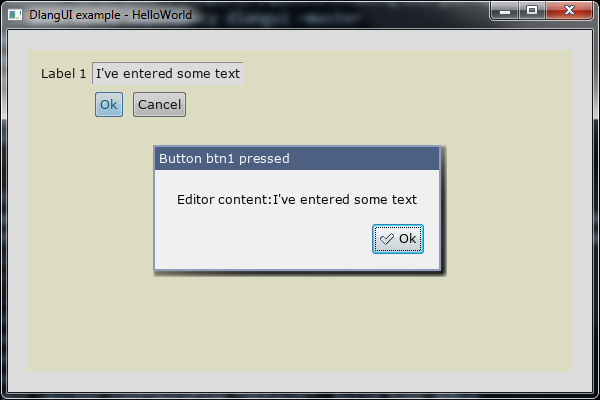
Let's create table layout with edit line and two buttons, Ok and Cancel.
auto tlayout = new TableLayout();
tlayout.colCount = 2;
tlayout.margins = 20; // distance from window frame to vlayout background
tlayout.padding = 10; // distance from vlayout background bound to child widgets
tlayout.backgroundColor = 0xFFFFE0; // yellow background color

tlayout.addChild(new TextWidget(null, "Label 1"d));
auto edit1 = new EditLine(null, "Some text for parameter 1"d);
tlayout.addChild(edit1);

auto buttons = new HorizontalLayout();
auto btn1 = new Button(null, "Ok"d);
buttons.addChild(btn1);
auto btn2 = new Button(null, "Cancel"d);
buttons.addChild(btn2);
tlayout.addChild(new TextWidget(null, ""d));
tlayout.addChild(buttons);
Note that we put EditLine and Button references to variables to provide access to them.
Let's add click signal handlers for btn1 and btn2.
On btn1 click let's show message box with text taken from editor.
// assign Ok button click signal handler: show content of editor
btn1.click = delegate(Widget src) {
    window.showMessageBox("Button btn1 pressed"d, "Editor content:"d ~ edit1.text);
    return true;
};
On btn2 click let's just close the window.
// assign Cancel button click signal handler
btn2.click = delegate(Widget src) {
    window.close();
    return true;
};
Widgets have click signal property. You need to assign delegate of proper type (for click - bool delegate with single Widget parameter, which holds reference of widget which is source of signal) or some class implementing interface of proper type (in case of click - OnClickHandler; corresponding method of this class will be called in this case).
Handler of click signal should return true if signal is processed.
Assignment of handler to signal removes all previous assignments.
Connect method or ~= operator will append new handler to list of existing handlers.
btn1.click.connect(delegate(Widget src) {
    window.showMessageBox("Button btn1 pressed"d, "Editor content:"d ~ edit1.text);
    return true;
});
window.showMessageBox() method shows message box with specified title and text.
Build and run code. After Ok button press, you will see following:
Full project code for this example is available on GitHub
As a handler, instead of delegate you can use instance of class implementing interface used to define signal.
For click it should be OnClickHandler:
// define sample class which implements OnClickHandler interface
class MyOnClickHandler : OnClickHandler {
    // override OnClickHandler.onClick
    override bool onClick(Widget source) {
        // show content of editor
        window.showMessageBox("Button btn1 pressed"d, "Editor content:"d ~ edit1.text);
        return true;
    }
}
// create instance of click handler class
auto clickHandler = new MyOnClickHandler();
// assign Ok button onClick handler:
btn1.click = clickHandler; // replace existing handlers with new one
Method will be found automatically.
Assignment operator replaces already assigned handlers, if any.
To append new handler to existing ones, use connect method (similar to Qt):
btn1.click.connect(clickHandler); // add one more handlerTo remove handler from signal, you can use remove method:
btn1.click.disconnect(clickHandler); // remove handlerAs well, as an event handler delegate you can use method of any class, if it has proper type of argument list and result value.
// define some class with method having same arguments and result type as our signal
class MyOnClickHandler2 {
    // method with proper signature, name may be arbitrary
    bool onCancelButtonClick(Widget source) {
        // close window
        window.close();
        return true;
    }
}
// create instance of click handler class
auto cancelClickHandler = new MyOnClickHandler2();
// assign Cancel button onClick handler (replacing existing handlers, if any)
btn2.click = &cancelClickHandler.onCancelButtonClick;
// append handler using connect method
//btn2.click.connect(&cancelClickHandler.onCancelButtonClick);
// remove handler using disconnect method
//btn2.click.disconnect(&cancelClickHandler.onCancelButtonClick);
Full project code for this example is available on GitHub
Commonly used signals are:
| type | signal | description | interface | handler signature |
|---|---|---|---|---|
| Widget | click | called when mouse clicked on widget or Enter or Space key pressed | OnClickHandler | bool onClick (Widget source, bool checked); |
| Widget | checkChange | called when Checked state is changed (usually used in checkboxes and radio buttons | OnCheckHandler | bool onCheckChanged (Widget source, bool checked); |
| Widget | focusChange | called when widget focus state is changed | OnFocusHandler | bool onFocusChanged (Widget source, bool focused); |
| Widget | keyEvent | called when key event occurs; return true if event is processed and no default handling is needed | OnKeyHandler | bool onKey (Widget source, KeyEvent event); |
| Widget | mouseEvent | called when mouse event occurs; return true if event is processed and no default handling is needed | OnMouseHandler | bool onMouse (Widget source, MouseEvent event); |
| ScrollBar | scrollEvent | called when scrollbar state (e.g. position) is changed | OnScrollHandler | bool onScrollEvent (AbstractSlider source, ScrollEvent event); |
| ComboBox | itemClick | called when checkbox item is selected | OnItemSelectedHandler | bool onItemSelected (Widget source, int itemIndex); |
| List Widgets | itemSelected | called when list item is selected | OnItemSelectedHandler | bool onItemSelected (Widget source, int itemIndex); |
| List Widgets | itemClick | called when list item is clicked or Enter key is pressed | OnItemClickHandler | bool onItemClick (Widget source, int itemIndex); |
| Grid Widgets | cellSelected | called when cell is selected | CellSelectedHandler | void onCellSelected (GridWidgetBase source, int col, int row); |
| Grid Widgets | cellActivated | called when cell is selected | CellActivatedHandler | void onCellActivated (GridWidgetBase source, int col, int row); |
Often, especially when layout is created by loading from DML, you need access to child items.
Use childById method to search in widget tree by widget id.
You have to specify widget ids to use childById method.
Example:
// create layout from DML
auto layout = parseML(q{
    TableLayout {
        colCount: 2
        margins: 20; padding: 10
        backgroundColor: "#FFFFE0"
        TextWidget { text: "Label 1" }
        EditLine { id: edParam1; text: "Some text for parameter 1" }
        TextWidget { text: "Label 2" }
        EditLine { id: edParam2; text: "Some text for parameter 2" }
        TextWidget { text: "Label 3" }
        ComboBox { id: cbOptions }
        TextWidget { text: "Some buttons" }
        HorizontalLayout {
            Button { id: btnOk; text: "Ok" }
            Button { id: btnCancel; text: "Cancel" }
        }
    }
});
// access individual widgets by id
layout.childById("btnOk").click = delegate(Widget src) {
    window.showMessageBox("Editors content:"d, "Edit1: "d ~ layout.childById("edParam1").text);
};