


The dataset that I used is known as PanNuke (Pan-Cancer Nuclei), it contains semi automatically generated nuclei instance segmentation and classification images with exhaustive nuclei labels across 19 different tissue types. The dataset consists of 481 visual fields, of which 312 are randomly sampled from more than 20K whole slide images at different magnifications, from multiple data sources.
In total the dataset contains 205,343 labeled nuclei, each with an instance segmentation mask. Models trained on PanNuke can aid in whole slide image tissue type segmentation, and generalize to new tissues.

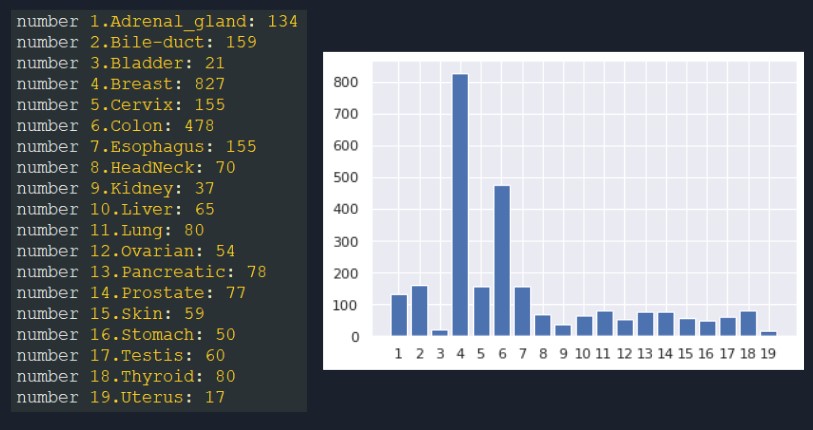
As can be seen from the image above, the 19 tissue names and their corresponding distribution to the whole dataset are shown below:
There are five nuclei types for each tissue type in PanNuke dataset, these are:
1. neoplastic
2. inflammatory
3. softtissue
4. dead
5. epithelial
The part-1 of the dataset that I used is hosted in kaggle, it is available here. Also, the notebook that I used to analyze the dataset is available here.
For this project, I used two different architectures for instance segmentation: 1. Hover-Net and 2. Mask RCNN . Hover-Net is designed for computational pathology and therefore the appropriate architecture to be used in PanNuke dataset. Mask RCNN on the other hand, is a general purpose architechture. It can be used in any type of instance segmentation dataset for as long as the annotations are converted in COCO format.
-
Hover-Net Training/Validation
To use HoverNet as our main architecture, it is needed to convert the dataset into the format HoverNet can process. Below is the code block that was used to convert the PanNuke dataset to format
(items, img_size, img_size, indices), where the indices 0:3 are the RGB codes, 3 is the instance and 4 is the class type. The notebook used for HoverNet format data conversion can be viewed here# This function is modified from https://github.com/meszlili96/PanNukeChallenge.git def transform(images, masks, path, out_dir, start, finish): fold_path = out_dir+path try: os.mkdir(fold_path) except FileExistsError: pass start = int(images.shape[0]*start) finish = int(images.shape[0]*finish) for i in tqdm(range(start, finish)): np_file = np.zeros((256,256,5), dtype='int16') # add rgb channels to array img_int = np.array(images[i],np.int16) for j in range(3): np_file[:,:,j] = img_int[:,:,j] # convert inst and type format for mask msk = masks[i] inst = np.zeros((256,256)) for j in range(5): #copy value from new array if value is not equal 0 inst = np.where(msk[:,:,j] != 0, msk[:,:,j], inst) map_inst(inst) types = np.zeros((256,256)) for j in range(5): # write type index if mask is not equal 0 and value is still 0 types = np.where((msk[:,:,j] != 0) & (types == 0), j+1, types) # add padded inst and types to array np_file[:,:,3] = inst np_file[:,:,4] = types np.save(fold_path + '/' + '%d.npy' % (i), np_file)
After conversion, we proceed to training of the model. We used the official implementation of
Hover-Netavailable ingithub. The usage is easy since the repository is properly documented, I just have to change the configuration to match my use of PanNuke (e.g. epoch, directories, etc.). Below is the validation results in Hover-Net.------valid-np_acc : 0.94211 ------valid-np_dice : 0.83099 ------valid-tp_dice_0 : 0.96235 ------valid-tp_dice_1 : 0.63813 ------valid-tp_dice_2 : 0.55646 ------valid-tp_dice_3 : 0.46966 ------valid-tp_dice_4 : 0.00026 ------valid-tp_dice_5 : 0.06760 ------valid-hv_mse : 0.04192
1056.png 1037.png 105.png 


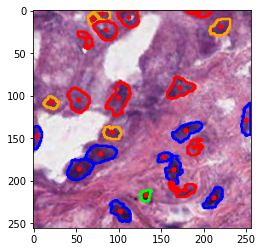
#color representation RED: neoplastic GREEN: inflammatory BLUE: softtissue BROWN: dead ORANGE: epithelial -
Mask RCNN Training/Validation
For Mask RCNN architecture, we first convert the dataset into
COCOformat.COCOformat is commonly used in instance segmentation datasets so it is not difficult to convert PanNuke into this format. Basically,COCOformat is saved in a json file as a dictionary of images and annotations. The basic structure of the annotations dictionary is shown below.# annotations section { "segmentation": [[ 239.97, 260.24, 222.04, … ]], "area": 2765.1486500000005, "iscrowd": 0, "image_id": 558840, "bbox": [ 199.84, 200.46, 77.71, 70.88 ], "category_id": 58, "id": 156 }
The data conversion code from PanNuke to COCO is shown below. The notebook I used in the conversion is available here. It automatically saves the conversion in the
json file.# code from https://github.com/nolancardozo13/pathology_maskrcnn.git def pannuke_to_coco_format(image_path, output_path, categories = ["neoplastic","inflammatory","softtissue","dead","epithelial"] , dataset_name = "pannuke"): ''' this function converts the pannuke dataset format to the coco format which makes it easier to apply detectron 2 algorithms on. ''' images_name = os.listdir(image_path) cocoformat = {"licenses":[], "info":[], "images":[], "annotations":[], "categories":[]} for i in range(len(categories)): cocoformat["categories"].append({"id": int(i+1), "name": categories[i], "supercategory": dataset_name}) m_id = 1 for i, img in tqdm(enumerate(images_name)): image = Image.open(image_path + img + "/images/" + img + ".jpg") image_info = pycococreatortools.create_image_info(int(i+1), img + ".jpg" , image.size) cocoformat["images"].append(image_info) c_types = os.listdir(image_path + img + "/masks/") for c in c_types: masks = os.listdir(image_path + img + "/masks/"+c) for msk in masks: category_info = {'id': int(categories.index(c)+1), 'is_crowd': False} m_image = np.asarray(Image.open(image_path + img + "/masks/"+c+"/"+ msk).convert('1')).astype(np.uint8) annotation_info = pycococreatortools.create_annotation_info( m_id, int(i+1), category_info, m_image, image.size, tolerance=2) m_id = m_id + 1 if annotation_info is not None: cocoformat["annotations"].append(annotation_info) time.sleep(0.2) with open(output_path, "w") as f: json.dump(cocoformat, f)
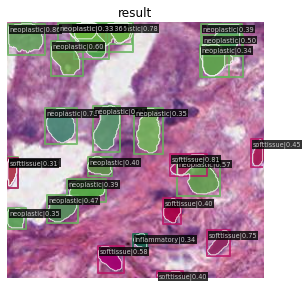
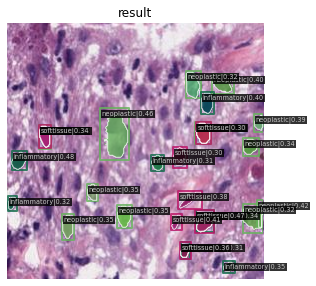
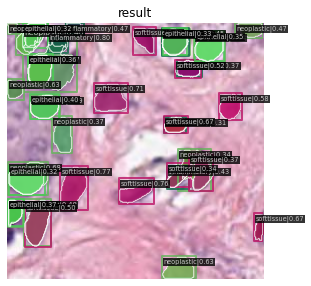
The training is done with the toolbox MMDetection. Configuration as usual, is changed to match the PanNuke dataset training. The notebook used in the training can be viewed here. The results are shown below.
2022-05-08 22:54:52,456 - mmdet - INFO -
 Average Precision  (AP) @[ IoU=0.50:0.95 | area=   all | maxDets=100 ] = 0.150
 Average Precision  (AP) @[ IoU=0.50      | area=   all | maxDets=1000 ] = 0.304
 Average Precision  (AP) @[ IoU=0.75      | area=   all | maxDets=1000 ] = 0.134
 Average Precision  (AP) @[ IoU=0.50:0.95 | area= small | maxDets=1000 ] = 0.142
 Average Precision  (AP) @[ IoU=0.50:0.95 | area=medium | maxDets=1000 ] = 0.300
1056.png 1037.png 105.png 


You don't need to install anything to run the project. The notebooks I used are all hosted in kaggle and are attached in this repository. If you want to run or view the codes, here are the links to them:
- PanNuke Data Analysis: Pan-Cancer Nuclei Data Analysis.
- PanNuke to Hover-Net conversion: Pan-Cancer Nuclei Data Conversion - #1
- PanNuke to COCO conversion: Pan-Cancer Nuclei Data Conversion - #2.
- Hover-Net Training: Pan-Cancer Nuclei Instance Segmentation - #1.
- Mask RCNN Training: Pan-Cancer Nuclei Instance Segmentation - #2.
- Inference: Pan-Cancer Nuclei Inference.
- Output Usage: Pan-Cancer Nuclei Usage
This repo is licensed under Apache License