Frequently Asked Questions RGB10
- How do I configure my wifi connection in ArkOS?
- How do I SSH into ArkOS?
- I was using Paragon software to add, remove, or modify files on the SD card and now my unit won't boot with the card. What could be wrong?
- How do I change emulator cores in ArkOS?
- How do I scrape roms using screenscraper in ArkOS?
- How can I make text look better in certain games and systems in ArkOS?
- What are the global event keys and emulator event keys in ArkOS?
- Where can I find information on where to load roms, available cores, and port information for ArkOS?
- I can't seem to insert coins in some MAME games. How do I fix this?
- Can the mouse pointer that's always visible in the upper right corner of Drastic (NDS Emulator) be removed?
- My unit doesn't seem to boot from the SD card anymore. What could be the issue?
- How can I access a terminal physically on ArkOS
- When I'm in a game, I go to the retroarch menu and make a change and when I attempt to save the current configuration, it fails to save. Why is that happening?
- How do I add and enable background music in ArkOS?
- What does the Backup settings in the Options/Advanced section do?
- How do I use ArkOS Browser for managing my roms via a web browser?
- How can I change or remove the splash screen when loading games?
- How do I turn on the accessibility features of Retroarch?
- How do I get out of kiosk or kid UI mode?
- How do I mount a USB drive for copying and moving files?
- Is it possible for Emulationstation to be fullscreen?
- How do I change the boot logo?
- How does the low battery indicator work?
- How does the movie/video player work?
- Where are game saves and savestates stored?
- Where do I put PSP DLCs?
- I've added the roms to the appropriate folder, but once I put the SD card inside the console it doesn't seem to find my roms.
- How do I generate .m3u files for PS1 games in ArkOS?
- I have duplicate games showing for PS1. How do I eliminate the duplicates?
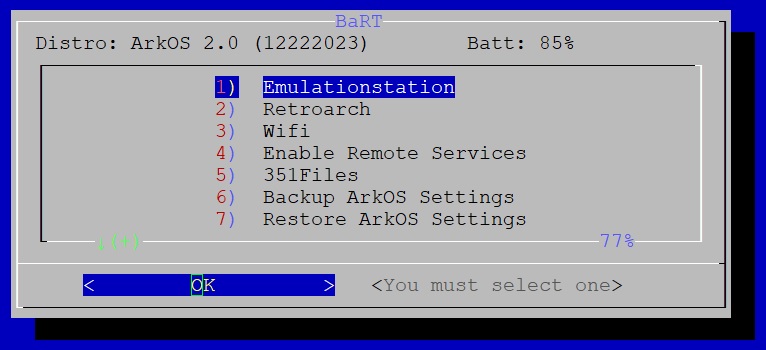
- What is BaRT and how do I access it?
- The analog stick is reversed on the RGB10s. How do I fix it?
- The L2 and R2 buttons on my OGA 1.1(BE) unit are not functional. How do I fix it?
- How do I make American Laser Games, EASYRPG, ScummVM, or Wolfenstein show up in Emulationstation?
- What is Quick Mode and how do I enable it?
- How do I Host, Join, or Spectate an Adhoc (local) Netplay session?
- What is Game Share?
- How do I use the governor (performance) setting for systems and games?
A. Please note that it is highly recommended that you use the ArkOS 1.2 image or newer that was made available on 11/21/2020 due to wifi fixes that were implemented. You must have a compatible USB wifi dongle plugged in. See this link for a compatible list of USB wifi dongles. It's also been reported that this TP-Link Archer T2U Nano AC600 unit works very well with ArkOS. It's inexpensive and supports 2.4GHz and 5GHz wireless signals. I personally used this EDUP Nano USB 650Mbps unit and it works very well with ArkOS. It also is very inexpensive and supports 2.4Ghz and 5GHz wireless signals. You then will need to do the following:
- Go to the Options menu and select WIFI.
- Then hit the R1 button to go to the + sign and click the A button to add your wifi details.
- Once completed, you can then verify that your wifi is connected by confirming that you see the wifi symbol located near the top right corner of the Emulationstation Menu. You can also verify that you have a valid wireless connection by going to Options then NETWORK INFO and verify you have an assigned IP for your device.
Note: If you have a password that has special characters not available through the Wifi menu option in the Options menu, you can configure your wifi device or manually by doing one of the options below:
At boot, ArkOS will check for a wifikeyfile.txt file in the roms/tools folder and start a wifi credentials importing process.
format is
ssid="your ssid"
pass="your ssid password"
Upon successful connection, the file gets deleted for security purposes.
- Press Start, scroll down to Quit, then select Quit Emulationstation.
- Connect a USB keyboard to your device and press ALT+F2.
- Login using the username of ark and password of ark.
- Then type nmtui to launch the graphical text based Network Manager utility.
- Click on Edit a connection then Add and follow the menu for configuring your connection.
- For more information on how to use this utility, check out the article available through this link
- Configured network connections are stored in /etc/NetworkManager/system-connections/
A. Verify that you completed the steps in FAQ #1 above to configure your wireless connection. You will then need to do the following:
- Go to the Options menu and select NETWORK INFO so you can see your the assigned IP to your device.
- Be aware that the assigned IP address will show a slash then a number (most likely a 24). That just represents the network block size, not the ssh port number. The default ssh port number is 22.
- Click A to continue and you will go back out to the Options menu.
- Select Enable Remote Services so that SSH is enabled before attempting to connect.
- User and Password credentials are ark/ark.
- Be aware that every time you'd like to access ArkOS on your device from your network, you will need to Enable Remote Services after every reboot. This is a security feature as it's not good security practice to keep remote services active on your device especially when connecting to unknown networks. It also reduces resource overhead for the system to help ensure the best possible gaming experience.
- If you'd like for ssh to always remain enabled, just type
sudo systemctl enable sshfrom within a ssh or terminal session. - To enable the ability to login as root, do the following while in a ssh or terminal session:
- Set a password for the root user by doing
sudo passwd rootand set your preferred root password following the instructions presented. - Allow root to be able to login through ssh by doing
sudo nano /etc/ssh/sshd_configthen scroll down toPermitRootLoginand remove the beginning hashtag (#) and set PermitRootLogin to yes. Basically it should sayPermitRootLogin yeson that line. - Hit Ctrl+X, then hit y to save the change.
- Then either restart ssh by typing in
sudo systemctl restart sshor restart ArkOS.
- Set a password for the root user by doing
- If you'd like to enable authorized key based login, do the following from the ssh terminal session:
sudo chmod -R 755 /home/arkmkdir -p ~/.ssh && touch ~/.ssh/authorized_keyschmod 700 ~/.ssh && chmod 600 ~/.ssh/authorized_keys- Create and/or copy your public key to the
/home/ark/.ssh/authorized_keysfile. See this link for help on how to accomplish this if needed.
With great power comes great responsibility! Be careful as you make changes as now you can easily make various changes that can render the OS unstable or unbootable.
Q. I was using Paragon software to add, remove, or modify files on the SD card and now my unit won't boot with the card. What could be wrong?
A. The most probable issue is a corrupted ext4 partition on the SD card. There's been a common occurrence of Paragon corrupting the ext4 partition on SD cards. It's best to use a Linux machine (or a Linux VM) to manage files on the ext4 partition of the SD card. You can try to fix the ext4 partition by following the steps in this link, or simply reimage the card. The ArkOS image linked from this wiki provides an exfat partition for the Roms and Bios folder that is easily accessible from Linux, Mac or Windows without any additional software and is easier for managing such files as you don't have to have a Linux machine or VM.
- The SD card itself is bad. The original SD card that comes with these units are of unknown quality and are most likely low quality.
- The SD card reader on your unit may be bad. At which point, you would need to repair, replace, or return the unit.
A. Try turning on the RGA Scaling feature. There is a small difference from Bilinear filtering in that this feature does subpixel scaling instead of just smoothing (may look blurry) as bilinear filtering does. This feature can be turned on while in game by going to the retroarch menu, then settings, then video, then scrolling down to the RGA Scaling option and hit A to turn it on. The screen will blank for a few seconds and come back. See if it improves the picture for you.

For OGA BE 1.1, the Global Hotkey is F5 and the default retroarch/retroarch32 hotkey is F2.
- Be aware that there's a known issue with retroarch in which using the menu combination key of Select+X to close the menu while in game may cause the retroarch hotkeys to stop functioning. This is caused by an issue in which the search box may come up in the menu but is hidden because the retroarch menu disappears as you go back to the game. The workaround available is that you can hit L1+R1+Start+Select to open the menu and exit the search dialog with the start button in order to restore the retroarch hotkeys. Select+X function will return. More information about this issue available from this libretro forum link. Mitigated as of 12/23/2021
Amiberry
- Select + X: Amiberry Menu
- Select + Start: Exit Amiberry.
If you need to be able to use a mouse for a particular game, do the following:
- Launch a game then go to the Amiberry Menu by pressing Select + X
- On the left side of the screen, scroll down to Input.
- Hit right and set Port 0 to Odroidgo2_joypad and change Default to Mouse
- Set Port 1 to Mouse and leave Default as default
- Then hit left and scroll up to configuration.
- Hit right and scroll down to the Save button and hit the A button. This will save this configuration as the default configuration for that particular game when it's loaded.
Daphne (Hypseus)
- Minus Key: Coin
- Start: Start game
- A: Button 1
- B: Button 2
- Y: Button 3
- Plus Key: Pause
- Plus Key+Start: Exit Daphne
For Drastic (NDS emulator)
- Minus Key: screen swap between upper and lower DS screens
- Plus Key: stylus tap
- Joystick: Move the stylus
- Select: Drastic menu
To exit the emulator, do so through the Drastic menu.
For OpenBOR
To exit the emulator, hit the Start button then select exit in the menu for most paks or hit Minus+Start.
For Pico-8
To exit the system, hit the Start button then Option then select Shutdown or hit Minus+Start.
For PPSSPP (PSP emulator)
- Plus key: PPSSPP Menu
To exit the emulator, do so through the PPSSPP menu or hit Minus+Start.
For Solarus
To exit the system, hit the Minus and Start button.
For Mupen64plus standalone emulator

- Minus + Start: Exit emulator
- Minus + R1: Save State
- Minus + L1: Load State
- Minus + A: Pause/Unpause emulator
For TI-99 standalone emulator
- A: Fire
- B: Key 1
- X: Key 2
- Y: Key 3
- L1: FCTN+QUIT
- R1: FCTN+REDO
- L2: Key Space
- R2: Key 0
- Start: Key Enter
- Select: FCTN+BACK
- DPAD Up: Key P (Usually Pause)
- Minus + Start: Exit emulator
For File Manager
- D-pad: Move
- L: Page up
- R: Page down
- A when a directory is selected: open directory
- A when a file is selected: view or execute
- B: Go to parent directory / cancel
- Y: System actions: - Select all items - Select no items - Create new directory - Display disk information - Quit program
- X: Actions on selected items: - Copy to destination directory - Move to destination directory - Rename (appears only if 1 item is selected) - Delete Display disk used
- SELECT: Select highlighted item. Selected items are displayed in red.
- START: Open highlighted directory in destination panel. If a file is highlighted, open current directory in destination panel.
Note: Key assignments are used from the default retroarch32 configuration. If the default key assignments are changed in retroarch32, it will change the key assignments for File Manager as well!
For Mednafen based emulators
- Minus + A: Pause emulation
- Minus + B: Reset emulation
- Minus + X: Enable Rewinding
- Minus + Y: Toggle FPS display (from top to bottom, the display format is: virtual, rendered, blitted)
- Minus + Dpad Left: Decrement selected save state slot
- Minus + Dpad Right: Increment selected save state slot
- Minus + R1: Save State
- Minus + L1: Load State
- Minus + R2: Fast Forward emulation
- Minus + L2: Rewind emulation (if rewinding is enabled first)
- Minus + Start: Exit emulator
For an entire system library:
- Hit the Start button, then hit A on Emulator Settings.
- Select the system you'd like to change the emulator core for then hit A.
- For emulator, select either retroarch, retroarch32 or standalone where applicable. For core, select your preferred core.
Per game:
- Highlight the game then hit the Select button then hit A.
- Go to Edit This Game's Metadata then go to Emulator and select retroarch, retroarch32 or standalone where applicable. Then go to core and select preferred core.
- Then save the selection.
A. You'll need a screenscraper.fr account. You can register for a free account at https://www.screenscraper.fr/. Once you've completed that, enter your username and password that you created at the website in the screenscraper es menu then scrape away! Note that if you pay for extra threads, it will increase the speed of scraping. This is useful if you have a large rom collection.
Q. Where can I find information on where to load roms, available cores, and port information for ArkOS?
A. Check this link for more info.
A. For some reason, select for credit doesn’t work for some games in MAME and CPS. If you change the coin button to something else like R2 or L2, it works. Below are the instructions you can follow to do this:
- Launch the MAME or CPS game that's having the coin issue.
- Go into the retroarch menu by hitting Minus+X.
- Then go to Controls.
- Then go to Port 1 Controls.
- Select an alternate coin button.
- You can save this setting by going back to the controls menu and selecting one of the 3 save options.
- Hit Select+X to exit the retroarch menu or hit the B button to go back and hit the resume option.
Q. Can the mouse pointer that's always visible in the upper right corner of Drastic (NDS Emulator) be removed?
A. As of the writing of this entry (11/10/2020), it can not be removed. It’s unfortunately a "feature" of the emulator for the time being. Resolved as of the 1/28/2021 update.
- It could be either your SD card is corrupted, failing, or has failed. It is recommended that you use a good name brand SD card such as Sandisk, Samsung, or PNY. For a dependable list of good name brand cards, please check this link. Make sure to buy your SD cards from a trusted retail source. In the United States of America, Wal-Mart, Best Buy, and Target are good sources. Online, SD cards shipped and sold by Amazon are best. Example of such is in this link
- It could be that you're unit's battery is low on charge and you need to charge it. Make sure you let it completely charge.
- It could be that the unit's battery is bad. The included stock battery is of low quality and doesn't maintain battery life consistently among sold units.
- It could be that your unit has suffered a component failure failure. At this point, you'll need to contact rkconsole.com for the original seller you purchased the unit from for further assistance for a replacement or refund if available.
- Plug in your usb keyboard.
- Exit EmulationStation by hitting Start, then Quit, then Quit Emulationstation.
- On your connected usb keyboard, hit alt-f2.
- You should now have a terminal login screen appear on the screen. User: ark Password: ark
- If you'd like to go back to EmulationStation without restarting, do the following:
sudo systemctl restart emulationstation
Q. When I'm in a game, I go to the retroarch menu and make a change and when I attempt to save the current configuration, it fails to save. Why is that happening?
A. The most likely cause is that you have saved a core, content, or game override for the particular emulator core or game you currently have loaded. Once you have those, you will no longer be able to save a global configuration from that emulator core or game. This is by design from libretro. What you'll have to do is from within Emulationstation, scroll through the systems to the retroarch menu, then select either retroarch or retroarch32, then make your global changes there and save current configuration there.
- Just pop the micro SD card into a card reader, plug it into your Windows 10 1703, Mac OS X, or Linux computer and look for the drive letter named EASYROMS.
- Place all .mp3 or .ogg files you'd like to use as background music in the roms(EASYROMS)/bgmusic folder on the exfat partition.
- Safely eject your micro SD card from your computer and insert the micro SD card in your RGB10 and turn it on.
- In Emulationstation, press START then go to Sound Settings > Frontend Music > ON.
- Go back out of the start menu and enjoy!
Important Note If your .mp3 or .ogg music file(s) are not playing, it's mostly likely an issue with the .mp3 or .ogg files your using. To test and confirm it works on your installation, try the free public domain one on your unit from the link below. If it works, then this confirms that the issue is with your .mp3 or .ogg file(s). This has been a common issue with music downloaded or converted from YouTube.
Clandestine Operative by Stargazer Jazz provided by freesoundtrackmusic.com
Amiberry savestates and whdboot configuration and save
Current Timezone
Drastic emulator configuration
Emulationstation collections
Emulationstation settings
Mupen64plus standalone emulator gamepad configuration
Retroarch configurations for both 64 bit and 32 bit
Retroarch cheats for both 64 bit and 32 bit
Retroarch overlays for both 64 bit and 32 bit
Wireless connections
Important Notes:
- As the compressed file will contain sensitive information such as wireless ssid passwords, it should be stored securely off the sd card once created if there's a concern of possible prying eyes.
- An accompanying log file (arkosbackup.log) is also created in the roms/backup/ folder.
- Only one backup file is created and currently supported with these options. A new backup process will overwrite the existing backup and logfile in the roms/backup/ folder.
- Ensure you've configured your wifi following instructions here
- Make sure to Enable Remote Services by scrolling to Options and Hit A on Enable Remote Services
- Once enabled, go to your desktop or mobile browser and type http://rgb10
Username: ark
Password: ark - Once you've successfully logged in, you'll see the contents of the EASYROMS(roms) folder.
- You can Upload your roms and Download your roms into the various folders.
Create a file/directory
Click on "New folder" on the left side menu and enter a name for your new directory.

Similarly, you can create a new file from the main interface.
Once you have created the directory, you'll be redirected into that directory. If not, just double click on it to open. From there, you can upload files/folders or download the existing files.
Upload Files
To upload a new file, click on the Upload button (Up arrow) on the top and choose the files you want to upload.

The selected file will be uploaded in few seconds depending upon the size.
Download files
Choose the file you want to download and hit download button (down arrow) on the top.

Single files can be downloaded directly. Also, you can download more than one files at a time. Multiple files can be downloaded as .zip, .tar, .tar.gz, .tar.bz2 or .tar.xz.
Similarly, you can remove or copy your files.
A. Make sure you're on the 05/24/2024 or later version of ArkOS to make use of this feature. From within the main Emulationstation menu, press Start then press A on UI Settings then A on Game Loading Image Mode. From there, you can select between Pic, Ascii, and None
- PIC – You can choose between the following Game Loading Image setting:
- Default – Default ArkOS launch image if available in the roms/launchimages named loading.jpg.
- Image – Loads a scraped image if available for the selected game.
- Marquee – Loads a scraped marquee if available for the selected game.
- Thumb – Loads a scraped thumbnail if available for the selected game. - Ascii – Loads the ArkOS ascii launchimage if available in the roms/launchimages named loading.ascii.
- None – Disables the use of launch images which can save up to 2 seconds on game loading time.
Notes
-
If you change to PIC from having it set to Ascii or None, you’ll need to press B to go back to the main Start menu, then press A on UI Settings to see the various Game Loading Image options.
-
Game Loading Image options assumes your Images, Marquees and Thumbs are setup as follows for your systems.
Example for ROMS/gb/game.zip
ROMS/
├─ gb/
│ ├─ images/
│ │ ├─ game-image.png
│ │ ├─ game-marquee.png
│ │ ├─ game-thumb.pngIf you use the built-in screenscraper feature, this is the structure it will create for your games for your scraped images.
You can change the default splash screen by uploading a new splash screen image to the /roms/launchimages folder. The image must meet the following criteria:
- Must be in .jpg format
- Must be named loading.jpg. The name is case sensitive!
- Must be 480 pixels in width and 320 pixels in height.
- Must be of 24 bit depth
You can also update loading.ascii with your own ascii art if you prefer.
- Scroll to the Rertroarch system in Emulationstation then hit the A button.
- Then select Retroarch or Rertroarch32.
- Once in the Retroarch menu, hit the A button on Settings, then Accessibility, then Accessibility Enable. You can also adjust the speed of the Text-to-Speech.
- Once completed, Hit the B button twice, then scroll down to Configuration file, hit the A button then scroll down to Save Current Configuration and Hit the A button again.
From the DPAD do up, up, down, down, left, right, left, right, B, A. You should now have access to the full UI.
- Plug in a USB drive that is formatted in Fat, Fat32, Exfat, or NTFS to the USB A port at the bottom of the unit.
- While in Emulationstation, go to Options and select USB Drive Mount.
- Note - Only the first available partition on the USB drive will be mounted!
- If the USB drive has been successfully mounted, you will see a notification on the screen that it's been mounted to /mnt/usbdrive. If not, double check that you plugged in the drive correctly and that the file system on it is not corrupted and is one that is supported as listed in step 1 above.
- You can now use File Manager to navigate to /mnt/usbdrive to access the mounted USB drive to copy and/or move files between it and ArkOS.
- When you're done copying and/or moving files within File Manager, be sure to go back to to Options and select USB Drive Unmount before unplugging your drive or you may risk corrupting the USB drive's file system.
A. Starting with the 02/27/2021 update for Arkos, You can switch to another version of Emulationstation that is fullscreen by doing the following:
- Go to the Options Section just after ScummVM and before Retroarch and click the A button.
- Click on Advanced.
- Then click on ES FULLSCREEN.
Notes:
- If you ever want to switch back to the original Emulationstation, repeat steps 1 and 2 above and then click on ES HEADER.
- With the Fullscreen version, battery life information, current volume and wifi status is available from the start menu.
The image must meet the following criteria:
- Must be in .bmp format
- Must be named logo.bmp. The name is case sensitive!
- Must be 480 pixels in width and 320 pixels in height.
- Must be of 24 bit depth
- Must be rotated counterclockwise.
- See here for more info and examples.
- Screen brightness will lower then raise to previous set brightness every 30 seconds when battery life is less than or equal to 30 percent.
- Screen brightness will lower then raise to previous set brightness every 5 seconds when battery life is less than or equal to 19 percent.
Note: You can turn this feature off by going to the Options/Advanced section in Emulationstation just above Retroarch and select DISABLE LOW BATTERY WARNING.
A. The movie/video player is ffplay. More information about ffplay is available in this link
- Supported movie/video formats are .avi .mp4 .mpg
- Supported movies/videos need to be loaded in the videos subfolder within the roms folder.
- Up to 720p seems to perform fine with limited testing.
- Support will be limited for this feature. If a video/movie doesn't work on this, try a lower resolution or just use a more suitable device like a smartphone.
Controls:
- A: Pause
- X: Mute
- L2: Seek to the previous chapter or if there are no chapters, seek 10 minutes back.
- R2: Seek to the next chapter or if there are no chapters, seek 10 minutes forward.
- Dpad Left: Seek 1 second back
- Dpad Right: Seek 1 second forward
- Dpad Up: Seek 1 minute forward
- Dpad Down: Seek 1 minute back
- Minus+Start: Exit player
Ex. GBA .srm files and .state files would be saved in /roms/gba.
If its savedata dlc: place it in the SAVEDATA folder. If its a game data DLC: place it in the GAME folder
Q. I've added the roms to the appropriate folder, but once I put the SD card inside the console it doesn't seem to find my roms.
- The roms are in the supported extension for the system per the Emulators and Ports section
- Try pressing start then go to UI Settings then visible systems and make sure to select all.
- Try pressing start then go to Advanced settings and be sure parse gamelists only is off.
-
Load all of your ps1 .cue or .chd files into the /roms/psx folder.
- Only .cue or .chd files are possible for creating .m3u files in ArkOS!
- If you wish, you can place your ps1 games within individual sub folders within the /roms/psx folder. For example, you can put all of your Metal Gear Solid cue/bin or chds within /roms/psx/mgs folder and this tool will still work.
- Your multi disc games should have the word Disc as part of it description in order to properly generate a good m3u file.
-
Go to the Options section in Emulationstation just above Retroarch and select PS1 - Generate m3u files and when completed, the screen will show what all m3u files were created.
- If you add additional multi disc games after running this tool, be sure to go to the Options section in Emulationstation just above Retroarch and select PS1 - Delete m3u files and then recreate them. Failing to do so will create additional entries in existing m3u files that may cause issues.
A. This is most likely caused by having multiple .cue or .chd files for multi disk games. Do the following:
- Be sure to follow the steps here for generating .m3u files in ArkOS
- Then go to the Options section in Emulationstation just above Retroarch and select PS1 - Show only m3u files.
- Emulationstation will restart and you should only have single entries for your multi disk games.
- You can switch to a Retroarch only interface on boot.
- In this mode, no additional tools or standalone emulators are accessible. This means no NDS, no standalone PSP, no TI99. To enable remote services, you must do so through BaRT. To use a File Manager, you must do so through BaRT. Of course, you can always just switch back to Emulationstation anytime as well and access these standalone emulators and tools.
- If Emulationstation doesn't load due to a bad configuration of the es_systems.cfg file, you can load BaRT and
- Connect to Wifi
- Enable remote services to handle recovery tasks,
- Load 351Files for file management needs
- Drop into terminal mode by connecting a keyboard and hitting alt+f2.
- To access BaRT, just hold the B button while booting and in a few seconds, you should be presented with the Boot and Recovery Tools screen similar to this:
A. Load BaRT by holding the B button while booting your RGB10s. Then scroll down and select Set controls to RGB10s mode with the A button. Your unit will then reboot. Your analog stick should now function correctly.
A. Load BaRT by holding the B button while booting your OGA 1.1(BE). Then scroll down and select Set controls to OGA 1.1(BE) mode with the A button. Your unit will then reboot. Your L2 and R2 buttons should now function correctly.
Q. How do I make American Laser Games, EASYRPG, ScummVM, or Wolfenstein show up in Emulationstation?
A. Make sure you load the appropriate support files into the respective folders. See the Emulators Information section for more info. Then make the system visible from the Emulationstation start menu by pressing the start button, then press the A button on UI Settings, then press the A button on Visible Systems. Select the systems you want visible by highlighting them then pressing A or scroll to the bottom and press Select All. Then press the B button then press Start. The additional systems you selected should now be visible.
A. When you do a safe shutdown (Plus button + Power Button) while in a Retroarch or Retroarch32 emulator, an auto savestate will be created of the current game and the unit will shutdown. Upon power on, the system will autoboot into the last game and resume the auto savestate. To enable this mode, select Enable Quick Mode from the Options>Advanced menu section in Emulationstation. Reminder - This only works with Retroarch and Retroarch32 based emulators. As of 9/21/2023, this also works with the Pico-8 standalone emulator as well. You can boot directly into the last Pico-8 game you were playing or into splore. Of course, no auto savestate will be available since the emulator doesn't support savestates.
Note - If a game fails to boot during Quick Mode, it may mean the savestate created is corrupted. You can delete this savestate by holding the R1 button while booting up and then press A on the screen asking if the savestate should be deleted. You can also bypass booting directly into a game during quick mode by holding the B button down which will load the BaRT menu where you can boot into Emulationstation or Retroarch directly or use other tools.
A. Make sure you're on the 12/08/2023 or later version of ArkOS. After you press A to launch an emulator core and game via retroarch or retroarch32 that is compatible with netplay, hold the X button before the game loads. You should then be presented with an Adhoc Netplay Session Manager menu.
- All supported devices must be on the same version of ArkOS
- Compatible only with Retroarch and Retroarch32 8bit, 16bit, and older Arcade games such as Teenage Mutant Ninja Turtles and The Simpsons
- All supported devices must be using the same version of retroarch and retroarch32 cores.
- Make sure to update all retroarch and retroarch32 cores
- Game Share mostly works with single game files. Multi Disc games may or may not work.
- By default, Adhoc Netplay attempts to host sessions via a 5GHz connection for the best experience. If a host or client has a wireless chip that does not support 5GHz, ensure the host is set to 2.4Ghz mode in the Adhoc Netplay Session Manager Settings menu.
- It can take up to 1-2 minutes for a client or spectator to find the host for an Adhoc NetPlay game session. Starting the Host session first before attempting to join from a client or spectator can help speed this process up.
A. Game Share allows you to wirelessly share a game with another ArkOS device so you can adhoc netplay with the ArkOS device. This is handy in case one unit has a game that is wanted to be played via netplay but the other doesn't. Only works to share the game to one other wirelessly connected device. This is available from the Adhoc Netplay Session Manager menu.
A. Make sure you're on the 12/22/2023 or later version of ArkOS to make use of this feature. The governor setting allows you to control the speed frequency for systems and games.
The available governors are performance, ondemand, and powersave.
- Performance locks the frequency to the highest setting of the chip. It also uses the most battery and generates the most heat.
- Ondemand allows the frequency to vary based on the load as sensed by the OS. It attempts to balance performance and saving on power and heat generation where possible.
- Powersave locks the frequency to a step above the lowest frequency. This has the best battery life and lowest heat generation but can cause certain systems and games to experience lag especially when certain overlays and shaders are used.
By default the governor for all systems and games is set to performance.
Why? Because the 2nd primary goal of the distro is performance.
This can be set globally for all systems and games, per system, and per game.
- To set it globally, press Start then go to Advanced Settings then go to Default Emulator Governor and change it.
- To set it on a per system basis, press Start then go to Emulator Settings, choose the emulator(system), then go to governor and change it.
- To set it on a per game basis, go to the system and game, then press select, then go to edit this game's metadata, then go to governor and change it, then scroll to the bottom and scroll to save and press the A button.
Note the hierarchy of the governor settings is as follows:
- Per game takes precedence over emulator and global.
- Per emulator takes precedence over global.