NOTE: the MIT license of this repo means all individual resources made by myself, the content of the tutorial and the example codes is licensed under MIT. All third-party opensource projects, upstream source codes and patches to other opensource projects will/should follow their own LICENSE.
The RP2040 is a 32-bit dual ARM Cortex-M0+ microcontroller integrated circuit by Raspberry Pi Foundation. At the same time, it was released as part of the Raspberry Pi Pico board.
It announced on 21st January 2021, the RP2040 is the first microcontroller designed by the Raspberry Pi Foundation. The microcontroller is low cost, with the Raspberry Pi Pico being introduced at US$4 and the RP2040 itself costing US$1. The microcontroller can be programmed in Assembly, Rust, C/C++ and MicroPython. It is powerful enough to run TensorFlow Lite.
Per the datasheet, there are multiple versions of the chip: "The full source for the RP2040 bootROM can be found at https://github.com/raspberrypi/pico-bootrom. This includes both version 1 and version 2 of the bootROM, which correspond to the B0 and B1 silicon revisions, respectively."
For more info about RP2040, please refer to https://www.raspberrypi.com/products/rp2040/
A number of manufacturers have announced their own boards using the RP2040, among them, 'Raspberry Pi Pico' is a tiny, fast, and versatile and official reference board produced by Raspberry Pi.
There is a very good manual for Raspberry Pi Pico, If you already read this official manual, you can just ignore this tutorial.
- A RP2040 board. here I use official PICO.
- A USB to SWD adapter. Such as CMSIS-DAPLink, Tigard(FT2232) etc, or a pico dock with daplink integrated.
NOTE RP2040 can work as a USB storage if 'holding the bootsel button down and plug in', you can mount it and DND hex file to flash. but it does not support debugging and a little bit slow, so you'd better prepare a SWD adapter for debugging.
- Compiler, ARM GNU toolchain
- Debugger, OpenOCD/gdb (OpenOCD 0.12 and above version, or pico-openocd fork)
- SDK, pico-sdk/pico-extras
- Flashing tool, OpenOCD or USB storage mode.
As same as STM32 and various ARM MCU, RP2040 use the 'arm-none-eabi' GNU toolchain. it's not neccesary to build the toolchain yourself, since there are already a lot of well supported prebuilt release and already widely used by developers.
xpack-dev-tools provde a prebuilt 'arm-none-eabi' toolchain. you can download it from here.
After download:
sudo mkdir -p /opt/xpack-arm-none-eabi
sudo tar xf xpack-arm-none-eabi-gcc-12.2.1-1.2-linux-x64.tar.gz -C /opt/xpack-arm-none-eabi --strip-components=1
and add /opt/xpack-arm-none-eabi/bin to PATH env.
NOTE, the triplet of xpack prebuilt toolchain is 'arm-none-eabi'.
You can download the prebuilt toolchain for various host from https://developer.arm.com/downloads/-/gnu-rm.
Note: There is prebuilt arm-gcc v12.2 and can be downloaded from https://developer.arm.com/downloads/-/arm-gnu-toolchain-downloads, but the gdb debugger broken due to python issue, do not use the latest 12.2 version until python issue fixed.
Download and extract the toolchain for x86_64 linux:
wget https://armkeil.blob.core.windows.net/developer/Files/downloads/gnu-rm/10.3-2021.10/gcc-arm-none-eabi-10.3-2021.10-x86_64-linux.tar.bz2
sudo tar xf gcc-arm-none-eabi-10.3-2021.10-x86_64-linux.tar.bz2 -C /opt
And add /opt/gcc-arm-none-eabi-10.3-2021.10/bin to PATH env of your shell.
NOTE: the toolchain's tripplet is 'arm-none-eabi'.
The official SDK for RP2040 is 'pico-sdk'. Pico SDK provides the headers, libraries and build system necessary to write programs for the RP2040-based devices such as the Raspberry Pi Pico in C, C++ or assembly language.
The SDK is designed to provide an API and programming environment that is familiar both to non-embedded C developers and embedded C developers alike. A single program runs on the device at a time and starts with a conventional main() method. Standard C/C++ libraries are supported along with C level libraries/APIs for accessing all of the RP2040's hardware include PIO (Programmable IO).
Additionally the SDK provides higher level libraries for dealing with timers, synchronization, USB (TinyUSB) and multi-core programming along with various utilities.
Please refer to https://github.com/raspberrypi/pico-sdk for more info. it's very easy to setup pico-sdk:
git clone https://github.com/raspberrypi/pico-sdk.git
cd pico-sdk
git submodule update --init
You can put pico-sdk system-wide or use it within your project. here put it system-wide
sudo mv pico-sdk /opt
And set PICO_SDK_PATH to the SDK location /opt/pico-sdk in your environment, or pass it (-DPICO_SDK_PATH=/opt/pico-sdk) to cmake later.
After SDK setup, you can fetch the pico-examples and try to build it.
git clone https://github.com/raspberrypi/pico-examples.git
cd pico-examples
mkdir build
cd build
cmake .. -DPICO_SDK_PATH=/opt/pico-sdk
cd blink
make
After built successfully, a lot of files include 'blink.elf', 'blink.hex' and 'blink.uf2' will be generated.
There are also some additional libraries provided in 'pico-extras' that are not yet ready for inclusion the Pico SDK proper, or are just useful but don't necessarily belong in the Pico SDK. the corresponding examples for 'pico-extras' is 'pico-playground'.
NOTE, it depend on pico-sdk, you need setup pico-sdk correctly first.
git clone https://github.com/raspberrypi/pico-extras.git
sudo mv pico-extras /opt
And set PICO_EXTRAS_PATH to /opt/pico-extras in your environment.
for 'pico-playground':
git clone https://github.com/raspberrypi/pico-playground.git
cd pico-playground
mkdir build
cd build
cmake ..
make
There are a lot of way to flash the firmware of RP2040, as mentioned above, here will introduce the 'usb-storage' way and 'OpenOCD' way.
'Holding the bootsel button down and plug in' will enter USB storage mode. you can mount it and DND the 'uf2' firmware into RP2040 and it will flash the firmware automatically, generally, you will wait a little moment until it done.
If the board has 'reset' button, you can also 'Holding the bootset button down, then press and release reset button, then release bootsel button' to enter USB storage mode.
Here the device is sda1 and using blink example in 'pico-examples', the flashing process looks like:
sudo mount /dev/sda1 /mnt/rp2040
sudo cp blink.uf2 /mnt/rp2040
sudo umount /mnt/rp2040
After flashing complete, the LED on board will blink.
OpenOCD 0.12 and above version has RP2040 support upstreamed, If your distribution already update to OpenOCD 0.12, you can use it directly, otherwise you may have to build it yourself.
Building and Installation:
git clone https://github.com/openocd-org/openocd.git
cd openocd
git submodule update --init --recursive --progress
./configure --prefix=/opt/pico-openocd --program-prefix=pico- --enable-cmsis-dap --disable-werror
make
sudo make install
NOTE here use 'pico-' program prefix to avoid conflict with system wide openocd. and install it to /opt/pico-openocd/, you need add /opt/pico-openocd/bin to PATH env.
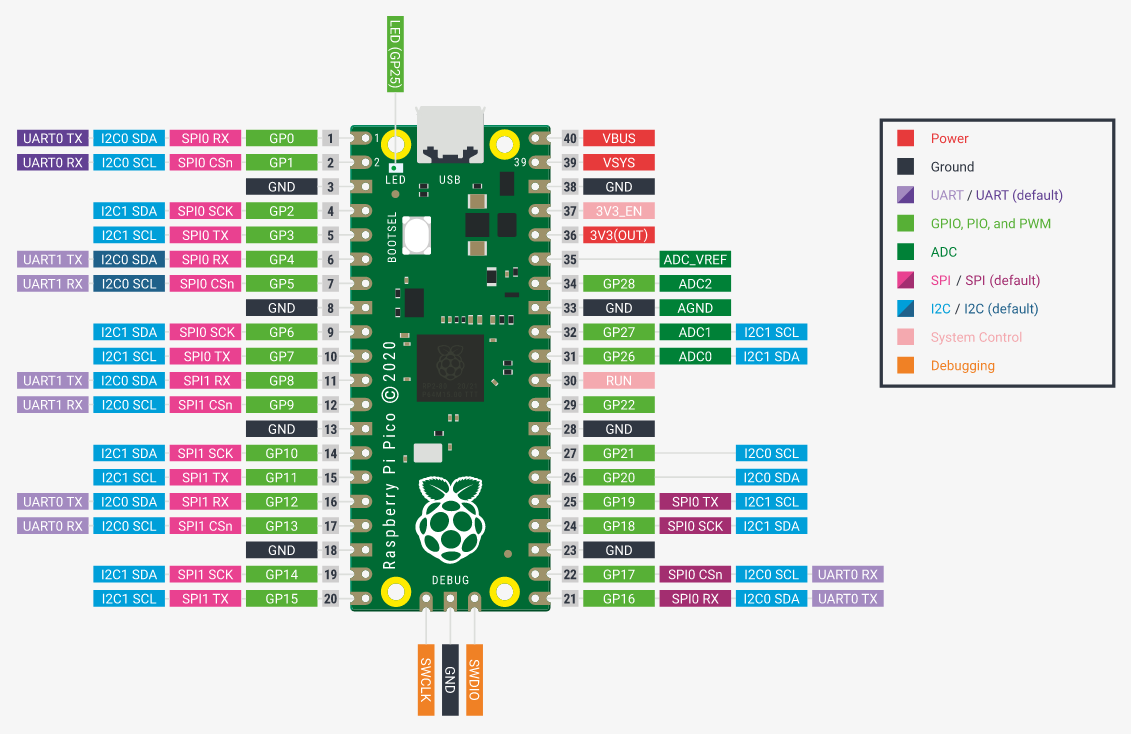
After pico-openocd installed, please wire up your SWD adapter with the corresponding PINs of PICO, there are 3 pins (GND/SWDIO/SWCLK) marked as 'debug' in PICO board. you can use USB cable to supply power and connect that 3pins, or use SWD adapter only to supply power (3.3v, connect to VSYS/VIN pin).
There is also a lot of DOCKs for pico with CMSIS DAP integrated, it's more convenient, you can also use such a DOCK.
Here I use standalone tigard FT2232 board as SWD adapter.
If you use a DAPLink, please change tigard-swd.cfg to cmsis-dap.cfg for all below commands. and also need to change the config file path according to your OpenOCD installation.
to flashing the 'blink.hex' from blink example:
pico-openocd -f tigard-swd.cfg -f /opt/pico-openocd/share/openocd/scripts/target/rp2040.cfg -c "init; reset halt; targets rp2040.core0; flash write_image erase blink.hex; reset; shutdown;"
A wrapper script 'pico-swd' is provided within this repo, you can modify (change it to use your own interface cfg file) and use it instead of typing command everytime. the script support 'reset', 'write firmware', 'dump firmware' and 'attach'(useful for debugging) to rp2040 board. for example, above flashing command can be shortten to:
pico-swd write blink.hex
You can also use 'blink.bin' file instead of 'blink.hex'.
First, you need attach to the MCU, launch a terminal and run:
sudo pico-openocd -f tigard-swd.cfg -f /opt/pico-openocd/share/openocd/scripts/target/rp2040.cfg
or simply run:
pico-swd attach
the output looks like:
Open On-Chip Debugger 0.12.0
Licensed under GNU GPL v2
For bug reports, read
        http://openocd.org/doc/doxygen/bugs.html
Info : FTDI SWD mode enabled
Info : Hardware thread awareness created
Info : Hardware thread awareness created
Info : RP2040 Flash Bank Command
Info : Listening on port 6666 for tcl connections
Info : Listening on port 4444 for telnet connections
Info : clock speed 2000 kHz
Info : SWD DPIDR 0x0bc12477
Info : SWD DLPIDR 0x00000001
Info : SWD DPIDR 0x0bc12477
Info : SWD DLPIDR 0x10000001
Info : rp2040.core0: hardware has 4 breakpoints, 2 watchpoints
Info : rp2040.core1: hardware has 4 breakpoints, 2 watchpoints
Info : starting gdb server for rp2040.core0 on 3333
Info : Listening on port 3333 for gdb connections
Then launch another terminal, build the blink example with debug infomation:
cd pico-examples
mkdir build-debug
cd build-debug
cmake -DCMAKE_BUILD_TYPE=debug ..
cd blink
make
arm-none-eabi-gdb ./blink.elf
And a gdb session will opened:
Reading symbols from ./blink.elf...
(gdb) target remote :3333
Remote debugging using :3333
warning: multi-threaded target stopped without sending a thread-id, using first non-exited thread
main () at blink/blink.c:18
18              sleep_ms(500);
(gdb) list main
4        * SPDX-License-Identifier: BSD-3-Clause
5        */
6
7       #include "pico/stdlib.h"
8
9       int main() {
10      #ifndef PICO_DEFAULT_LED_PIN
11      #warning blink example requires a board with a regular LED
12      #else
13          const uint LED_PIN = PICO_DEFAULT_LED_PIN;
(gdb) list
14          gpio_init(LED_PIN);
15          gpio_set_dir(LED_PIN, GPIO_OUT);
16          while (true) {
17              gpio_put(LED_PIN, 1);
18              sleep_ms(500);
19              gpio_put(LED_PIN, 0);
20              sleep_ms(500);
21          }
22      #endif
23      }
(gdb) break 18
Breakpoint 1 at 0x10000328: file pico-examples/blink/blink.c, line 18.
Note: automatically using hardware breakpoints for read-only addresses.
(gdb) c
Continuing.
target halted due to debug-request, current mode: Thread
xPSR: 0x01000000 pc: 0x00000178 msp: 0x20041f00

Thread 1 hit Breakpoint 1, main () at pico-examples/blink/blink.c:18
18              sleep_ms(500);
(gdb)
The pico-sdk is managed by cmake very well, it's very easy to setup a new project, Here we use the blink.c as example:
/**
 * blink.c
 *
 * Copyright (c) 2020 Raspberry Pi (Trading) Ltd.
 *
 * SPDX-License-Identifier: BSD-3-Clause
 */

#include "pico/stdlib.h"

int main() {
#ifndef PICO_DEFAULT_LED_PIN
#warning blink example requires a board with a regular LED
#else
    const uint LED_PIN = PICO_DEFAULT_LED_PIN;
    gpio_init(LED_PIN);
    gpio_set_dir(LED_PIN, GPIO_OUT);
    while (true) {
        gpio_put(LED_PIN, 1);
        sleep_ms(200);
        gpio_put(LED_PIN, 0);
        sleep_ms(200);
    }
#endif
}
First, create a dir for project 'blink' and put blink.c into it, then create 'CMakeLists.txt' and set up your project to point to use the Raspberry Pi Pico SDK
cmake_minimum_required(VERSION 3.13)

# initialize the SDK based on PICO_SDK_PATH
# note: this must happen before project()
include(pico_sdk_import.cmake)

project(my_project)

# initialize the Raspberry Pi Pico SDK
pico_sdk_init()

add_executable(blink
    blink.c
)

# Add pico_stdlib library which aggregates commonly used features
target_link_libraries(blink pico_stdlib)

# create map/bin/hex/uf2 file in addition to ELF.
pico_add_extra_outputs(blink)
And
cp $PICO_SDK_PATH/external/pico_sdk_import.cmake .
Then setup a CMake build directory and build it:
mkdir build
cd build
cmake .. #-DCMAKE_BUILD_TYPE=debug, if you need debug build.
make