NOTE: the MIT license of this repo means all individual resources made by myself, the content of the tutorial and the example codes is licensed under MIT. All third-party opensource projects, upstream source codes and patches to other opensource projects will/should follow their own LICENSE.
NOTE, most of works of STM8 development with Linux was done by Georg Icking-Konert, for example, stm8gal flashing tool, SPL patches for SDCC and STM8_headers, please refer to https://github.com/gicking
ST's 8-bit microcontroller platform is implemented around a high-performance 8-bit core and a state-of-the-art set of peripherals. This platform is manufactured using an ST-proprietary 130 nm embedded non-volatile memory technology. The STM8 allows fast and safe development through enhanced stack pointer operations, advanced addressing modes and new instructions.
For more infomation, refer to https://www.st.com/en/microcontrollers-microprocessors/stm8-8-bit-mcus.html
You need:
- A development board with STM8 MCU.
- A STLINK USB adapter(no matter version) with SWIM interface (and 5v VCC), for flashing and debugging.
- Optional, a USB/UART adapter if there is no one on development board. it can be used for UART flashing when bootloader enabled, but lack of debugging support.
The opensource toolchain for STM8 under linux consists of:
- Compiler, SDCC
- Debugger, OpenOCD/stm8-binutils-gdb and a STLINK adapter is mandary.
- SDKs, includes baremetal programming, Official SPL SDK and STM8_headers.
- Flashing tool, stm8flash with STLINK adapter and stm8gal with USB/UART adapter
Most Linux distributions shipped SDCC in their repositories. You can install it by yum or apt.
If you really want to build it yourself, at least you need make/bison/flex/libtool/g++/boost development package/zlib development package/etc. installed, and the building process is really simple:
./configure --prefix=<where you want to install SDCC>
make
make install
If the prefix does not set to standard dir (such as '/usr' or '/usr/local'), you need add the <prefix>/bin dir to PATH env.
Most Linux dist ships OpenOCD package, you can install it by yum or apt.
For STM8 development, it's not neccesary to patch and build OpenOCD yourself.
"Baremetal programming" is not difficult for MCU, you can always do something without using any libraries/SDKs.
Here is an example to blink a LED wired up as PD0->Resister->LED->GND.
You must read the datasheet first to find out the memory and register map, here I use STM8S208MB and the io register map as below:
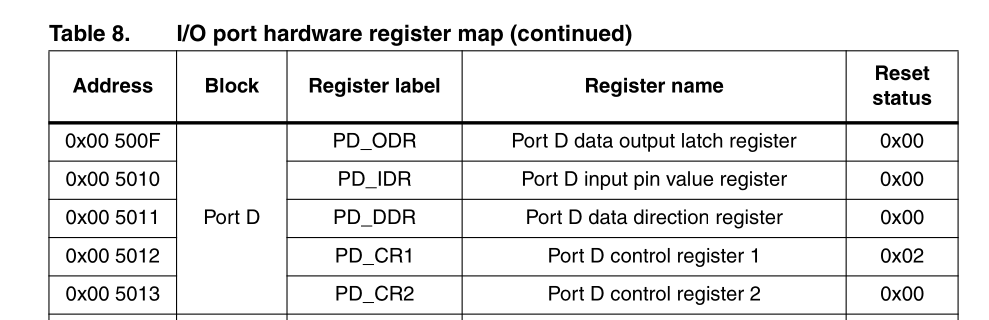
These registers are pretty much self-explanatory. here’s a brief overview: DDR is the direction register, which configures a pin as either an input or an output. After we configured DDR we can use ODR for writing or IDR for reading pin state. Control registers CR1 and CR2 are used for configuring internal pull-ups, output speed and selecting between push-pull or pseudo open-drain.
//blink.c

#include <stdint.h>
#define _SFR_(mem_addr)     (*(volatile uint8_t *)(0x5000 + (mem_addr)))
/* PORT D */
#define PD_ODR      _SFR_(0x0F)
#define PD_DDR      _SFR_(0x11)
#define PD_CR1      _SFR_(0x12)

/* CLOCK */
#define CLK         _SFR_(0xC6)

#define LED_PIN     0


#define F_CPU 16000000UL //16Mhz
static inline void delay_ms(uint16_t ms) {
    uint32_t i;
    for (i = 0; i < ((F_CPU / 18000UL) * ms); i++)
        __asm__("nop");
}

void main() {
    CLK = 0x00; // switch to 16Mhz

    PD_DDR |= (1 << LED_PIN); // configure PD0 as output
    PD_CR1 |= (1 << LED_PIN); // push-pull mode
    while (1) {
        /* toggle pin every 1000ms */
        PD_ODR ^= (1 << LED_PIN);
        delay_ms(1000);
    }
}
and built it:
sdcc -lstm8 -mstm8 blink.c
ST officially provide 'STM8 Standard Peripheral Library' for STM8 MCUs, you can download it from here

NOTE:
- you have to sign up and sign in first, and there is also a license need to be read carefully and agreed before download
- There are 4 packages, choose one according to your MCU model
As mentioned beginning, Georg Icking-Konert done a great job to provide a set of patches to enable SPL work with SDCC.
Please refer to https://github.com/gicking/STM8-SPL_SDCC_patch and patch the SPL yourself.
for STM8S208MB, you should download 'en.stsw-stm8069_v2.3.1.zip', Here provide a blink example for SPL.
git clone https://github.com/cjacker/opensource-toolchain-stm8.git
cd opensource-toolchain-stm8
cp en.stsw-stm8069_v2.3.1.zip .
unzip en.stsw-stm8069_v2.3.1.zip
git clone https://github.com/gicking/STM8-SPL_SDCC_patch.git
cat STM8-SPL_SDCC_patch/STM8S_StdPeriph_Lib_V2.3.1_sdcc.patch |patch -p1
cd blink-SPL
make
After the example built successfully, you will get 'blink.ihx' (we will flash it to development board later) and various other files in example dir.
Georg Icking-Konert also had another great opensource project named "STM8_headers" for all STM8 microcontroller series, namely STM8A, STM8S, STM8L, STM8AF and STM8AL. it's MIT license.
For example, blink.c using STM8_headers:
//blink.c, using STM8_headers

#include "STM8S208MB.h"
#define LED_PORT   sfr_PORTD
#define LED_PIN    PIN0

// toggle specified pin. Pass port struct as pointer
void toggle_pin(PORT_t *port, uint8_t pin) {

  port->ODR.byte ^= pin;

} // toggle_pin

void main (void) {
  uint32_t  i;
  // switch to 16MHz (default is 2MHz)
  sfr_CLK.CKDIVR.byte = 0x00;
  // configure LED pin as output
  LED_PORT.DDR.byte = LED_PIN;    // input(=0) or output(=1)
  LED_PORT.CR1.byte = LED_PIN;    // input: 0=float, 1=pull-up; output: 0=open-drain, 1=push-pull
  LED_PORT.CR2.byte = LED_PIN;    // input: 0=no exint, 1=exint; output: 0=2MHz slope, 1=10MHz slope
  // main loop
  while(1) {
    // toggle LED. Pass port struct as pointer
    toggle_pin(&LED_PORT, LED_PIN);
    // simple wait ~1000ms @ 16MHz
    for (i=0; i<600000L; i++)
      NOP();
  } // main loop
} // main
Here provide a blink example for STM8_headers:
git clone https://github.com/cjacker/opensource-toolchain-stm8.git
cd opensource-toolchain-stm8
git clone https://github.com/gicking/STM8_headers.git
cd blink-STM8_headers
make
There are two flashing tools for STM8 can be used with linux, stm8flash works with STLINK and stm8gal works with UART.
It may be a little bit weird, but you should know:
- You have to use a STLINK adapter and stm8flash to flash a special firmware first to enable bootloader.
- Or you have an empty development board never flashed with STLINK.
You need gcc/libusb development packages installed before build and install stm8flash:
Installation:
git clone https://github.com/vdudouyt/stm8flash.git
cd stm8flash
make
sudo install -m0755 stm8flash /usr/bin/
Then connect the corresponding pins of SWIM interface and the development board. here use baremetal blink.c as example:
sdcc -lstm8 -mstm8 blink.c
sudo stm8flash -cstlinkv2 -pstm8s208mb -w blink.ihx
or you can try some examples within this repo:
make
make swim
Run stm8flash --help to get more usage tips.
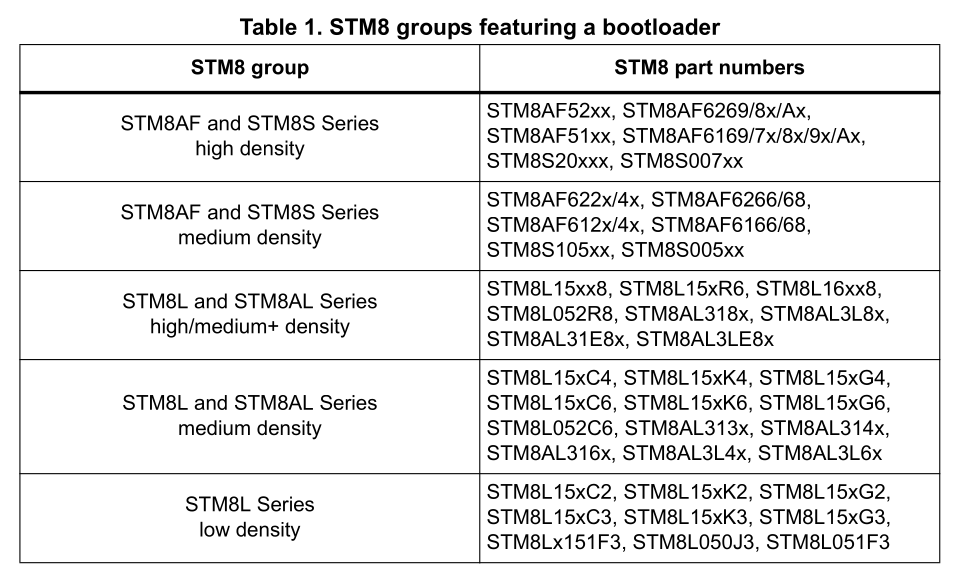
As mentioned above, a STLINK adapter is mandary to enable UART flashing support. actually, we need STLINK adapter and stm8flash to change some 'option bytes' of STM8 MCU to enable the 'bootloader' (BSL). Please refer to UM0560 "STM8 bootloader user manual" and corresponding datasheet of the MCU you use for more information.
Not all STM8 models have a bootloader, the support list as below (from UM0560):
Option bytes of STM8S208MB (from STM8S208MB datasheet):

What we need to enable bootloader is:
set 0x487E to 0x55
set 0x487F to 0xAA
There is various way to accomplish this, the STVP for windows officially provide by ST have option bytes configuration support, but as I know, it only set 0x487E and does not set 0x487F.
For linux, there is no STVP provided. Here we use another way: flash a firmware once to setup these option bytes. after that, the UART flashing can be used until you flash this development board with STLINK again.
There are BSL activate codes in stm8gal repo, you need to build it yourself:
git clone https://github.com/gicking/stm8gal.git
cd BSL_activate
make DEVICE=STM8S207 # ok for STM8S208MB
by the way, If you use STM8S105, you should:
make DEVICE=STM8S105
After building successfully, "STM8S207/main.ihx" will be generated.
sudo stm8flash -cstlinkv2 -pstm8s208mb -w STM8S207/main.ihx
This firmware will set the option bytes, also blink a LED on board, by default, it toggle PH2 for STM8S207 and PD0 for STM8S105, you can modify the codes according to your development board.
After bootloader enabled, we can use stm8gal and UART to flash the development board wired up with a USB cable.
stm8gal is a tool for uplading hexfiles to the STM8 microcontroller via UART or SPI , using the built-in ROM bootloader.
git clone https://github.com/gicking/stm8gal.git
make
sudo install -m0755 stm8gal /usr/bin
For usage:
stm8gal --help
For flashing:
sudo stm8gal -p /dev/ttyUSB0 -w blink.ihx -reset 0
when it prompt for 'synchronize', press the RESET button once on your development board:
stm8gal (v1.5.0)
  open serial port '/dev/ttyUSB0' ... done
  synchronize ... done (ACK)
  get device info ... done (STM8S; 128kB flash)
  load 'blink.ihx' ... done
  convert IHX ... done
  write 219B / 219B ... done
  read 219B / 219B ... done
  verify memory ... done
  jump to 0x8000 ... done
done with program
NOTE, as mentioned above, if you use STLINK adapter flashing the board again, you may need to re-activate the bootloader.
A STLINK adapter and OpenOCD are mandary for debugging.
Within this repo, an OpenOCD interface cfg 'stlink.cfg' is provided for various known STLINK adapters.
Before continue reading, please wire up the STLINK adapter and development board, launch a terminal and run:
openocd -f st-link.cfg -f /usr/share/openocd/scripts/target/stm8s.cfg -c "init" -c "reset halt"
Here is the console output:
Open On-Chip Debugger 0.11.0
Licensed under GNU GPL v2
For bug reports, read
        http://openocd.org/doc/doxygen/bugs.html
srst_only separate srst_gates_jtag srst_open_drain connect_deassert_srst

Info : STLINK V2J27S6 (API v2) VID:PID 0483:3748
Info : Target voltage: 3.270139
Info : clock speed 800 kHz
Info : starting gdb server for stm8s.cpu on 3333
Info : Listening on port 3333 for gdb connections
target halted due to debug-request, pc: 0x00006000
Info : Listening on port 6666 for tcl connections
Info : Listening on port 4444 for telnet connections
stm8-binutils-gdb project implements the GDB debugger for STM8.
Up to this tutorial written, the latest version is '2021-07-18', follow below instructions to build and install it, it will download binutils/gdb tarball automatically from upstream:
wget https://sourceforge.net/projects/stm8-binutils-gdb/files/stm8-binutils-gdb-sources-2021-07-18.tar.gz/download -O
stm8-binutils-gdb-sources-2021-07-18.tar.gz
tar -xf stm8-binutils-gdb-sources-2021-07-18.tar.gz
cd stm8-binutils-gdb-sources
./patch_binutils.sh
./configure_binutils.sh
cd binutils-2.30
make
sudo make install
stm8-gdb works with ELF binary format with debug symbols, you have to use below flags to build your source code:
--out-fmt-elf --all-callee-saves --debug --verbose --stack-auto --fverbose-asm --float-reent --no-peep
For instance:
sdcc -lstm8 -mstm8 --out-fmt-elf --all-callee-saves --debug --verbose --stack-auto --fverbose-asm --float-reent --no-peep blink.c
After compilation, a blink.elf will be generated. you can also try make debug in 'blink-baremetal' example.
NOTE: If you have multiple source files in your project, these flags should be applied to every source file when creating the object code. otherwise, the final ELF binary will not have debug symbols embeded in.
After blink.elf with debug symbols built, with openocd connected, launch 2nd terminal and try:
stm8-gdb -q ./blink.elf
A gdb sesscion will be opened:
(gdb) run
Starting program: ./blink.elf
Remote debugging using localhost:3333
0x00006000 in ?? ()
Loading section SSEG, size 0x1 lma 0x1
Loading section HOME, size 0x7 lma 0x8000
Loading section GSINIT, size 0x1a lma 0x8007
Loading section GSFINAL, size 0x3 lma 0x8021
Loading section CODE, size 0xcb lma 0x8024
Start address 0x8007, load size 240
Transfer rate: 1 KB/sec, 48 bytes/write.
(gdb) interrupt
(gdb)
Program received signal SIGINT, Interrupt.
0x0000807e in main () at blink.c:19
19          for (i = 0; i < ((F_CPU / 18000UL) * ms); i++)
or you can use:
$ stm8-gdb -q blink.elf
Reading symbols from blink.elf...done.
(gdb) target extended-remote :3333
Remote debugging using :3333
0x00008086 in main () at blink.c:19
19          for (i = 0; i < ((F_CPU / 18000UL) * ms); i++)
(gdb) load
Loading section SSEG, size 0x1 lma 0x1
Loading section HOME, size 0x7 lma 0x8000
Loading section GSINIT, size 0x1a lma 0x8007
Loading section GSFINAL, size 0x3 lma 0x8021
Loading section CODE, size 0xcb lma 0x8024
Start address 0x8007, load size 240
Transfer rate: 1 KB/sec, 48 bytes/write.
(gdb) break main
Breakpoint 1 at 0x805f: file blink.c, line 24.
(gdb) continue
Continuing.

Breakpoint 1, main () at blink.c:24
24          CLK = 0x00; // switch to 16Mhz
(gdb) n
26          PD_DDR |= (1 << LED_PIN); // configure PD0 as output
(gdb) info registers
pc             0x8063   32867
a              0x0      0
x              0x0      0
y              0x10     16
sp             0x17ff   6143
cc             0x2b     43
xh             0x0      0
xl             0x0      0
yh             0x0      0
yl             0x10     16
(gdb)
Please refer to gdb manual for more infomation on how to use GDB.