Build clBLAS library *.a or *.so files only
clBLAS is supported for Linux and Windows. MacOS is not officially supported.
clBLAS does not provide Microsoft Visual Studio project files, makefiles, or any other native build infrastructure for its examples. Instead, it includes a file named CMakeLists.txt in the root directory, and uses CMake as a 'master' build system to GENERATE native build files, such as Visual Studio projects, nmake makefiles, UNIX makefiles, or Mac xcode projects.
- NOTE: CMake is very similar to the autoconf tool 'configure', except it is cross-platform and it integrates many features in addition to building. With CMake the native OS build files are GENERATED, so changes made to the native build files are overwritten the next time CMake runs.
CMake is freely available for download on the web; the minimum required version is 2.8.
clBLAS build static (*.a) by default. If you need to build shared (*.so) ones, simply check "BUILD_SHARED_LIBS" on cmake-gui. Otherwise leave it unchecked.
- Assume you build clBLAS in folder "YOU_BUILD_DIR". On Windows, the build library and headers should be installed in "YOUR_BUILD_DIR/package/lib64" and "YOUR_BUILD_DIR/package/include", respectively. On Linux, they will be installed in "YOUR_BUILD_DIR/library". If not, explore YOUR_BUILD_DIR.
The clBLAS library itself contains only two build dependencies.
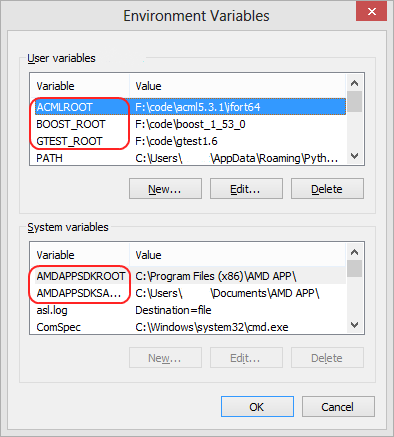
Installing the AMD APP SDK installs all the header and binary files in the appropriate locations and also defines the AMDAPPSDKROOT environment variable. CMake requires only this information to find the OpenCL dependencies--on Windows or Linux. AMD APP SDK version 3.0 is recommended; version 2.9.1 also works.
With all of the pre-requisite dependencies downloaded, compiled and set up, CMake automates the creation of build environments in a cross-platform manner, generating native build files for a respective platform. When launched, it inspects the host computer and searches for all the tools, SDKs, libraries, and code necessary to build the project.
CMake ships with several interfaces to help a developer generate native build files. For X/Windows-based systems, CMake has a GUI interface called CMake-gui that incorporates the traditional point-and-click conventions for buttons, list boxes, and search boxes (On linux, cmake-gui is typically installed in a separate package from cmake; search for cmake-gui using the package managers search mechanism). For CLI-based functionality (including CMD from Windows), CMake has a native command-line executable (the GUI is just a wrapper around the command line). The command line executable is useful for scripting purposes, such as might be used with automated and continuous build systems.
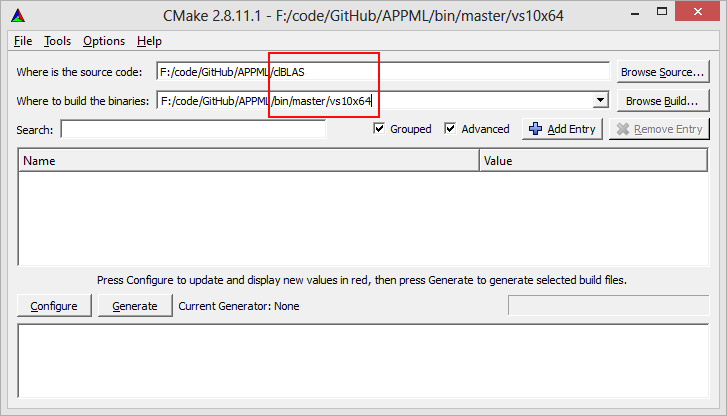
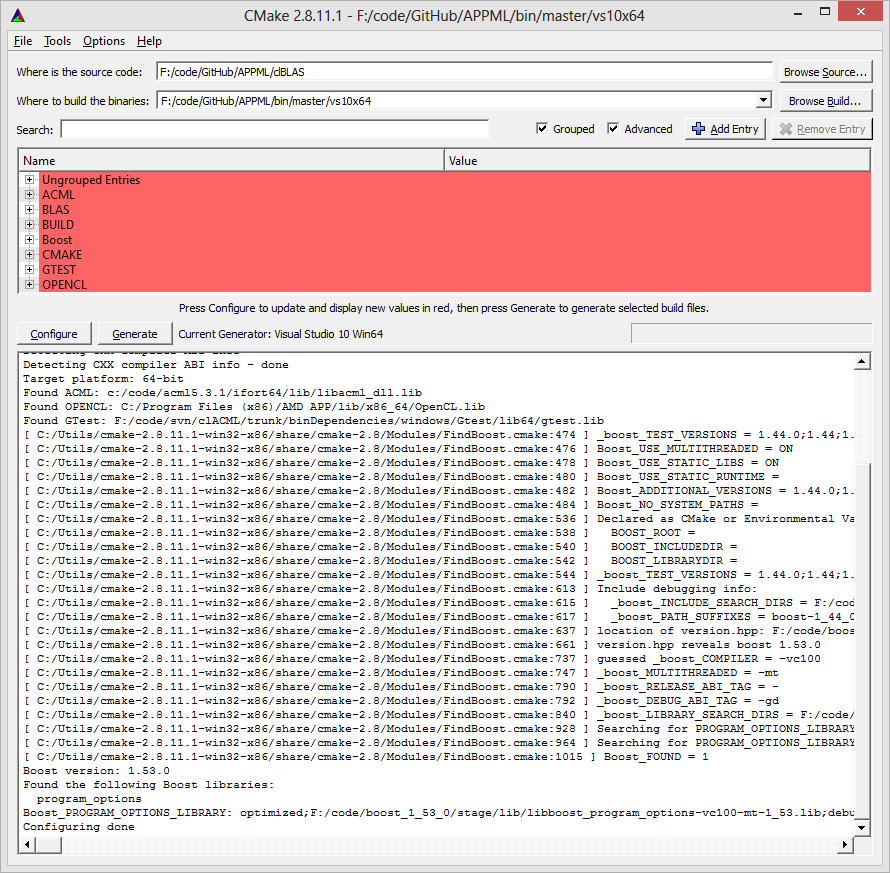
The clBLAS source directory contains the initial CMake files necessary for configuring clBLAS. In the CMake Window, enter the source code and binary URIs as given in the image below, and select Configure. You can also use the 'Browse Source ...' and "Browse Build..." buttons to navigate to the source root and binary folder. It is recommended to create subdirectories for both the branch being built and the compiler being used.
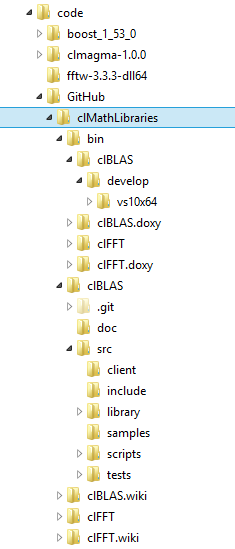
As you can see from the filesystem layout, the binary files are built outside of the source code tree. The /bin directory is a sister directory to the clBLAS source directory, not a subdirectory.
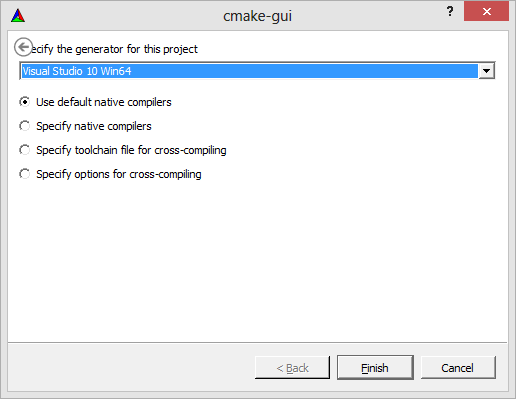
Next, click the Configure button, and specify your choice of generator. In this example, 'Visual Studio 10 Win64' generator is selected, which generates a build tree for 64bit AMD64 executables.
The selected bin directory is descriptive of the generator used, and is convenient to have generated outside of the source tree because it is easy to start a fresh build (just delete the binaries directory). After selecting the generator, CMake examines the system, locating all the project dependencies and properties, which appear in the properties box in RED.
While CMake finishes configuring the projects, it prints messages in the output log visible in the bottom textbox within the GUI; this states that CMake found the OpenCL and clBLAS libraries. If not, CMake prints in RED text which libraries or header files are missing. This usually implies that the environment variables that CMake uses to find dependencies are not set up properly. After the Configure button confirms that it can find all dependencies without error, clicking the "Generate" button generates the actual build files into the specified binaries directory.
Debug builds can be done by running cmake with '-DCMAKE_BUILD_TYPE=Debug', or by manually specifying build arguments with 'CFLAGS=MYCFLAGS CXXFLAGS=CFLAGS cmake -DCMAKE_BUILD_TYPE=Debug'.
clBLAS first introduced Offline Kernel Compilation in version 2.6.0. This feature enables the library to pre-compile OpenCL kernels at build time rather than run time and thus improves the overall library performance. With version 2.8.0, Offline Kernel Compilation feature is both expanded and made more flexible.
- All GEMM and DTRSM kernels can be offline compiled.
- User can choose to offline compile a specific subset of GEMM kernels.
- All kernels chosen to be offline compiled will be compiled for device 0.

For example, a CMake configuration shown in above figure will generate a clBLAS project that pre-compiles SGEMM NT kernels and still compiles other kernels at runtime, with OpenCL 2.0 compiler.
After a successful configuration pass, the directory specified initially in the 'Where to build the binaries:' textbox contains an 'clBLAS.sln' file, which can be opened in the appropriate version of Visual Studio. At this point, selecting the 'Build Solution' menu item builds all the generated projects. By default, Visual Studio will have the 'ALL_BUILD' project selected as the 'Startup' project. If a particular project must be run under a debugger (such as a test program), mark it 'Startup' by first right-clicking on the project, then selecting 'Set as Startup Project'. Then it is possible to hit the debug arrow in visual studio or hit the F10 key to single step into the test and the test framework will be under the control of the debugger.
clBLAS currently compiles with Visual Studio 2012, 2013 on Windows.
For Linux, clBLAS compiles with at least 4.6 and 4.8 (others may also work, but we haven't tested them and cannot guarantee).