Build
clSPARSE does not provide native build infrastructures, such as makefile or IDE projects in it's repository. Instead, clSPARSE uses CMake as a 'meta' build tool and generates it generates native build files on the fly on the user's system, after it has analyzed the filesystem for system settings and project dependencies. CMake is similar in concept to the GNU Autoconf tools, except it focuses on cross-platform support and integrates many modern features in addition to building.
- NOTE: Since CMAKE generates native OS build files, changes written to the native build files are overwritten the next time cmake runs.
Each supported platform has a different method to install the build tool.
- Windows: CMake 2.8.12 (download from Kitware)
- Linux: CMake 2.8.12 (install with distro package manager)
- MacOSX: CMake 2.8.12 (install via brew)
Of course, when in doubt or the system package managers have old versions, CMake is freely available for download on the web.
If a user intends to do development on clSPARSE source, the first step to using clSPARSE would be to fork it. This is described on the index page to the wiki. Then the user would proceed in cloning their forked repository.
If a user intends only to build clSPARSE, the fork step can be bypassed and the user could clone straight from upstream.
git clone https://github.com/clMathLibraries/clSPARSE.gitA software project is very rarely a single silo of code and documentation. Typically, software is developed in such a fashion as to reduce the need for creating redundant code; this is especially true in the open source world where developers all around the globe share code in the hopes that it is useful to others. This is all a way of saying that software dependencies happen and typically software dependencies, for all their goodness, can make software builds really complicated. CMake SuperBuilds are build frameworks constructed to manage dependencies in an intuitive way. It is similar in concept to a build of builds, or as a master-build per se.
The cmake code for the SuperBuild is located in the root directory of the clSPARSE project, /CMakeLists.txt. This top-level cmake file acts as a master build file, that calls independent builds on clSPARSE and its software dependencies. First, the SuperBuild handles downloading of the software dependencies, and builds them based upon their own build framework. After the dependencies are built and installed, the main clSPARSE package is built finding and using the dependencies automatically.
- An OpenCL SDK, such as AMD APP
- Boost
- GoogleMock
CMake is a tool that encourages out-of-source builds. What this means is that build artifacts are written to a destination separate from the source. CMake can also build in an in-source manner, but this is actively discouraged. For one, it makes working with source controls a bit more difficult because of artifacts that are generated inside of the repository, and second it is nice to be able to do an equivalent of 'make clean' by deleting the build directory.
The superbuild takes care of building and installing all dependencies except for the OpenCL SDK1. That has to be installed by the user prior to configuring the project with cmake. However, cmake should automatically find OpenCL and configure itself properly to link to it.
As such, after cloning the repository, it is recommended to create a sister directory on the same level as the git repository to hold binary artifacts generated from the build process
.
├───bin
│   ├───deps
│   │   └───vs12x64
│   └───develop
│       └───vs12x64
└───clSPARSE
    ├───cmake
    └───src
In the filetree demonstrated above, a few things to clarify.
- ./bin/deps/vs12x64 - Directory to contain dependencies compiled with Visual Studio 2013 64-bit
- ./bin/develop/vs12x64 - Directory to contain clSPARSE compiled with the develop branch with Visual Studio 2013 64-bit
- ./clSPARSE - Directory resulting from
git clone https://github.com/clMathLibraries/clSPARSE.git
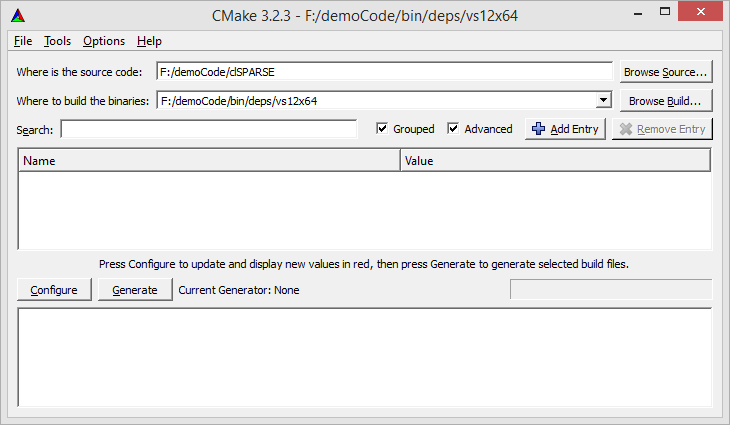
All platforms with a GUI interface support using the cmake-gui configuration tool, including Linux and OSX. This is the easiest way to explore and learn to use the CMake tool.
After launching, a blank CMake GUI should appear. Along the top are two text boxes:
- The first specifies where the source code to configure is located, and
- The second specifies where build artifacts are written.
This is a useful step for individuals who either work with a lot of different development branches, or who start over a lot. Downloading and compiling software dependencies can be time-consuming, and it is possible with SuperBuilds to pre-compile dependencies and cache them to be reused and shared among several lines of development.
Using the directory layout from above, this should look similar to
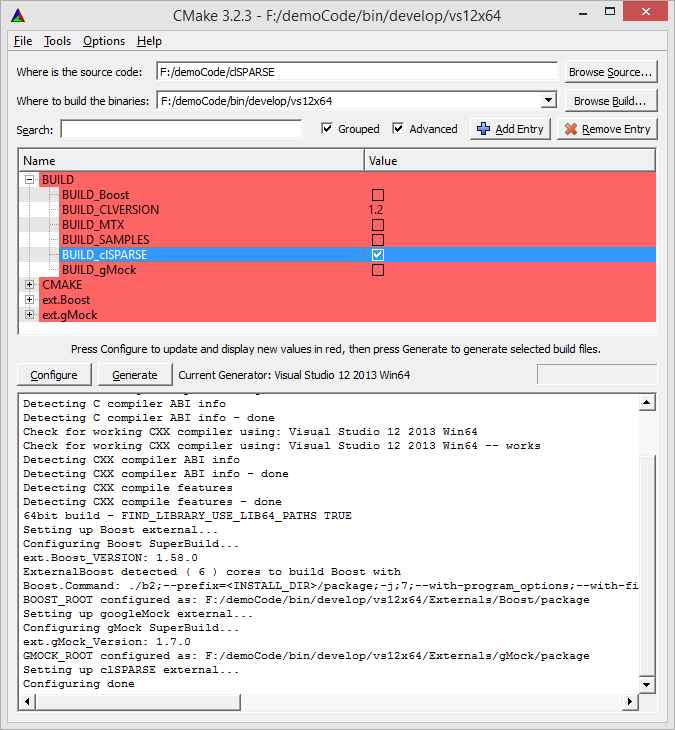
Clicking the configure button once, the GUI will populate itself with a lot of different settings. Make sure to select the generator you are interested in; this works the same across all supported platforms. It is helpful to make sure that the grouped and the advanced checkboxes are checked.

Notice that the BUILD_clSPARSE checkbox is unchecked, and Boost and gMock is checked. That is because with this step, we are only interested in building the dependencies. A few explanations:
- BUILD_Boost - Download and compile the Boost
- BUILD_CLVERSION - Version of OpenCL to compile against.
- BUILD_MTX - Ask CMake to download sparse matrix files from the University of Florida Sparse Matrix Collection. Can be used as test or benchmark data.
- BUILD_SAMPLES - Ask CMake to build sample programs. The samples are written and configured to assume that clSPARSE is installed.
- BUILD_gMock - Download and compile the Google Mock, which contains Google Test
Once only the dependency checkboxes are checked, click the generate button. Depending on the generator selected on the configure step, a native build system of some form will exist in the binary directory, in this case it is a visual studio solution. Whatever the case may be, building using the native build system will download and compile those dependencies. If the user wishes to download Sparse matrices, check the BUILD_MTX box too. Once the Sparse matrices have finished downloading (after configuring once), uncheck the box again to speed up the configuration process.
Once the dependencies have finished building, you reuse these dependencies in other builds by setting appropriate environment variables to point CMake in the future where to find these precompiled dependencies. On Windows, environment variables be set in the Control Panel 'System' module, and in a bash environment they can be set in a users .bashrc file to initialize every time a new terminal windows is opened.
- Boost - env{BOOST_ROOT}
- gMock - env{GMOCK_ROOT}
No matter if the user decides to pre-compile dependencies or not, this step is about compiling the clSPARSE project proper. First, launch the cmake-gui and point the source and binary directories to the appropriate locations. An example is shown below, with the binary directory set to our build of the git branch and the configure button clicked once:
In this step, I am assuming that I have already compiled my dependencies from the optional step above, and I have unselected BUILD_Boost and BUILD_gMock, but I have made sure to select BUILD_clSPARSE. Since I set environment variables above, cmake will automated find our pre-compiled dependencies and use them to build clSPARSE. If the environment variables were not set above, cmake will prompt you to add the appropriate entries into its configuration state by clicking the Add Entry button at the top of the GUI.
It is also completely fine to instruct CMake to build everything, and cmake will download and install the dependencies first and then track those dependencies when building clSPARSE.
Once everything is set in the GUI, click the Generate button to build the native build files and build clSPARSE.
A special note about choosing to enable BUILD_SAMPLES. The samples were designed and written in such a way as to treat the clSPARSE project like any other project would. In the CMake code, this is accomplished by adding the samples folder as an 'external project' like the Boost and Google Mock projects were. The result of this is that if BUILD_SAMPLES is enabled, the clSPARSE project is installed on the users machine. Since samples are only meant to be just that, it was not felt that we should actually install clSPARSE on the users machine, so the installation directory is chosen to be a sub-directory of the binary project picked at configure time called clSPARSE-package.
The samples CMakeLists.txt file assumes that it is looking for an already installed clSPARSE package and uses the CMake primitive
find_package( clSPARSE REQUIRED CONFIG )to search for and set up clSPARSE as a dependency of the samples.
After having built the SuperBuild the first time, there is no reason to repeatedly build it. All the dependencies are compiled, and the SuperBuild is designed not to change the dependencies very often. Instead, close down whatever build environment is used (Visual Studio, Xcode or just cd for makefiles), and look inside the sub-directory generated for the clSPARSE project called clSPARSE-build. This sub-directory has a build enviornment that is specific to building only clSPARSE. If a Visual Studio or an Xcode project is found, the project can be opened and only files that make up clSPARSE are present and neatly categorized. In a makefile type build environment, typing make clean will only clean the build environment used to build clSPARSE, and not touch or modify the pre-compiled dependencies in any way. This is the recommended and easiest way to build when iterating through code changes developing clSPARSE.
By nature of the SuperBuild, the options the user sees by default in the cmake-gui are those that are inherent of the SuperBuild itself. How does one go about changing CMake values in the clSPARSE library?
You can use the cmake-gui tool to look at the library configuration information; just point the tool's binary directory to the libraries build directory through the text box:
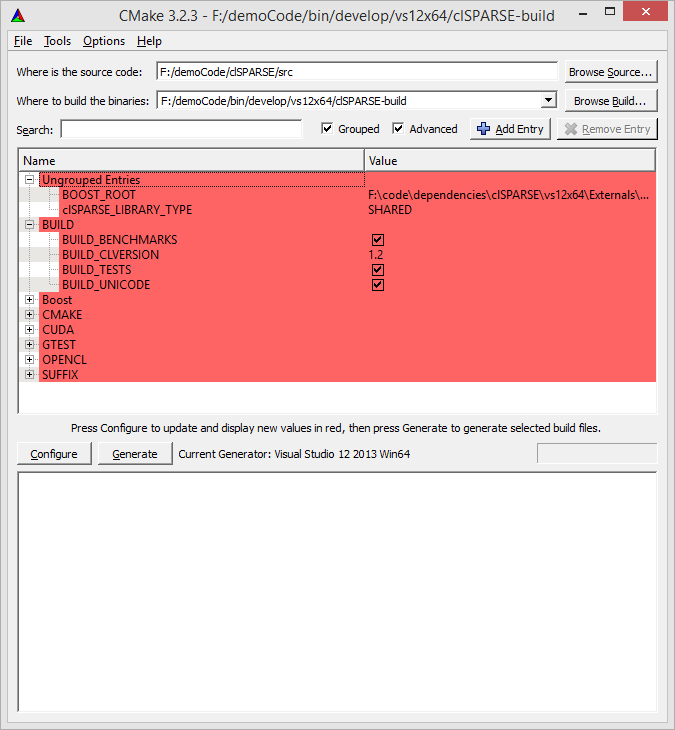
Notice that the 'Where to build the binaries' textbox now shows the values stored in 'clSPARSE-build'. The user is free to change values in here and configure again.
CMake provides several interfaces to help a developer generate native build files; cmake-gui is only one of them. For CLI-based builds (including CMD from Windows), CMake has a native command-line executable cmake (the GUI is just a wrapper around the command line). The command line executable is useful for scripting purposes, such as might be used with automated and continuous build systems.
However, the best experience to configure cmake projects through the command line is with the ccmake tool. Typically this can be installed with the package manager native to the distro that the user is on, such as yum, zypper, apt-get or others.
The entire configuration process is very similar to that of using the gui, but the program works over the terminal with ssh for remote access using curses terminal graphics. An example of launching ccmake is:
kknox@nightcrawler:~/code/github/bin/clSPARSE/develop/make/debug
$ ccmake ../../../../../clSPARSE/
Launching ccmake with that command will start the configuration process using very nice shell graphics. After hitting the 'c' key to tell ccmake to configure once, the terminal looks like:

Use the cursor to hop around the various options presented and customize their values from their default states. Otherwise, the experience is mostly the same as what is desribed for the cmake-gui tool above.
NOTE: When using command line based builds, the build environment is set to only build one flavor of build type, 'Release' or 'Debug'. This is different than IDE type build environments, where the user picks 'Release' or 'Debug' builds through an IDE option. You can see in the screenshot above that Cmake defaults CMAKE_BUILD_TYPE to 'Release' style builds, which would be the most appropriate choice for non developers. If a developer wishes to step around in the library with a debugger, change the CMAKE_BUILD_TYPE to 'Debug' before configuring. If it is desirable to have both 'release' and 'debug' builds, configure the project into two separate binary directories for command line based builds, such as with:
.
├───bin
│   ├───deps
│   │   ├───debug
│   │   └───release
│   └───develop
│       └───make
│           ├───debug
│           └───release
└───clSPARSE
    ├───cmake
    └───src
1: OpenCL SDK's are usually distributed as a binary installation package that make them hard to install in an automated fashion.