In this blog I have created a simple synapse deployment. You will learn about the following things:
- Create at a YAML file that will deploy a bicep infrastructure as code file. This bicep file will build a Synapse workspace, a Spark Pool and an Integration Runtime.
- Make some pipelines and a Notebook in the Synapse workspace and commit that to the main branch.
- Publish from the main branch so that artifacts like pipelines and so on get committed to the "live" workspace
- The results from the publish action generate a new ARM template which we will use to action a "Synapse workspace deployment@2" task in YAML to promote this to the next Synapse workspace in a higher environment (from Dev to Test for example)
- Add some access rights to get onto the workspace (taking note that the first time you deploy that the firewall rules may need time to kick in and your pipeline might fail)
When creating a new Synapse Workspace it is necessary to have a linked storage account. We will create this storage account alongside the Synapse workspace. You can find the bicep file in ../modules/synapse.bicep.
To begin, let's take a look at the yaml file that is the first to kick off in the DevOps project. As you may notice, the azure-pipelines.yml file has no branch trigger, indicating that automated CI/CD is not currently in place
It has parameters for the user to select which enviornment to run the pipeline for.

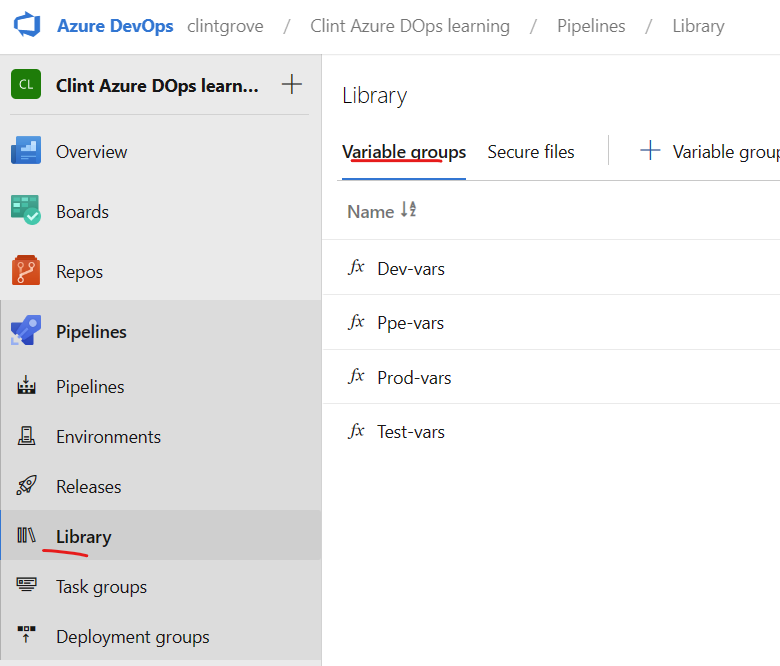
It calls the DevOps "Library" through the code you can see below, this is helpful to get secrets/passwords etc
variables:
     - group: ${{parameters.Environment}}-vars
For better context I took a screenshot of where that is in your DevOps.
The steps: section is where the first task is called to build an Azure resource (in this case our Synapse Workspace and Storage Account)
steps:

- task: AzureResourceManagerTemplateDeployment@3
In the "modules" folder you will see a file called synapse.bicep. This bicep file creates the Synapse Workspace, the Storage Account, the firewall rules, a Spark Pool and does some role assigments.
NOTE! The first time you run this, it will probably fail! I know, its not ideal and I haven't found a way around it yet. Just run the pipeline twice and the second time it should succeed. It has to do with the time delay in the Workspace having the firewall settings set up. Inside the bicep file you will see that we open up the firewall to all ip ranges. As I said this is a simple Synapse set up, so no fancy private networks.
Running a bash file with arguments
In the second task of the azure-pipelines.yml file you will see a AzureCLI@2 task.
- task: AzureCLI@2
 displayName: 'Assign role "Synapse Administrator"'
 inputs:
   azureSubscription: clintazrealallrgs
   scriptType: bash
   scriptLocation: 'scriptPath'
   scriptPath: '$(System.DefaultWorkingDirectory)/scripts/roleassignAdmin.sh'
   arguments: "groovyws${{lower(parameters.Environment)}} 4fe7fc36-b425-420f-a3f4-5e14e084eb5e"
As you can see from the display name, I am adding people as users to the Synapse workspace with different roles. There is a Synapse "Adminstrator", and then there is Artifact Publisher. You can see the bash scripts "roleassignAdmin.sh" and "roleassignArtifact.sh" in the scripts/ folder.
The arguments piece took me a while to learn. I hope it comes in handy for you at some point in the future. All you need to do to pass arguments to the (bash) .sh file is to put the argument in the right order. You will see that I have two arguments in the argument line above, they are in the correct order according to the variables in the .sh file.
I have created two pipelines and two notebooks just to put some things in the workspace so that we can promote to the next higher up syanpse. I have set it up so that we have a "test" synapse to promote to from "dev".
The most important part to rethink, or think about is that we will be adding our own folder to the workspace_publish branch. This is something that you may have thought not to do, as in, don't mess with this branch because its used automatically by Synapse to store its published artifacts to, an area that we shouldn't touch in case we mess it up and something doesn't work. But you are able to add your own folders in here without any problems.
I have added a folder called "ParamFiles". Go ahead and look in there to see what I have done.
I have created a template paramter json files for each environment. I have a TEST and a UAT file. Now granted, yes, we have to manually maintain this file, but it saves you a whole lot of hassle. All you have to do is keep it in sync with the template paramter file that lives in "groovywsdev", the one named "TemplateParamterForWorkspace.json".
You can list all of the parameters in your TEST and UAT parameter files, or you can choose from a variety of them. Most of them you would probably want to include. In our case, its such a simple demonstration that we will take all the parameters. I made a list of them below so that there is no confusion as to what I am talking about.

You will have a yaml file which is in the main branch called "DeploySynapseArtifacts.yml". This yaml does a checkout to the workspace_publish branch. And then proceeds to do a "Synapse workspace deployment@2" task which is the official way to promote your Synapse artifacts to another Synapse workspace.
You will have to create yourself a new release pipeline in DevOps. I will show you a picture of mine below

Note: You will have to rename your parameters to names that are unique, especially for the Storage account. My Storage Account is called "stgaccgroovydev", but you cannot use this. You will have to change it.
