X. Annexes
const yourStack = new pulumi.StackReference('your-stack-name')The yourStack object is similar to this:
{
	id: 'some-string',
	name: 'some-string',
	outputs: {
		'aurora-endpoint': 'some-string',
		'aurora-readonly-endpoint': 'some-string',
		'instance-1-endpoint': 'some-string',
		'private-bucket': 'some-string',
		'public-file-bucket': 'some-string',
		services: [
				'some-string',
				'some-string',
				'some-string',
				'some-string'
		]
	},
	urn: 'some-string'
}
Outputs cannot be accessed explicitly. Instead, you must use the getOutput method:
const endpoint = yourStack.getOutput('aurora-endpoint')const pulumi = require('@pulumi/pulumi')
const aws = require('@pulumi/aws')
const ENV = pulumi.getStack()
const PROJ = pulumi.getProject()
const PROJECT = `${PROJ}-${ENV}`
const REGION = aws.config.region
const ACCOUNT_ID = aws.config.allowedAccountIds[0]All Pulumi resources support the optional provider property:
const cert = new aws.acm.Certificate(certName, {
	name: certName,
	domainName: domainConfig.name,
	validationMethod: domainConfig.validationMethod || 'DNS',
	tags: {
		...tags,
		Name: certName
	}
}, {
	protect,
	dependsOn: [...this.stages],
	provider: new aws.Provider('temp-provider', { region: 'us-east-1' })
})This sections describe 2 categories of NPM scripts:
- Core scripts: Those scripts helps managing Pulumi (e.g., deployement, unblocking stack, ...).
- AWS scripts: Those scripts helps managing AWS specific tasks (e.g., starting a port-forwarding via AWS SSM).
{
	"scripts": {
		"tag": "func() { git add --all; git commit -am \"deploy to $1\"; git tag -a $(date -u +%Y%m%d-%H%M%S-$1) -m $(date -u +%Y%m%d-%H%M%S-$1); }; func",
		"up": "func() { pulumi up -s YOUR_ORG/$1 -y;[ $? == 0 ] && npm run tag $1; }; func",
		"prev": "func() { pulumi preview -s YOUR_ORG/$1; }; func",
		"out": "func() { pulumi stack output -s YOUR_ORG/$1 --json; }; func",
		"refresh": "func() { pulumi refresh -s YOUR_ORG/$1 -y; }; func",
		"cancel": "func() { pulumi cancel -s YOUR_ORG/$1 -y; }; func",
		"blast": "func() { pulumi destroy -s YOUR_ORG/$1; }; func",
		"clean": "func() { cp Pulumi.$1.yaml Pulumi.$1.backup.yaml; pulumi stack rm YOUR_ORG/$1; cp Pulumi.$1.backup.yaml Pulumi.$1.yaml; rm -rf Pulumi.$1.backup.yaml; }; func",
		"import": "func() { pulumi stack export -s YOUR_ORG/$1 > stack.json; }; func",
		"export": "func() { pulumi stack import -s YOUR_ORG/$1 --file stack.json; }; func",
		"rm_pending_ops": "func() { node -e \"require('fs').writeFileSync('./stack.json',JSON.stringify((()=>{const s=require('./stack.json');delete(s.deployment.pending_operations);return s;})(), null, '  '));\"; }; func",
		"unlock": "func() { npm run import $1;npm run rm_pending_ops;npm run export $1;rm -rf ./stack.json; }; func",
		...
	}
}NOTE: When your stack lives under an organization, the stack must be prefixed with your organization's name. In the samples above, replace
YOUR_ORGwith your organization's name. If you wish to use your default Pulumi account, then delete theYOUR_ORG/prefix.
-
npm run up dev: Deploys the dev stack. This also automaticallygit commitandgit tagif the deployment is successful. -
npm run prev dev: Previews the dev stack. -
npm run out dev: Prints the dev stack's outputs. -
npm run refresh dev: Update the Pulumi stack using the real stack as reference. Used to remove drift. This has no consequences on your physical files. -
npm run cancel dev: Cancels the current Pulumi deployment. -
npm run blast dev: Destroys the dev stack. -
npm run remove dev: Removes the dev stack. -
npm run import dev: Imports the Pulumi dev state into a local./stack.jsonfile. Use this to inspect all resources or to fix apending_operationsissues. -
npm run export dev: Exports the local./stack.jsonfile to the Pulumi dev state. -
npm run rm_pending_ops: Removes thedeployment.pending_operationsproperty from the./stack.jsonfile. This is usefull when we're trying to unlock a Pulumi deployment. -
npm run unlock dev: Runs the following operations in sequence:-
npm run import dev: Pulls the./stack.json. -
npm run rm_pending_ops: Updates the./stack.jsonby removing itsdeployment.pending_operationsproperty. -
npm run export dev: Uploads the./stack.jsonback to the Pulumi project to fix thepending_operationsissue. -
rm -rf ./stack.json: Deletes the./stack.jsonfile.
-
WARNING: Those scripts assume that the following CLI tools are installed:
AWS CLI v2Session Manager pluginfor the AWS CLI. This is required by thesshandpfscript below. To learn how to install this plugin, please refer to the Installingsession-manager-pluginsection.- The user is using an AWS profile that grant enough access to their AWS account (TIP: Execute
npx switch-profilein your terminal to ease that process).
{
	"scripts": {
		"id": "func() { aws ec2 describe-instances --region ap-southeast-2 --filter \"Name=tag:Name,Values=name-tag-on-EC2-$1\" --query \"Reservations[].Instances[?State.Name == 'running'].InstanceId[]\" --output text; }; func",
		"rds": "func(){ aws rds describe-db-clusters --region ap-southeast-2 --query 'DBClusters[].{DBClusterIdentifier:DBClusterIdentifier,Endpoint:Endpoint,ReaderEndpoint:ReaderEndpoint} | [?DBClusterIdentifier == `rds-cluster-name-'$1'`]' | grep -Eo '\"Endpoint\":\\s\"(.*?)\\.com' | cut -c 14-; };func",
		"ssh": "func() { aws ssm start-session --region ap-southeast-2 --target $(npm run id $1 | tail -1); }; func",
		"pf": "func(){ echo Forwarding traffic from local port $2 to $1 EC2 on port 22; aws ssm start-session --region ap-southeast-2 --target $(npm run id $1 | tail -1) --document-name AWS-StartPortForwardingSession --parameters '{\"portNumber\":[\"22\"], \"localPortNumber\":[\"'$2'\"]}'; };func",
		"conn": "func(){ ssh ec2-user@localhost -p $3 -N -L $2:$(npm run rds $1 | tail -1):3306 -i ~/.ssh/your_id_rsa; }; func",
		...
	}
}
Where the following tokens must be replaced with your own:
-
name-tag-on-EC2: The bastion server is supposed to run in an EC2 instance that has aNametag that uses this naming convention:<name-tag-on-EC2>-${env}. -
rds-cluster-name: The RDS cluster name should uses this naming convention:<rds-cluster-name>-${env}.
Commands description:
-
npm run id dev: Gets the EC2 instance ID. IMPORTANT NOTE: This script assumes that:- The EC2 instance has been tagged with a
Name, and that name is configured in that script. - The region is
ap-southeast-2. Change this if that's not the case.
- The EC2 instance has been tagged with a
-
npm run rds dev: Gets the RDS endpoint. IMPORTANT NOTE: This script assumes that:- The region is
ap-southeast-2. Change this if that's not the case.
- The region is
-
npm run ssh dev: SSH to the EC2 instance via SSM session manager. IMPORTANT NOTE: This script assumes that:- The region is
ap-southeast-2. Change this if that's not the case.
- The region is
-
npm run pf dev 9999: Starts a port-forwarding session via SSM. Traffic sent to127.0.0.1:9999is forwarded to the EC2 on port 22. IMPORTANT NOTE: This script assumes that:- The region is
ap-southeast-2. Change this if that's not the case.
- The region is
-
npm run conn dev 3306 9999: Starts a port-forwarding from127.0.0.1:3306to127.0.0.1:9999. Then, the traffic is sent via SSM to the bastion server where it forwarded to RDS. This command is usefull if you wish to test your SQL code locally. IMPORTANT NOTE: This script assumes that:- The region is
ap-southeast-2. Change this if that's not the case. -
npm run pf dev 9999has been executed on another process to establish the secure connection via SSM on port9999. - There is a valid private RSA key in path
~/.ssh/your_id_rsa.
- The region is
To learn how to configure Table Plus for port-forwarding, please refer to the Connecting TablePlus to RDS with SSH port-forwarding using AWS SSM section.
The following example shows what a Dockerfile for an AWS Lambda would look like:
FROM amazon/aws-lambda-nodejs:14.2021.09.29.20
ARG FUNCTION_DIR="/var/task"

# Pulumi setup
## 1. Configure the Pulumi environment variables
ENV PULUMI_SKIP_UPDATE_CHECK true
ENV PULUMI_HOME "/tmp"
ENV PULUMI_CONFIG_PASSPHRASE "your-passphrase"
## 2. Install Pulumi dependencies
RUN yum install -y \
	which \
	tar \
	gzip
## 3. Install Pulumi. All version at https://www.pulumi.com/docs/get-started/install/versions/
RUN curl -fsSL https://get.pulumi.com/ | bash -s -- --version 3.10.0 && \
	mv ~/.pulumi/bin/* /usr/bin

# Create function directory
RUN mkdir -p  ${FUNCTION_DIR}

# Install all dependencies
COPY package*.json ${FUNCTION_DIR}
RUN npm install --only=prod --prefix ${FUNCTION_DIR}

# Copy app files
COPY . ${FUNCTION_DIR}

# Set the CMD to your handler (could also be done as a parameter override outside of the Dockerfile)
CMD [ "index.handler" ]
Notice:
- Environment variables:
-
PULUMI_SKIP_UPDATE_CHECKmust be set to true to prevent the pesky warnings to update Pulumi to the latest version. -
PULUMI_HOMEmust be set to a folder where the Lambda has write access (by default, it only has write access to the/tmpfolder. Use EFS to access more options). The default PULUMI_HOME value is~. Unfortunately, Lambda don't have access to that folder. Not configuring the PULUMI_HOME variable would result in afailed to create '/home/sbx_userxxxx/.pulumi'error message when the lambda executes thepulumi login file:///tmp/command. For a detailed example of what files are contained inside this folder, please refer to this document. -
PULUMI_CONFIG_PASSPHRASEmust be set, even if you don't use secrets, otherwise, you'll receive anpassphrase must be set with PULUMI_CONFIG_PASSPHRASE or PULUMI_CONFIG_PASSPHRASE_FILE environment variableserror message durin thepulumi upexecution.
-
-
bash -s -- --version 3.10.0: Use the explicit version to make sure Pulumi's update don't break your code. -
mv ~/.pulumi/bin/* /usr/binmoves the the executable files to where the lambda can access them (i.e.,/usr/bin).
Because Pulumi relies on the standard AWS SDK to access AWS's APIs, the appropriate policies must be set in your hosting environment. For example, in order to provision S3 buckets, the following policy must be attached:
const createBucketsPolicy = new aws.iam.Policy(`create-bucket`, {
	path: '/',
	description: 'Allows the creation of S3 buckets',
	policy: JSON.stringify({
		Version: '2012-10-17',
		Statement: [{
			Action: [
				's3:CreateBucket',
				's3:Delete*',
				's3:Get*',
				's3:List*',
				's3:Put*'
			],
			Resource: '*',
			Effect: 'Allow'
		}]
	})
})In you Lambda code, you can know use the Automation API, or call Pulumi via the child_process (which is actually what the automation API does):
const { automationApi, aws:{ s3 } } = require('@cloudlesslabs/pulumix')

const main = async () => {
	const [errors, result] = await automationApi.up({
		project: 'my-project-name',
		provider: {
			name:'aws',
			version: '4.17.0' // IMPORTANT: This cannot be any version. Please refer to the note below.
		},
		stack: {
			name: 'dev',
			config: {
				'aws:region': 'ap-southeast-2',
				'aws:allowedAccountIds': [123456]
			}
		},
		program: async () => {
			const myBucket = await s3.bucket({
				name:'my-unique-website-name',
				website: {
					indexDocument: 'index.html'
				}
			})
			return myBucket
		}
	})

	console.log(`Pulumi home dir: ${result.stack.workspace.pulumiHome}`)
	console.log(`Pulumi work dir(contains checkpoints): ${result.stack.workspace.workDir}`)
	console.log(`Pulumi output:`)
	console.log(result.outputs.myBucket.value)
	// Example
	// {
	// 	id: 'lu-20210922kogrikvuow',
	// 	arn: 'arn:aws:s3:::lu-20210922kogrikvuow',
	// 	bucket: 'lu-20210922kogrikvuow',
	// 	bucketDomainName: 'lu-20210922kogrikvuow.s3.amazonaws.com',
	// 	bucketRegionalDomainName: 'lu-20210922kogrikvuow.s3.ap-southeast-2.amazonaws.com',
	// 	websiteDomain: 's3-website-ap-southeast-2.amazonaws.com',
	// 	websiteEndpoint: 'lu-20210922kogrikvuow.s3-website-ap-southeast-2.amazonaws.com'
	// }
}
console.log('RESULT') console.log(result) console.log('RESULT OUTPUTS') console.log((result||{}).outputs)
// Clean Pulumi checkpoints
const workspace = ((result||{}).stack||{}).workspace||{}
const { pulumiHome, workDir } = workspace
IMPORTANT: The
provider.versionrequired and is tied to the Pulumi version you're using (3.10.0in this example). Configuring the wrong AWS version will throw an error similar to no resource plugin 'aws-v4.17.0' found in the workspace or on your $PATH. To know which AWS version to use, set one up, deploy, and check the error message.
This assumes that:
- An RDS instance is hosted in a private subnet.
- A bastion with ID
i-12345host hosted in the private subnet has been with AWS SSM to access the RDS instance in theap-southeast-2region.
Run this command:
aws ssm start-session --region ap-southeast-2 --target i-12345 --document-name AWS-StartPortForwardingSession --parameters '{"portNumber":["22"], "localPortNumber":["9999"]}'
FYI, this command is scripted in the AWS scripts section. Using those scripts:
- Use
npm run rds prodto get the hostname of the RDS database, then use it to setup TablePlus.- Use
npm run pf prodto start port-forwarding using AWS SSM.
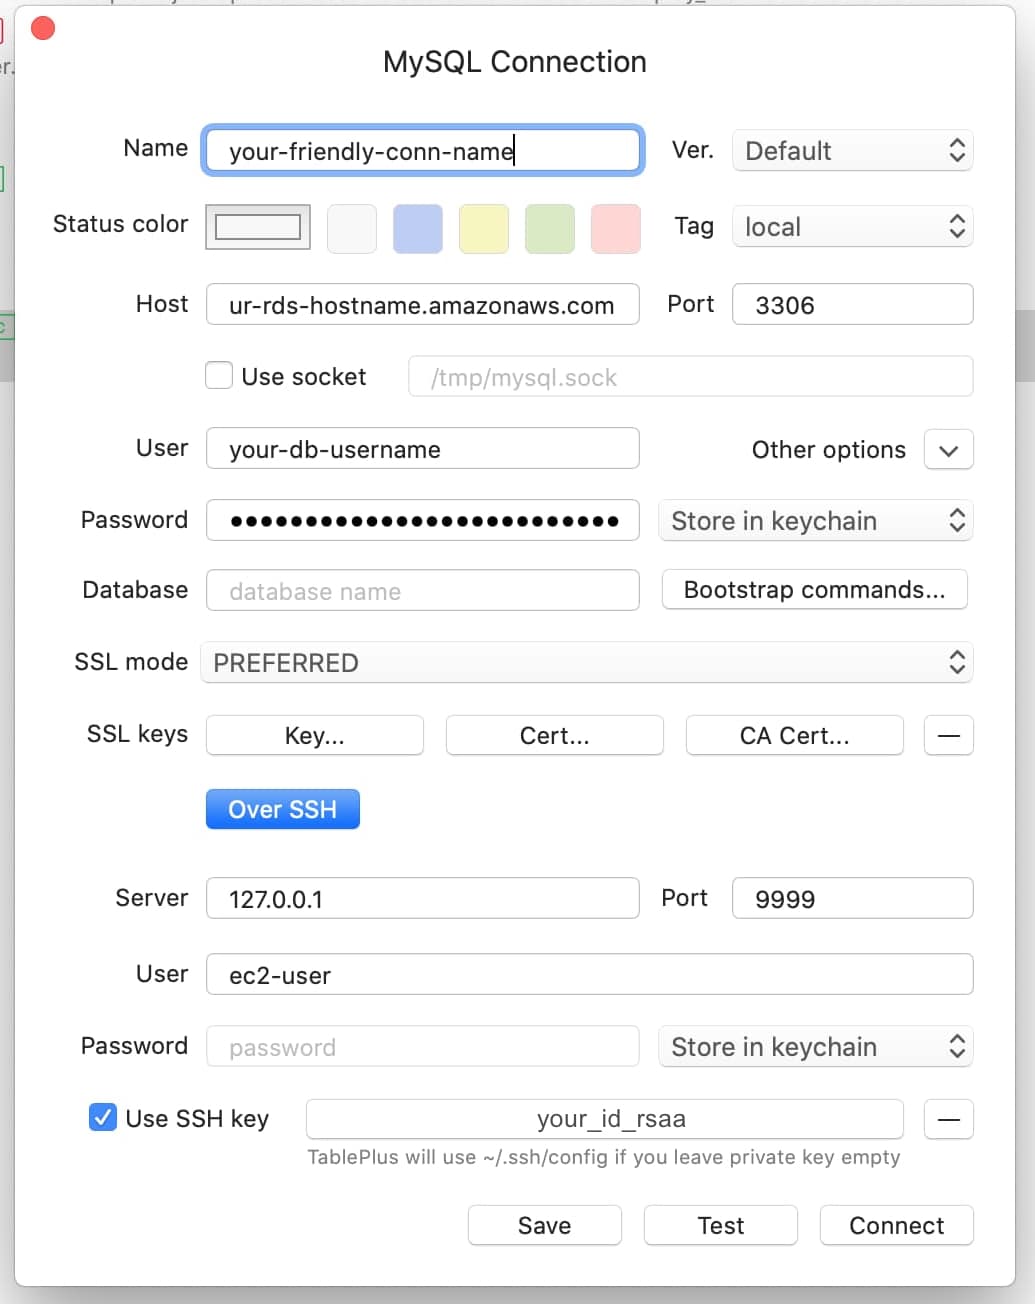
This starts a post-forwarding listener on 127.0.0.1:9999. Then configure Table Plus as follow:
Prerequisite: AWS CLI version 2 must be installed.
To use SSM locally, the Session Manager plugin for AWS CLI must be installed. You can check if that plugin is already installed by executing the following command:
session-manager-plugin
If the plugin is installed, a successfull message should be returned.
Otherwise, install this plugin as follow (for other OS than MacOS, please refer to this doc):
curl "https://s3.amazonaws.com/session-manager-downloads/plugin/latest/mac/sessionmanager-bundle.zip" -o "sessionmanager-bundle.zip"
unzip sessionmanager-bundle.zip
sudo ./sessionmanager-bundle/install -i /usr/local/sessionmanagerplugin -b /usr/local/bin/session-manager-plugin
Once that's done, configure your default AWS profile with a profile that can access your EC2 instance (tip: Use npx switch-profile), then run the following command:
aws ssm start-session --target <INSTANCE ID>
TIP: Use the instance tag name rather then the instance ID.