A Collection of Flutter and Dart Tips and Tricks

Center(
  child: Container(
    margin: const EdgeInsets.all(10.0),
    color: Colors.yellow,
    height: 100,
    child: ClipRect(
      child: Banner(
        message: "hello",
        location: BannerLocation.topEnd,
        color: Colors.red,
        child: Container(
          color: Colors.yellow,
          height: 100,
          child: Text("Hello, banner!")),
      ),),),),
Center(
  child: Container(
    color: Colors.blue,
    height: 120.0,
    width: 120.0,
    child: Baseline(
      child: Container(
        color: Colors.red,
        height: 60.0,
        width: 60.0,
      ),
      baseline: 20.0,
      baselineType: TextBaseline.alphabetic,
    ),
  ),
)
88.LongPressDraggable Widget is used to create a widget that can be dragged starting from LongPress.
LongPressDraggable(
  feedback: FlutterLogo(
    textColor: Colors.orange,
    size: 100,
    style: FlutterLogoStyle.stacked ),
    child: FlutterLogo(
    textColor: Colors.green,
    size: 100,
    style: FlutterLogoStyle.stacked ),
  onDragEnd: (details) { setState(() {
   final adjustment =MediaQuery.of(context).size.
   height  constraints.maxHeight;
   _offset = Offset(details.offset.dx,
   details.offset.dy - adjustment);
    }); },)
87.ExpansionPanel widget is a panel with a header and a body and can be either expanded or collapsed. The body of the panel is only visible when it is expanded.
ExpansionPanel(
  isExpanded: _expanded,
  canTapOnHeader: true,
  headerBuilder: (context, isExpanded) => ListTile(
    title: Text('Click To Expand'),
  ),
  body: ListTile(
    title: Text('Description text'),
  ),
);
86.ActionChip widget used to create compact elements called chips, which trigger an action when the user presses on it.
ActionChip(
label: Text('Delete'),
onPressed: () =>
    print('Processing to delete item'),
);
Stepper(
  steps: [
    Step(
      isActive: true,
      state: StepState.editing,
      title: const Text('Login Info'),
      content: Column(children: <Widget>[
        TextFormField(
          decoration: InputDecoration(
          labelText: 'Email Address')),
        TextFormField(
          decoration: InputDecoration(
          labelText: 'Password')),
      ]),
    ),
  ],
);
Future<TimeOfDay?> selectedTime = showTimePicker(
   context: ctx,
   initialTime: TimeOfDay.now(),
);
Row(
  mainAxisSize: MainAxisSize.min,
  children: <Widget>[
    Text('Item1') ,
    VerticalDivider(),
    Text('Item2'),
    VerticalDivider(),
    Text('Item3')
  ])
Container(
  color: Colors.black,
  child: Transform(
    alignment: Alignment.topRight,
    transform: Matrix4.skewY(0.3)
   ..rotateZ(-math.pi / 12.0),
    child: Container(
      padding: const EdgeInsets.all(8.0),
      color: const Color(0xFFE8581C),
      child: const Text('Apartment for rent!'),
    ),
  ),
)
const SelectableText(
  'Hello! How are you?',
  textAlign: TextAlign.center,
  style: TextStyle(fontWeight: FontWeight.bold),
);
Tooltip(
  message: 'I am a Tooltip',
  child: Text('Hover over the text to show
   a tooltip.'),
);
Switch(
  value: isSwitched,
  onChanged: (value)=>
    setState(() {
      isSwitched = value;
      print(isSwitched);
    }),
  activeTrackColor: Colors.lightGreenAccent,
  activeColor: Colors.green,
),
RangeSlider(
  values: _currentRangeValues,
  min: 0,
  max: 100,
  divisions: 5,
  labels: RangeLabels(
 _currentRangeValues.start.round().toString(),
  _currentRangeValues.end.round().toString(),
  ),
  onChanged: (RangeValues values) =>
    setState(() {  _currentRangeValues = values;
    }),
);
RadioListTile<SingingCharacter>(
  title: const Text('Thomas Jefferson'),
  value: SingingCharacter.jefferson,
  groupValue: _character,
  onChanged: (SingingCharacter value)=>
  setState(() { _character = value; }),
),
PhysicalModel(
  elevation: 6.0,
  shape: BoxShape.rectangle,
  shadowColor: Colors.black,
  color: Colors.white,
  child: Container(
    height: 120.0,
    width: 120.0,
    color: Colors.blue[50],
    child: FlutterLogo(size: 60 ),
  ),
)
PageView(
  children: <Widget>[
    Container(
      color: Colors.pink,
      child: Center(
        child: Text('Page 1'),
      ),
    ),
    Container(
      color: Colors.cyan,
      child: Center(
        child: Text('Page 2'),
      ),
    ),
  ],
)
LinearProgressIndicator(
  value: controller.value,
  semanticsLabel:
  'Linear progress indicator',
)
73.CheckboxListTile is a widget that combines a checkbox and a list tile. It allows you to create a checkbox along with the title, subtitle, and icon.
  CheckboxListTile(
  value: _isChecked,
  onChanged: (bool value) {
    setState(() {
      _isChecked = value;
    });
  },
)
Flexible(
  child: Text(
    'Flutter Text Overflow while adding long
     text. how to wrap text in flutter ',
     style: TextStyle(fontSize: 20),
  ),
)
Flow(
delegate: FlowMenuDelegate(
   menuAnimation: menuAnimation),
   children:
   menuItems.map<Widget>(
   (IconData icon) =>
   flowMenuItem(icon)).toList(),
);
ListTile(title: Text('Item1')),
Divider(),
ListTile(title: Text('Item2')),
DecoratedBoxTransition(
  position: DecorationPosition.background,
  decoration:
  decorationTween.animate(_controller),
  child: Container(
      width: 200,
      height: 200,
      padding: EdgeInsets.all(20),
      child: FlutterLogo(),
  ),
),
await Future.delayed(
const Duration(seconds: 1));
67.The AnimatedDefaultTextStyle will transitions the default text style over a given duration whenever the given style changes.
AnimatedDefaultTextStyle(
  duration: Duration(milliseconds: 300),
  child: Text("Flutter"),
  style: newStyle,
)
66.Use GestureDetector to detect gestures like tap, double Tap, press, LongPress, pan, drag, zoom etc.
Container(
  color: _color,
  height: 200.0,
  width: 200.0,
  child: GestureDetector(
    onTap: ()=>
    setState(() { _color = Colors.yellow;}),
  ),
)
65.Use CupertinoButton Widget to create an iOS-style button that Takes in a text or an icon that fades out and in on touch.
Container(
  child: Center(
    child: CupertinoButton(
      onPressed: () {},
      child: Text("CupertinoButton Widget"),
    ),
  ),
),
Container(
  child: Center(
    child: CupertinoButton.filled(
      onPressed: () {},
      child: Text("CupertinoButton Widget"),
    ),
  ),
),
64.Use the CupertinoAlertDialog to create an iOS-style widget that informs the user about situations that require acknowledgement.
CupertinoAlertDialog(
  title: Text("This is the title"),
  content: Text("This is the content"),
  actions: [
    CupertinoButton(
        child: Text('Cancel'),
        onPressed: () => Navigator.of(ctx).pop();
     ),
    CupertinoButton(
      child: Text('I agree'),
      onPressed: () {
        print('I agreed');
        Navigator.of(ctx).pop();
      },
    )
  ],
)
AnimatedSwitcher(
  duration: const Duration(milliseconds: 500),
  transitionBuilder: (Widget child,
  Animation<double> animation) {
  return ScaleTransition(child: child,
  scale: animation);
},
child: Text( '$_count',
    key: ValueKey<int>(_count) , style:
    Theme.of(context).textTheme.headline4,
  ),
),
62.FractionallySizedBox Widget is a widget that sizes its child to a fraction of the total available space.
FractionallySizedBox(
  widthFactor: 0.5,
  heightFactor: 0.25,
  child: ElevatedButton(
    onPressed: () {},
    child: Text('Click Me'),
  ),
),
Column(
  children: [
    Container(
      color: Colors.red,
      height: 50,
      width: 50,
    ),
    Spacer(),
    Container(
      color: Colors.green,
      height: 50,
      width: 50,
    ),
  ],
)
RotatedBox(
  quarterTurns: 2,
  child: Text(
    'This is a Roated Text ',
    style: TextStyle(
      fontSize: 55,
      fontWeight: FontWeight.bold,
      letterSpacing: 0,
    ),
  ),
)BackdropFilter(
filter: ImageFilter.blur(
sigmaX: 10.0,
sigmaY: 10.0,
),
child: Container(
color:
Colors.black.withOpacity(0.2),
),
)
58.The CupertinoContextMenu Widget is a full-screen modal route that opens when the child is long-pressed.
CupertinoContextMenu(
  child: Container(color: Colors.red),
  actions: <Widget>[
    CupertinoContextMenuAction(
      child: const Text('Action one'),
      onPressed: () =>
      Navigator.pop(context),
    ),
  ],
)
57.The AnimatedCrossFade Widget cross-fades between two given children and animates itself between their sizes.
AnimatedCrossFade(
  crossFadeState: _isFirst
      ? CrossFadeState.showFirst
      : CrossFadeState.showSecond,
  duration: const Duration(seconds: 1),
  firstCurve: Curves.easeInCubic,
  secondCurve: Curves.easeInCirc,
  firstChild:
  const FlutterLogo(style:
  FlutterLogoStyle.horizontal, size: 100.0),
  secondChild:
  const FlutterLogo(style:
  FlutterLogoStyle.stacked, size: 100.0),
)
FadeTransition(
       opacity: _animation,
       child: const Padding(
       padding: EdgeInsets.all(8),
       child: FlutterLogo(),
   ),
)
SlideTransition(
  position: _offsetAnimation,
  child: const Padding(
    padding: EdgeInsets.all(8.0),
    child: FlutterLogo(size: 150.0),
  ),
)54.AnimatedOpacity Widget automatically transitions the child’s opacity over a duration whenever the opacity changes.
AnimatedOpacity(
  opacity: _opacity,
  duration: const Duration(seconds: 1),
  curve: Curves.bounceInOut,
  // The green box must be a child of the
  AnimatedOpacity widget.
  child: Container(
    width: 200.0,
    height: 200.0,
    color: Colors.green,
  ),
)
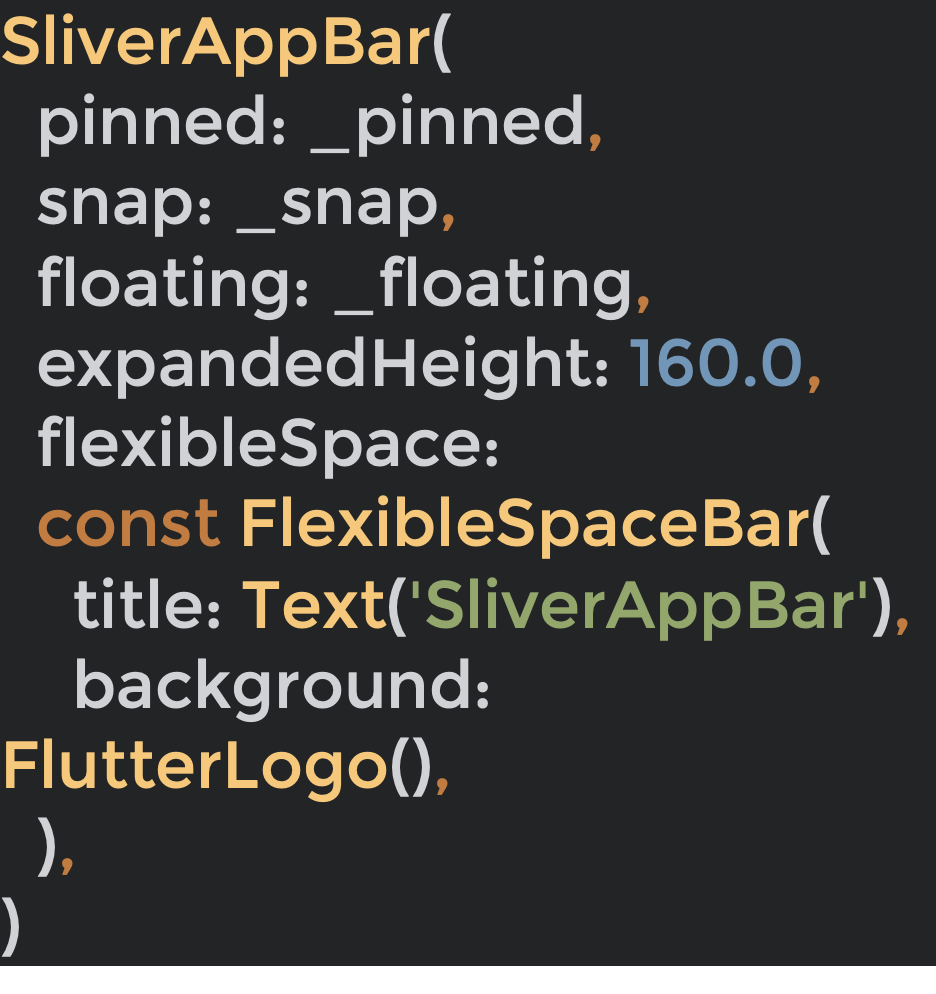
SliverAppBar(
pinned: _pinned,
snap: _snap,
floating: _floating,
expandedHeight: 160.0,
flexibleSpace:
const FlexibleSpaceBar(
title: Text('SliverAppBar'),
background: FlutterLogo(),
),
)
52.The AnimatedContainer widget is a container widget with animations. It can be animated by altering the values of its properties.
AnimatedContainer(
  width: _width,
  height: _height,
  decoration: BoxDecoration(
    color: _color,
    borderRadius: _borderRadius,
  ),
  duration: Duration(seconds: 1),
  curve: Curves.fastOutSlowIn,
)
It will try to place each child next to the previous child on the main axis. If there is not enough space, it will create a new run adjacent to its existing children in the cross axis.
Wrap(
  children: List.generate(10,
      (index) => Container(
      margin: const EdgeInsets.all(10),
      color: Colors.green,
      height: 100,
      width: 100,
    ),
  ),
);
LayoutBuilder(
  builder: (context, constraints) {
    if (constraints.maxWidth >= 750) {
      return Container(
        color: Colors.green,
        height: 100,
        width: 100,
      );
    } else {
      return Container(
        color: Colors.yellow,
        height: 100,
        width: 100,
      );
    }
  },
);Text('Important Text',
style: TextStyle(
color: Colors.black,
fontSize: 50,
fontWeight: FontWeight.bold,
shadows: [
Shadow(
color: Colors.red[500]!,
offset: const Offset(-50, -50),
blurRadius: 5),
Shadow(
color: Colors.green[200]!,
offset: const Offset(50, 50),
blurRadius: 5),
],
),
);
Column(
  children: [
    // The original image
    Image.network(_imageUrl),

    // The black-and-white image
    ColorFiltered(
      colorFilter:
      const ColorFilter.mode(Colors.grey,
      BlendMode.saturation),
      child: Image.network(_imageUrl),
    ),
  ],
);
47.AnimatedSize is a widget that automatically transitions its size over a given duration whenever the given child’s size changes.
double _size = 50.0;
bool _large = false;

void _updateSize() {
  setState(() {
    _size = _large ? 250.0 : 100.0;
    _large = !_large;
});
}
GestureDetector(
  onTap: () => _updateSize(),
  child: Container(
    color: Colors.amberAccent,
    child: AnimatedSize(
      vsync: this,
      curve: Curves.easeInCirc,
      duration:
      const Duration(seconds: 2),
      child: FlutterLogo(size: _size),
),
),
);Center(
child: ShaderMask(
blendMode: BlendMode.srcIn,
shaderCallback: (Rect bounds) {
return const LinearGradient(
colors: [Colors.red, Colors.green],
tileMode: TileMode.clamp,
).createShader(bounds); },
child:
const Text('This is a colorful Text',
style:TextStyle(fontSize: 36) ,
),
),
)
ElevatedButton(
  onPressed: () {},
  style:
  ElevatedButton.styleFrom(
      shape: CircleBorder(),
      padding: EdgeInsets.all(30) ,
    ),
    child: Icon(
    Icons.add,
    size: 50,
  ),
)
44.Use the barrierDismissible property to prevent dismissing the AlertDialog when the user taps on the screen outside the alert box.
showDialog<String>(
  context: context,
  barrierDismissible: false,
  builder: (BuildContext context) =>
      AlertDialog(
        title: const Text('This is a title'),
        content:
        const Text('This is a description'),
        actions: <Widget>[
          TextButton(
            onPressed: () =>
            Navigator.pop(context, 'Cancel'),
            child: const Text('Cancel'),
          ),
          TextButton(
            onPressed: () =>
            Navigator.pop(context, 'OK'),
            child: const Text('OK'),
          ),
    ],
  ),
 );
final snackBar = SnackBar(
  content:
  const Text('Amazing SnackBar!'),
  action: SnackBarAction(
    label: 'Undo',
    onPressed: () {
      // Do something.
    },
  ),
);Scaffold(
floatingActionButtonLocation:
FloatingActionButtonLocation.centerFloat,
floatingActionButton:
FloatingActionButton(
onPressed: () {},
child: Icon(Icons.settings_voice),
),
...
);
41.Use the ListView to create a horizontal list by setting the scrollDirection parameter to Axis.horizontal
ListView(
  scrollDirection: Axis.horizontal,
  children: [

    /// some object

  ],
);
Using ‘+’ operator
String str1 = "Dart";
String str2 = "Is";
String str3 = "Fun";

print(str1 + str2 + str3);
String interpolation.
String str1 = "Dart";
String str2 = "Is";
String str3 = "Fun";

print('$str1 $str2 $str3');
Directly writing string literals.
print('Dart' 'Is' 'Fun');Strings.join() method.
  // Creating List of strings

List<String> str = ["Dart", "Is", "Fun"];

  String _thestr = str.join();
  print(_thestr);

  _thestr = str.join(" ");
  print(_thestr);
39.Getters and setters are special methods that provide read and write access to an object’s properties.
class Rectangle {
  double left, top, width, height;
  Rectangle(this.left, this.top, this.width,this.height);

 double get right => left + width;
  set right(double value) => left = value - width;

  double get bottom => top + height;
  set bottom(double value) => top = value - height;
}

void main() {
  var rect = Rectangle(3, 4, 20, 15);
  print(rect.left);
  rect.right = 12;
  print(rect.left);
}
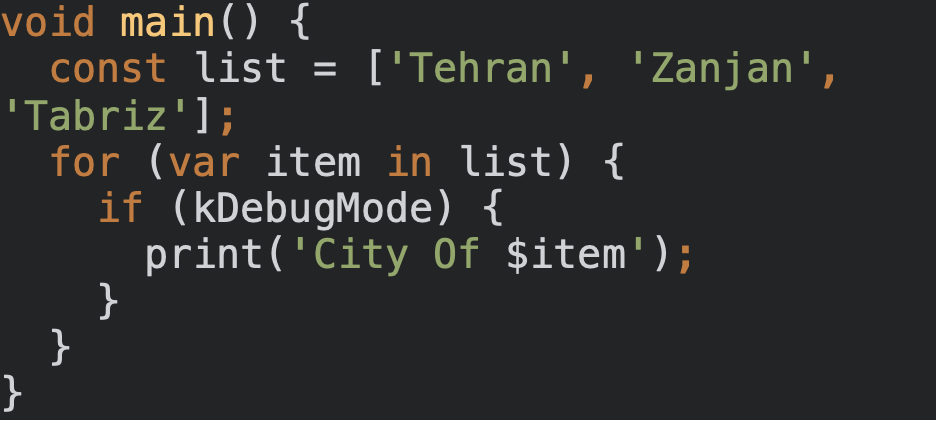
void main() {
const list = ['Tehran', 'Zanjan', 'Tabriz'];
for (var item in list) {
if (kDebugMode) {
print('City Of $item');
}
}
}
37.Use MediaQuery to get information about the current device size, its orientation, and user preferences.
var orientation =
MediaQuery.of(context).orientation;
var height =
MediaQuery.of(context).size.height;
var width =
MediaQuery.of(context).size.width;

return orientation == Orientation.portrait
    ? Container(
        color: Colors.green,
        height: height / 4,
        width: width / 4,
      )
    : Container(
        height: height / 3,
        width: width / 3,
        color: Colors.yellow,
);36.SafeArea is a padding widget that inserts its child with enough padding to keep it from being blocked by the system status bar, notches, holes, rounded corners, and others.
@override
Widget build(BuildContext context) {
  return  Scaffold(
    body: SafeArea(
      top: true,
      bottom: true,
      left: true,
      right: true,
      minimum: EdgeInsets.all(16.0),
      maintainBottomViewPadding: true,
      child: Text('Check this important text'),
    ),
  );
}
35.Use FittedBox to scale and fit the child widget inside. It restricts its child widgets from growing their size beyond a specific limit. It re-scales them according to the size available.
Center(
  child: Row(children: [
    Expanded(
      child: FittedBox(
        child: Text(
          "It is a long established fact that a "
           "reader will be distracted by the readable "
           "content of a page when looking at its layout.",
          maxLines: 1,
          style: TextStyle(fontSize: 23),
        ),
      ),
    ),
  ]),
)
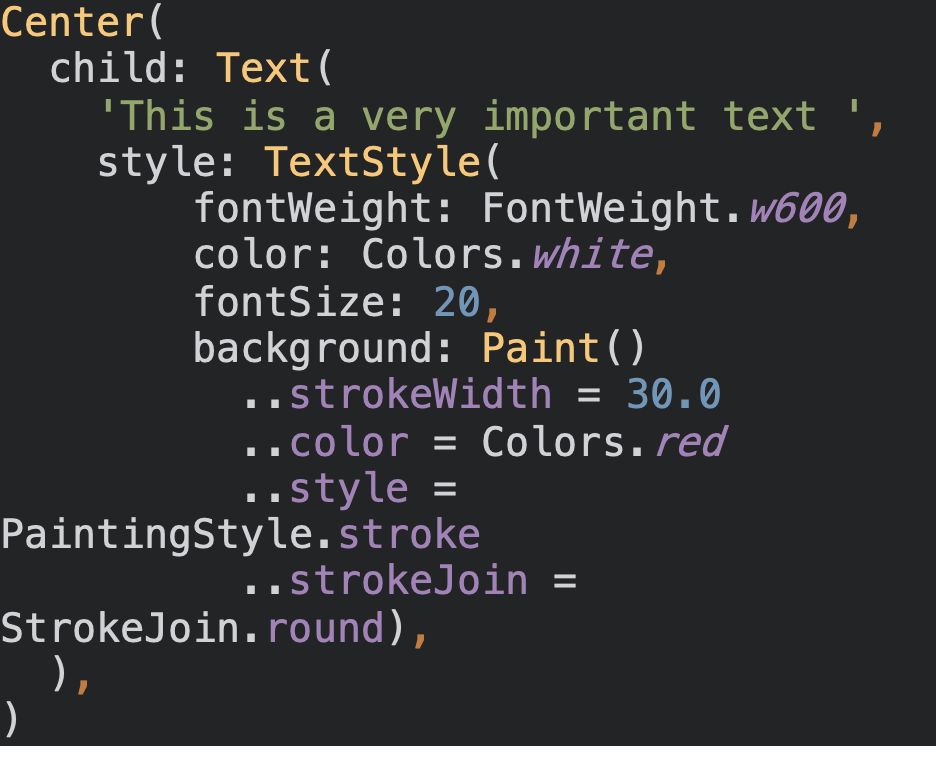
Center(
child: Text(
'This is a very important text ',
style: TextStyle(
fontWeight: FontWeight.w600,
color: Colors.white,
fontSize: 20,
background: Paint()
..strokeWidth = 30.0
..color = Colors.red
..style = PaintingStyle.stroke
..strokeJoin = StrokeJoin.round),
),
)
InkWell(
  splashColor: Colors.red,
  onTap: () {},
  child: Card(
    elevation: 5.0,
    child: Text(
      ' Click This ',
      style: Theme.of(context).textTheme.headline2,
    ),
  ),
);32.Dart allows you to create a callable class so you can call the instance of the class as a function
class WelcomeToTheCity {
  // Defining call method
  String call(String a, String b, String c) =>
  'Welcome to $a$b$c';
}

void main() {
  var welcomeToCity = WelcomeToTheCity();

  // Calling the class through its instance
  var welcomeMsg =
  welcomeToCity('SanDiego ', 'CA ', 'USA');

  print(welcomeMsg);
}31.Enums and extension methods can make code cleaner to read. In the example below, we are converting Enums to Strings.
enum Cities { Tehran, Zanjan, Tabriz }

extension ToString on Cities {
  String get name => toString().split('.').last;
}

void main() {
  print(Cities.Tehran.name);
  print(Cities.Zanjan.name);
  print(Cities.Tabriz.name);
}
30.To write any Dart program, be it a script or a Flutter app, you must define a function called main(). It is the entry point of every app.
void main() {
  var list = ['London', 'Dublin', 'Paris'];
  for (var item in list) {
    print('${list.indexOf(item)}: $item');
  }
}MaterialApp(
debugShowCheckedModeBanner: false,
// other arguments
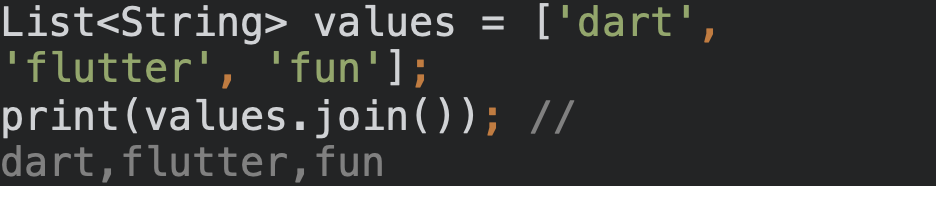
);List<String> values = ['dart', 'flutter', 'fun'];
print(values.join()); // dart,flutter,fun
27.Use themes to define a set of colors, fonts, shapes, and design styles throughout your app. It’s a way to centralize all your stylistic decisions in one place.
MaterialApp(
 ...
  theme: ThemeData(
    // The default brightness and colors.
    brightness: Brightness.light,
    primaryColor: Colors.lightGreen[500],
    accentColor: Colors.amber[600],
    // The default font family.
    fontFamily: 'Georgia',
    // TextTheme & text styling
    textTheme: TextTheme(
      headline1: TextStyle(
		fontSize: 64.0, fontWeight: FontWeight.bold),
      headline6: TextStyle(
		fontSize: 36.0, fontStyle: FontStyle.italic),
      bodyText2: TextStyle(
		fontSize: 14.0, fontFamily: 'Hind'),
    ),
  ),
);
26.get access to the index on an Item in a list, you need to convert the list to a map using the asMap.
myList.asMap().entries.map((entry) {
  int idx = entry.key; // index
  String val = entry.value;
  return something;
}
25.Use Stack to overlap widgets, The first widget will be the bottommost item, and the last widget will be the topmost item.
Stack(
  children: [
    Container(
      width: 100,
      height: 100,
      color: Colors.red,
    ),
    Container(
      width: 90,
      height: 90,
      color: Colors.green,
    ),
    Container(
      width: 80,
      height: 80,
      color: Colors.blue,
    ),
  ],
);
24.Use the Hero widget to animate a widget from one screen to the next. e.g., an icon on the first page flying to the second page.
// Page 1
Hero(
  tag: "FlyingHero",
  child: Icon(
    Icons.party_mode_outlined,
    size: 50.0,
  ),
);
// Page 2
Hero(
  tag: "FlyingHero",
  child: Icon(
    Icons.party_mode_outlined,
    size: 150.0,
  ),
);
Row(
  crossAxisAlignment: CrossAxisAlignment.center,
  children: [
    Expanded(
      child: Image.asset('images/pic1.jpg'),
    ),
    Expanded(
      child: Image.asset('images/pic2.jpg'),
    ),
    Expanded(
      child: Image.asset('images/pic3.jpg'),
    ),
  ],
);
import 'package:flutter/services.dart';

void main(){

  SystemChrome.setEnabledSystemUIMode(
  SystemUiMode.manual,
  overlays: [],
  );

}const Map<int, Color> color = {
50: Color.fromRGBO(255, 207, 68, .1),
100: Color.fromRGBO(255, 207, 68, .2),
200: Color.fromRGBO(255, 207, 68, .3),
300: Color.fromRGBO(255, 207, 68, .4),
400: Color.fromRGBO(255, 207, 68, .5),
500: Color.fromRGBO(255, 207, 68, .6),
600: Color.fromRGBO(255, 207, 68, .7),
700: Color.fromRGBO(255, 207, 68, .8),
800: Color.fromRGBO(255, 207, 68, .9),
900: Color.fromRGBO(255, 207, 68, 1),
};
const MaterialColor custom_color =
MaterialColor(0xFFFFCF44, color);import 'dart:io' show Platform;
...
if (Platform.isIOS) {
doSomethingforIOS();
}
if (Platform.isAndroid) {
doSomethingforAndroid();
}
import 'package:flutter/services.dart';

...

void main() async {
  await SystemChrome.setPreferredOrientations(
 [DeviceOrientation.portraitUp]);

  runApp(App());
}import 'dart:math';
...
int min = 0;
int max = someList.length - 1;
Random rnd = new Random();
int r = min + rnd.nextInt(max - min);
return someList[r];17. You can use GridView.count to create a grid that’s two tiles wide in portrait mode and three tiles wide in landscape mode
Flexible(
  child: GridView.count(
    crossAxisCount:
    (orientation == Orientation.portrait) ? 2 : 3,
    mainAxisSpacing: 4.0,
    crossAxisSpacing: 4.0,
    padding: const EdgeInsets.all(4.0),
    childAspectRatio:
    (orientation == Orientation.portrait) ? 1.0 : 1.3,
    children: someList.map((catData) =>
        aListItemWidget(catData)).toList(),
  ),
);class someAPI {
Future<int> getThings() => Future.value(3000);
Future<int> getItems() => Future.value(300);
Future<int> getStuff() => Future.value(30);
}final api = someAPI();
final values =
await Future.wait([
api.getThings(),
api.getItems(),
api.getStuff(),
]);for (var entry in items.entries) {
//print the keys and values
print('${entry.key}: ${entry.value}');
}14. Apply HitTestBehavior.opaque on GestureDetector to make the entire size of the gesture detector a hit region!
If your GestureDetector isn't picking up gestures in a transparent/translucent widget, make sure to set its behavior to HitTestBehavior.opaque so it'll capture those events.
GestureDetector(
  behavior: HitTestBehavior.opaque,
  onTap: () => print('Tap!'),
  child: Container(
    height: 250,
    width: 250,
    child: Center(child: Text('Gesture Test')),
  ),
)
You can provide Image according to your need, also you can use the box decoration properties to provide shape and border.
You can use kReleaseMode constant to check if the code is running in release mode or not. kReleaseMode is a top-level constant from foundation.dart.
More specifically, this is a constant that is true if the application was compiled in Dart with the -Ddart.vm.product=true flag.
import 'package:flutter/foundation.dart';

print('Is Release Mode: $kReleaseMode');
Want to set the background image to your Container? And you are using a Stack to do so? There is a better way to achieve this result. You can use decoration to set the image in the container.
Container(
  width: double.maxFinite,
  height: double.maxFinite,
  decoration: BoxDecoration(
    image: DecorationImage(
      image: NetworkImage('https://bit.ly/2oqNqj9'),
    ),
  ),
  child: Center(
    child: Text(
      'Flutter.dev',
      style: TextStyle(color: Colors.red),
    ),
  ),
);Use double quotes for nested strings or (optionally) for strings that contain single quotes. For all other strings, use single quotes.!
final String name = 'Flutter And Dart Tips';

print('Hello ${name.split(" ")[0]}');
print('Hello ${name.split(" ")[2]}');
Do you know that you can throw your message when your assert fails? assert() takes an optional message in which you can pass your message.
assert(title != null, "Title string cannot be null.");Use an Ink widget! The Ink widget draws on the same widget that InkWell does, so the splash appears.
class InkWellCard extends StatelessWidget {
  @override
  Widget build(BuildContext context) {
    return Card(
      elevation: 3.0,
      child: Ink(
        child: InkWell(
          onTap: () => print("Ordering.."),
          child: Text("Order Bagels"),
        ),
      ),
    );
  }
}You can use the print() function to view it in the system console. If your output is too much, then Android sometimes discards some log lines. To avoid this, you can use debugPrint().
You can also log your print calls to disk if you're doing long-term or background work.
Cascades Notation (..) allows chaining a sequence of operations on the same object. Besides, fields (data-members) can be accessed using the same.
class Person {
  String name;
  int age;
  Person(this.name, this.age);
  void data() => print("$name is $age years old.");
}
// Without Cascade Notation
Person person = Person("Richard", 50);
person.age = 22;
person.name += " Parker";
person.data();
// Cascade Notation with Object of Person
Person("Jian", 21)
..age = 22
..name += " Yang"
..data();
// Cascade Notation with List
<String>["Natasha", "Steve", "Peter", "Tony"]
..sort()
..forEach((name) => print("\n$name"));Just wrap the widget with the Theme Widget and pass the ThemeData().
Theme(
  data: ThemeData(...),
  child: TextFormField(
      decoration: const InputDecoration(
        icon: Icon(Icons.person),
        hintText: 'What do people call you?',
        labelText: 'Name *',
      ),
      validator: (value) {
        return value!.contains('@')?
        'Do not use the @ char': null;
      }
  ),
)
Instead of this.
void main() {
  bool isAndroid = true;
  getDeviceType() {
    if (isAndroid) {
      return "Android";
    } else {
      return "Other";
    }
  }
  print("Device Type: " + getDeviceType());
}
Use below.
void main() {
  bool isAndroid = true;
  getDeviceType() => isAndroid ? "Android" : "Other";
  print("Device Type: " + getDeviceType());
}Text(
"Your Text",
style: Theme.of(context).textTheme.title,
)Adding = null is redundant and unneeded.
// Good
  var title;

// Bad
  var title = null;
Want to add the separator in your Flutter ListView? Go for the ListView.separated();
ListView.separated(
  itemCount: Items.length,
  itemBuilder: (ctx, i) => ExampleNameItem(),
  // Separator can be any widget.
  separatorBuilder:(ctx, i) =>const Divider(),
);While checking the null in the Dart, Use null-aware operators help you reduce the amount of code required to work with references that are potentially null.!
// instead of
if (title == null) {
  title = "Title";
}
// User below
title ??= "Title";