Home
Notice: If you're trying to troubleshoot a problem, see the common issues page.
So you've decided to try out NVM for Windows, or at least learn more about it. Awesome. You can hack on it or build from source if you want to.
The easiest way to get started is to use the installer. This is found in the releases. The file is called nvm-setup.zip, which contains nvm-setup.exe.
If you need to install manually, there is a separate download called nvm-noinstall.zip. You should also uninstall any existing versions of node.js.
-
Download nvm-noinstall.zip. Extract this to the directory where NVM should be "installed". The default directory used by the installer is
C:\Users\<username>\AppData\Roaming\nvm, but you can use whatever you like.
The zip archive contains three files, including nvm.exe, elevate.vbs, and elevate.cmd. All three of these are required for NVM to function properly. The "elevate" scripts help elevate administrative permissions for actions that require it. This is a critical component for switching between versions of node.js.
NVM for Windows "switches" versions of node.js by updating a symlink, using the
mklinkcommand. The symlink is recreated to point to whichever version of node.js should run. This process requires elevated administrative permissions.
- Update the system environment variables.
There are two system environment variables that need to be created, and one that needs to be modified.
First, add a new environment variable called NVM_HOME. This should be set to the directory from step 1. If you used the default, this would be C:\Users\<username>\AppData\Roaming\nvm.
Second, add a new environment variable called NVM_SYMLINK. This should be set to the path that will be used to identify which version of node.js is running. THIS DIRECTORY SHOULD NOT EXIST. It will automatically be created and maintained by NVM.
Finally, update the system path by appending %NVM_HOME%;%NVM_SYMLINK% to the end. The result should look something like:
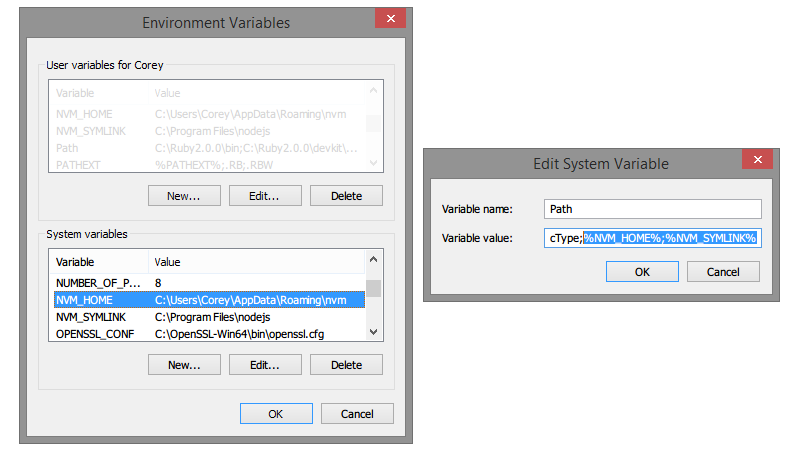
User Variables: While not explicitly required, these same changes can be applied to the user environment variables as well. This can simplify use of nvm in the console without restarting Windows.
- Create
settings.txtin the installation directory.
NVM for Windows stores configuration details in a simple text file. The example settings.txt contains an example that will work with the latest version.
The key attributes of this file are:
- root: This is the installation directory where the files were extracted (
NVM_HOME). - path: This is the symlink directory defined in
NVM_SYMLINK. - proxy: Set this to "none". If you need to use a proxy, it can be modified using nvm from the command line.
- arch: This should be
32or64based on whether Windows is running as a 32-bit or 64-bit application.
- Test it, possibly restart.
If you chose not to set the user environment variables in step 2, you may need to restart Windows in order for it to recognize NVM in the path. If you did set the user environment variables, you don't need to do anything else.
Type nvm in the console window. It should show the help menu. This is confirmation that NVM for Windows is successfully installed. Congrats, you did it by hand!
Have a look at the installation path - C:\Users\[username]\AppData\Roaming\nvm is the default path. In this folder you'll find unins000.exe. Double-click it and agree to removing NVM and all Node-versions in the following steps.