HOWTO
This page provides a quick introduction to open80211s and gives step by step guide on how to set up a mesh network using open80211s and a supported driver.
The 802.11 standard provided WDS frame format to enable multihop wireless networking but it did not the define the procedures necessary for a standardized WDS implementation. Because of this, many proprietary 802.11 multi-hop solutions appeared, segmenting the market and making users captive to the proprietary solution they've selected.
In order to address this issue, the 802.11s standard was created, which solves BSS (Basic Service Set) interoperability issues and thereby fills the WDS gap; it also creates a new type of BSS, the so-called mesh BSS (MBSS).
The amendment covers majors sections such as interworking, MAC, security, and path selection to make the MBSS a self-contained network that enables applications beyond what a traditional single-hop WLAN supports.
In September 2011 IEEE 802.11s standard was ratified and an amendment was integrated within the 802.11 standard. If required, IEEE 802.11-2012 copies can be downloaded from the IEEE website.
open80211s, is an open-source implementation of the ratified IEEE 802.11s wireless mesh standard. The goal for the open80211s project is to run on any commodity hardware supported by the Linux kernel. More specifically, open80211s was born to fulfill the following goals:
- To create the first open implementation of 802.11s
- To let the world use, understand, and contribute to 802.11s and open80211s
- To consolidate the numerous non-interoperable mesh protocols into one that is based on a standard specification
Cozybit has used open80211s on multiple devices, ranging from personal laptops, embedded linux hardware to Android based devices.
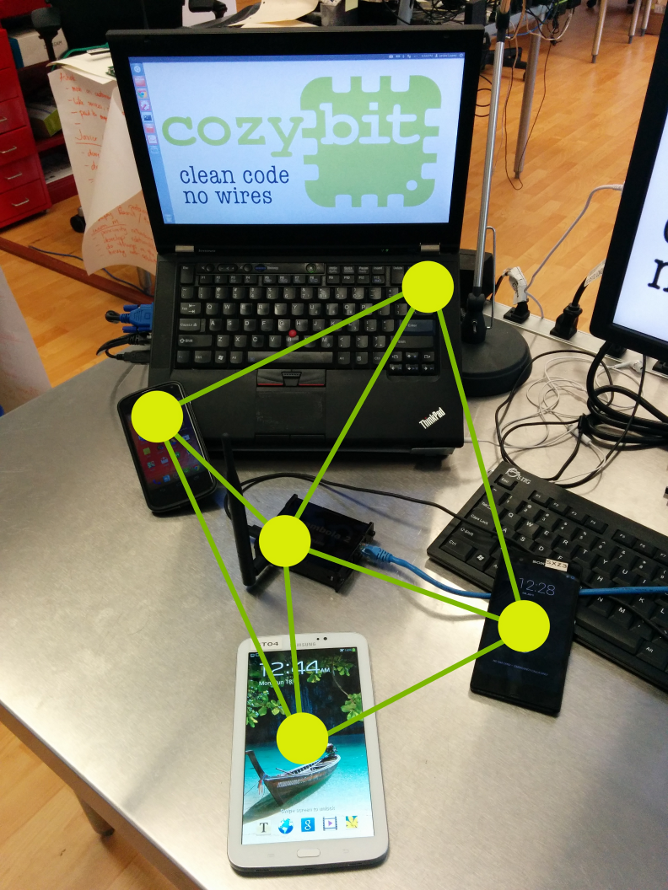
This pictures shows open80211s interoperability benefits, the mesh-network is formed by multiple non-homogeneous nodes, where each node is build by a different manufacturer, but both of them have access to the same network. The tested hardware includes, a Lenovo Thinkpad T420 (rtl8192ce), a Samsung Galaxy Tab 3 7 (mvl8787), a Sony Xperia Z (wcn36xx), a LG Nexus 4 (wcn36xx) and Carambola-2 dev board (ath9k).
This HOWTO assumes that your target device is not running any WiFi manager such as NetworkManager for Debian based Linux distributions. Please kill or otherwise stop NetworkManager or similar software before setting up your mesh interfaces, or prevent network-manager from attempting to configure the device that you plan to use for mesh.
If you are actively using NetworkManager, you can try ignoring the interfaces that you're planning on using, by placing a .conf-file like this in /etc/NetworkManager/conf.d/:
[main]
plugins=keyfile

[keyfile]
unmanaged-devices=interface-name:mesh-if1;interface-name:mesh-if2
open80211s relies on Linux's [mac80211] (http://wireless.kernel.org/en/developers/Documentation/Glossary#mac80211) module, this module allows kernel to perform all necessary 802.11 frame management in software instead of in hardware. This arrangement is typicall called a SoftMAC approach, giving devices finer control of the hardware, allowing developers to upgrade the wireless stack without modifying the wireless card's firmware. Most 802.11 devices today tend to use a FullMAC arrangement, where most of the responsibility is relegated to the hardware.
We can generalize that hardware that supports SoftMAC mode is usually open80211s capable.
Besides the hardware requirements, there are also driver requirements that are inherent to the hardware being used.
Any mac80211 based driver should be open80211s capable, however non mesh-enabled mac80211 drivers may require minimal code changes in order to support open80211s.
The Linux wireless wiki contains a database contains information about all 802.11 Linux drivers and the advertised capabilities of each driver (Existing WiFi drivers Linux).
In order to set up a mesh you'll need a kernel and a few packages. Internally we use a master project distro11s to test and develop open80211s. Using distro11s you can build a full mesh node using all the different repositories listed below and then runs all open80211s software in a virtualized QEMU instance. This is a very handy tool for open80211s and kernel developers. We invite you to try it!
Alternately, to build open80211s for a specific target you can fetch the different components individually and then compile each software module for your target platform:
An open mesh is one where all peers with compatible configuration are allowed to join the mesh. Essentially, this means that just the Mesh ID and the channel must match.
This is the simplest approach, it doesn't provide authentication or frame encryption, traffic is visible to any peer, similar to OPEN network for 802.11 AP/STA mode.
open80211s is part of the Linux kernel, any kernel published after September 2011 contains the open implementation of IEEE 802.11s standard.
Wireless-testing is the development repository that contains the latest Wireless communications source code of the Linux kernel. This repository usually contains the latest accepted upstream patches for wireless, therefore it also includes the latest open80211s patches.
To get the wireless-testing kernel:
git://git.kernel.org/pub/scm/linux/kernel/git/linville/wireless-testing.git
If you are trying this release within a few days of release date all our patches may not be in wireless-testing yet. In that case, just clone the kernel from here:
git@github.com:cozybit/open80211s.git
Configure the kernel to include the mac80211 stack with mesh capabilities using the config options CONFIG_MAC80211, CONFIG_MAC80211_MESH and enable the driver(s) that you need, for example the Atheros-9k driver CONFIG_ATH9K. Compile the kernel image and modules and install on your target.
You also have the option of using backports, instead of building the kernel or you may also use any kernel after 2.6.26. Using wireless-testing is strongly recommended as it represents the latest development and driver support.
iw is a nl80211 command line interface utility to manage and configure wireless devices. It replaces the older iwconfig tools as these tools use a deprecated interface.
Follow the instructions at iw's documentation page to build the latest version of iw from source or use a recently released version of iw, for your target device.
If security is not required, please skip the next section.
In a secured mesh, all peers must share a secret password. Authentication is established via the Simultaneous Authentication of Equals protocol. Key derivation and cipher suite negotiation is done via the Authenticated Mesh Peering Exchange. Both protocols are specified in the 802.11s standard.
In addition to the software requirements above you will need the following extra software:
Key derivation and cipher negotation is handle by userspace authsae application.
You can get our fork of authsae from here:
git://github.com/cozybit/authsae.git
authsae depends on openssl. You'll have to edit linux/Makefile to tell it where to find it.
Then build:
cc -g -DLINUX -Wall -Werror -I..   -c -o meshd.o meshd.c
cc -g -DLINUX -Wall -Werror -I..   -c -o ../common.o ../common.c
cc -g -DLINUX -Wall -Werror -I..   -c -o ../sae.o ../sae.c
cc -g -DLINUX -Wall -Werror -I..   -c -o ../service.o ../service.c
cc -g -DLINUX -Wall -Werror -I..   -c -o ../ampe.o ../ampe.c
cc -o meshd meshd.o ../common.o ../sae.o ../service.o ../ampe.o ../crypto/aes_siv.o -L. -lcrypto -lconfig
cc -g -DLINUX -Wall -Werror -I..   -c -o meshd-nl80211.o meshd-nl80211.c
cc -g -DLINUX -Wall -Werror -I..   -c -o nlutils.o nlutils.c
ar rcs libsae.a ../common.o ../sae.o ../service.o ../ampe.o ../crypto/aes_siv.o
cc -o meshd-nl80211 meshd-nl80211.o nlutils.o libsae.a -L. -lsae -lnl -lnl-genl -lcrypto  -lconfig
cc -g -DLINUX -Wall -Werror -I..   -c -o mon.o mon.c
cc mon.o ../service.o ../common.o -o mon
Currently we are working on adding mesh support (including open, authenticated and encrypted mesh networks) within the widely adopted wireless controller wpa_supplicant tool.
We are currently preparing patches for open-source submission, until the patches are accepted and integrated you can fork the latest development code from our repository.
git://github.com/cozybit/wpa_supplicant.git
Once forked be sure to checkout the latest_mesh_enabled development branch.
wpa_supplicant requires a valid build configuration file .config on your wpa_supplicant directory. You can write your own or reuse the sample one, to enable mesh support on compilation, double check that your config has CONFIG_MESH=y option set.
To copy the sample build configuration file, just:
$cp /tests/hwsim/example-wpa_supplicant.config /wpa_supplicant/.config
To build wpa_supplicant
$cd /wpa_supplicant
$make
In this example we will configure a mesh node to use an OPEN mesh network, this node will automatically peer with any other peer that is using same configuration (mesh ID and channel).
Each mesh node needs to be configured as follows:
-
Boot several nodes with the compiled kernel and with
iwproperly installed. -
Choose a mesh ID. The mesh ID is a string that will be used in the mesh node beacons. Only mesh points with the same mesh id will be able to communicate with each other. The mesh id is a maximum of 32 bytes long. In this document, we refer to the mesh id as
$MESH_ID. -
Add a new mesh interface for the wlanN device on each node. You can choose the name of the mesh interface. "mesh" is a popular choice. In this document, we refer to the mesh interface as
$MESH_IFACE.
# iw dev wlan0 interface add $MESH_IFACE type mp
A new interface will be created:
# ifconfig -a | grep $MESH_IFACE
mesh      Link encap:Ethernet  HWaddr 00:18:39:14:48:B5
Note: All mesh interfaces start by default in channel 1. The channel can be changed with
# iw dev $MESH_IFACE set channel
If you like, you can alter the interface's mac address by
# ifconfig $MESH_IFACE hw ether $MAC_ADDRESS
or
#ip link set dev $MESH_IFACE address $MAC_ADDRESS
Bring up your $MESH_IFACE interface and assign an IP
# ifconfig $MESH_IFACE
For this tutorial, let's assume that our mesh nodes are assigned addresses in the 192.168.3.80/28 subnet.
# ifconfig $MESH_IFACE 192.168.3.80
Join a mesh network:
# iw dev $MESH_IFACE mesh join $MESH_ID
- In the default configuration, mesh points will automatically attempt to create peer links will all other mesh nodes with the same mesh ID. You can examine which peer links have been established with the iw dev $MESH_IFACE station dump command:
# iw dev $MESH_IFACE station dump
Station 00:15:6d:84:14:10 (on mesh)
	inactive time:	1320 ms
	rx bytes:	352
	rx packets:	4
	tx bytes:	174
	tx packets:	2
	signal:  	-61 dBm
	tx bitrate:	1.0 MBit/s
	mesh llid:	32577
	mesh plid:	15969
	mesh plink:	ESTAB
Station 00:15:6d:84:14:09 (on mesh)
	inactive time:	3370 ms
	rx bytes:	1064
	rx packets:	12
	tx bytes:	545
	tx packets:	7
	signal:  	-53 dBm
	tx bitrate:	1.0 MBit/s
	mesh llid:	41036
	mesh plid:	24435
	mesh plink:	ESTAB
Each Station in the station dump output represents a mesh node with whom we have a peer link. The first line shows the MAC address of the mesh node. The mesh plink field reports the state of the peer link with this mesh node. When this value is ESTAB, direct communication with this mesh node is possible.
- You should now be able to ping any node in the mesh. After doing that you can use arp and iw to inspect the arp table and path table. This will reveal where the packet was actually sent in order to get to its destination.
192-168-3-80:~# ping -c 2 192.168.3.83
PING 192.168.3.83 (192.168.3.83) 56(84) bytes of data.
64 bytes from 192.168.3.83: icmp_seq=1 ttl=64 time=8.85 ms
64 bytes from 192.168.3.83: icmp_seq=2 ttl=64 time=3.42 ms

192-168-3-80:~# arp
? (192.168.3.83) at 00:15:6d:84:14:0e [ether]  on mesh

192-168-3-80:~# iw dev $MESH_IFACE mpath dump
00:15:6d:84:14:10 00:15:6d:84:14:10 mesh	0	228 	0	2196731904	0	0	0x10
00:15:6d:84:14:0e 00:15:6d:84:14:10 mesh	2	456 	0	2196731904	360	0	0x4
00:15:6d:84:14:09 00:15:6d:84:14:09 mesh	1	8193	0	2196731904	0	0	0x10
The arp table shows the hardware address of the destination node. This is useful for interpreting the output of the mpath dump command. The mpath dump shows the table that the mesh stack uses to route packets. This table is constructed as the mesh stack successfully establishes paths to destinations in the mesh. Each output line shows the destination address in the first column and the next hop address in the second column. Look up the destination address of our ping packet (00:15:6d:84:14:0e) in this table. You can see that the next hop is 00:15:6d:84:14:10, revealing that the packet will not be sent directly to the destination. Instead, it will be sent to 00:15:6d:84:14:10 who will presumably forward it on appropriately. In contrast, if the destination of the packet were 00:15:6d:84:14:09, the packet would be sent directly to that node. This is because the path table reports the same address for the destination and next hop.
Each entry in the mpath dump has several trailing fields after the destination and next hop addresses. For more information on the meaning of these fields, see the mpath page.
Et voilà!
Similar results can be obtained using the mesh enabled wpa_supplicant. This guide assumes that wpa_supplicant daemon is not running on the system and a wireless interface $MESH_IFACE is already available.
Check if $MESH_IFACE interface is available.
# ifconfig -a | grep $MESH_IFACE
$MESH_IFACE      Link encap:Ethernet  HWaddr 00:18:39:14:48:B5
Again, let's assume that our mesh nodes are assigned addresses in the 192.168.3.80/28 subnet.
# ifconfig $MESH_IFACE 192.168.3.80
Create a wpa_supplicant.conf file se we can set the mesh configuration information.
ctrl_interface=/var/run/wpa_supplicant
ctrl_interface_group=adm

# mpm on userspace
user_mpm=1

# open mesh network
network={
        ssid="$MESH_ID"     /* Replace $MESH_ID for your mesh ID, use same for all peers */
        mode=5              /* Mode 5, is MESH (open80211s) for wpa_supplicant */
        frequency=2432      /* Use the same frequency for all peers */
        key_mgmt=NONE       /* Open mesh doesn't use key mgmt */
}
Then we just need to launch wpa_supplicant on background mode from the command line
# wpa_supplicant -d -Dnl80211 -i$MESH_IFACE -c $WPA_S_CONF_FILE -B
wpa_supplicant applicant will use the given configuration to join the mesh network automatically, once joined to the network peer_links will be created with on-range remote peers.
# iw dev $MESH_IFACE station dump
Station 00:15:6d:84:14:10 (on mesh)
	inactive time:	1320 ms
	rx bytes:	352
	rx packets:	4
	tx bytes:	174
	tx packets:	2
	signal:  	-61 dBm
	tx bitrate:	1.0 MBit/s
	mesh llid:	32577
	mesh plid:	15969
	mesh plink:	ESTAB
Once mesh plink value is set to ESTAB, direct communication with this mesh node is possible. At this point you should be able to ping any node in the mesh network.
Everything you need to create an authenticated mesh is listed in the Requirements section above. authsae will handle all authentication and peering for us.
Edit authsae.conf to enter your mesh password:
/* this is a comment */
authsae:
{
 sae:
  {
    debug = 480;
    password = "thisisreallysecret";
    group = [19, 26, 21, 25, 20];
    blacklist = 5;
    thresh = 5;
    lifetime = 3600;
  };
 meshd:
  {
       meshid = "byteme";
       interface = "mesh0";
       passive = 0;
       debug = 1;
       mediaopt = 1;
       band = "11g";
       channel = 1;
       htmode="HT20";
  };
};
Then on each node:
AUTHSAE_DIR=/path/to/authsae
AUTHSAE_CONF=/path/to/authsae.conf
$AUTHSAE_DIR/linux/meshd-nl80211 -c $AUTHSAE_CONF -s $MESHID -i $MESH_IFACE
After authentication and peering completes you should see authenticated mesh peers:
$ iw $MESH_IFACE station dump
Station 00:02:03:04:00:00 (on mesh0)
	inactive time:	608 ms
	rx bytes:	26967
	rx packets:	535
	tx bytes:	1182
	tx packets:	10
	tx retries:	0
	tx failed:	0
	signal:  	-30 dBm
	signal avg:	-30 dBm
	tx bitrate:	1.0 MBit/s
	mesh llid:	0
	mesh plid:	0
	mesh plink:	ESTAB
The steps to configure a secure mesh network with wpa_supplicant are exactly the same as for an open network, the only difference is found on wpa_supplicant configuration file.
ctrl_interface=/var/run/wpa_supplicant
ctrl_interface_group=adm

# mpm on userspace
user_mpm=1

# secure mesh network
network={
        ssid="$MESH_ID"          /* Replace $MESH_ID for your mesh ID, use same for all peers */
        mode=5                   /* Mode 5, is MESH (open80211s) for wpa_supplicant */
        frequency=2432           /* Use the same frequency for all peers */
        key_mgmt=SAE             /* Secure mesh use SAE as key mgmt */
        psk="thisisreallysecret" /* ASCII based pass phrase */
}
If you have an 11n capable card, simply set the channel type to HT20 or HT40+/HT40-, as allowed by /sys/kernel/debug/ieee80211/phy0/ht40allow_map, to enable high throughput:
iw mesh0 set channel 149 HT40+
-
You can modify the mesh path table with these commands:
- iw dev $MESH_IFACE mpath del $DST_ADDR: to delete a mesh path entry.
- iw dev $MESH_IFACE mpath new $DST_ADDR next_hop $NEXTHOP_ADDR to force a specific network topology.
-
You can modify the mesh peer links table with these commands:
- iw dev $MESH_IFACE station dump: list all the plinks.
- iw dev $MESH_IFACE station set $HW_ADDR plink_action [open|block]: trigers a specific peer link stablishment process or blocks a specific peer link.
- iw dev $MESH_IFACE station del $HW_ADDR: deletes a peer link from the peer table.
-
You can get and set mesh parameters using the "mesh_param" command in iw. For example, to change the mesh TTL value (which defaults to 5), one would:
# iw dev $MESH_IFACE get mesh_param mesh_ttl 5
# iw dev $MESH_IFACE set mesh_param mesh_ttl 3
See this page for the full list of implemented mesh configuration parameters.
Our wireshark mesh patches have been accepted upstream (since r38281), so you just need to get a recent wireshark version to dissect mesh, here you can download the Wireshark binaries or here if you prefer instructions to build from source code.
Wireshark can parse all mesh frames in an open mesh and the unencrypted management frames in a secured mesh.
A mesh gate is just a mesh node that connects to an external network. To bring up a mesh gate we need to setup up a bridge between a mesh interface and, for example, an Ethernet interface.
- Bring up a mesh interface as described in the "Testing" section above.
mpp$ iw dev wlan0 interface add $MESH_IFACE type mp mesh_id ${MESH_ID}
mpp$ ifconfig $MESH_IFACE up
- Add this new interface and your ethN interface to a new bridge:
mpp$ brctl addbr br0
mpp$ brctl stp br0 off
mpp$ brctl addif br0 eth1
mpp$ brctl addif br0 $MESH_IFACE
mpp$ ifconfig $MESH_IFACE down
mpp$ ifconfig eth1 down
mpp$ ifconfig $MESH_IFACE 0.0.0.0 up
mpp$ ifconfig eth1 0.0.0.0 up
mpp$ ifconfig br0 ${MESH_IP}
If you are having problem setting up the bridge, here is a great howto.
- Enable gate announcements
You can configure gates to advertise their presence on the mesh. We do this by including those advertisements in root announcements. To enable this functionality you must make your gate a root node using Proactive RANN and enable gate announcements:
iw mesh set mesh_param mesh_hwmp_rootmode=4
iw mesh set mesh_param mesh_gate_announcements=1
Alternatively, you can also enable the Proactive PREQ with no PREP using the following command:
iw mesh set mesh_param mesh_hwmp_rootmode=2
iw mesh set mesh_param mesh_gate_announcements=1
Or else you can also enable the Proactive PREQ with PREP using the following command:
iw mesh set mesh_param mesh_hwmp_rootmode=3
iw mesh set mesh_param mesh_gate_announcements=1
Once you do this, all the nodes in your mesh will proactively create paths to your gate. Mesh nodes will send to gate(s) all traffic to those destinations that could not be resolved in the mesh.
Gates introduce some management and data traffic overhead. You should keep the number of gates down on your network.