User Manual
We have put Junknet on npm.
To install it, you can run npm install junknet.
Alternatively, you can build it from source. First, clone our git repository from https://github.com/cs130-w21/1.git.
You can do this by running git clone https://github.com/cs130-w21/1.git from your shell.
Then, navigate to the project directory (cd 1), and run npm install junknet.
This will install junknet and its dependencies to a local directory; you should be able to run junknet from that directory. If you'd like to install junknet globally, run npm install -g junknet instead.
You will also need to install a recent (>4.3) version of GNU Make.
The above two steps are sufficient if you want to use Junknet as a Client.
If you want to set up a Junknet Daemon (ie. set up your machine so it can recieve and run jobs), you'll need to install docker.
All jobs are run in docker containers, so you'll need to install:
- Docker Engine, latest stable version.
The easiest way to install the Docker daemon on Windows is is via Docker Desktop.
Make sure that dockerd is running before you start the Junknet Daemon.
npx junknet-make [DOCKER_IMAGE] [LIST_OF_TARGETS]...
This is the core functionality of Junknet.
Distributes the work of creating the list of targets based on the Makefile to available daemons on the local network in parallel.
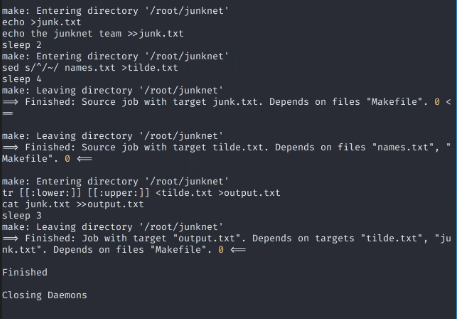
For example, say you have a Makefile that looks like this:
finalProgram: a.o b.o
	cc a.o b.o -o finalProgram

a.o: a.c
	cc a.c -o a.o

b.o: b.c
	cc b.c -o b.o
If you had 2 C source files called a.c and b.c, you'd normally run make finalProgram to build finalProgram from its source files.
With Junknet, you can run junknet-make myDockerImage finalProgram; Junknet will build finalProgram in a distributed fashion using nearby Junknet Daemons on the LAN.
Note that not all Docker images include a copy of make. Junknet needs a docker image with make to function, so we'd recommend using the buildpack-deps:bullseye (found here) image for Junknet builds. This limitation will be removed in a future release.
After a job has been started, as sub-tasks are completed, the controller will output a status update on the completed sub-task.
To cancel a job, send a SIGINT to the process. In the UNIX shell, this can be accomplished by pressing Control+C.
The Client will stop all communications with Daemons, and will gracefully exit.

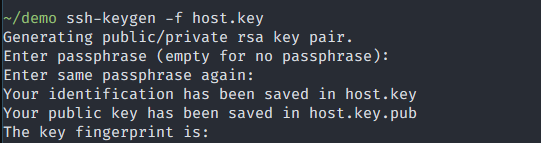
To start the daemon, enter: npx junknetd -h [HOST-KEY] -p [PORTNUM]
-h, --hostKeys: Specify private SSH key file(s) to identify this server. You can generate a ssh key with the ssh-keygen program. If this option is not given host.key is automatically used as the host key.
-p, --port: Specifies the local port number the daemon will listen on. When given 0, the daemon will listen on any open port.

To cancel an ongoing job, send a SIGINT to the process, just as with the Client.
- We support Makefiles as defined by POSIX. We do not support GNU extensions to the Makefile format, such as grouped targets (
&:) and phony targets (.PHONY). -
junknet-makewill use the file calledMakefilein your current working directory. It will be possible to specify alternate Makefile locations in a future release.
When all files are up to date, Junknet throws an error instead of printing a helpful message specific message (eg. "make: all targets up to date. Nothing to do"). This does not lead to any problems with program behavior; it's just a reporting thing.
Check out our developer resources at https://junknet.netlify.app/.