This is a very simple PHP application to showcase Openshift and persistent storage. I use it to show the speed and simplicity of a source to image process and how modern application can scale.
All details on the K8s plugin: https://netapp.io/persistent-storage-provisioner-for-kubernetes/
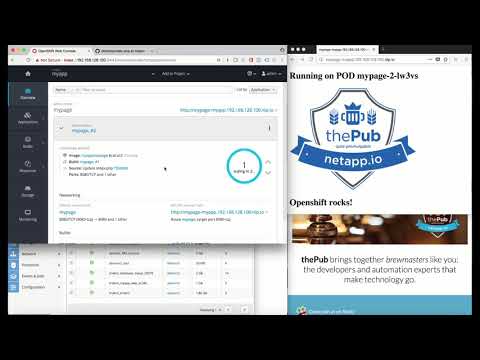
Here is the recorded demo of it:
The suggested installation is running on a notebook. A linux VM and a NetApp ONTAP simulator is required.
Linux VM can be downloaded here: http://www.osboxes.org/centos/ Use 3GB of RAM Login with root
> yum update -y
> yum install wget -y
> yum install nfs-utils -y
> curl -fsSL https://get.docker.com/ | sh
Add insecure flag for local docker registry:
> vi /etc/docker/daemon.json ->
    {
      "insecure-registries" : ["172.30.0.0/16"]
    }
> systemctl stop firewalld
> systemctl disable firewalld
> systemctl enable docker
> systemctl start docker
Test if Docker is working
> docker version
Openshift Client Tool 3.6.1
along with Trident 17.10
and/or
Openshift Client Tool 3.7.1
along with Trident 18.01
and/or
Openshift Client Tool 3.10.0
along with Trident 18.10
> wget https://github.com/openshift/origin/releases/download/v3.10.0/openshift-origin-client-tools-v3.10.0-dd10d17-linux-64bit.tar.gz
> tar xvfz openshift-origin-client-tools-v3.10.0-dd10d17-linux-64bit.tar.gz
> mv openshift-origin-client-tools-v3.10.0-dd10d17-linux-64bit/oc /usr/local/bin
If you are going to use this installation more than once, a static IP setup is recommended. The DHCP range of VMware Fusion/Workstation usually starts at 128-254. So you can use any IP below .128 in your IP range. VMware is using .2 IP in your range as the default gateway and DNS server forwarder! For a static and persistent setup (Openshift started with "oc cluster up" is per default non-persistent) use the commands below.
> ip addr
> mkdir /opt/openshift/data
> mkdir /opt/openshift/config
❗ The syntax of the Openshift-Clienttool changed! With old versions <3.10 use the following syntax. Newer versions see below.
> oc cluster up --public-hostname='your-static-IP' --host-data-dir=/opt/openshift/data --host-config-dir=/opt/openshift/config
❗ The syntax of the Openshift-Clienttool changed! Use the following syntax for version 3.10+.
> oc cluster up --public-hostname='your-static-IP' --base-dir=/opt/openshift
> oc login -u system:admin
> oc adm policy add-cluster-role-to-user cluster-admin admin
In order to restart (after a reboot) the configured Openshift cluster (see above) use the commands below:
> ip addr
> oc cluster up --public-hostname='your-static-IP' --host-data-dir=/opt/openshift/data --host-config-dir=/opt/openshift/config --use-existing-config
❗ For newer versions (3.10+) use this instead:
> oc cluster up --public-hostname='your-static-IP' --base-dir=/opt/openshift
If you start the Openshift cluster as following, you need to go through the setup (including Trident install) after every reboot of the Linux VM!
> ip addr
> oc cluster up --public-hostname='192.168.123.180' (IP Address from the ip addr command )
> oc login -u system:admin
> oc adm policy add-cluster-role-to-user cluster-admin admin
The sim can be upgrade with the regular ONTAP image you download from mysupport.netapp.com The process to upgrade the sim is: The root volume might be to small to host an upgrade:
> storage aggregate add-disks -aggregate aggr0 -diskcount 2
> volume size -vserver sim1-01 -volume vol0 +2g
Upgrade procedure
✅ Starting with 9.4 ONTAP is the image upload and upgrade process is fully supported in the web-GUI.
> system image get -package http://172.16.51.1/image.tgz (--> there is a Chrome plugin to run a webserver on your notebook https://chrome.google.com/webstore/detail/web-server-for-chrome/ofhbbkphhbklhfoeikjpcbhemlocgigb?hl=en)
> system image update -package image.tgz
> system image show
> system image modify -node sim1-01 image2 -isdefault true
> Reboot
Prep the simulator as following:
- Add Licenses
- Create a SVM with NFS protocol v4.0
- Delegate the volume creation to your SVM

- Adjust Default Export Policy for everyone or your private Network
- Security style needs to be unix! --> test a mount in your Linux VM If you wanna see the exports (showmount -e) from your Linux VM, enable showmount in your SVM: cluster ::> nfs server modify -vserver NFS83 -showmount enabled

Issues with the Sim In case of hard reset of the VM, your sim might be complain about a defect root volume. Here is how to fix it: https://vmstorageguy.wordpress.com/2017/05/05/how-to-ontap-9-1-root-volume-damaged/ In short:
- reset the Sim-VM
- hit ctrl-c right after POST to get on the firmware prompt
- on the firmware prompt. Enter the following command and reboot:
unsetenv bootarg.init.boot_recovery
boot_ontap
Download the NetApp Trident software:
> wget https://github.com/NetApp/trident/releases/download/v17.10.0/trident-installer-17.10.0.tar.gz
> gunzip trident-installer-17.10.0.tar.gz
> tar xvf trident-installer-17.10.0.tar
> cd trident-installer
> cp sample-input/backend-ontap-nas.json setup/backend.json
Edit the setup/backend.json with the SIM values
> vi setup/backend.json
{
  "version": 1,
  "storageDriverName": "ontap-nas",
  "managementLIF": "172.16.152.20",
  "dataLIF": "172.16.152.21",
  "svm": "openshift",
  "username": "vsadmin",
  "password": "netapp11"
 }
> cp sample-input/pvc-basic.yaml setup/pvc-basic.yaml
> cp sample-input/storage-class-basic-v1.yaml.templ setup/storage-class-basic.yaml
Add backendType (of your sim) to setup/storage-class-basic.yaml
> vi setup/storage-class-basic.yaml
apiVersion: storage.k8s.io/v1
kind: StorageClass
metadata:
  name: basic
provisioner: netapp.io/trident
parameters:
  backendType: "ontap-nas"
Install trident with the prepared config files
> oc new-project trident
> ./install_trident.sh
> oc create -f setup/storage-class-basic.yaml
> ./tridentctl create backend -f setup/backend.json
> oc annotate storageclass/basic storageclass.kubernetes.io/is-default-class=true
The volume driver for ONTAP is creating a volume for every PVC. In order to scale a environment over the currenty volume limit of 1000 volumes per node, the nas-economy driver was introduced with Trident 17.10. See the following page for details: https://netapp.io/2017/12/01/trident-17-10-available-now/
Here is the process to add a second storage class with the ONTAP-economy driver: Create a new setup/backend-eco.json with the SIM values
> vi setup/backend-eco.json
{
  "version": 1,
  "storageDriverName": "ontap-nas-economy",
  "managementLIF": "192.168.128.31",
  "dataLIF": "192.168.128.30",
  "svm": "devsvm2",
  "username": "vsadmin",
  "password": "netapp11"
}
> cp sample-input/pvc-basic.yaml setup/pvc-eco.yaml
> cp sample-input/storage-class-basic-v1.yaml.templ setup/storage-class-eco.yaml
Change backendType in setup/storage-class-eco.yaml
> vi setup/storage-class-eco.yaml
apiVersion: storage.k8s.io/v1
kind: StorageClass
metadata:
  name: eco
provisioner: netapp.io/trident
parameters:
  backendType: "ontap-nas-economy"
Change backendType in setup/pvc-eco.yaml
> vi setup/pvc-eco.yaml
kind: PersistentVolumeClaim
apiVersion: v1
metadata:
  name: eco
  annotations:
    volume.beta.kubernetes.io/storage-class: econonmy
spec:
  accessModes:
    - ReadWriteOnce
  resources:
    requests:
      storage: 1Gi
Add the additional backend with the prepared config files
> oc create -f setup/storage-class-eco.yaml
> ./tridentctl create backend -f setup/eco.json
Check if the additional storage class is created
> ./tridentctl get backend
+----------------------------+-------------------+--------+---------+
|            NAME            |  STORAGE DRIVER   | ONLINE | VOLUMES |
+----------------------------+-------------------+--------+---------+
| ontapnaseco_192.168.128.30 | ontap-nas-economy | true   |       3 |
| ontapnas_192.168.128.30    | ontap-nas         | true   |       0 |
+----------------------------+-------------------+--------+---------+
- Add to project -> show all available builders
- choose php builder, e.g. 7.0
- name example, git https://github.com/cschnidr/phpinfo/, create without options
- Optional: (only works if github can access your installation...) copy webhook url, click on github link, add webhook url to github, choose JSON as format !
- go back to console tab, go to overview, check build log if not ready, back to overview
- show generated URL on top right, click, show running app, back to console
- easy to scale up, scale to 2 and 3 pods, mouse hover on the "starting" pods
- load the your app in three different browsers to see the load-balancing (not showing the picture!)
- attach persistent storage to your app (click on your app-name, go to configuration tab and scroll to the very bottom --> Add storage
- use web as a PVC name and use
/opt/app-root/src/webfor the mount path in the following screen (that the directory where the volume will be mounted in the container, which is below the web-root of the web server) - check System Manager of your ONTAP sim to check for a new volume
- go to your project overview in Openshift and click on the light blue circle with the pods. Click on one container and then go to the terminal tab. This gives you a terminal inside the relevant container. Change to the web directory.
- download the picture into the persistent volume:
wget http://netapp.io/wp-content/uploads/2017/03/thePub_GreyBlue.png - reload the app in all browsers --> pic appears
- go to github, click index.php, edit, edit the title tag below the pic and commit (in order to be able to edit this project you need to clone it into your own Github account)
- go back to Openshift, click on your project and click on the three dots in the grey title bar on the right and choose "start deploy" --> Openshift will then download the new code from Github and will deploy it in new containers. The persistent storage is seemlessly attached to those as well. Thank you Trident :-)
- after completion, delete the whole project in Openshift. The backend storage will also be deleted by Trident!
oc delete all -l app=example