User Guide
A graphical user interface (GUI) tool that assists with configuration and management of the File Access Policy Daemon (fapolicyd).
The capabilities of this application support the following:
- Editing rules, with validation and syntax highlighting
- Analyzing trust differences between what fapolicyd believes and what exists on disk
- Analyzing fapolicyd logs to understand fapolicyd runtime behavior
- Analyzing disk access by profiling application execution
- Editing the fapolicyd configuration with syntax validation
- Control of the fapolicyd daemon via DBUS signals
In the remainder of this document we will refer to the File Access Policy Analyzer as the analyzer.
- File Access based notification and interception of events generated by the Linux Kernel fanotify API.
- Trust is based on expected size or sha256 hash of a file at a path. The trusted state of the system is stored by fapolicyd and compared against the actual state. Files that match the database are recognized as trusted.
- Rules are defined as a list of first-match-win patterns that when matched to a file access request are used to allow or deny that request.
- A File Access Policy is the union of trust and rules that provides the fapolicyd daemon the information it needs to make a decision whether to allow or deny a file access request.
- Detect and resolve file trust discrepancies between the trusted system configuration and the actual system configuration.
- Author file access rules using GUI components that make understanding and editing easier compared to a plain-text editor.
- Analyze file access logs and display in GUI components simplifying navigation of events compared to reading the raw logs.
- Diagnose file access policy issues and guide along path to resolution.
- Reduce repetitively stressful operations with an ergonomic GUI.
The analyzer is currently available for Fedora EPEL 8, EPEL 9, and Fedora 37 or later, including Rawhide.
dnf install fapolicy-analyzerThe RPM install will install a Desktop entry for the analyzer, which can be launched from desktop shortcut or applications menu.
If launching the application as an unprivileged user the system should present an elevation prompt requesting the users password to execute the application as root. This prompt is provided though integration with PolicyKit (polkit).
Launching the analyzer from the command line can be done as
sudo fapolicy-analyzer
This entry point script integrates polkit for privilege elevation allowing users to execute the application without the need for sudo.
When executing without sudo the polkit prompt will look something like
$ fapolicy-analyzer
pkttyagent registering on the dbus...
==== AUTHENTICATING FOR org.freedesktop.policykit.exec ====
Authentication is needed to run `/usr/bin/env' as the super user
Authenticating as: root
Password:
At this point the user's password (not the root password) can be entered and the user may be elevated, dependent on the PolicyKit policy.
There are additional options that can be passed through the command line, use the --help argument for more details.
This application consists of four file access policy analysis tools
- Trust Administration
- Rule Administration
- Policy Profiling
- Log Analysis
In addition the application offers an interface to configure and control the fapolicyd service via DBUS.
The analyzer is driven by two toolbars that are common to all screens.
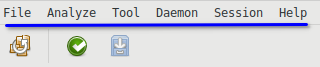
The menu bar (top) provides access to global functionality such as switching tools, analyzing a log, or controlling the fapolicyd daemon.
The ribbon bar (bottom) is the context-sensitive portion of the toolbar which contains actions for the current tool, such as validating rules, or controlling profiling.
The Tool menu item provides access to each of the major components of the application and users may switch freely between them, and will be prompted if any action should be taken before switching.
The Analyze menu item provides entry point to analyzing fapolicyd logs from each of the supported input sources. Once clicked the user will be taken to the analysis view where they will be prompted for more information depending on the type of analysis being performed.
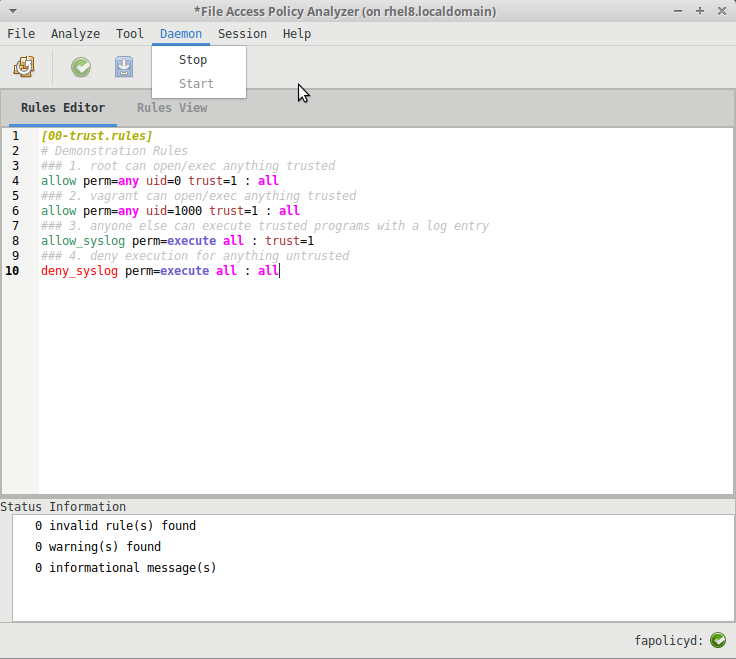
The Daemon menu allows starting and stopping the fapolicyd daemon via DBUS. The config option loads the fapolicyd configuration file editor.
The status of the daemon will be shown in the status bar at the bottom of the application; green for active, red for stopped.
The term "system trust" refers to an immutable list of trusted files sourced from the RPM database on the host machine. This trust is updated when fapolicyd starts or receives a reload signal, at which time the RPM database is parsed and filtered, and applicable entries are used to populate the fapolicyd trust store.
When the analyzer is started the fapolicyd trust store is parsed and file locations on disk are checked against the expected size and sha256 hashes to determine trusted/untrusted status. The trust administration view highlights the untrusted files in red while trusted are in green.
The intent here is to clearly indicate the trusted/untrusted status of the file on disk. Untrusted status in the system trust view indicates that the file on disk has changed from what was installed from the RPM.
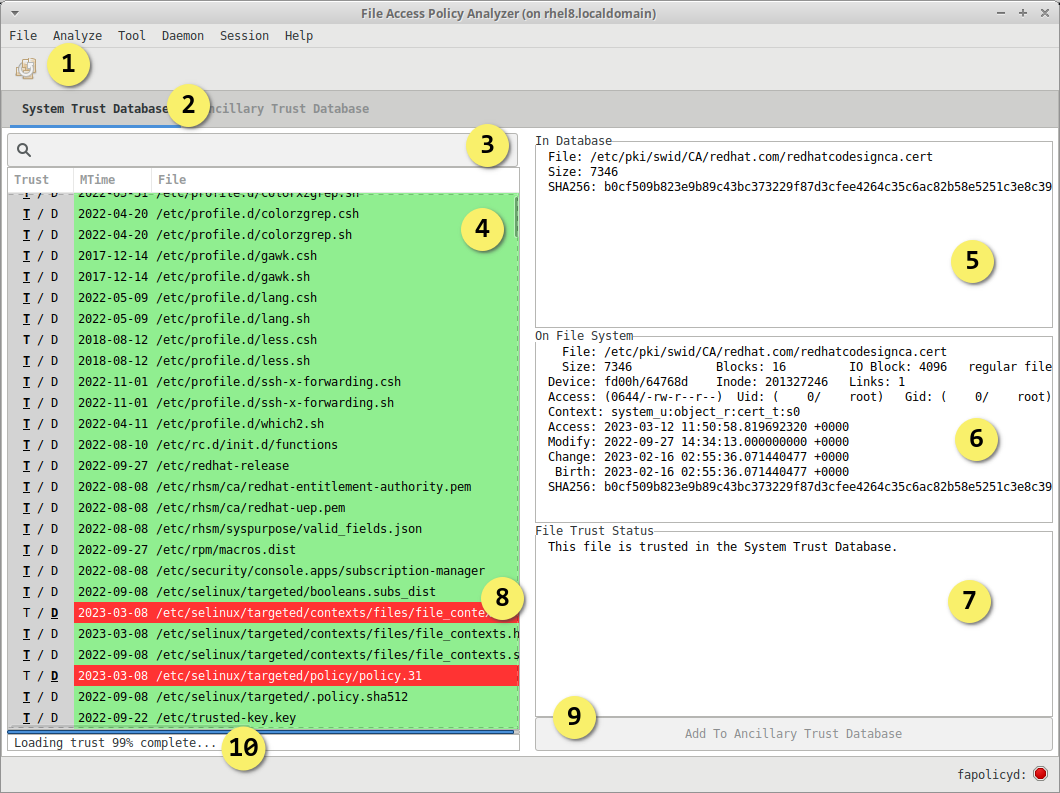
- Deploy changes to disk and apply to fapolicyd. Activated when deployable changes have been added.
- Switch the trut table between System and Ancillary
- Search for entries using the search field
- Sortable trust table with trusted status indicated by color and in the
Trustcolumn, T/Green = Trusted, D/Red = Discrepancy - Selected file as entered in the fapolicyd trust database
- Selected file as it exists on disk, ie the stat of the file on disk
- Summary of trust status as determined by disk analysis
- Untrusted file highlighted in red, can be selected and added to ancillary trust
- Select one or more files with discrepancies and click the "Add to Ancillary Trust" button to create trust entries for them
- Trust loading progress bar indicates the status of trust table being populated.
- This can take a while with larger trust databases, the progress bar will provide an accurate status.
After adding trust entries the deployment options on the toolbar become active. See the Deployment section for more details.
From this view you are able to resolve trust issues by adding files with discrepancies to the ancillary trust.
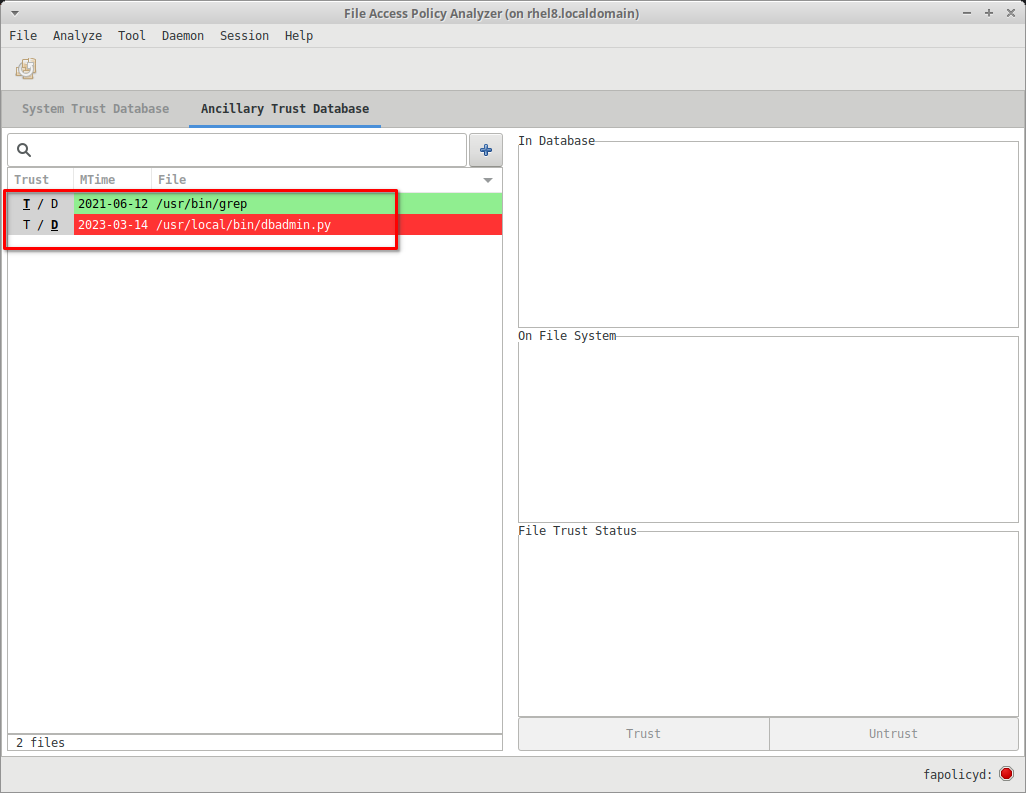
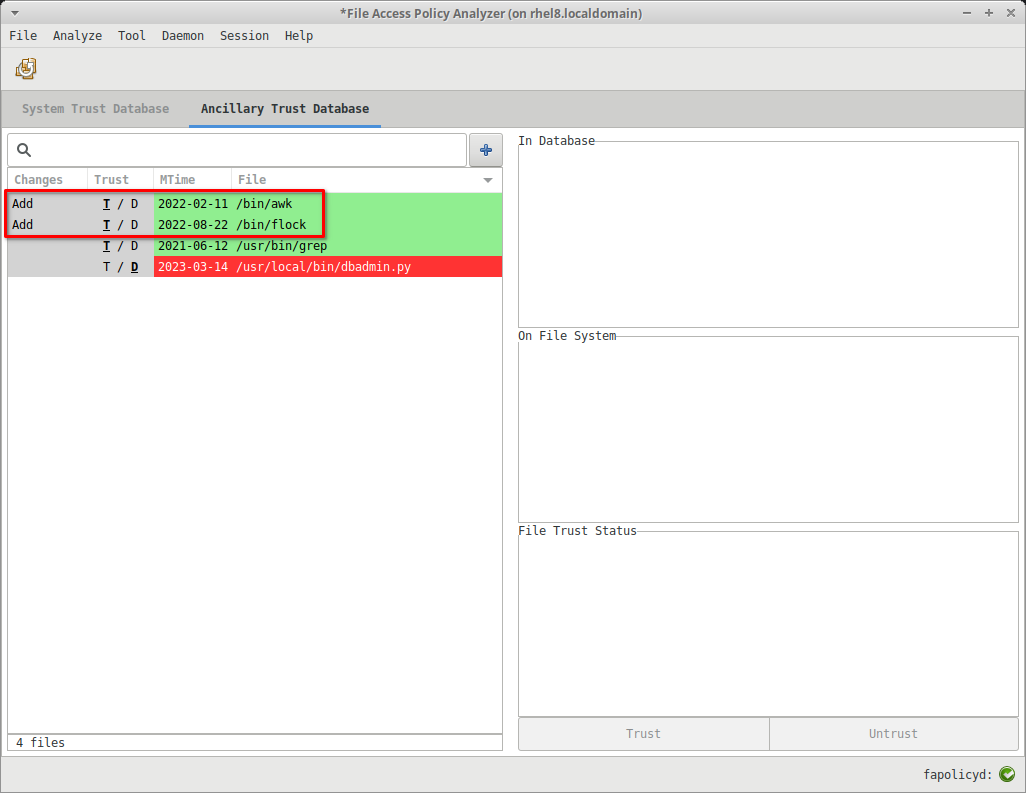
In addition to the RPM database, fapolicyd can source trust from a text file or collection of text files. In the GUI we call this trust Ancillary trust.
From this view you are able to add additional files or directories of files that will add to system trust when the files are not know, or override it if the file was already in the rpm db.
Again the intent here is to clearly indicate the trusted/untrusted status of the file on disk. Untrusted status in the ancillary trust view indicates that the file on disk has changed from what was originally marked as trusted by an administrator.
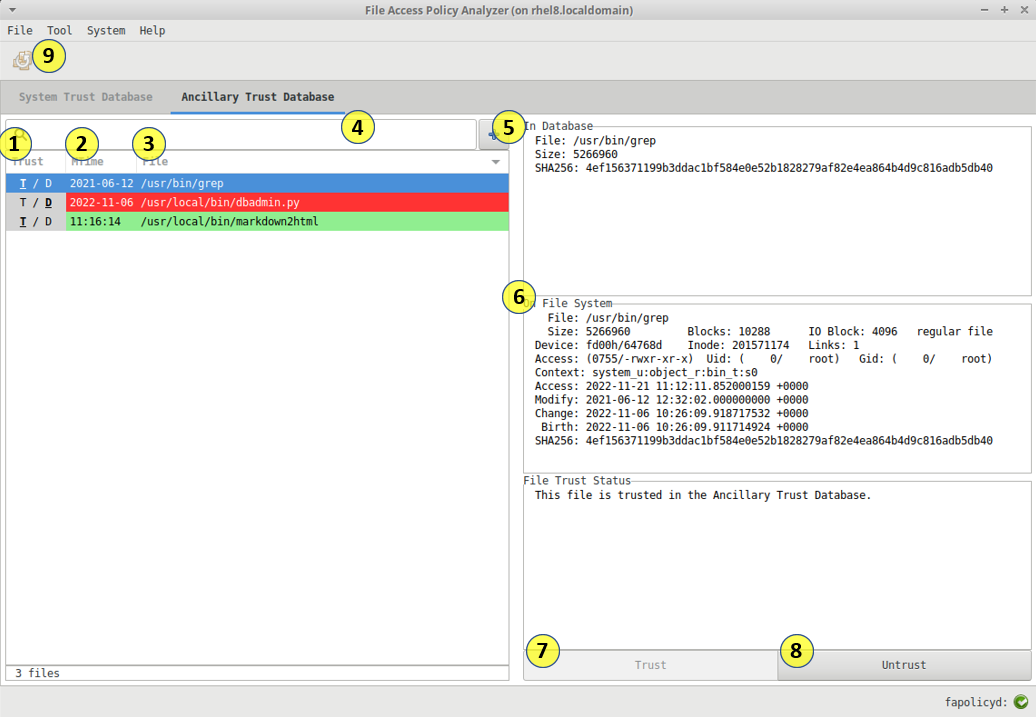
- Sort entries based on their trusted status. T = Trusted, D = Discrepancy
- Sort entries based on the file modified time.
- Sort entries based on file name.
- Search for entries using the search field.
- Add trusted entries to the database using a file selection tool.
- Select entries and view the metadata displayed in the right hand columns a. Path, hash, size in the fapolicyd database b. Stat of actual file on disk c. File trusted status summary
- Select one or more files with discrepancies and click the "Trust" button to add the selection to the trust database.
- Select one or more Trusted entries and click the "Untrust" button to remove the selection from the trust database.
- Deploy changes to disk and apply to fapolicyd
Mixed support for the fapolicyd trust.d backend exists. The analyzer can fully load all trust files from the directory specified as the trust.d source.
When any trust entry sourced from trust.d is modified, it will be written back to the file it originated in.
When new trust entries are added there is currently no way to direct it to a trust.d file. In this case entries are written to the default fapolicyd.trust file, which is located in /etc/fapolicyd.
This configuration for trust.d is specified in the config.toml.
The GUI contains a text based rule editor that provides text highlighting and rules.d flattening to improve the rule editing experience. The rule text is checked syntactically and semantically by parsers and linters that provide the user with feedback when issues are found.
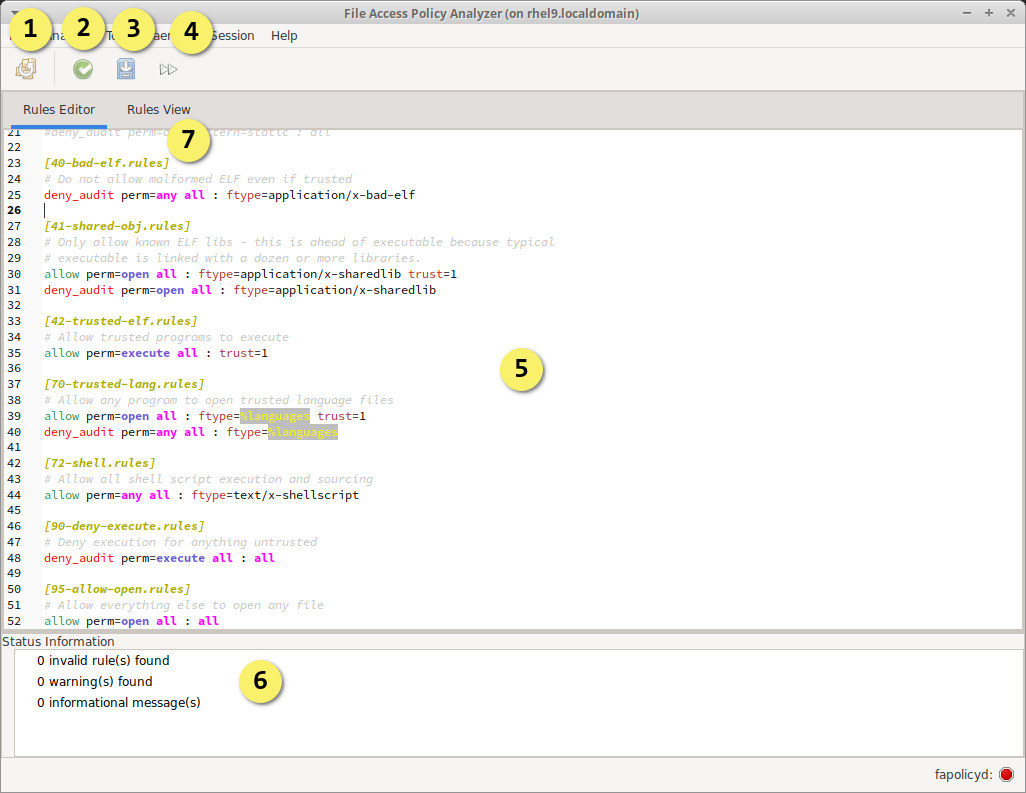
- Deploy changes to disk and apply to fapolicyd
- Validate and lint the current editor content, without saving it
- Save the current editor content to the session, validates prior to saving
- Apply current rules to the active profiler session (requires saved rules and active profiling)
- Editor for text based rules, with syntax highlighting
- Collapse / expand the Status Information tree that display messages from the rule parse
- File marker annotations allow manipulating file content from within the text editor
When the profiler is active the double-right-arrow toolbar button will be available to apply rules to the profiling session without requiring a restart. This is convenient when diagnosing an issue and trying different rulesets without restarting.
In the future this feature will be paired with a dynamic analysis log to allow a complete view of rule execution while running and manipulating the ruleset.
Within the rules.d directory there is a structure of one or more files that each may contain multiple rules. Determining the overall order of rules, as fapolicyd will interpret them, while editing can be tedious within the limited context of a single file. To ease this, the editor implements a flattening approach that displays all .d files within a single editor view. Transient delimiter annotations are inserted into the text view that identify file breaks. These annotations are editable which enables the user to rename, split, and merge file content by changing annotation content and location.
The file delimiters in the editor will be referred to as file markers. The file markers annotate the content of the editor to inform it where to break files when writing to disk.
File markers consist of the file name wrapped in square braces
[01-my.rules]
File markers are inserted automatically when loading rules.d. While editing, markers may be added or removed to split or merge rules into the corresponding rules files.
A rule set that contains two rules, originally sourced from a single file
allow perm=execute all : trust=1
deny perm=execute all : all
Can be split into multiple rule files by adding file markers as follows
[01-my-rules.rules]
allow perm=execute all : trust=1
[02-my-rules.rules]
deny perm=execute all : all
When the rules are deployed the file markers will be used identify what files will be present and what rules exist in each. The content following a marker, up to the point of another marker, will be included in the file specified by the marker.
The rules files are named relative to the configured rules.d location in the config.toml file. This location defaults to /etc/fapolicyd/rules.d/, so the example above would create two files,
1-my-rules.rules and 02-my-rules.rules, under /etc/fapolicyd/rules.d/.
The previous set of rules can be merged together into a single file by removing one of the markers.
[00-my-rules.rules]
allow perm=execute all : trust=1
deny perm=execute all : all
A root marker is required, if not specified it will be inserted by the application using a default file name.
So if all markers were to be removed, the content in the editor would be saved under /etc/fapolicyd/rules.d/00-analyzer.rules.
The tree view of rules bridges some gaps in rendering of rules within the text editor. The ability to provide the flattened rule id and perform mouse operations on specific rules is currently limited to this view.
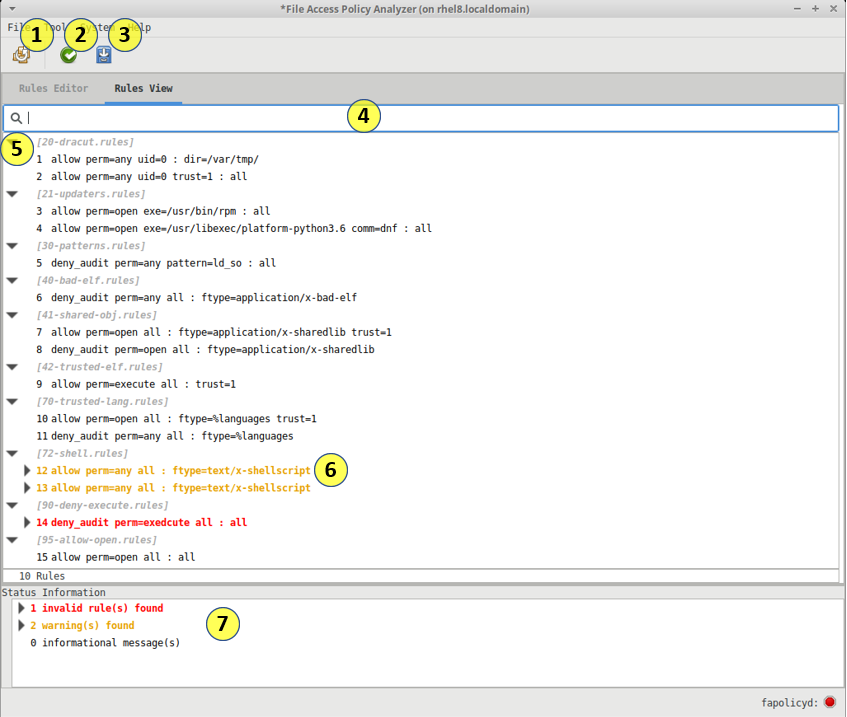
- Deploy changes to disk and apply to fapolicyd
- Validate and lint the current editor content, without saving it
- Save the current editor content to the session, validates prior to saving
- Search field to search for rules based on text content
- Collapse / expand the rules tree at the file level
- File marker annotations
- Collapse / expand the Status Information tree that display messages from the rule parse
This view is currently considered experimental, and is read-only.
- Start & Stop Profiling
- Load the event log generated by fapolicyd in the Policy Analyzer
- Clear previous profiler state
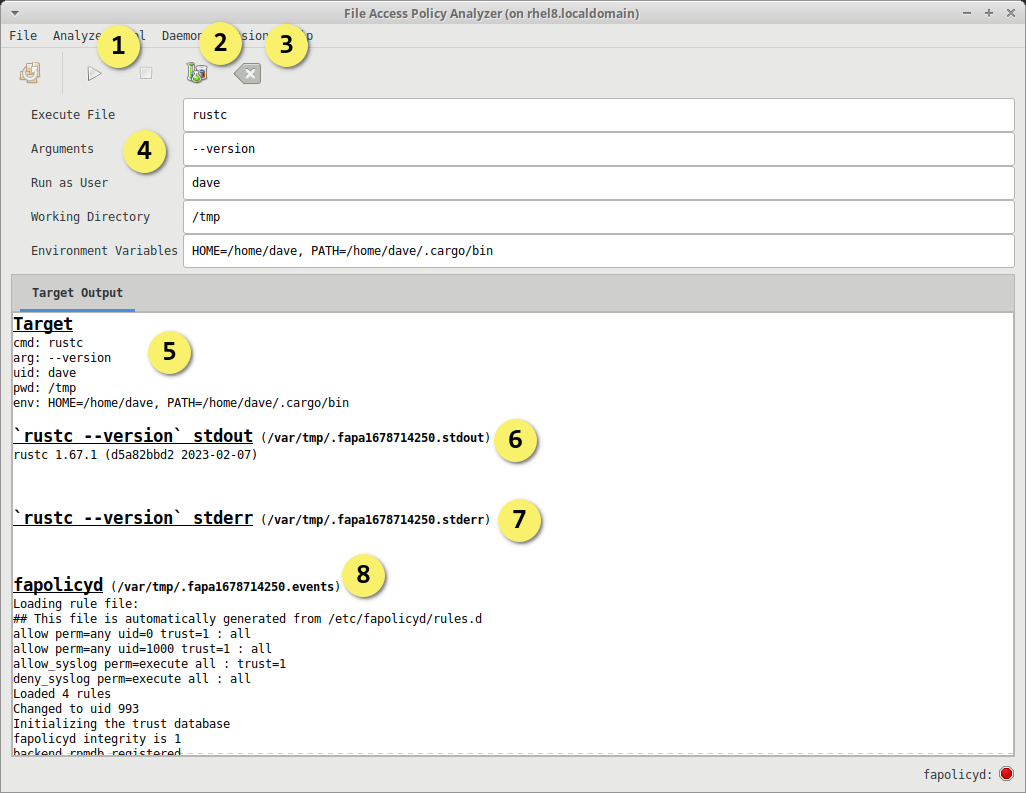
- Profiler arguments
- Executable target path, relative or absolute (required)
- Arguments to pass to the executable target (optional)
- User or UID to execute target as (optional: default root)
- Working directory to launch target from (optional)
- Environment variables to pass to target (optional)
- Display the options passed to the profiler
- Display the standard output generated by the target application
- Display the standard error generated by the target application
- Display the event log generated by fapolicyd
- Take the fapolicyd systemd service offline
- Start fapolicyd in permissive debug mode, redirecting the logs to a known location
- Execute the target application
- if the application is indeterminate the terminate button shall be used to end profiling session
- Stop fapolicyd
- Restore the fapolicyd systemd service
- Display the results in the output view
- Load the logs into the Policy Analyzer upon request
The profile execution is configured similarly to a launch profile in an IDE. Provide the target, args, working directory, and environment variables. Additionally we support the ability to run as a different user.
The working directory for the execution will be defined using the following rules:
- Use the directory specified in the profiler GUI Working Directory field, if specified
- Use the home directory of the user specified in the profiler GUI Run as user field, if specified
- Use the root user home directory
The start and stop buttons on the toolbar will control the profiling process.
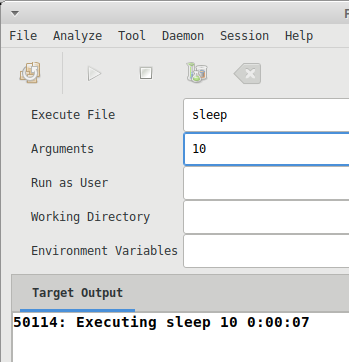
The output view will display the process id (PID), timer, and diagnostic messages while the profiler is executing the target.
The Policy Analysis can be executed by clicking the analyze button on the toolbar once the profiler session has ended.
The output view also shows the path to the temporary file containing the log in the case where there are other uses for it.
The Policy Analyzer tool displays a three column faceted view that allows one to quickly drill into a fapolicyd event log. The three column configuration represents data from a log entry split across the user/group, subject part, and object part. Each line representing a single log entry.

The first two columns are reversible, allowing the user to use a starting perspective of either user/group or subject. The double arrow button within the first column header flips the perspective.
Each column contains a search field to perform filtering of entries. There are also right click options available for entries that provide trust reconciliation.
- Deploy changes to disk and apply to fapolicyd
- Refresh the data display from the event source
- Adjust the time to filter events by
- User / Group column contains a filter field and lists the system user/groups entries. Selection here will filter the Subject column.
- Subject column contains a filter field and list of subjects associated to the selected user/group: Display the subject of the log event, selection here filters the Object column.
- Object column contains a filter field and list of objects associated to the selected subject.
- User and Group selection controls the display of the Subject tab.
- Perspective switch between the User / Group and Subject. Switches the first column between user/group or Subject.

The Trust column indicates the trust source of the subject, System Trust (ST), Ancillary Trust (AT), or Untrusted (U).
The Access column indicates a roll up of access decisions across all objects associated to this call, all Allowed (A), Partially allowed (P), all Denied (D).
The file is the path to the Subject as literally indicated in the log source.
The row color also indicates a roll up of access decisions across all objects associated to this call where Green indicates all objects were approved, Red is all objects were denied, Yellow is mixed approvals.

The Rule column indicates the rule number that generated the logged event.
The Trust column indicates the trust source of the object, System Trust (ST), Ancillary Trust (AT), or Untrusted (U).
The row color also indicates trust status where Green indicates trusted and allowed, Red is denied, Yellow is allowed but unknown.
The Perm column indicates the requested permission of the access in the logged event. This will be one of "open" or "execute".
Access indicates the decision made by fapolicyd, Allowed (A) or Denied (D).
The File column is the path to the object as literally indicated in the log source.
Note: There is a known issue with the analyzer not following links which creates a discrepancy in the log display. This will be resolved in v1.2
When the Policy Analyzer shows that a file access was denied due to trust issue, the user can use a right click operation to reconcile the trust issue by updating the trust database with the content that matches the on-disk file.
The Policy Analyzer view can be populated from a number of sources that provide fapolicyd event log data.
Entrypoint to the Policy Analyzer using the Analyze > Debug log menu item will allow the user to pick a fapolicyd debug log.
The fapolicyd debug log may be generated by using the --debug option on the daemon
Entrypoint to the Policy Analyzer Using the Analyze > Syslog menu item will load the systems current syslog journal.
The required format for syslog entries must be added to the fapolicyd configuration.
syslog_format = rule,dec,perm,uid,gid,pid,exe,:,path,ftype,trust
Analyzing events directly from the kernel audit log entries is currently supported on Fedora 39 and newer and available using the Analyze > Audit menu item. This requires a >= 6.3 kernel, Audit >= 3.1, and fapolicyd >= 1.2.
This feature will be enabled in RHEL 8/9 as it the required kernel patch becomes available on those platforms.
Deployment involves applying the current state held within the GUI to disk and having fapolicyd apply it to its state.
To accomplish this we do the following
- Stop fapolicyd service
- Write ancillary trust to disk
- Write rules.d to disk
- Start fapolicyd service
After a deployment to disk is completed the user will be presented with a dialog asking if they want to keep the applied settings. There is a 30 second count down during which time you may test the system for functionality. If the dialog does not receive a confirmation that the changes should be kept in place, the changes deployed to disk will rollback to the previous state.
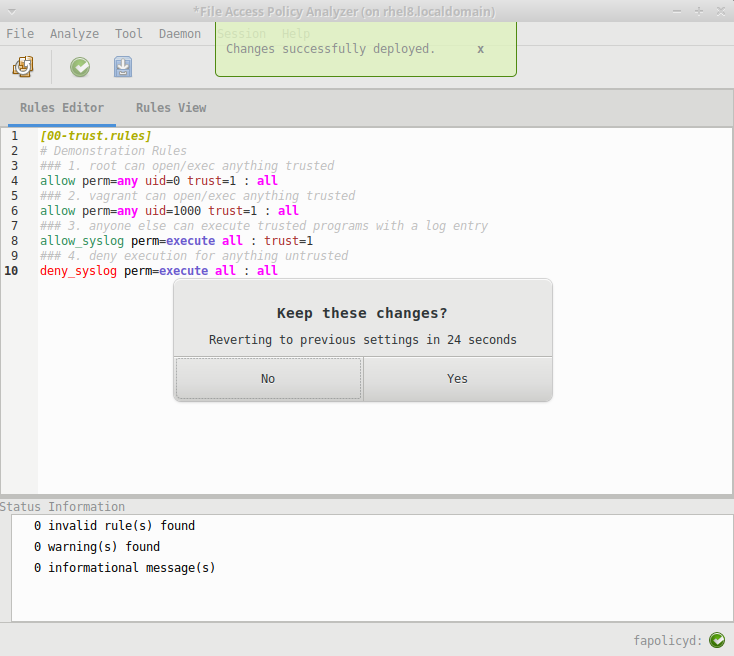
- Status message indicating the deployment was successful
- Modal dialog that allows selection up to when the timer expires
This is intended to be a fail safe in the case where a misconfiguration disables interaction with the host.
If the analyzer can limit the disk access it requires then it is in a unique position control fapolicyd after deploying new configuration.
It is important to consider that simply loading the application is not enough. As polices are created and deployed, the ability to return to disk to access anything may be limited.
- Load and cache resources when the application starts up.
- Icons
- UI definitions
- Configuration
- Communicate with systemd using DBUS, avoiding calls that access the file system (e.g. systemctl)
Reducing disk access after starting is critical to providing a high level of resiliency and control in the case of fapolicyd limiting access.
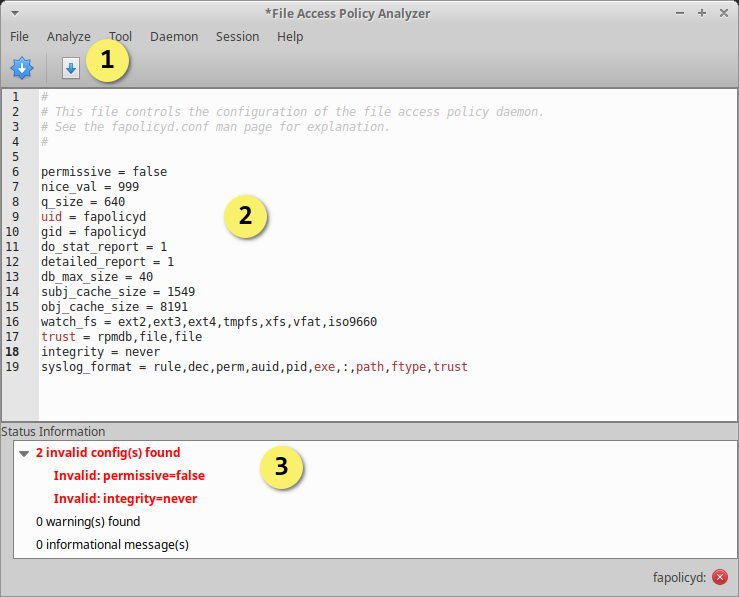
The GUI contains a fapolicyd configuration editor with integrated syntax checking. This tool ensures that only valid configuration is deployed to the system.
Errors encountered in the configuration will be displayed in the bottom pane of the configuration view.
- Deploy changes to disk and apply to fapolicyd
- Edit config text, with syntax highlighting
- Display messages from the configuration validation
User sessions with undeployed operations can be saved either explicitly by the user, or automatically in the event of an unexpected application termination.
At any point between deployments, a user can save their current work on the host system through the File menu: Session > Save or Session > Save As... with the former's operation identical to the latter's for the first save operation.
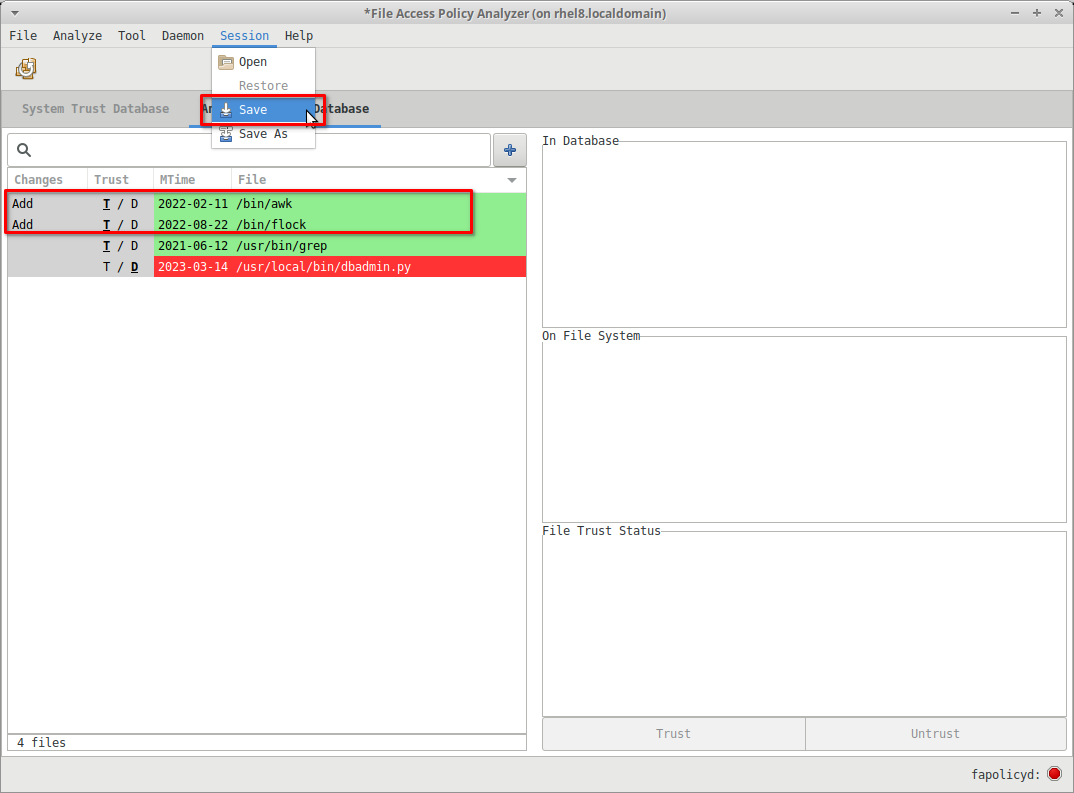
In either of those scenarios, the File Chooser dialog will be displayed. Navigate to the desired directory and specify the filename:
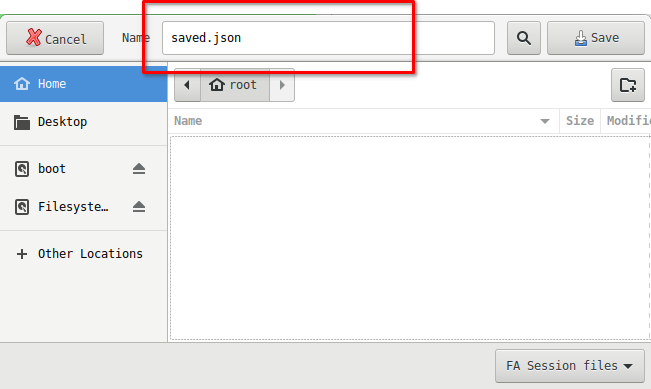
Note that there is a known issue where the analyzer session file's default file suffix (json) is not correctly set, affecting the files displayed within both the Save As and Open File Chooser dialogs.
Additionally, the default json suffix is not automatically appended to the saved session file.
The work-around for the above bug is for the user to explicitly set the display filtering option for both Save and Open operations to Any files in order for the existing files to be visible
in the File Chooser dialog. On session file saves, the user will need to explicitly add the json file suffix is desired. Ultimately, the session file suffix has no functional consequences on the
operation of the analyzer.
To restore a previously saved user session the user can invoke the Open file operation via the Session > Open menu item:
And as mentioned in the note above, set the File Chooser dialog display filter option to Any files in order to see the files as the user navigates to the desired saved session file.

Upon reloading the saved session, the user's edit session can continue at the point of the prior session save:
The application uses a single toml file to provide the options that will be described in the following sections.
This config file will be located under the XDG config directory, $HOME/.config/fapolicy-analyzer/config.toml.
An example toml configuration file
[ui]
initial_view = 'rules'
[system]
rules_file_path = '/etc/fapolicyd/rules.d'
trust_lmdb_path = '/var/lib/fapolicyd'
system_trust_path = '/var/lib/rpm'
trust_dir_path = '/etc/fapolicyd/trust.d'
trust_file_path = '/etc/fapolicyd/fapolicyd.trust'
syslog_file_path = '/var/log/messages'
[application]
data_dir = '/home/dev/.local/share/fapolicy-analyzer'
User interface configuration options
-
initial_view- the tool view the application loads into. This can be set to one ofrules,trust,profiler, "debug log", and "syslog". If this option is not specified the default is the rules view.
These options are for configuring the location of fapolicyd and other system resources. The default options should remain unless in testing or debugging specific functionality.
General application configuration entries.
-
data_dir- the location where application data such as backup files are stored. Defaults to the XDG data directory.
The rules found in /usr/share/audit/sample-rules/43-module-load.rules will initialize auditd for fanotify reporting
A naive configuration can be tested like this
cp /usr/share/audit/sample-rules/43-module-load.rules /etc/audit/rules.d/audit.rules
<reboot>
cat /etc/audit/audit.rules
-a always,exit -F arch=b32 -S init_module,finit_module -F key=module-load
-a always,exit -F arch=b64 -S init_module,finit_module -F key=module-load
-a always,exit -F arch=b32 -S delete_module -F key=module-unload
-a always,exit -F arch=b64 -S delete_module -F key=module-unload
Sample the log with ausearch --start today -m fanotify.