This project is offline lightweight DIY solution to monitor urban landscape. After installing this software on the specified hardware (Nvidia Jetson board + Logitech webcam), you will be able to count cars, pedestrians, motorbikes from your webcam live stream.
Behind the scenes, it feeds the webcam stream to a neural network (YOLO darknet) and make sense of the generated detections.
It is very alpha and we do not provide any guarantee that this will work for your use case, but we conceived it as a starting point from where you can build-on & improve.
- Nvidia Jetson TX2
- Webcam Logitech C222 (or any usb webcam compatible with Ubuntu 16.04)
- A smartphone / tablet / laptop that you will use to operate the system
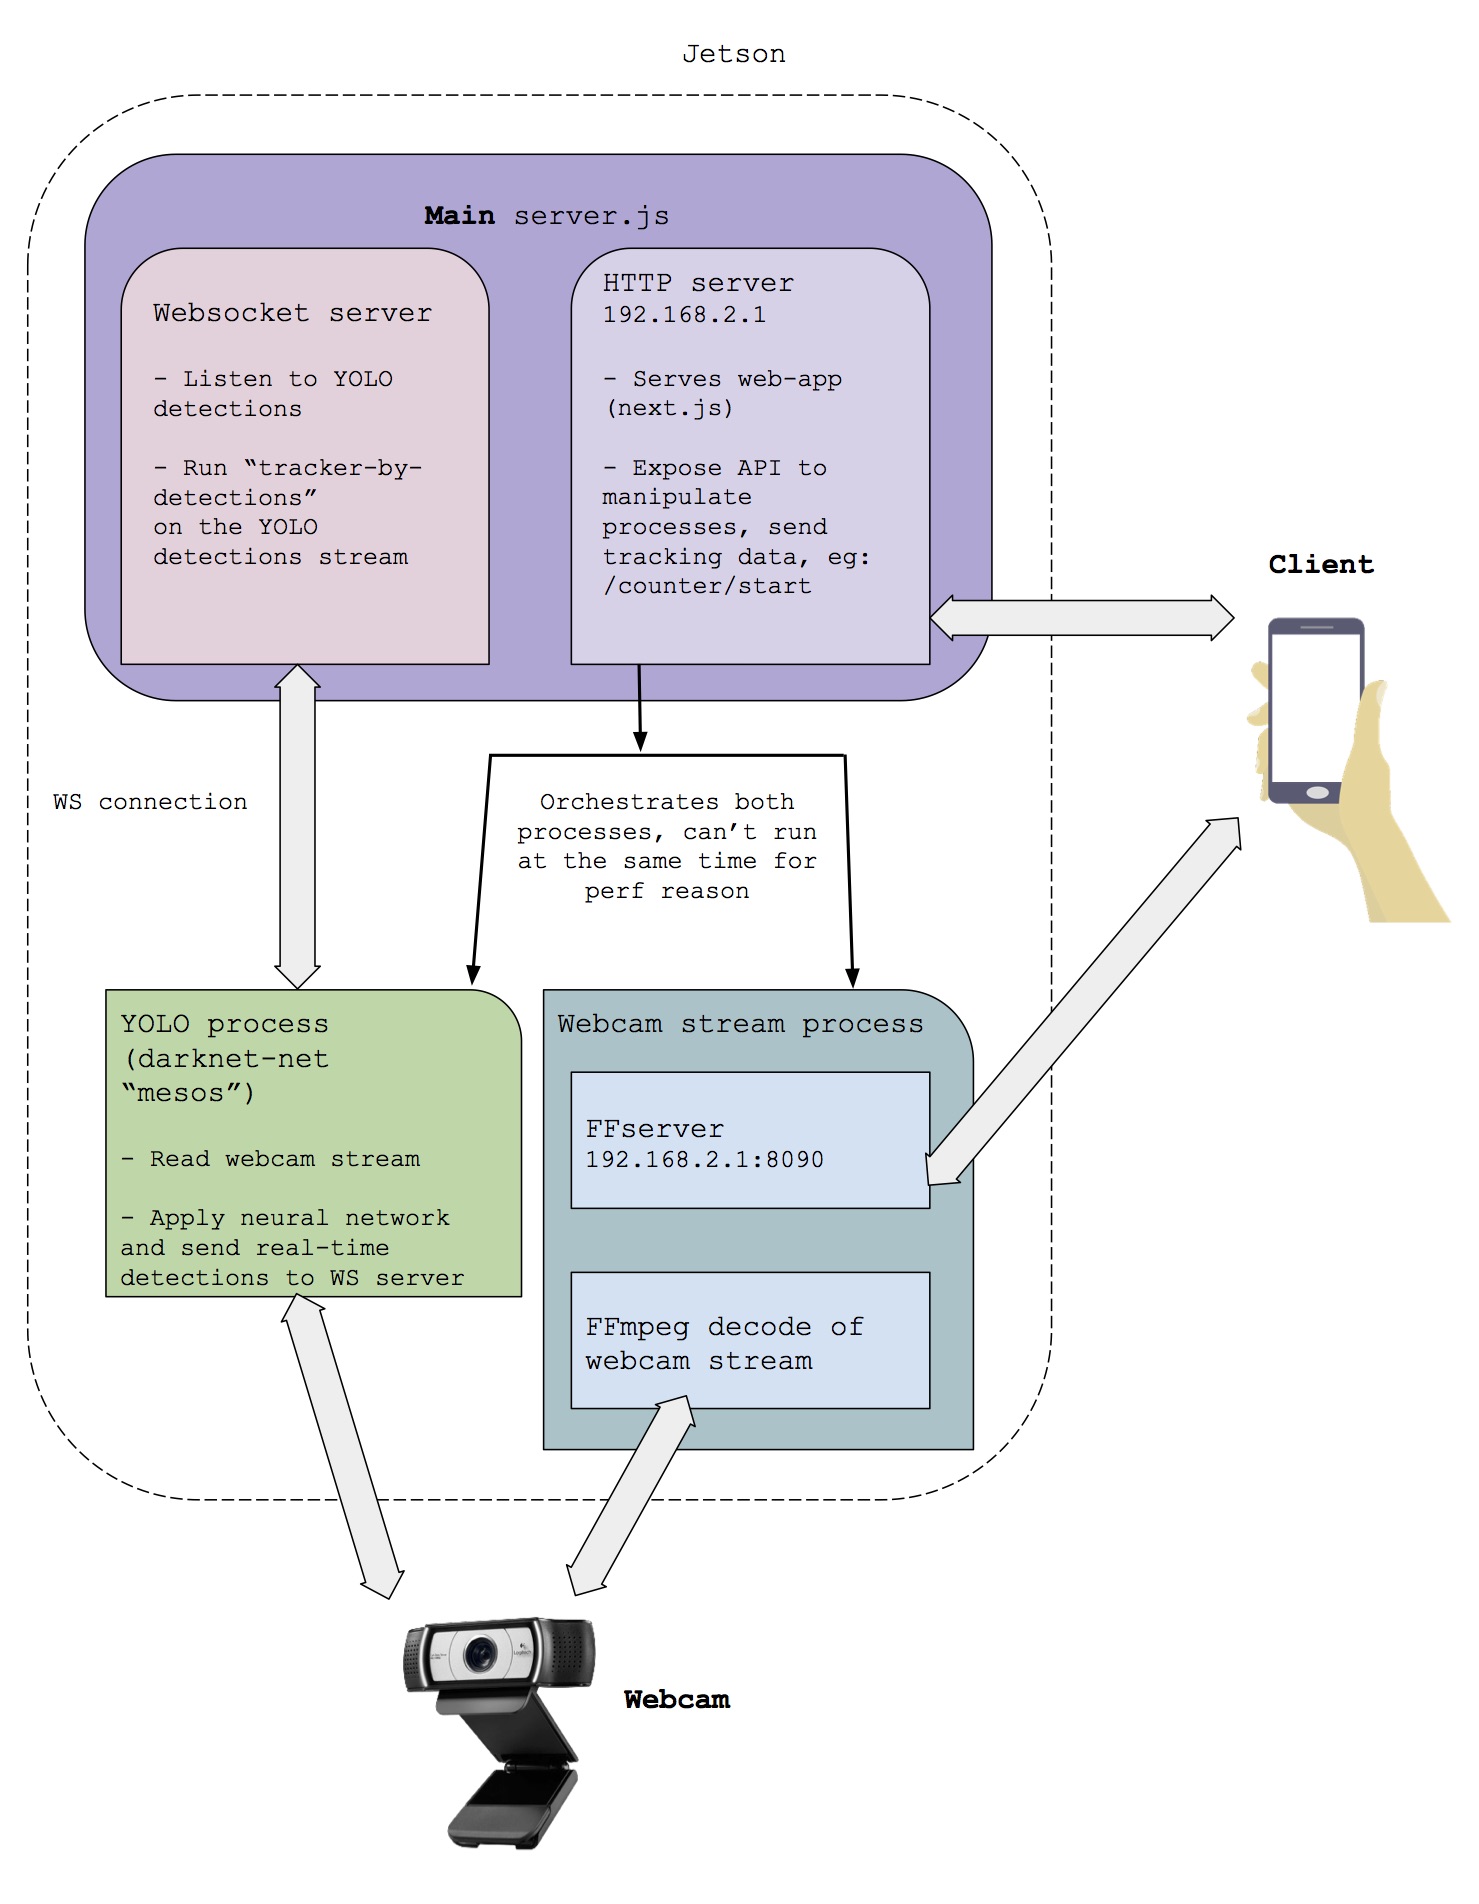
See technical architecture for a more detailed overview

NOTE: lots of those steps needs to be automated by integrating them in a docker image or something similar, for now need to follow the full procedure
- Download JetPack to Flash your Jetson board with the linux base image and needed dependencies
- Follow the install guide provided by NVIDIA
-
Update packages
sudo apt-get update
-
Install cURL
sudo apt-get install curl
-
install git-core
sudo apt-get install git-core
-
Install nodejs (v8):
curl -sL https://deb.nodesource.com/setup_8.x | sudo -E bash - sudo apt-get install -y nodejs sudo apt-get install -y build-essential -
Install ffmpeg (v3)
sudo add-apt-repository ppa:jonathonf/ffmpeg-3
# sudo add-apt-repository ppa:jonathonf/tesseract (ubuntu 14.04 only!!)
sudo apt update && sudo apt upgrade
sudo apt-get install ffmpeg
-
Optional: Install nano
sudo apt-get install nano
-
enable SSID broadcast
add the following line to
/etc/modprobe.d/bcmdhd.confoptions bcmdhd op_mode=2
further infos: here
-
Configure hotspot via UI
follow this guide: https://askubuntu.com/a/762885
-
Define Address range for the hotspot network
-
Go to the file named after your Hotspot SSID in
/etc/NetworkManager/system-connectionscd /etc/NetworkManager/system-connections sudo nano <YOUR-HOTSPOT-SSID-NAME>
-
Add the following line to this file:
[ipv4] dns-search= method=shared address1=192.168.2.1/24,192.168.2.1 <--- this line -
Restart the network-manager
sudo service network-manager restart
-
-
Add the following line to
/etc/rc.localbeforeexit 0:#Maximize performances ( sleep 60 && /home/ubuntu/jetson_clocks.sh )&
-
Enable
rc.local.servicechmod 755 /etc/init.d/rc.local sudo systemctl enable rc-local.service
IMPORTANT Make sure that openCV (v2) and CUDA will be installed via JetPack (post installation step) if not: (fallback :openCV 2: install script, CUDA: no easy way yet)
-
Install libwsclient:
git clone https://github.com/PTS93/libwsclient
cd libwsclient
./autogen.sh
./configure && make && sudo make install
-
Install liblo:
wget https://github.com/radarsat1/liblo/releases/download/0.29/liblo-0.29.tar.gz
tar xvfz liblo-0.29.tar.gz
cd liblo-0.29
./configure && make && sudo make install
-
Install json-c:
git clone https://github.com/json-c/json-c.git
cd json-c
sh autogen.sh
./configure && make && make check && sudo make install
-
Install darknet-net:
git clone https://github.com/meso-unimpressed/darknet-net.git
-
Download weight files:
link: yolo.weight-files
Copy
yolo-voc.weightstodarknet-netrepository path (root level)e.g.:
darknet-net |-cfg |-data |-examples |-include |-python |-scripts |-src |# ... other files |yolo-voc.weights <--- Weight file should be in the root directory -
Make darknet-net
cd darknet-net
make
-
Install pm2 and next globally
sudo npm i -g pm2
sudo npm i -g next
-
Clone open_data_cam repo:
git clone https://github.com/moovel/lab-open-data-cam.git
-
Specify ABSOLUTE
PATH_TO_YOLO_DARKNETpath inlab-open-data-cam/config.json(open data cam repo)e.g.:
{ "PATH_TO_YOLO_DARKNET" : "/home/nvidia/darknet-net" } -
Install open data cam
cd <path/to/open-data-cam>
npm install
npm run build
-
Run open data cam on boot
cd <path/to/open-data-cam>
# launch pm2 at startup
# this command gives you instructions to configure pm2 to
# start at ubuntu startup, follow them
sudo pm2 startup

# Once pm2 is configured to start at startup
# Configure pm2 to start the Open Traffic Cam app
sudo pm2 start npm --name "open-data-cam" -- start
sudo pm2 save
💡 We should maybe set up a "captive portal" to avoid people needing to enter the ip of the jetson, didn't try yet 💡
When the jetson is started you should have a wifi "YOUR-HOTSPOT-NAME" available.
- Connect you device to the jetson wifi
- Open you browser and open http://IPOFTHEJETSON:8080
- In our case, IPOFJETSON is: http://192.168.2.1:8080
🚨 This alpha version of december is really alpha and you might need to restart ubuntu a lot as it doesn't clean up process well when you switch between the counting and the webcam view 🚨
You should be able to monitor the jetson from the UI we've build and count 🚗 🏍 🚚 !
The install script for autmatic installation
Setting up the access point is not automated yet! __follow this guide: https://askubuntu.com/a/762885 __ to set up the hotspot.
-
run the
install.shscriptsudo chmod +x install.sh ./install.sh sudo reboot
To debug the app log onto the jetson board and inspect the logs from pm2 or stop the pm2 service (sudo pm2 stop <pid>) and start the app by using sudo npm start to see the console output directly.
-
Error:
please specify the path to the raw detections fileMake sure that
ffmpegis installed and is above version2.8.11 -
Error:
Could *not* find a valid build in the '.next' directory! Try building your app with '*next* build' before starting the serverRun
npm buildbefore starting the app -
Could not find darknet. Be sure to
makedarknet withoutsudootherwise it will abort mid installation. -
Error:
cannot open shared object file: No such file or directoryTry reinstalling the liblo package.
-
Error:
Error: Cannot stop process that is not running.It is possible that a process with the port
8090is causing the error. Try to kill the process and restart the board:sudo netstat -nlp | grep :8090 sudo kill <pid>
sshfs -o allow_other,defer_permissions nvidia@192.168.1.222:/home/nvidia/Desktop/lab-traffic-cam /Users/tdurand/Documents/ProjetFreelance/Moovel/remote-lab-traffic-cam/
ssh nvidia@192.168.1.222
yarn install
yarn run dev