Coffee machine IoT project. Easily check the amount of coffee in the pan via a Telegram bot. Electronics II course project.
- Table of contents
- Directories
- Architecture
- How the parts are connected
- Parts
- Photos
- Setting up the project
- 1. Install Docker
- 2. Clone or download the repository
- 3. Set up the database and Node-RED
- 4. Telegram bot
- 5. OTA update server
- 5.1 - Create the Google Drive folder and Sheets spreadsheet
- 5.2 - Create a Service account
- 5.3 - Enable the Drive and Sheets API
- 5.4 - Give access to the folder and spreadsheet to the service account
- 5.5 - Get the folder's and spreadsheet's ID
- 5.6 - Configure environment variables
- 5.7 - Start the server
- 5.8 - MAC whitelist
- 5.9 Self-signed HTTPS certificate (production)
- 6. Sensor
- TODO
- Automatic deployment (CI/CD)
- Sensor schematic
| Directory | Description |
|---|---|
| bot | Telegram bot which serves the coffee status from the database |
| coffee-sensor | The code for the ESP8266 sensor |
| kicad | Electronic wiring schema for the sensor |
| ota-update-server | Coffee sensor over-the-air firmware update server |
| serial-dumper | Utility for dumping numbers printed to serial from the coffee-sensor. Useful for generating test data. |
The project contains multiple components:
- The sensor attached to the coffee machine (
coffee-sensor) - An OTA firmware update server for the sensor (
ota-update-server) - A Telegram bot (
bot) - A Node-RED instance responsible for receiving the data from the sensor and inserting it into the database
- A PostgreSQL database which contains the data sent by the sensor


- LOLIN D1 mini, https://docs.wemos.cc/en/latest/d1/d1_mini.html#lolin-d1-mini
- HX711 load cell amplifier, https://cdn.sparkfun.com/datasheets/Sensors/ForceFlex/hx711_english.pdf
- Adafruit ssd1306, https://github.com/adafruit/Adafruit_SSD1306
- 4 Load cells, https://www.aliexpress.com/item/32839005317.html
- Jumper wires
- Coffee machine, optional, freely selectable, Moccamaster recommended
Click on an image to view the full-size image.


The project makes heavy use of Docker to make development easier, to make moving from development to production easier, and to allow a wider range of execution environments (self-hosted, cloud PaaS, cloud IaaS). The docker-compose.yml file describes all of our services which will be started.
From What is a container?:
A container is a standard unit of software that packages up code and all its dependencies so the application runs quickly and reliably from one computing environment to another. A Docker container image is a lightweight, standalone, executable package of software that includes everything needed to run an application: code, runtime, system tools, system libraries and settings.
To get started, install Docker and Docker-Compose.
If you're on Linux, consider following the Post-installation steps for Linux to add yourself to the docker group so that you don't need to sudo all of the docker commands.
Click on the big green button at the top right of the Github repository. The following steps may refer to certain files (e.g. docker-compose.yml). These files are found from the cloned or downloaded directory.

As seen from the diagram, the sensor sends its data to the database via the Node-RED instance. Let's first set this part up.
If you are using a PostgreSQL database hosted elsewhere, you can skip this step. You may be interested in hosted PostgreSQL services, such as ElephantSQL which has a fair free-tier.
Take a look at the definition of the db service in the docker-compose.yml file.
The key parts here to change are:
POSTGRES_USER=coffee       # superuser username
POSTGRES_PASSWORD=1234     # superuser password
POSTGRES_DB=coffee         # database name
When bringing up the postgres container for the first time, it will read these values to create a superuser and a database.
Edit the file and change the passwords to something secure, and store them somewhere safe.
Production notice: If running in production, create a new postgres user specifically for the coffee db, and don't use the superuser.
After this is done, you can start the database by doing
> docker-compose up -d db
Here the up command instructs docker-compose to find a service from the docker-compose.yml file named db, and to start it in the background (-d) so that we don't need to keep the terminal open.
After running this command, the database will create the user and the database, and then restart. You can view its progress by doing docker-compose logs -f db, and exit the logs view with CTRL-C.
When the database is ready, open a shell in its container with docker-compose exec db sh and run psql -U coffee coffee to open a database client. Then, run the following SQL to create the table we need:
CREATE TABLE weight (
  id BIGSERIAL PRIMARY KEY,
  timestamp TIMESTAMP WITH TIME ZONE,
  weight DECIMAL
);From https://nodered.org/:
Node-RED is a programming tool for wiring together hardware devices, APIs and online services in new and interesting ways.
It provides a browser-based editor that makes it easy to wire together flows using the wide range of nodes in the palette that can be deployed to its runtime in a single-click.
After bringing up the dabase, start nodered with
> docker-compose up -d nodered
You will see a new directory named nodered-data/ appear. This directory is a volume mount, meaning that it connects a directory from your computer to the directory inside the container.
Open up your browser and go to http://localhost:1880. You may need to wait a second for nodered to start.
To configure nodered to do what we want, follow the instructions here to import the nodered-flow.json file.
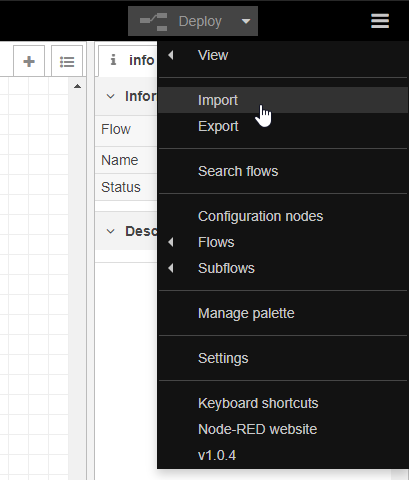
After importing the flow, you should see a cyan postgres node in the graph. Double-click on this node. A sidebar should appear. Click on the Edit button of the Server row:
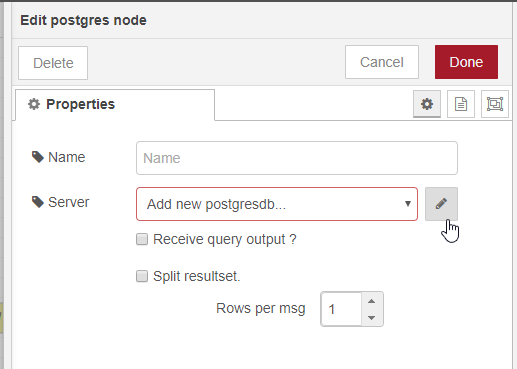
Insert your database connection details here. Refer to the details configured for the PostgreSQL database previously. Again, if you're using a hosted PostgreSQL instance from elsewhere, insert its details here instead.
- Host:
db(or if you've renamed thedbservice, its name) - Port:
5432 - Database: Same as
POSTGRES_DB - Username: Same as
POSTGRES_USER - Password: Same as
POSTGRES_PASSWORD
Click on Add, then select the newly created Server from the drop-down. Click Done.
Click the red Deploy button in the top right. This will apply the changes we've created. We now have the websocket endpoint available for our sensor at ws://localhost:1880/ws/weight. Remember this URL. The /ws/weight part is configurable in nodered.
Take a look at the environment variables in the docker-compose.yml file for the service bot.
The variables you need to edit are the following:
TG_TOKEN=<bot token here>
PG_HOST=db
PG_PORT=5432
PG_USER=coffee
PG_PASSWORD=1234
PG_DATABASE=coffee
Here the values for PG_ are the same as previously configured for Node-RED.
To get the Telegram Bot API token, you need to register an account with Telegram, then start a conversation with @BotFather and use the /newbot command to create a bot and get a token.
To you the Telegram bot created it needs to be searched from Telegram search bar. In this case we named our bot at Kahvibotti. When the status of the coffee machine is needed, type "/status" to the bot chat and it returns the last measured weight and time when measued. It also returns a plot from the last 30min of measured data.

If the coffee machine is unable to send data for 30 minutes to the cloud, the bot gives an error message. The picture has been made during the language update.

The OTA update server uses Google Drive as file storage, and for specifying the latest firmware version and filename. First, we need to create a Drive folder for the firmware, a Sheets spreadsheet where we store the latest version and filename, and a Google Cloud Service account with which we grant access to the server to these resources.
- Create a new folder in Google Drive
- Inside this folder, create a new Sheets spreadsheet, named e.g. "Current version".
- Inside this folder, create a new folder named e.g. "firmware".
- Open the Sheets spreadsheet
- Write fields like these in the spreadsheet:
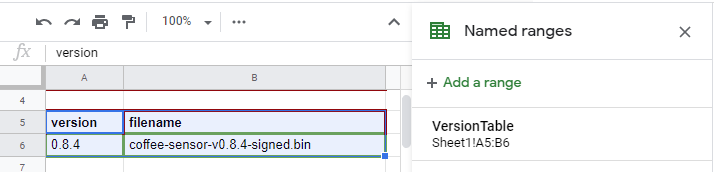
- Make sure the "version" field is before the "filename" field.
- Select this 2x2 region, and open Data -> Named ranges
- Click on Add a range, and name this range
VersionTable. This name must be exactlyVersionTable.
- Open the Google Cloud console.
- Create a new Project
- In the search bar, search for "Service accounts"
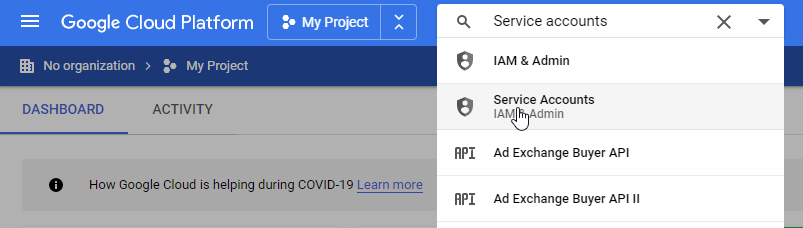
- Create a new Service account. Name and description does not matter.
- Click on the newly created service account to see its details.
- In "Keys", create a new key. For the type, choose JSON. Download this file and store it somewhere safe. This file is equivalent to the account's username & password, so make sure it's safe.
- Copy the service account's email somewhere. We will need it shortly.
- In the Google Cloud console, search for "Google Drive API"
- Click on Enable API
- Search for "Google Sheets API"
- Click on Enable API
- Go to the spreadsheet we created in 5.1.
- Click on the green Share button in the top right
- Paste the service account's email address
- Change its role to Viewer
- Now go to Drive and right-click on the "firmware" folder. Click on "Share"
- Steps 3-4.
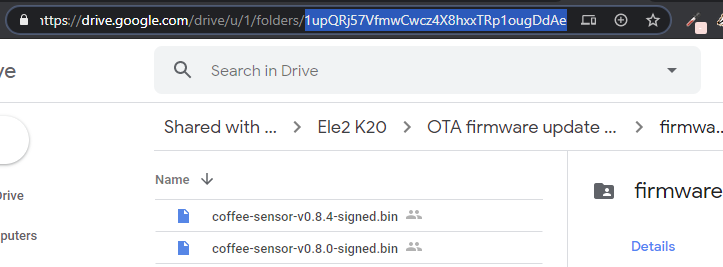
- Open the firmware directory in Drive
- Copy the folder ID from the URL, write it down somewhere.
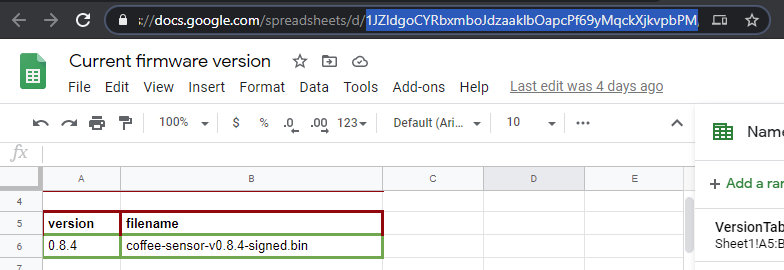
- Open the version spreadsheet
- Copy the spreadsheet's ID from the URL, write it down somewhere.
Open docker-compose.yml and find the ota-update-server service.
HOST=0.0.0.0
PORT=4000
DEVICE_WHITELIST=["foo"]                # MAC whitelist
FW_FOLDER_ID=123123123                  # firmware folder ID
FW_LATEST_SHEET_ID=123123123            # spreadsheet ID
GAPI_AUTH_CREDENTIALS=json key          # service account JSON key
FW_VERSION_CACHE_TTL=60000
FW_METADATA_CACHE_TTL=600000
FW_FILE_CACHE_TTL=86400000- Set
FW_FOLDER_IDto the firmware folder's ID. - Set
FW_LATEST_SHEET_IDto the spreadsheet's ID - Open the service account's .json key which you downloaded earlier. Remove line breaks from the file, and paste it after
GAPI_AUTH_CREDENTIALS=. E.g.:GAPI_AUTH_CREDENTIALS={"type": "service_account","project_id": "test-1234","private_key_id": "12345-abcd","private_key": "-----BEGIN PRIVATE KEY-----.......... - Make sure
GAPI_AUTH_CREDENTIALSdoesn't have line breaks, so it's all on the same line.
Now run
> docker-compose up -d ota-update-server
Again, docker-compose logs -f ota-update-server will show you the output of the program along with any error messages. CTRL-C gets you out of the logs view. The server is now running at http://localhost:4000/update
The OTA update server requires the sensor's MAC address to be on the MAC whitelist. This whitelist is the DEVICE_WHITELIST environment variable. This variable is a JSON array, so it should look something like this:
DEVICE_WHITELIST=["ab:cd:ef:12:34:56","65:43:21:fe:dc:ba"]After we configure the sensor itself, it will try to fetch firmware updates before being whitelisted. If it's not whitelisted, the OTA update server will reject the request and print the device's MAC address in the output. You can see this output with docker-compose logs -f ota-update-server, from which you can copy the MAC address to the DEVICE_WHITELIST.
After changing environment variables on an already running service, you need to do docker-compose up -d <service name> again to restart it with the new variables.
If you're setting up locally, skip this step.
The OTA update server itself does not deal with HTTPS, as it was designed with the fact in mind that it was going to be placed behind a TLS termination proxy (we used nginx). TLS termination is a fancy word for "a proxy in front of your web application which serves HTTPS to clients but talks to your application over HTTP".
If you want to use HTTPS, which you should always use in production, you'll want to generate a self-signed certificate, or build yourself a certificate renewal process which also makes sure that the devices have the new certificate fingerprint. It's easier to generate a self-signed certificate.
DigitalOcean has a good walkthrough on doing this with either nginx or apache2. After that, look up how to reverse proxy traffic from nginx or apache2 to your application.
Now that all of the supporting infrastructure is configured, it's time to configure the sensor.
This part is covered by the coffee-sensor README.
- docker & docker-compose:
- surrounding infrastructure
- bot
- botfather token
- db migrations
- update server
- self-signed certificate
- google cloud service account
- json key
- drive api
- sheets api
- drive folder and sheets structure
- named range
- semver
- nodered
- import flow
- url
- postgres
- credentials
- bot
- sensor
- dependencies
- setting up board in IDE
- ota url, https, fingerprint
- public.key, private.key
- versioning: semver
- ws url
- scale calibration
- tare
This GitHub repository uses GitHub Actions to automate deployment to production. The bot and ota-update-server services' Docker images are built and pushed to a private Docker repository whenever a commit is made to the master branch. Currently, we use containrrr/watchtower to automatically monitor for new images and restart the Telegram bot and OTA update server.
See the workflow file here.

