A detailed guide on getting starting with the Common Mapping Client. This guide is aimed at developers who may not be familiar with many of these technologies and concepts but have used other JS frameworks before to build complex web applications. It is our hope that this document can serve as useful reference for the major aspects of the CMC system for CMC and Application Developers as well as some justification for why certain technology and architectural decisions were made.
- Terminology
- Installation guide
- Package.json Scripts Overview
- Installing/removing packages via npm
- The CMC Core Philosophy
- The CMC Build Process
- Styling CMC
- Components and State with React & Redux
- Mapping With CMC
- Brief Overview of Application Directory
- How to Write Tests in CMC
- User Analytics
- Upgrading your Project to Latest Version of CMC
- Layer Ingestion Additional Services
- Additional Tools
- Deployment to Github Pages
- Main Technologies Under the Hood
- Contributing to CMC
- Copyright and License
Some terms and synonyms that you will see throughout this document
- CMC Core: This repository. Also known as "CMC" and "Core"
- Application Developer: Developers using CMC to create their own applications and are not necessarily contributing to the CMC Core project. Also known as "Non-Core Developers".
Make sure you have NodeJS 4.4 or higher installed before continuing.
Once you have a copy of the project, install all the dependencies and prep the project for development by running:
npm install
Next, start the development server by running:
npm start
Your default browser should open to localhost:3000 and you should see the default CMC application.
To create a production build run:
npm run build(may take a few minutes)npm run open:dist(to open the build using the included node server)
The scripts defined in package.json are used to control various aspects of application installation, development, testing, and building.
| Script | Description |
|---|---|
| postinstall | Copies over certain node_module files, libraries, sets up other stuff, etc. |
| prestart | Runs automatically before start. Cleans previous build. |
| precommit | Runs prettier code formatting automatically after commits have been staged. |
| start | Builds a development version of the app in memory and serves it from a local node server. |
| start:dist | Builds a production version of the app and serves it from a local node server. |
| open:src | Serve development version of the app from a local node server |
| open:dist | Serve production version of the app using a local node server |
| prebuild | Runs automatically before build script. Cleans the previous build. |
| build | Bundles all JavaScript using webpack and writes it to /dist |
| postbuild | Runs the postbuild script moving external assets into dist |
| prep:dist | Deletes the dist/ and creates a new one |
| clean:dist | Removes dist/ |
| clean:test | Removes test-results/ |
| pretest | Runs automatically before test. Cleans previous test results |
| prettier-all | Run prettier on all js/css/scss files under the src directory |
| test | Runs all tests using karma js |
| analyze-bundle | Analyzes webpack bundles for production and gives you a breakdown of where modules are used and their sizes via a convenient interactive zoomable treemap |
NPM packages are installed and removed using the following commands. The --save flag tells NPM to save/remove the specified packages from your package.json file.
- Install a package :
npm install <package_name> --save - Remove a package :
npm remove <package_name> --save
As is stated in the README, the Common Mapping Client aims to be a production-ready starting point for complex mapping applications. To avoid bloat and feature creep, if a capability or widget is not needed in the majority of mapping applications, it will not be part of CMC.
Inside of the src/_core directory lives the bulk of the CMC Core application code. This is code that an Application Developer should only need to reference, duplicate and modify, or exclude. Separating Core code out is helpful for maintaining a lean codebase as well as providing a clean method for upgrading to newer versions of the Core codebase without affecting/breaking the Application Developer's work.
It is strongly recommended that all of the work you do is outside of src/_core to avoid future merge conflicts with new versions of CMC Core (upgrading will be discussed later on in this document) and to keep a clean reference to the Core code. It is also recommended that you duplicate whatever folder structure you need from Core in the parent src folder. Similar to components, you can swap out utility Reducer functions by changing imports in src/reducers/index.js, and change styles by overriding them with SASS in src/styles.scss. Also note that to override MapWrapper classes (which are described in more detail later) you should modify the imports in src/utils/MapCreator.js and substitute or add your own MapWrapper class. By default uses layer, palette, help information, and metadata from src/default-data/_core_default-data/. When you create your own application it is recommended that you not modify the _core_default-data folder and instead add your own folder along side containing your own data.
All of the Core Components, Reducers, configurations, styles, tests, utils, etc., are imported (directly or indirectly as dependencies) into the application using the _core/components/App/AppContainer.js which is the root React Component in src/index.js. Please note that for the Reducer functions (discussed later in the section regarding React & Redux) the Core imports are done in src/reducers/index.js.
An Application Developer can choose to use CMC Core's AppContainer as it is and merely change config files to fetch different map layers or you can build your own AppContainer to remove/duplicate/modify Core components or add your own entirely new components. To do this, modify src/index.js to point at src/components/App/AppContainer instead of src/_core/components/App/AppContainer and edit the former accordingly.
To Override/Extend a Core Reducer: Create a new reducer function that uses a new state model (if desired) or a new reducer class (if desired). For the reducer class, you must pass a reference of this class to the Core reducer function otherwise it will default to using the Core reducer class. Let's use the example of extending the map reducer to use a new state model that defaults the view to 3D mode and modifying the Core setLayerActive function. Create/modify the following files:
reducers/models/map_Extended.js
import Immutable from 'immutable';
import { mapState } from '_core/reducers/models/map';

export const mapState_Extended = mapState.mergeDeep(Immutable.fromJS({
    "view": {
        "in3DMode": true
    }
}));
This new state model overrides the Core state model just enough to change the default view mode. It must still be imported in a reducer function to have any effect.
reducers/reducerFunctions/MapReducer_Extended.js
import MapReducer from '_core/reducers/reducerFunctions/MapReducer';
import * as appStrings from '_core/constants/appStrings';

export default class MapReducer_Extended extends MapReducer {
    static setLayerActive(state, action) {
        console.log("Modified Action");
        return MapReducer.setLayerActive(state, action);
    }
}
This new reducer class extends the Core reducer class and overrides the setLayerActive() method just to add a log statement before executing normally. It must still be imported in a reducer function to have effect.
reducers/map_Extended.js
import { mapState_Extended } from 'reducers/models/map_Extended';
import map from '_core/reducers/map';
import MapReducer_Extended from 'reducers/reducerFunctions/MapReducer_Extended';

export default function map_Extended(state = mapState_Extended, action, opt_reducer = MapReducer_Extended) {
    switch (action.type) {
        default:
            return map.call(this, state, action, opt_reducer);
    }
}
This reducer function imports the new model and reducer class, it sets the new state model as the default and passes the new reducer class to the Core reducer function which will use that class reference for all of its actions. It must still be imported into the index.js reducer to have effect.
reducers/index.js
import { combineReducers } from 'redux';
import view from '_core/reducers/view';
import map_Extended from 'reducers/map_Extended';
import settings from '_core/reducers/settings';
import help from '_core/reducers/help';
import layerInfo from '_core/reducers/layerInfo';
import share from '_core/reducers/share';
import dateSlider from '_core/reducers/dateSlider';
import asynchronous from '_core/reducers/async';
import analytics from '_core/reducers/analytics';
import alerts from '_core/reducers/alerts';

const rootReducer = combineReducers({
    view,
    map: map_Extended,
    settings,
    help,
    layerInfo,
    share,
    dateSlider,
    asynchronous,
    analytics,
    alerts
});

export default rootReducer;
This new index reducer replaces the Core map reducer function with the new map_Extended reducer function. When this modfied application is run, the default view should now be in 3D and you should see a log statement of "Modified Action" every time a layer is activated/deactivated.
In general, the best way to start altering a part of _core is to copy the piece into an area outside of _core, make the modifications you want then alter the imports necessary to use your new version. It is sometimes the case that these alterations are recursive in nature (e.g. if _core/A imports _core/B and you want to modify _core/B you will need a new B and a new A to import it). If you are familiar with inheritance and composition, be sure to check if your altered version can simply extend the _core version and thus save you quite a bit of code duplication and management. Look through the Example Projects to see these approaches in action.
There are three areas of configuration:
- CMC Core:
src/_core/constants/appConfig.js- exports config parameters as individual variables
- overrides none
- built into
bundle.jswith webpack
- CMC App:
src/constants/appConfig.js- exports config parameters as a single, unified variable
- overrides CMC Core
- built into
bundle.jswith webpack
- Ops:
src/config.js- exports config parameters as a single unified variable
- overrides CMC App
- not built into
bundle.js
The goal of these different sections is to allow CMC Core and CMC App developers to create and modify configurations without stepping on each other's toes and provide a mechanism for a built app to have it's configurations modified after deployment. Take the example of the APP\_TITLE and APP\_VERSION parameters. In Core they may be (APP\_TITLE = "CMC Core"; APP\_VERSION = 2.6;) but a subsequent application would want the configuration to be (APP\_TITLE = "My App"; APP\_VERSION = 1.0;) so they override those parameters in src/constants/appConfig.js. Let us then suppose that a backend service is updated and so the version of the app should be bumped to reflect that change. Since there is no reason to modify the frontend client, the Ops team can override those parameters to be (APP\_TITLE = "My App"; APP\_VERSION = 1.1;) in dist/config.js (which is a copy of src/config.js created at build time) without needing a new build or deployment of the app.
These overrides/additions are accomplished by adding the parameters into the APP_CONFIG object in src/constants/appConfig.js and into the APPLICATION_CONFIG object in src/config.js.
The following sections outline the build process for CMC following installation (npm install) which involves copying files and folders, configuring and running Webpack to combine, compile, and minify code, running a development server, and much more. While it may seem a little overwhelming, Application Developers may never actually need to modify most of these steps.
After npm install runs successfully, npm automatically looks for a script called postinstall. The package.json file contains a script called postinstall which points to a shell script scripts/postinstall.sh, so npm sees this and runs this script. This scripts/postinstall.sh script is used to add the assets/assets folder for serving static files asynchronously in production. After the folder is added, several libraries and images from node_modules, src/_core, and lib are added into assets/assets. Serving files from assets/assets is a useful last resort approach for files that aren't behaving well with webpack, libraries that require asynchronous loading of files and data (like Cesium), etc.
Why assets/assets? Good question. Our development node server serves multiple directories as if they were contained in one root directory. We created this assets structure in order to mimic what the production environment really looks like.
In short:
webpack takes modules with dependencies and generates static assets representing those modules.
Webpack is one of the most popular module bundlers or build systems for web applications (as of late 2017) and continues to increase in popularity and stability. Webpack was chosen for CMC over other build systems because almost every React/Redux starter kit and project uses Webpack. Alternatively you could use a combo of grunt/gulp/browserify/etc/etc if you really think some other combo is better.
CMC uses webpack version 2. Read more about webpack version 2 over in the docs here.
Webpack is complicated and does a lot but once you get over the learning curve (or avoid it entirely and just tweak existing configurations) it's great, very flexible, and does a lot right out of the box. Webpack is driven from a JS configuration file (or multiple files in our case for development and production).
CMC uses two Webpack configurations (three really, the last one is a clone of webpack.config.dev.js living inside of karma.conf.js but ignore that for now).
webpack.config.helper.js, is the main webpack configuration file. It defines a general build pipeline for CMC assets and includes specific options for the dev/prod configs to override. It outputs built assets under the dist directory. When configured for dev, it includes JS/CSS sourcemaps for debugging as well as hot module replacement and live reloading via BrowserSync for automatic reloading of certain pieces of code and CSS while maintaining application state and without refreshing the page. In production mode, it creates the optimized, minified, uglified, duplicate dependency reduced, static application output.
When you are developing an application using CMC, you will most often want to use the development webpack configuration. This configuration is most easily used by running the npm start command which in turn runs npm run open:src which runs scripts/srcServer.js using node. This script imports the development webpack configuration and uses browserSync to serve the output files and enable hot module reloading. If you take a look at the size of the output bundle in a browser development tool you'll see that it's quite large. This is normal since the bundle is not optimized at all and contains many sourcemaps. Not to worry though, the final production bundle will be much smaller. When you first boot up the development server it may take a few seconds but will then be fairly quick to live reload (e.g. if you change and save some CSS you should see the actual page CSS change almost instantly). Also note that no files are actually output during the development build and are instead served in-memory. For more information on development webpack configuration please view [https://webpack.js.org/concepts](webpack documentation). The development configuration is also thoroughly commented.
The production webpack configuration is useful for creating optimized static builds of your application. As a result, all of the development tools like sourcemaps, hot reloading, etc., are not used. The main use of this configuration is for when you want to deploy your application out to your users, so you won't be running it very often yourself (although your Continuous Integration Service might be) since the build can take up to a few minutes to complete. However, it can be useful to run the build every so often (even if you have a CI/CD service) to:
- Determine the final file size of output resources like bundle.js and styles.css
- Profile performance-critical parts of your application since the built version of the app will generally be slightly more performant than the development version
The production configuration is most easily used by running npm run build. However, npm is aware of the keyword build and will run the prebuild command if one exists. In our case we use prebuild to clean the output distribution area using npm run clean-dist.
After prebuild has successfully run, npm will run scripts/build.js. This script configures webpack using the production configuration and runs webpack to create the final bundled output.
After the build has run, npm automatically looks for a script called postbuild which we also have specified in package.json. Now scripts/postbuild.sh runs and copies over src/default-data and assets/* into the output dist directory so they can be accessed asynchronously after application load.
Now you should have a completed production application inside of dist that you can run anywhere. If you would like to open the production application using the server provided by CMC you can run npm run open:dist which uses browserSync (with hot module replacement and livereload disabled). You can also run npm run build:open to have the server automatically start after build success.
If you decide to use a new filetype, or a new loader, or a library that requires specific build configurations, it may be necessary to change the cmc-core webpack configuration. To enable that, we have created webpack.config.mod.js. That file defines a function that takes the cmc-core generated config as input and then returns a new (possibly altered) version of that config object. So to change the cmc-core webpack config, simply modify that file to perform the necessary modifications. If you check webpack.config.dev.js or webpack.config.prod.js you'll see that this webpack.config.mod.js file is already integrated so you don't need to do anything more to enable it.
Most libraries are easily used with Webpack but on occasion some libraries require a bit more work, such as complex libraries like CesiumJS. CesiumJS uses lots of extra assets and doesn't fit the typical mold of a modular javascript library, meaning you can't just import cesium and be done. The following steps from CesiumJS.org were used as basis for integration with CMC webpack setup https://cesiumjs.org/2016/01/26/Cesium-and-Webpack/. In short, webpack receives a few config tweaks, the main CesiumJS file is loaded using the webpack script loader which executes the script once in global context, Cesium requests extra static resources on demand from the assets folder, and CMC maps the global cesium variable to a instance variables for consistency.
Using a combination of webpack plugins, mainly html-webpack-plugin and style-ext-html-webpack-plugin, we automatically generate our root index.html file that serves as the entry point to the built application. With html-webpack-plugin we transform index_template.html into index.html, telling the plugin where to inject the css and js bundles via lodash templating (supplied by the plugin). We also enable the addition of the webpack build hash to these bundle files in order to provide a mechanism for cache busting. These hashes are unique to every build. Finally, we use style-ext-html-webpack-plugin to inline a few global css rules as well as small amount of css we would like to apply to the loading screen for the application.
CMC uses ESLint to report JS syntax and style issues. ESLint is configured via a file at the root of the repository called .eslintrc which contains many configuration items that tell ESLint what plugins, rules, and exceptions to use when linting your JS code. Some of these rules you may may want to alter globally from this file if you have different preferences. For example if you want to remove the ESLint rule warning against using var in your JS (since you use const and let instead in ES6) you can set
"no-var": 1 to
"no-var": 0Please, please, don't disable this rule though. Use const and let! Embrace ES6!
There may also be situations in which you only want to ignore certain cases in your code where you are forced to break certain rules. In this case, you can use ESLint comments in your code to tell ESLint to ignore a certain rules in certain places. For example, the CMC Core Help component /src/_core/components/Help/HelpContainer.js ignores the react/no-danger ESLint rule that is normally active to warn developers against using the risky-if-not-used-properly React dangerouslySetInnerHTML. In this case, CMC uses the attribute since it needs to insert some HTML (from Markdown files) in string form without explicitly parsing content and building HTML elements. To suppress the ESLint warning for this particular case, CMC uses the following ESLint inline comment syntax:
<div className={!this.props.helpPage ? 'hidden' : 'help-page'}
    // eslint-disable-next-line react/no-danger
    dangerouslySetInnerHTML={{__html: this.helpPageContent[this.props.helpPage]}}
/>
Other forms of ESLint ignore comments are used in CMC. Learn more about ESLint and the different ways to suppress rules http://eslint.org/docs/user-guide/configuring.
CMC uses Prettier for consistent, automatic pre-commit-hook formatting of js/css/scss files. Prettier is configured to run automatically on all .js, .css, and .scss files after commits have been staged. This formatting is purely stylistic and does not change any code (other than the occasional addition of missing semicolons). Prettier is used for all relevant Core files but Application Developers may choose to disable this behavior by removing the precommit hook in package.json, change the prettier settings included in the .prettierrc file, or substitute their own formatter. Prettier can also be invoked manually or on file save from within many editors such as VSCode, Sublime Text, etc. A convenience npm script called prettier-all is included for formatting all js/css/scss files located under src.
CMC ships with a BrowserSync server used to serve development and production versions locally. BrowserSync is great for development and testing but is not ideal for real world production use. Instead, use whatever static file server you're comfortable with like NGINX or Apache to serve your production dist/ directory.
The following sections outline how CMC is styled, how CMC styles are written, organized, and overwritten. CMC uses a component libarary and bases most of it's design principles on Google's Material Design Standards. While additional interaction and display design inspiration is drawn from other tools, the Material Design spec provides a solid foundation for most components. The use of a component libarary that follows this design spec also allows CMC based applications to quickly decide on layouts and styles so that they can focus more time on feature implementation.
Material-UI is a React UI Component library that follows Google's Material Design Standards. Material-UI was chosen for CMC because it is: fairly complete (component-wise), straightforward to override, and well maintained. As of writing, Material-UI has not released a v1.0 product and CMC is using a beta version of the product. That means that it is subject to rapid changes that occasionally break things, but in tracking the history of these changes we've found them to be few and relatively easy to incorporate.
CMC uses seperate css/js files as much as possible. Inline styles or even styles defined within a js file tend to be difficult to override and require an additional layer of abstraction or adjustment from "classic" web development that seem to outweigh its benefits. The bulk of CMC Core styles can be found alongside their respective components. In a few cases, multiple components draw from the same style file, and under src/_core/styles there are some common/generic styles. Under src/styles there are some prepopulated styles detailed below:
_colors.scss: This is a SASS partial file that simply defines reusable colors for the application. Note that changing the primary/secondary colors here will not affect Material-UI's themeing which is controlled elsewhere (see below). These colors are for direct use in CMC style modules.inlineStyles.scss: This file is processed and inlined intoindex.htmlduring build so that a small subset of styles are available as soon as the page loads. This allows something like a loading screen to be rendered more or less instantly while the rest of the js/css is being retrieved/processed by the browser. Edit this file as desired.inlineStyles.js: This is a js wrapper used to load theinlineStyles.scssfile.
Additionally, there are external style files loaded from the index.html file:
- Roboto & Roboto Mono – The two fonts used in CMC
- normalize.css - Used for more consistent cross-browser element rendering
- mapskin.min.css - Used for additional mapping specific icons
For all styles (except inlineStyles) CMC uses CSS Modules. This allows insulated styles to be created for each component while also providing mechanisms to reuse styles across the application. Styles are defined in .scss files alongside the components they style, those files are then imported in the component which creates an object with a localized class name mapping. Example:
ComponentName.css
.foo {
    background: red;
}
ComponentName.js
import styles from 'componentName.css';

export default (props) => {
    <div className={styles.foo}>CONTENT</div>
}
When ComponentName is rendered, it will have a class like ComponentName_foo_ASAKJHS applied to it. There are special keys to skip name localization and to combine multiple classes into a single reference, see CSS Modules documentation for more details.
CMC uses SASS which is a popular CSS extension language. From SASS's site:
Sass is an extension of CSS that adds power and elegance to the basic language. It allows you to use variables, nested rules, mixins, inline imports, and more, all with a fully CSS-compatible syntax. Sass helps keep large stylesheets well-organized, and get small stylesheets up and running quickly...
This is why all of the style files are .scss extensions. CMC primarily uses SASS for imports, variables, and nesting.
CMC uses PostCSS in both it's development and production webpack build processes. PostCSS provides a framework for CSS plugins that make writing CSS easier. CMC uses PostCSS's autoprefixer that automatically adds vendor prefixes from Can I Use to your CSS to ensure cross-browser compatibility. For example, take this snippet of CSS.
transition: opacity 0.1s linear 0s;Normally to ensure cross-browser compatibility you'd want to look up and add all of the different browser prefixes for the transition property. (Note that this example is a little overkill since CMC does not support many of these older browser versions)
-webkit-transition: opacity 0.1s linear 0s; /* Chrome < 26, Safari < 7 */
   -moz-transition: opacity 0.1s linear 0s; /* Firefox < 16 */
     -o-transition: opacity 0.1s linear 0s; /* Opera < 12.10 */
        transition: opacity 0.1s linear 0s; /* IE10+, Firefox 16+, Chrome 36+, Opera 12.10 */
This is a huge pain and it means you have to constantly change multiple copies of the same CSS property over and over. Luckily, autoprefixer solves this problem by automatically adding these browser prefixes to your CSS, meaning you can stick to only writing the standard version of the property:
transition: opacity 0.1s linear 0s;There are many other PostCSS compatible plugins that you may find useful so feel free to add more.
CMC Core components will generally include a className prop that will apply a class to the top level of a component. If you need more granular access to a component for styling, for instance styling a sub-component, you will need to create a new component in its place and compose from there. In general, CMC has taken the path of composability over customizability.
Application Theme
Material-UI has a theme provider module that passes themeing information down the component tree. CMC uses a theme provider at the top level of our AppContainer component to facilitate this. To change the theme of Material-UI components in your application, simply mimic src/_core/components/App/AppContainer.js by creating a Material-UI theme and using a <MuiThemeProvider /> to wrap the application.
Component Specific Styles Material-UI has several approaches to overriding component styles. CMC favors the use of class name overrides as it dovetails nicely with CSS Modules.
CMC tries to stay within the Material Design specification by using Google's Roboto and Roboto Mono fonts. React-Toolbox is built to use Roboto and CMC attempts to mirror and/or inherit font choices made by React-Toolbox in CMC components.
Roboto is recommended for everything from titles to labels to paragraphs. CMC only uses three weights of Roboto – 300, 400, and 500 to keep load times down since fonts are large. If you need more weights feel free to add some more.
Roboto Mono is recommended for use as a contrasting font in limited cases including title font, numerical displays (like dates, slider amounts, counters, etc.) but should be avoided for default use. CMC uses three weights of Roboto Mono – 300, 400, and 700.
CMC uses the NASA meatball favicon by default. The favicon is specified in index.html using the following imports:
<link rel="apple-touch-icon" sizes="180x180" href="/img/apple-touch-icon.png">
<link rel="icon" type="image/png" href="/img/favicon-32x32.png" sizes="32x32">
<link rel="icon" type="image/png" href="/img/favicon-16x16.png" sizes="16x16">
<link rel="manifest" href="/img/manifest.json">
<link rel="mask-icon" href="/img/safari-pinned-tab.svg" color="#5bbad5">
<link rel="shortcut icon" href="/img/favicon.ico">
<meta name="msapplication-config" content="/img/browserconfig.xml">
Favicons specification varies quite a lot based on browser, device, and screen size and pixel density, so CMC used http://www.favicon-generator.org/ to generate all of the necessary favicons (note that the list CMC uses may be a subset of the full output).
When Material icons or Mapskin icons do not contain the icon you are looking for, you can easily add your own svg icon. CMC uses several custom icons and you can look in src/_core/components/Share/ShareContainer.js for a complete example, but in short the process involves declaring your icon as shown below and tweaking the CSS, viewBox, and svg parameters.
let LayerIconTop = props => (
    <SvgIcon {...props}>
        <svg viewBox="-1 1 38 35" style={{ height: "93%" }}>
            <path
                fillRule="evenodd"
                d="M32.758 18.523c.048-.046.09-.097.125-.15.065-.09.074-.132.08-.154.022-.07.037-.134.046-.2.017-.134-.002-.275-.056-.41-.038-.114-.073-.15-.092-.17-.076-.093-.1-.117-.126-.14-.027-.024-.054-.043-.078-.06-.064-.05-.085-.063-.107-.075l-4.788-2.467 4.823-2.952c.07-.057.075-.062.076-.064.028-.02.054-.042.078-.065.048-.046.09-.097.125-.15.065-.09.074-.132.08-.154.022-.068.037-.133.046-.2.017-.133-.002-.274-.056-.41-.038-.113-.073-.15-.092-.168-.076-.094-.1-.118-.126-.14-.027-.025-.054-.044-.078-.06-.064-.05-.085-.064-.107-.076L18.62 3.09c-.033-.017-.065-.025-.085-.03-.15-.05-.23-.062-.31-.062-.06 0-.117.006-.174.018-.033.007-.067.016-.1.028-.088.035-.117.04-.15.06-.034.02-.057.034-.08.05l-.16.096-1.198.732L4.656 11.15l-.157.097c-.124.075-.218.13-.296.215-.13.14-.202.332-.203.536 0 .058.006.118.018.177.015.073.036.133.065.193.045.104.078.142.095.163.03.037.063.066.09.092.052.047.077.07.106.09.06.043.076.05.076.05l.082.044.173.09 4.555 2.348-4.587 2.81-.157.098c-.123.075-.217.13-.295.215-.164.177-.234.437-.188.7.022.097.042.152.068.206.045.104.078.142.095.163.03.035.063.065.092.09.05.048.076.07.105.092.06.042.076.05.076.05.027.014.055.03.082.043l.173.09c.075.04.15.078.226.117l5.24 2.702-5.534 3.39c-.052.03-.105.063-.157.096-.125.075-.22.13-.297.215-.166.18-.236.44-.188.702.017.08.038.143.068.204.045.104.078.142.095.163.03.034.063.064.092.09.05.047.076.07.105.092.062.042.07.045.077.05l.093.05.597.308 12.336 6.355.565.29.19.098c.043.02.084.043.126.064.037.02.075.04.125.05.093.033.128.04.162.047.042.007.086.01.13.01.126-.006.21-.016.286-.048.076-.025.12-.04.162-.064l13.36-8.176.074-.064c.026-.02.052-.042.076-.065.048-.046.09-.097.125-.15.066-.09.075-.132.08-.154.023-.068.038-.133.047-.2.018-.133 0-.274-.055-.41-.038-.113-.073-.15-.092-.168-.076-.094-.1-.118-.126-.14-.027-.025-.054-.044-.078-.06-.064-.05-.085-.065-.107-.077l-5.703-2.937 5.77-3.53c.11-.082.137-.104.16-.127zm-2.212 7.413l-11.79 7.215-.485-.25-.502-.258-1.15-.592-10.15-5.23 5.428-3.324 6.167 3.173.198.1.12.06.007.005c.03.016.068.035.118.046l.018.008.04.015c.035.01.07.02.104.025.042.007.086.01.13.01.024 0 .048 0 .07-.002.056-.004.14-.014.216-.046.01-.004.025-.01.04-.014.036-.01.08-.025.123-.05l.018-.01.005-.004 5.93-3.63 5.346 2.754zm-11.77-.74l-12.29-6.33 4.48-2.745 6.686 3.442-.032.02.205.082-.02.012.01-.007.01-.006.114.046.303.156.118.06.01.005c.03.017.067.036.117.047.003 0 .01.004.018.007l.04.015c.035.01.07.018.104.024.04.007.085.01.13.01.023 0 .047 0 .07-.002.055-.004.138-.014.215-.045l.025-.01.016-.004c.035-.01.078-.025.122-.05l.018-.01.005-.004 6.88-4.21 4.434 2.283-11.79 7.215v-.002z"
            />
        </svg>
    </SvgIcon>
);
LayerIconTop.muiName = "SvgIcon";
export { LayerIconTop };The React framework let's you break all of your UI components up into independent modules. Those modules then base their rendering on a state machine you define for them and React takes care of efficiently determining when and how much to edit the DOM. Redux centralizes that state machine and creates a single data flow path to keep everything coherent. In general, try to keep every aspect of the rendering located and editable in the state.
Most of the syntax for components and the file structure paradigm are driven by Redux more than React. Here are the main pieces of React/Redux that we deal with:
- Store - Wraps the application state and provides an API to dispatch actions that create a new state. The store will then pass that new state to React to render the new application state in the DOM.
- State - One big object that represents the current state of the application. The combination of this and the reducers constitutes the application's state machine.
- Reducers - These functions accept the current state of the application and an action object. They then perform an update to create the new application state that will be passed back to the store.
- ReducerFunctions - These are the actual function definitions that the Reducer will call to modify the state. This layer of indirection was developed in CMC to make overrides and expansion of Core reducers cleaner.
- Actions - These are JS objects, or functions that return JS objects, that contain action definition data. In CMC Core, the functions under
Actions/create these objects. - Components - These are the React objects that define a component's render logic within the DOM. They track some subset of the application state to base their rendering on and can dispatch actions to modify the application state.
- Containers - These are Components that primarily aggregate smaller components. They will often track very little state but may define a common action abstraction that is passed to children components. They let you group related components together while isolating their rendering.
- Note: CMC Core does not strictly adhere to this definition at present but is slowly migrating to this paradigm
- Models - These are smaller pieces of the application state that let you modularize state and create re-usable object models.
- Note: This is not strictly a React/Redux idiom
- Constants/ActionTypes - These are constant strings that are used to uniquely identify actions. They are not strictly necessary but are useful to avoid simple errors.
This data flow demonstrates how an interaction flows from the user through Redux/React and back to the user. The simple example is of a switch that toggles on and off. Notice how the actual DOM that the user sees isn't updated until the end.
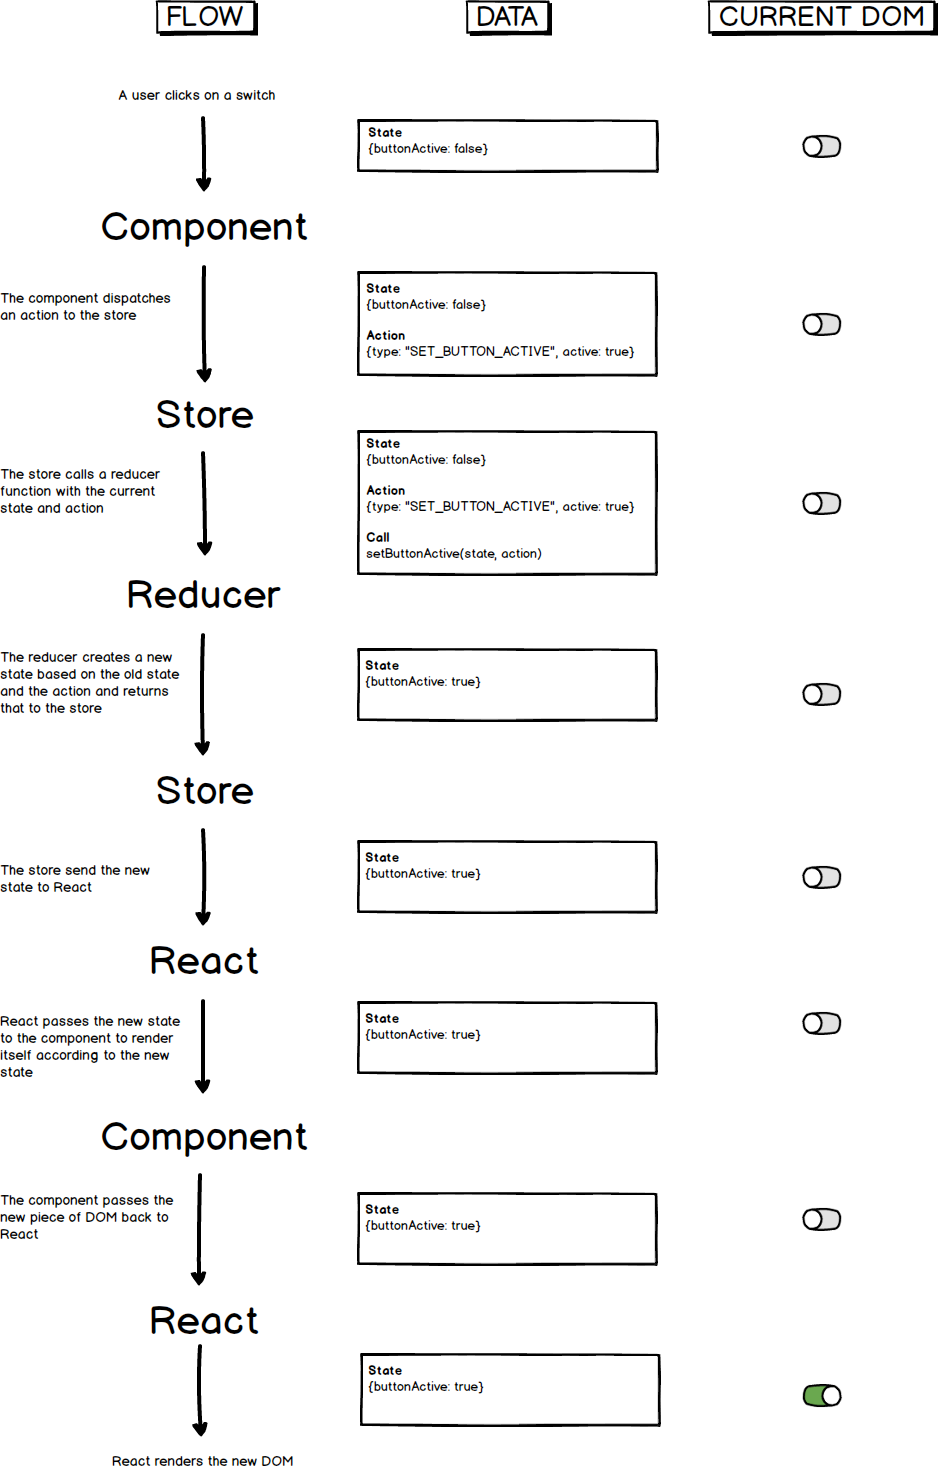
Read up on ReactJS and ReduxJS for more detailed information.
After a state change, React will find all components that are affected (i.e. those components that track the changed piece of state), perform a render of those components in their virtualDOM, performs a diff between their virtualDOM and the current DOM to determine which pieces of the DOM need changing, then update the DOM accordingly. If you have many sequential state updates, your application can quickly become bogged down in this cycle. Some steps to optimize this process are:
- Break up your components into more isolated pieces (wrapping them in a container lets you continue to think of them as a whole)
- Reduce the amount of state each component tracks
- Make liberal use of
shouldComponentUpdate()in your components to skip unnecessary renders - Track pieces of state as instance variables within components and use
forceRender()to shortcut the entire process- Note: this is not often recommended as it circumvents the Redux paradigm of a single state, but CMC Core has found this approach useful when performance becomes bottlenecked
When a component dispatches an action to the Redux store, the store will update the state and push the update to React. React will then go through it's render process. Once completed the call to the dispatch will return.
If a component needs to track a piece of state to dispatch actions but doesn't need it to determine its rendering, shouldComponentUpdate() can return false when that piece of state changes but it will still have the updated piece of state when dispatching the action.
Take the example of loading an external file, file.json. A component would dispatch an action that is a function that returns a Promise. The Promise will be tracked by the Thunk middleware in the CMC store. For an example of this, look at loadInitialData() in src/_core/Actions/LayerActions.js.
CMC uses Thunk Middleware in its store to allow for actions that perform asynchronous operations (such as fetching external resources). In a future version, we may also include something like Redux Batched Updates to remove unwanted renderings.
In its purest the form, React and Redux would have the currently displayed DOM be simply a reflection of what is in the state. This places a heavy burden on React as it must perform a diff between the current and next DOM on each state update. This also means that you are expected to place all rendered components in the React/Redux cycle so that React can take care of those changes for you. However, this paradigm breaks for thinks like maps because their rendering is handled by mapping libraries and are often rendered directly on a canvas element, which has no discernible DOM updates to manage. A React idiomatic approach would be:
- On each state change, read the expected state of the map and the current state of the map
- e.g. Which layers are active? What are their opacities? Their order? What are the current lat/lon bounds on the view?
- Compare the two states
- Perform the necessary updates on the map to conform it to the expected state
The issue with this approach simply one of scale. There are so many aspects of map rendering which may or may not be library specific that building out this diffing ability would be beyond cumbersome and slow. Instead, CMC takes the following approach:
- On each dispatch to the store (e.g. to turn on a layer)
- Perform the update on the map object
- Update the state accordingly
- If the update succeeded, set the layer object in the state to active
- If the update failed, do not update the layer object in the state but add an error alert
- Return the updated state
This allows CMC to avoid tracking any map state except for what is needed by components to render correctly as well as skip large amounts state comparisons.
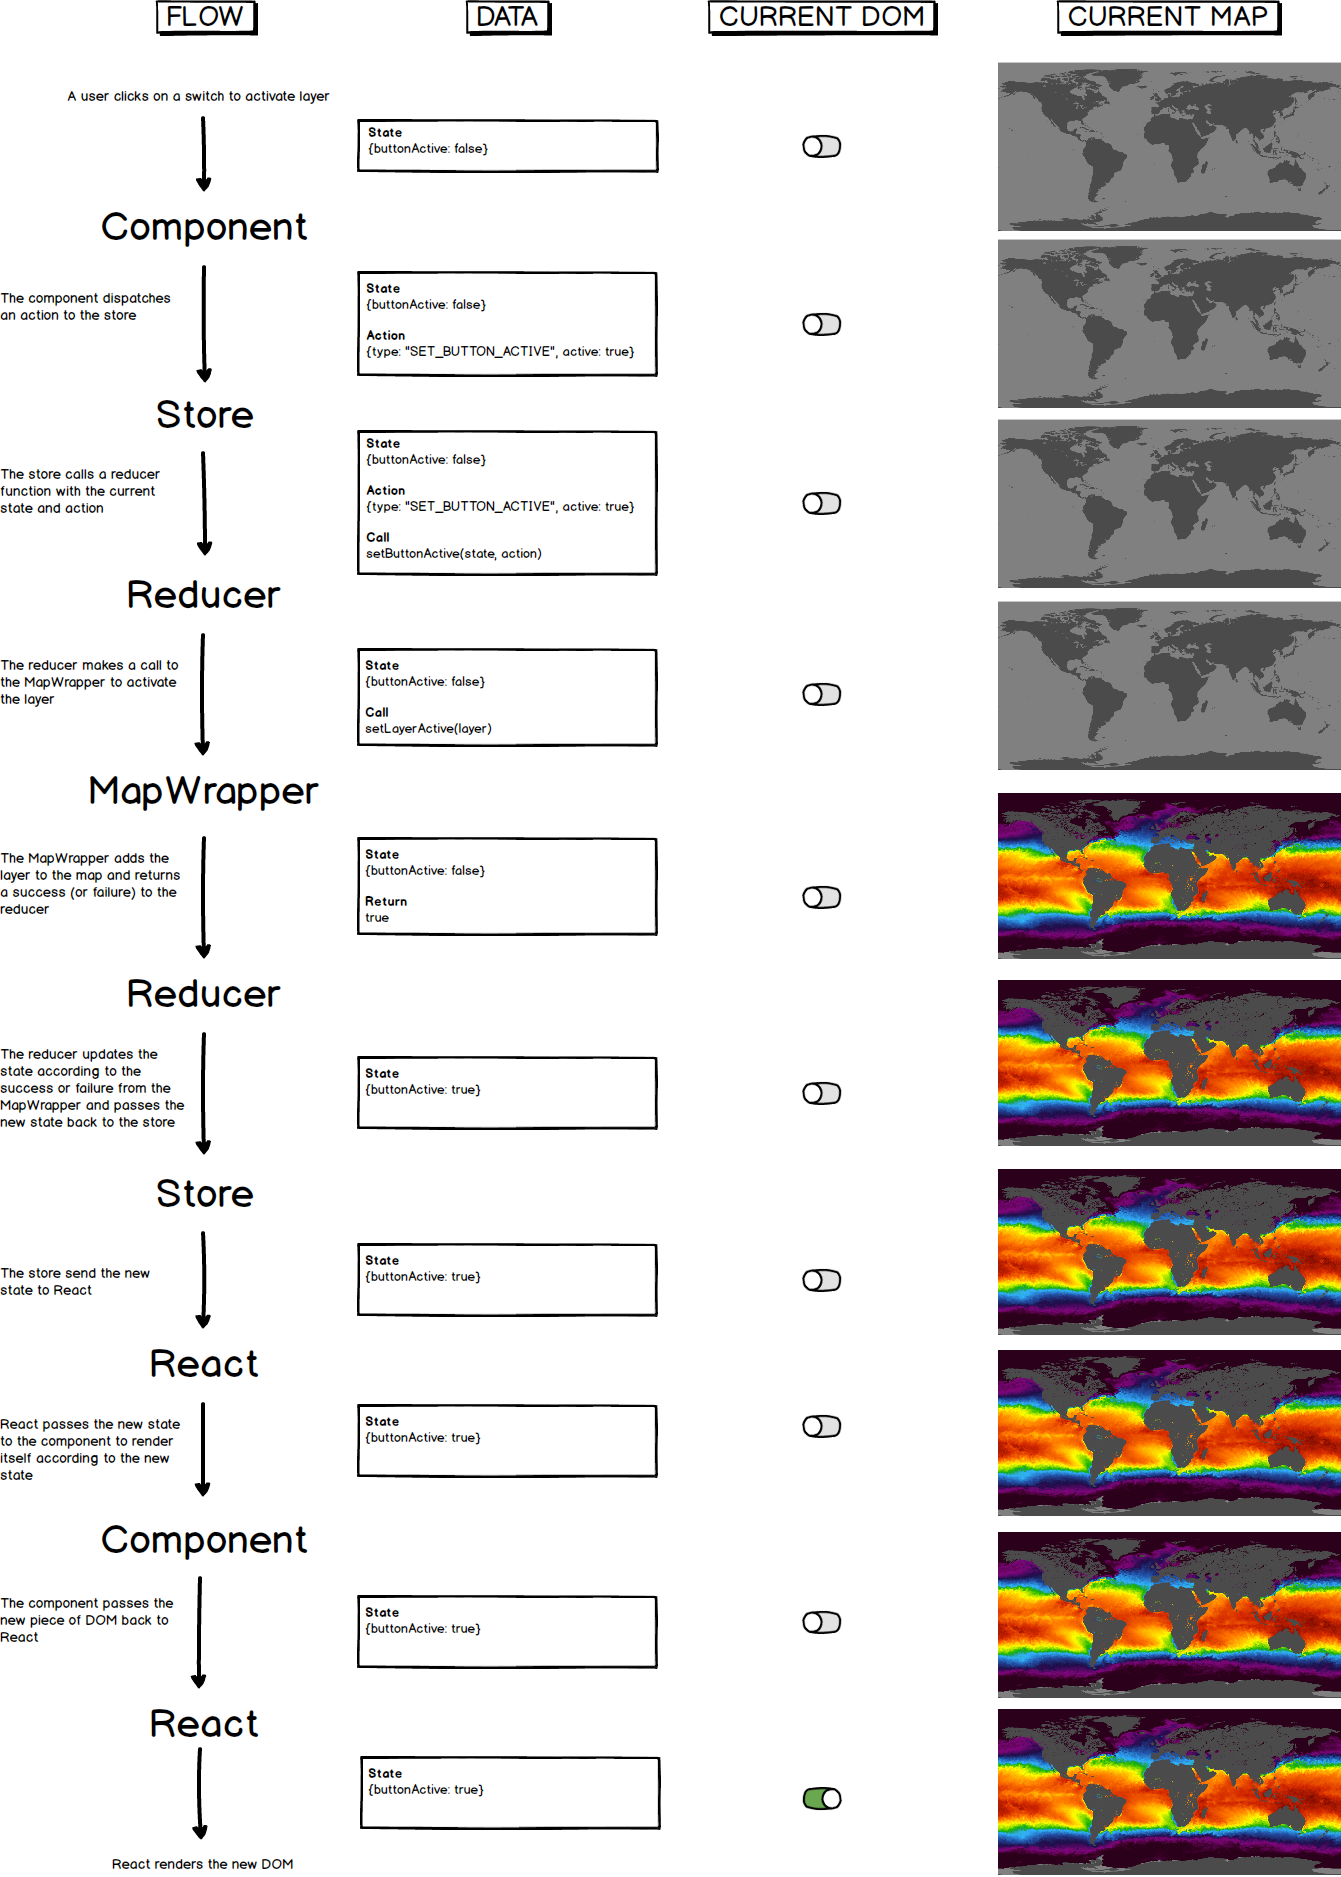
This deviation in data flow is shown below. In this diagram, we use the same premise as the data flow diagram above with one change, the switch will now toggle a layer on the map on or off. Notice how the DOM for the switch is again not updated until the end but the map is updated from within the reducer itself.
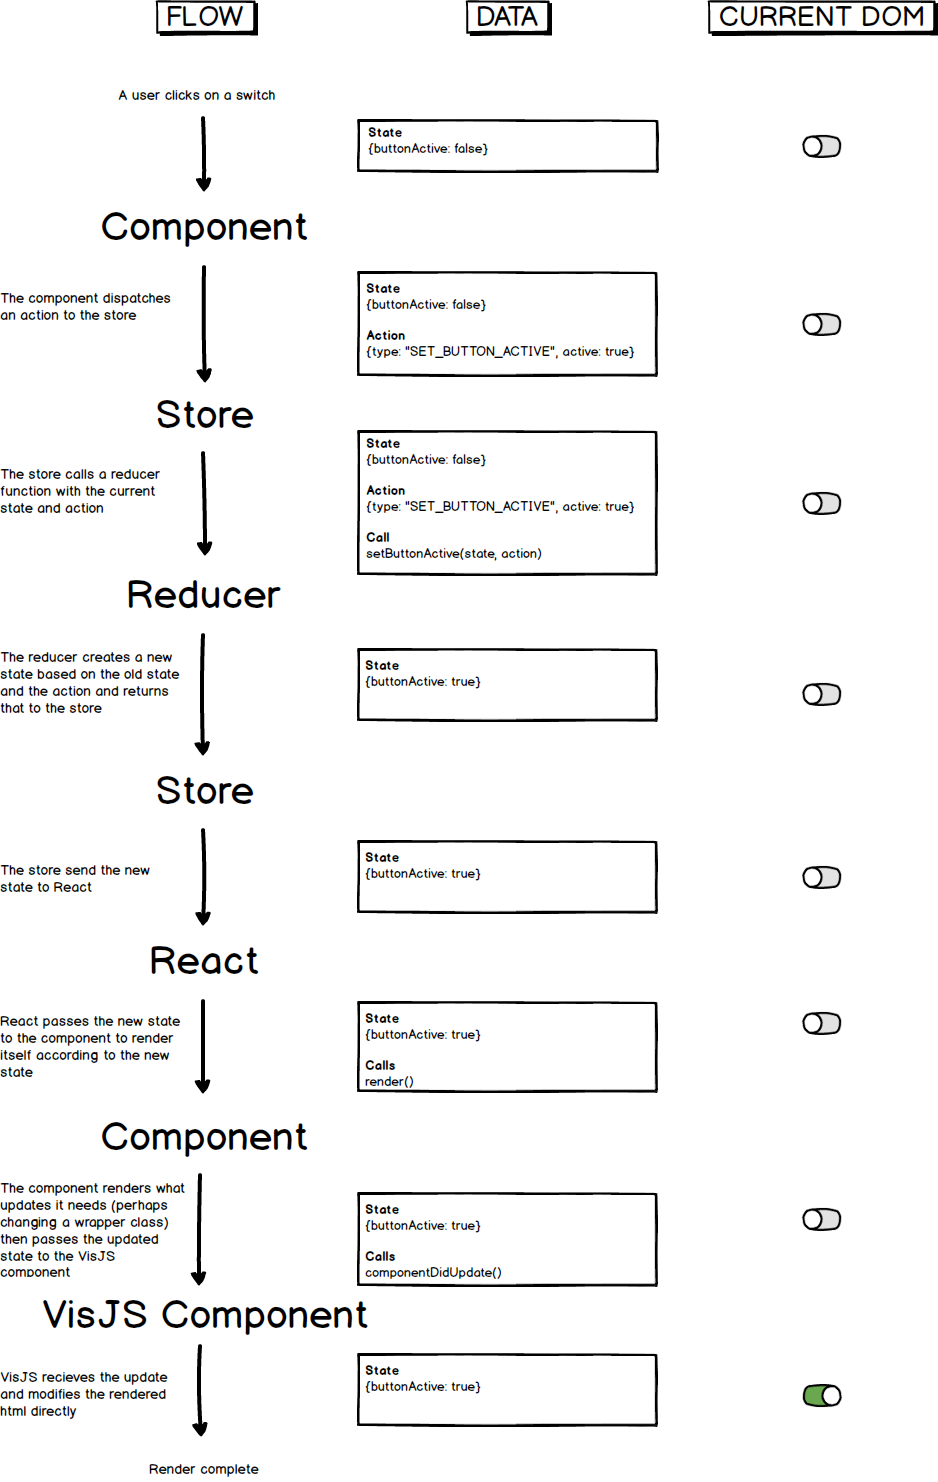
vis.js is a fairly powerful visualization library. It's made to be easier to work with than something like D3 and provides a number of high level abstractions to make basic visualizations simple. In this application it is primarily responsible for rendering the Timeline and associated components, though it has capabilities beyond that which we encourage you to use. In relation to React/Redux, VisJS essentially replaces the React rendering functions. We create a React component to manage the data flow between VisJS and the rest of the application as well as provide a sane DOM entry point for VisJS. VisJS then takes the DOM node and data from the state machine to perform its own rendering.
This flow is very similar to how maps are handled in CMC with the main difference being that updates are handled from within the component instead of the reducer. In this way, the React component acts essentially as a wrapper around the VisJS component that it creates as an instance variable.
Here is a data flow diagram to demonstrate this. In this example we are again toggling on a switch, however here we are assuming the switch is a VisJS component. Notice how the render cycle behaves normally up until component render time at which point the changes to the DOM are offloaded to VisJS and React does not need to do anything.
This is a collection of things CMC has run into in its development but there is a wealth of information out there on optimizing React/Redux applications so please don't stop here if you're interested in boosting your application's performance. And remember kids, Measure First, Optimize Later
- React's Render Cycle: Specifically the section after the reducers have updated the state and React is now updating the components and UI. As explained above, React has to do a fair amount of work to decide what needs updating, how to update it, and to actually update the DOM. This section if likely to be the most profitable in terms of increasing performance. Methods to improve this section are:
- Use logging or React-DevTools to profile which components are rendering when
- Reduce the number of props and amount of state components rely on
- Use smaller, more isolated components
- Use
shouldComponentUpdate()to cut down on unnecessary renders - Use instance variables and
forceUpdate()within components to skip the Redux/React cycle entirely. This will force React to go straight to a render of the component, skipping all the steps in between. Note that this technique is not often recommended as it circumvents the Redux paradigm of a single state. The only times this technique is really appropriate is with state changes/renderings that can safely live outside the central state without harm to the user. These should be very small things and there is no hard and fast rule for defining them. - Use middleware to batch your updates. In some cases, there are several state updates that happen sequentially. It may not be necessary to render the states in between these actions so using middleware to roll all the state updates into one avoids this issue entirely in some cases.
- Delay/Batch updates for individual components. For this, we'll use the example of the
src/_core/components/Share/ShareContainer.jscomponent. It needs to remain constantly up to date with the state of the application so that at any time the user can copy the url from the browser to share the application with someone else. That means that on each state update, the ShareContainer has to update. With certain action sequences (such as adjusting layer opacity) it's very possible for the call to render to come 100+ times in under 0.5sec. The actual render time for this component is non-trivial as it is reading a large amount of the state and constructing a string to represent that state. To cut down on the need for rendering this component, CMC implemented a timeout that waits 0.5s from when a render is first fired to actually read the state and render itself. That effectively batches all the state updates that occur within that 0.5s together so that the number of renders required for that component has been reduced from 100+ to 1.
- Reducer Functions: State updates can be costly, depending on your data structures and the extent of changes needed. CMC uses ImmutableJS to keep state updates isolated from each other and to provide high performance data structures. Some tips to improve in this section are:
- Use Immutable.Maps instead of Immutable.Lists when possible. ImmutableJS provides nearly identical APIs for Maps and Lists. It may not always make sense to use a Map but they provide constant time data access which can be a major boon in many cases.
- Make state changes as functional as possible. The fewer extraneous actions that occur in each reducer, the better.
- Layer Rendering on the Map: For a layer to render, the mapping library will need to fetch the resources (images/data files) necessary, decode those resources, then draw them onto the canvas. It must repeat that process whenever the map view changes or layers are added/removed. Ways to improve this are:
- Use tiled datasets. This allows the library to parallelize resource gathering and cache resources more efficiently
- Don't use large vector datasets. This goes along with tiling but large vector datasets require a greater amount of computation to render.
- Beware VisJS Renderings: Rendering in VisJS, if done too often with fancy transitions can easily hog CPU power since (unlike React) there is no DOM diffing done to avoid unnecessary renderings. Pay attention to your VisJS components to ensure they render only when needed and that your svg transitions are simple.
- Chrome Timeline Tool: Learn to use this and you will quickly be able to narrow in on which actions cost you the most and where to focus your efforts.
- React-DevTools: This browser extension offers many tools for quickly checking your application state during runtime and tracking changes as they occur to find extraneous renderings.
ImmutableJS offers a set of high-performance, immutable data structures. Since Redux/React emphasizes a functional paradigm and so much of the application relies on a single, shared state that is passed by reference throughout, it is very important to make sure that the state is treated as immutable. ImmutableJS also provides a coherent and powerful API for dealing with Arrays, Maps, Sets, and more.
CMC uses Openlayers3 and Cesium as its default mapping libraries. As noted in the diagram above, these mapping libraries sit slightly removed from the normal React/Redux cycle and are interacted with through an abstraction layer called a MapWrapper (src/_core/utils/MapWrapper.js). The MapWrapper abstraction is used so that the actual mapping library used can be changed to suit any given applications needs.
These two libraries were chosen for a few reasons:
- They each provide a large and robust feature set that will accommodate most applications' needs
- Strong community involvement for both
- Together they demonstrate the flexibility of the MapWrapper abstraction
- Cesium is by far the best WebGL based, open sourced 3D mapping library
- Why not leaflet or ArcGIS JS?
- Leaflet relies too much on third-party plugins to provide a rich feature set. These plugins are often not well maintained and managing them can easily become overwhelming
- ArcGIS JS is closed source and built with Dojo in mind and does not meet the flexibility requirements CMC needed to support many unique projects
If an Application Developer wants to use Leaflet for their project, they need only create their own MapWrapper_Leaflet.js class that extends CMC Core's base MapWrapper class, modify the MapCreator.js file to instantiate that class instead of the default and that's it. You can see examples of this here: Example Projects.
The MapWrapper class provides an abstracted API for the Reducer functions to interact with the map objects. This allows the reducers to be completely ignorant of what kind of map they are operating on (2D or 3D or WebGL or DOM based etc). Each individual MapWrapper class inherits from the base MapWrapper abstract class (we say abstract though JS really has no such thing) and uses Composition to maintain a backing instance of a map object from the library it uses. For each abstracted method, the MapWrapper operates on this map instance, catches any errors that occur and returns a success or failure to the caller. In addition, the MapWrapper class can be extended to build complex features around the mapping library. For example, extracting data from tiles involves overriding the mapping library's method for requesting image tiles, reading the data from the fetched resources, and storing that off within the MapWrapper for later reference.
Openlayers and Cesium are both aware of their visibility in the DOM to some extent. This means that they will delay rendering if their containing domNodes have display: none; styling. This allows MapReducers and the MapWrapper to operate on the map while it is not displayed without fear of it rendering in the background. Note however that the instance does not easily give up resources and once initiated Cesium in particular can become a resource hog.
CMC supports two types of layer configuration formats, JSON and XML. The XML format is specifically the WMTS capabilities format that would be returned from a GetCapabilities request to a WMTS server. The JSON format is an array of json entries that match the layer model used in the application (e.g. layerModel in src/_core/reducers/models/map.js) as follows:
{
    "layers": [
        {
            "id": "[STRING_LAYER_ID]",
            "title": "[STRING_LAYER_ID]",
            ...
        }
    ]
}
Note that CMC considers all of the layer configs to be "partial" meaning that they do not need to specify all of the fields in the layer model (see below for more information).
The complete set of configurations that the application will load by default are defined in appConfig under URLS.layerConfig.
The process of ingesting layer configs is as follows:
- Request and parse all specified configs into a list of partial configs stored in
state.map.layers.partials - Iterate through all of the partial configs and merge partial configs from different sources a. Merging prioritizes JSON definitions, e.g. it will merge a JSON based config into the matching XML config and merge the result into the default layer model (see below for an example)
- Store the final merged object into state according to the
typefield b. If atypeis not specified (e.g. the layer's config is only from XML) then it is kept in thepartialslist - If
appConfig.DELETE_LAYER_PARTIALSistruethen all unmatched partials are deleted from state (this is the default)
Layer Config Example
JSON layer config
{
    "layers": [
        {
            "id": "example_layer_id_1",
            "title": "Layer Title - JSON - 1",
            "type": "data"
        },
        {
            "id": "example_layer_id_2",
            "title": "Layer Title - JSON - 2",
            "type": "data"
        }
    ]
}
WMTS Capabilities config snippet
<Capabilities xmlns="http://www.opengis.net/wmts/1.0" xmlns:ows="http://www.opengis.net/ows/1.1" version="1.0.0" ...>
    ...
    <Contents>
        <Layer>
            <ows:Title xml:lang="en">Layer Title - XML - 1</ows:Title>
            <ows:Identifier>example_layer_id_1</ows:Identifier>
            ...
        </Layer>
        <Layer>
            <ows:Title xml:lang="en">Layer Title - XML - 3</ows:Title>
            <ows:Identifier>example_layer_id_3</ows:Identifier>
            ...
        </Layer>
    </Contents>
</Capabilities>
JS layer model snippet
const layerModel = {
    id: undefined,
    title: "",
    type: "",
    ...
};
After the JSON and XML configs are ingested, the following will be stored in state:
map: {
    layers: {
        data: {
            layer_id_1: {
                id: "example_layer_id_1",
                title: "Layer Title - JSON - 1",
                type: "data",
                wmtsOptions: "(wmts options parsed from xml config)",
                ...
            },
            layer_id_2: {
                id: "example_layer_id_2",
                title: "Layer Title - JSON - 2",
                type: "data",
                wmtsOptions: "(default wmts options in layer model)",
                ...
            }
        }
    }
}
Note that the example_layer_id_3 layer described in the XML config is absent. That is because there was no matching JSON config to specify it's type and the application therefore discarded the partial config. Also note that we do not need a corresponding XML config for example_layer_id_2 as JSON is given priority in this application.
If the same configs were used but appConfig.DELETE_LAYER_PARTIALS was false, then we would get:
map: {
    layers: {
        data: {
            layer_id_1: {
                id: "example_layer_id_1",
                title: "Layer Title - JSON - 1",
                type: "data",
                wmtsOptions: "(wmts options parsed from xml config)",
                ...
            },
            layer_id_2: {
                id: "example_layer_id_2",
                title: "Layer Title - JSON - 2",
                type: "data",
                wmtsOptions: "(default wmts options in layer model)",
                ...
            }
        },
        partial: [
            {
                id: "example_layer_id_3",
                title: "Layer Title - XML - 1",
                type: "",
                wmtsOptions: "(wmts options parsed from xml config)",
                ...
            }
        ]
    }
}
This is helpful if, for example, you want your application to pull it's layer configurations only from a WMTS GetCapabilities call.
Openlayers 4 Tile Transitions Openlayers v4.4.0 introduced an optional fade transition for loading tiles in tiled raster layers. This transition smooths the loading display of tiled layers during zooming and panning actions. However, with layers that change over time this transition can become tricky to accomodate when moving between dates and times for those layers. CMC incorporates two configuration variables to adjust how this transition affects the application's display. Note that all configurations attempt to maximize use of the CMC layer cache.
TILE_LAYER_UPDATE_STRATEGY: sets the approach by which a layer is updated over timereplace_tile: maintains the previous layer display and incrementally replaces tiles as they loadreplace_layer: removes the previous layer display and incrementally adds tiles as they load
DEFAULT_TILE_TRANSITION_TIME: this sets the transtion duration (in ms) of the loaded tiles, set to0to disable
CMC defaults use a slightly shortened transition time and uses the tile replacement strategy. To disable the transitions entirely and have an application display that appears as it would have before this feature was introduced, set TILE_LAYER_UPDATE_STRATEGY to replace_layer and DEFAULT_TILE_TRANSITION_TIME to 0.
Openlayers Layer Cache
Openlayers tiled layer sources maintain a cache of tiles that have been loaded to improve performance during zooming and panning. CMC implements a cache on top of that to improve performance during date/time changes. When the date is changed and a layer is updated on the map, CMC stores a reference to the old layer in it's own layer cache so that the tile resources are maintained. If the date is changed to a date with a cached layer, the layer is pulled from the cache and new requests for tiles are not necessary (unless the view has been changed of course). In the case of the TILE_LAYER_UPDATE_STRATEGY being set to replace_tile (see above) the openlayers source (not the layer) is cached. To adjust the size of this layer cache, change the MAX_LAYER_CACHE configuration variable.
So at this point you're probably feeling like:

and it is, everything is going to be fine, yes this is a lot of stuff, but you'll eventually work through it all and build something really awesome, so keep powering through this stuff!
.
├── .babelrc                  # Configures Babel
├── .editorconfig             # Configures editor rules
├── .eslintrc                 # Configures ESLint
├── .gitignore                # Tells git which files to ignore
├── .npmrc                    # Configures npm to save exact by default
├── .travis.yml               # Travis configuration file
├── README.md                 # This file.
├── assets/assets             # Folder created during postinstall to house Cesium, Cesium-Drawhelper, arcJS, flexboxgrid, mapskin, and normalize libraries that won't play well with webpack and have to be requested post load. Note: the assets/assets nesting is _not_ by mistake, it's actually used at the moment to resolve some build system alias issues.
├── coverage                  # Karma code coverage output folder
├── dist                      # Folder where the build script places the built app. Use this in prod.
├── docs                      # All documentation
├── lib                       # Contains arcJS and mapskin libraries that are not available in npm as well as a config file for Modernizr.
├── karma.conf.js             # Configuration for karma test runner
├── package.json              # Package configuration. The list of 3rd party libraries and utilities
├── scripts                   # Node scripts that run build related tools
│   ├── deployAssets          # Folder containing files used for deployment of CMC in a Dockerized NGINX server
│   ├── build.js              # Runs the production build
│   ├── distServer.js         # Starts webserver and opens final built app that's in dist in your default browser
│   ├── deploy.bash           # Script for deploying built app to Github Pages
│   ├── dockerDeploy.bash     # Script for deploying built app (with branch support) in Docker
│   ├── postbuild.sh          # Shell script that runs after npm build to copy over certain libs to certain places in the distribution
│   ├── postinstall.sh        # Shell script that copies over certain node_module files, libraries, sets up other stuff, etc.
│   └── srcServer.js          # Starts dev webserver with hot reloading and opens your app in your default browser
├── src                       # Source code
│   ├── _core                 # Folder containing all cmc-core files that should not need to be modified by external developer
│   │   └── actions           # Core Flux/Redux actions. List of distinct actions that can occur in the app.
│   │     ├── components        # Core React components
│   │     ├── constants         # Core application constants including constants for Redux
│   │     ├── reducers          # Core Redux reducers. Your state is altered here based on actions
│   │     │   ├── models        # Core state models acted upon by reducers. Each reducer corresponds to a model
│   │     │   └── reducerFunctions  # Functions used by core reducers, separated out for cleanliness
│   │     ├── styles              # Core CSS Styles, typically written in Sass
│   │     │   └── resources     # Style media resources like favicons and images required by core
│   │     ├── store           # Redux store configuration, modifications usually unnecessary
│   │     ├── tests               # All Core tests
│   │     │   └── data            # Any dummy data core tests may need
│   │     └── utils               # Application constants including constants for Redux
│   ├── components            # Components that live outside of Core, used for applications built on top of Core. By default contains only AppContainer.js stub file for getting started.
│   ├── constants             # Container for user defined constant files. Also includes appConfig.js which is used for general app config.
│   ├── default-data          # Default data for the application
│   │   └── _core_default-data    # Default data for Core, not to be modified by user
│   │       ├── help              # Core in-app help markdown documentation files
│   │       └── layer-metadata    # Core metadata files for each layer
│   ├── config.js             # Ops configuration options
│   ├── index.html            # Start page where the app bundle is included, also has loading screen written in vanilla JS.
│   ├── index.js              # Entry point for your app
│   ├── styles                # CSS Styles, typically written in Sass
│   │   ├── _theme.scss           # High level SCSS variables used for setting various application colors (Note: this is an scss partial file, see http://stackoverflow.com/questions/31311147/underscore-in-partial-sass-file)
│   │   ├── _variables.scss   # SCSS variables, mixin and animation definitions (Note: this is an scss partial file, see http://stackoverflow.com/questions/31311147/underscore-in-partial-sass-file)
│   │   └── styles.scss       # SCSS top level file used for importing _variables and Core styles.scss
│   │
│   └── utils                 # Plain ES6 JS objects. Pure logic. No framework.
├── test-results              # Karma test results output folder
├── webpack.config.dev.js     # Configures dev webpack
└── webpack.config.prod.js    # Configures production webpack
The following sections outline the testing concepts, tools, and configuration necessary for testing both CMC Core and your own application.
The testing tools and their main dependencies used are:
- Karma - Test runner for Javascript
- Chai - An assertion library for NodeJS and browser
- Mocha - JS test framework for NodeJS and browser for async testing
- Karma-chai - Chai for Karma
- Karma-mocha - Mocha for Karma
- Karma-chrome-launcher - Launcher for Google Chrome, Google Chrome Canary and Google Chromium
- Karma-htmlfile-reporter - Reports tests results in pretty HTML format
- Karma-coverage - Generates code coverage reports using Istanbul
- Nyc - Istanbul Command Line Interface
- Enzyme – JS testing utilities for React (not currently used but can be very useful)
- Sinon - Test spies, stubs, and mocks for JS (not currently used but can be very useful)
- Sinon-chai - Extends Chai with assertions for the Sinon.JS mocking framework (not currently used but can be very useful)
That's a lot, but not to worry. The ones you really need to be aware of are Karma, Chai, and Karma Coverage. Additionally, you shouldn't need to do anything drastically different from what's been set up here already so for the most part you can base your tests off of existing tests and structures in CMC Core.
Run tests using npm run test with the following (optional) flags:
--nowebgl- Do not run tests that require webgl--includecoretests- Include tests from the cmc-core test suite--watch- keep the karma test runner active so that changes to test files are automatically reloaded when they change
Whenever you run tests, a test-results directory will be generated that contains the results and code coverage in html format.
Application tests cover a range of functionalities from testing utility functions to testing Redux state changes. The differences between writing tests for CMC Core and applications built on top of CMC will be covered later. All test files must use the .spec.js file extension and may be written in ES6. As a general rule, try to keep a 1-1 mapping of your *.js files to *.spec.js. Due to time constraints, CMC does not currently have component level tests where the nitty gritty rendering aspects of components are tested using Enzyme and Sinon, but feel free to add your own.
Let's begin with an example test from a CMC Core utility test file /src/_core/tests/Cache.spec.js.
import { expect } from 'chai';
import Cache from '_core/utils/Cache';

export const CacheSpec = {
    name: "CacheSpec",
    tests: {
        setAndGet: {
            test1: () => {
                it('Set adds an arbitrary key/value mapped entry to the cache.' +
                    'Get takes a key and retrieves the mapped value if it hasn\'t ' +
                    'been ejected, false otherwise', () => {
                        let limit = 3;
                        let cache = new Cache(limit);
                        cache.set("a", 1);
                        cache.set(3, [1]);
                        cache.set("c", { a: 1 });

                        //assert
                        expect(cache.get("a")).to.equal(1);
                        expect(cache.get(3)).to.deep.equal([1]);
                        expect(cache.get("c")).to.deep.equal({ a: 1 });
                        expect(cache.get("d")).to.deep.equal(false);
                        expect(cache.getSize()).to.equal(limit);
                    });
            }
        },
        ejection: {
            test1: () => {
                it('Adds key/value pairs up the specified limit then ejects entries in FIFO order', () => {
                    let limit = 3;
                    ...
This file imports the Cache module from Core as well as the expect assertion function from Chai. The testing structure below is not strictly the minimal testing setup as it contains some abstraction that CMC uses to be able to provide overridable/ignorable Core tests for the user. For now we'll ignore these extra bits and focus on the test content.
In the first test, we use the Mocha syntax it to describe a single test. Here, we test the setting and getting of the Cache class.
it('Set adds an arbitrary key/value mapped entry to the cache.' +
    'Get takes a key and retrieves the mapped value if it hasn\'t ' +
    'been ejected, false otherwise', () => {
        let limit = 3;
        let cache = new Cache(limit);
        cache.set("a", 1);
        cache.set(3, [1]);
        cache.set("c", { a: 1 });

        //assert
        expect(cache.get("a")).to.equal(1);
        expect(cache.get(3)).to.deep.equal([1]);
        expect(cache.get("c")).to.deep.equal({ a: 1 });
        expect(cache.get("d")).to.deep.equal(false);
        expect(cache.getSize()).to.equal(limit);
    });
First we construct our cache and add some things to it.
let limit = 3;
let cache = new Cache(limit);
cache.set("a", 1);
cache.set(3, [1]);
cache.set("c", { a: 1 });
Then we declare our assertions using Chai's expect syntax (which you can learn more about here).
//assert
expect(cache.get("a")).to.equal(1);
expect(cache.get(3)).to.deep.equal([1]);
expect(cache.get("c")).to.deep.equal({ a: 1 });
expect(cache.get("d")).to.deep.equal(false);
expect(cache.getSize()).to.equal(limit);
Note that you can use expect whenever you wish and however many times you wish but it's good to keep tests focused on a particular input/output or set of expected behaviors.
Now let's move on to a more complex test that involves using the Redux store. Here's a test from src/_core/tests/store.map.spec.js that tests initialization of the 2D and 3D maps.
it('initializes 2D and 3D maps', function() {
    const store = createStore(rootReducer, initialState);

    const actions = [
        mapActions.initializeMap(appStrings.MAP_LIB_2D, "map2D"),
        mapActions.initializeMap(appStrings.MAP_LIB_3D, "map3D")
    ];
    actions.forEach(action => store.dispatch(action));

    const actual = store.getState();
    const actualNumMaps = actual.map.get("maps").size;
    const actualMap2D = actual.map.get("maps").toJS()[appStrings.MAP_LIB_2D];
    const actualMap3D = actual.map.get("maps").toJS()[appStrings.MAP_LIB_3D];

    actual.map = actual.map.remove("maps");

    const expected = {...initialState };
    expected.map = expected.map.remove("maps");

    expect(actualNumMaps).to.equal(2);
    expect(actualMap2D).to.not.equal(undefined);
    expect(actualMap3D).to.not.equal(undefined);
    TestUtil.compareFullStates(actual, expected);
});
In this test we first create the Redux store that we will use to test state changes:
const store = createStore(rootReducer, initialState);We then define an array of actions to affect this store. In this case we specify actions to initialize the 2D and 3D maps.
const actions = [
    mapActions.initializeMap(appStrings.MAP_LIB_2D, "map2D"),
    mapActions.initializeMap(appStrings.MAP_LIB_3D, "map3D")
];
Next we dispatch the actions to the store. Note that these action dispatches are synchronous! This is a guarantee provided by Redux as was mentioned in a previous section. In testing, this allows us to string together an arbitrary number of actions together and deterministically arrive at an expected final state. Note that this is somewhat incorrect for asynchronous actions (which will be covered later).
actions.forEach(action => store.dispatch(action));Now we pull out a few items out of the state that we wish to examine. This step is performed since these items live in the maps part of state which in this case holds Openlayers and Cesium objects which cannot be compared to themselves and are therefore removed later on.
const actual = store.getState();
const actualNumMaps = state.map.get("maps").size;
const actualMap2D = state.map.get("maps").toJS()[appStrings.MAP_LIB_2D];
const actualMap3D = state.map.get("maps").toJS()[appStrings.MAP_LIB_3D];

actual.map = actual.map.remove("maps");
Next we make a copy of our expected state from the initialState object we defined at the top of the file that all tests in this file use. To do this we use the JS spread operator.
const expected = {...initialState };
expected.map = expected.map.remove("maps");
where initialState is defined as an object mirroring the state model you've previously defined and the individual state values like mapState are imported from your actual model files, in this case _core/reducers/models/map.
const initialState = {
    map: mapState,
    view: viewState,
    asynchronous: asyncState,
    help: helpState,
    settings: settingsState,
    share: shareState,
    dateSlider: dateSliderState,
    analytics: analyticsState,
    layerInfo: layerInfoState
};
Next we check some actual values of the state versus expected values.
expect(actualNumMaps).to.equal(2);
expect(actualMap2D).to.not.equal(undefined);
expect(actualMap3D).to.not.equal(undefined);
Finally, we use a utility function in TestUtil to convert the state object parts into JS and compare them.
TestUtil.compareFullStates(actual, expected);If you are developing tests for CMC Core there's a bit of extra structure you need to use on top of the standard tests. This structure allows Application Developers to override or exclude certain CMC Core tests from their application testing setup while still allowing CMC Core tests to be upgraded in the future.
Each Core test file exports an object containing a name property, used as a label when logging the test output, and an object containing test suites. Let's take a look at the setAndGet test suite again.
import { expect } from 'chai';
import Cache from '_core/utils/Cache';

export const CacheSpec = {
    name: "CacheSpec",
    tests: {
        setAndGet: {
            test1: () => {
                it('Set adds an arbitrary key/value mapped entry to the cache.' +
                    'Get takes a key and retrieves the mapped value if it hasn\'t ' +
                    'been ejected, false otherwise', () => {
                        let limit = 3;
                        let cache = new Cache(limit);
                        cache.set("a", 1);
                        cache.set(3, [1]);
                        cache.set("c", { a: 1 });

                        //assert
                        expect(cache.get("a")).to.equal(1);
                        expect(cache.get(3)).to.deep.equal([1]);
                        expect(cache.get("c")).to.deep.equal({ a: 1 });
                        expect(cache.get("d")).to.deep.equal(false);
                        expect(cache.getSize()).to.equal(limit);
                    });
            }
        },
        ejection: {
            test1: () => {
                it('Adds key/value pairs up the specified limit then ejects entries in FIFO order', () => {
                    let limit = 3;
                    ...
Each test suite (like setAndGet) contains one or more tests pertaining to the title of the test suite. As a convention, CMC Core tests are labeled test + number-ascending but any unique identifier can be used. These test names will eventually be used by Application Developers if the wish to ignore certain tests.
The testing flow for Core tests is as follows –
- Inside of
karma.conf.js(more about this later) we specify the list of files/patterns to use for testing. Here we specifysrc/tests/**/*.spec.js. Note that this is not the Core directory of files. - In
src/tests/core-test-overrides.spec.js, the only *.spec.js in the folder, we import all Core tests and use a utility fromTestUtilto run each test suite. If you write a new Core test suite be sure to add it to this file or else the test will not be run.
Non-Core test files should live in the src/tests directory and should end in *.spec.js. In this directory you will find a file named non-core-test-stub.spec.js which you should modify for your own use. Inside of this file and any other test files you write you should have something looking like:
import { expect } from 'chai';
import Immutable from 'immutable';
import MyUtils from '/utils/MyUtils';

const myUtils = new MyUtils();

describe('Misc Utils', () => {
    describe('generateStringFromSet', () => {
        it('returns a space separated string from a set of strings mapped to booleans', () => {
            let varIn = {
                "foo": true,
                "bar": false,
                "fubar": true
            };
            let varOut = 'foo fubar';

            //assert
            expect(myUtils.generateStringFromSet(varIn)).to.equal(varOut);
        });
        it ('...')
    }),
    describe('findObjectInArray', () => {...})
Where all you need to do is use Mocha describe syntax, essentially writing tests in the same way as is described in the Mocha docs. These tests will match the pattern in karma.conf.js and will be run through the testing framework.
There many be times as an Application Developer when you wish to modify or override a Core test. For example, let's say you want to build an application that does not use a 3D map and you want to exclude all Core tests that test and rely on the 3D map. To override these tests, you would want to find the relevant (failing) tests in _core/tests/MapUtil.spec and remove them by overriding the imported object in core-test-overrides.spec.js. For example:
MiscUtilSpec.generateStringFromSet.test3 = () => {};excludes that test by overriding the test contents. You can also choose to exclude some or all imported Core test suites by changing what's inside the testSuites array in core-test-overrides.spec.js.
Core tests sometimes make use of use of asynchronously loaded data from src/_core/tests/data. This folder contains several files copied over from src/default-data/_core_default-data (if you're developing Core tests you will need to make note of this) and some intermediate state object definitions for use in testing. For non-Core tests feel free to import any of the files from src/_core/tests/data and/or add your own folder in src/tests/YOUR_DATA with your own files.
CMC Core tests (src/_core/tests/store.map.spec.js in particular) make use of the Mocha beforeEach and afterEach hooks in order to provide an html fixture from the DOM so that the maps have a place to render. In Core, these beforeEach and afterEach functions are defined in the exported testSuite objects. In non-Core tests feel free to use these functions and any other Mocha hooks according to the normal Mocha paradigm.
Certain CMC Core tests that test functionalities requiring WebGL are configured to skip themselves if a certain global variable is defined as true. This variable is included as a global variable in the test webpack build in karma.conf.js if a certain environment variable is set while running tests (NO_WEB_GL). Skipping WebGL tests is useful if you need to run your tests in an environment where configuring a WebGL enabled browser is difficult or impossible. Running tests on a continuous integration server that doesn't have anything besides PhantomJS available is one example where this functionality can be useful. Note that skipped tests will still be reported in the test output but will be labeled as skipped.
Testing asynchronous functions is accomplished by making use of the done callback paradigm in Mocha. We can use this done callback to tell Mocha to wait for this callback to be called to complete the test. In Core we make use of this paradigm and also make use of timeouts for certain map behaviors that do not have easily trackable async success or failure values. For example in StoreMapSpec.test16 in src/_core/tests/store.map.spec.js we use async testing to test the 2D and 3D map zooming out behavior. This is because the call to zoom on the map may return true but the zoom will not be accomplished until after a final render which uses an unknown number of frames. To accommodate this, we give a generous timeout in the beginning, initialize maps, wait for maps to initialize, do some zooming, wait a bit, and then check the relevant state and map properties.
test16: () => {
    it('can zoom out', function(done) {
        this.timeout(30000);

        const store = createStore(rootReducer, initialState);

        const actions = [
            mapActions.initializeMap(appStrings.MAP_LIB_2D, "map2D"),
            mapActions.initializeMap(appStrings.MAP_LIB_3D, "map3D")
        ];
        actions.forEach(action => store.dispatch(action));

        setTimeout(() => {
            const zoomActions = [
                mapActions.zoomIn(),
                mapActions.zoomOut()
            ];
            zoomActions.forEach(action => store.dispatch(action));
            setTimeout(() => {
                const state = store.getState();

                const actual = {...state };
                const actualMap2D = actual.map.get("maps").toJS()[appStrings.MAP_LIB_2D];
                actual.map = actual.map.remove("maps");

                const expected = {...initialState };
                expected.map = expected.map.remove("maps");

                expect(actualMap2D.getZoom()).to.equal(2);
                TestUtil.compareFullStates(actual, expected);
                done();
            }, 1000);
        }, 1000);
    });
},
If your async functions have promises or callbacks then you should be able avoid using timeouts, but in this case when we have neither callbacks or promises we are forced into using timeouts.
Every command used to run tests (e.g. npm run test, npm run test:watch, etc.) makes use of Karma test reporters (usually in the form of plugins). All tests by default use:
- Progress reporter - Report test progress in console
- Karma HTML Reporter - For reporting test results in styled HTML format. The default output folder for these test results is
test-results, configuration of which will be covered in the next section. - Karma Coverage Reporter - For generating code coverage reports in several formats including HTML and lcov. The default output folder for these test results is
coverage, configuration of which will be covered in the next section. Test coverage is a very handy tool for identifying untested statements, branches, and functions. Learn more about it here. Note that the coverage plugin will only be aware of files that are run through Karma so if you don't have.spec.jsfiles for, say, components and none of these components are imported then none of the components will be analyzed in the coverage report. This is something to be aware of when you're trying to estimate the real code coverage of your project. That said, take the overall code coverage percent with a grain of salt. Try to be smart with how you prioritize what you test. Knowing that 100% of your critical math and utility functions are correct with other files only at 25% coverage is probably more valuable than 50% code coverage throughout the entire project.
These default reporters are specified in the karma.conf.js configuration but some commands are overridden at runtime using flags. For example, npm run test uses the --reporters=progress,html to skip code coverage generation. Code coverage does take a bit of extra time so if you're running tests often or using a watched test (like test:watch) then it makes sense to skip coverage.
CMC Karma testing is configured using a file called karma.conf.js. This configuration shouldn't need much tweaking and is heavily commented but there are several important parts to note.
Karma uses webpack to preprocess the files and must be configured using roughly the same method as the webpack.config.dev. If you add more module rules or resolve rules to your webpack.config.dev, you must add these rules to the webpack section in karma.conf.js or else Karma will not be able to load your files. This system is something that may be improved upon in the future with some common webpack config shared between webpack configurations but for now that's what needs to be done.
The Karma config options:
browserNoActivityTimeout: 60000,
browserDisconnectTolerance: 1,
browserDisconnectTimeout: 20000,
are used to control browser timeouts and disconnects while testing. These numbers can be tweaked to allow for some wiggle room when you're testing on lower end machines, say a CI server, and need more time to run tests above the default limits. If you're noticing timeout issues in your testing try playing with these config options.
The Karma config options:
browsers: process.env.TRAVIS ? ['Chrome_travis_ci'] : ['Chrome'],

// Custom launcher for headless CI testing (Travis)
customLaunchers: {
    Chrome_travis_ci: {
        base: 'Chrome',
        flags: ['--no-sandbox', "--enable-webgl", "--ignore-gpu-blacklist"]
    }
},
relate to the configuration of which browser Karma uses to run tests. Some options include:
To run Chrome, Firefox, Safari, and any other standard browsers outside of a standard environment you must run X Virtual Framebuffer. For example, in the CMC Core .travis.yml file (for Travis CI), the following commands are run before package install:
export CHROME_BIN=chromium-browser- Tell Karma the Chrome path in the Travis Environmentexport DISPLAY=:99.0- Export the display variable used for xvfbsh -e /etc/init.d/xvfb start- Start xvfbsleep 3- give xvfb some time to start
In the Karma config, we check for the process.env.TRAVIS environment variable set in the Travis environment and if it exists we specify a particular browser to use. Otherwise, we use standard native Chrome. Below in customLaunchers we configure the Travis Chrome browser base path as well as a few flags to enable WebGL so that we can run CesiumJS.
Using real browsers can be useful since it allows us to test CMC in environments closer to the real end-user environment. Additionally, using a real browser allows us to run all of our tests, including those that utilize WebGL which is something many thin or headless testing browsers don't support well or at all. That said, running Chrome or any of the other standard browsers is slightly more complicated (since it requires xvfb setup and some browser flags which can vary from CI to CI) and are a little less performant than using something like PhantomJS, which is a Webkit framework for running headless tests. If you don't need to run WebGL tests or just want to simplify your testing setup you can use PhantomJS, but do note that all tests that rely on the rendering of the CesiumJS 3D map will fail, so you will have to override or ignore these tests.
Learn more about Karma and Karma configuration here.
The analytics operates as a "silent reducer". It watches every action dispatched to the store and buffers each action that it is defined to include. Every time 10 actions are buffered or 5 seconds have passed, the currently buffered actions are sent as a JSON string to the defined endpoint as a POST request. This means if you set up some server to capture these actions you can ask and answer various questions based on these actions such as:
- "What is the most popular layer?"
- "How often do people use this layer"
- "How often do people use 3D mode?"
- "How many people change the date?"
- "How soon do most people change the date?"
- "What percentage of people change the basemap?"
- and so on
To learn more about this analytics system and view a simple example of a server to collect and analyze these actions, check out our CMC Analytics Example - COMING SOON.
In addition to the custom analytics solution mentioned previously, CMC includes a React-based Google Analytics module that can be enabled/disabled and configured from appConfig.js. The default behavior is to register the app using a root pageview of '/' but adding more specific pageviews is as easy as calling ReactGA.pageview('ROUTE') when desired. For more on the React Google Analytics module please refer to the React-GA repository. The CMC Core component containing the React-GA plugin is src/_core/components/Analytics/AnalyticsContainer.js.
CMC was architected so that developers using CMC as a base for their applications would be able to easily upgrade the underlying CMC version in their applications. That said, there isn't a huge abstraction layer separating CMC Core from non-Core – a deliberate choice made by the Core developers – which means that there are some files and areas that Core and non-Core developers must share and be aware of to avoid nasty merge conflicts or blowing away work.
Upgrading CMC can range from almost painless (0 - 2 simple merge conflicts) to a bit of work (3+ large merge conflicts, new Core dependencies, etc.) which means that you should plan on giving yourself a bit of time to read up on what's changed in Core since your version (see docs/core-docs/CHANGELOG.md), how much effort it will take to upgrade, and whether or not you really want/need to upgrade. If you're getting quite close to a release you may want to hold off until you have a little more time to upgrade so you can take your time and be careful.
scripts- These scripts may change in Core. You shouldn't need to tweak these scripts too much and you probably won't have conflicts here. That said, you should probably use your own deploy.sh script customized for your own CI/deployment environment.AppContainer.js- This is just a stub file in Core so you shouldn't see any issues here..travis.yml- CMC Core .travis.yml file may change from time to time, be careful with this one if you're using Travis CI.tests/core-test-overrides.spec.js- If Core adds a new Spec file it will need to add an import to this file which in theory shouldn't cause too much trouble.package.json- There's no getting around this one unfortunately with the current architecture. If Core modifies dependencies, updates it's version number (which it will do every time you upgrade to a tagged version), your package.json may conflict/be overridden. Make sure you look at what's changed in the Core package.json before upgrading and plan accordingly.webpack.config.dev.js- This config will also change from time to time but in theory you shouldn't have to worry about this file too much and any conflicts should be easy to manage.webpack.config.prod.js- Same as above.
This separation between Core and Non-Core is still being tweaked now and then to improve the upgrading process.
- Add cmc-core as a git remote if you haven't done so already by running
git remote add core https://github.com/nasa/common-mapping-client.git - Fetch the latest from cmc-core by running
git fetch --tags core - Make a new branch (optional)
- Review the changes that have been made to Core since your version by looking in
docs/core-docs/CHANGELOG.MD. - Merge in Core by running
git merge <LATEST_TAG> - Check your
package.jsonto make sure Core didn't overwrite anything of yours in the merge. - Run
npm installto make sure that any packages added in the latest version of CMC get installed - Run your tests with
npm run testto verify that everything passes - Load up your application and verify that everything works.
As mentioned before, CMC is not expected to be a final product. This extends not only to the front-end application itself, but also the services that power it. CMC Core uses a directory called default-data that contains numerous static files that provide CMC with something to display by default. This includes lists of layers, color palettes, vector data, etc. In a real world application, we would not expect this directory to be referenced. Instead, we would expect all of the static data to be replaced by a dynamic service on the backend with some sort of REST API (this could be a solr catalogue or similar). However, for small projects and local development, static file usage is more than adequate.
CMC also provides some utility classes that may be useful in creating high performance visualization applications.
CMC includes a few layers of abstraction on top of Web Workers to enable threading and moving high demand processing such as image recoloring or large dataset processing off of the main thread. Operations like these can often take several seconds on a typical client computer and while these operations occur, the user is not able to interact with the UI. Moving these operations to Web Workers can free up the main thread and allow it to continue handling the rest of the application logic, unfreezing the UI. By default, an instance of a WorkerManager (see below) is stored in state so that it can be accessed from anywhere in the application.
_core/utils/WorkerManager.js: Provides an interface to create a pool of workers, a job queue, and clear the pool of workers. Note that each instance of WorkerManager manages a seperate pool of web workers so it is recommended to only create a single instance of the WorkerManager as browsers have differing limits on the number of web workers that can be created. The WorkerManager instance that is stored in state initially populates a pool of workers based on theDEFAULT_WEB_WORKER_NUMappConfig variable (which defaults to 0) though you can add workers to the pool at any time usingcreateWorkers(numer). Jobs can be queued usingqueueJob(options)whereoptionsis an object that must include a stringoperationand any additional data you want sent to the worker.queueJob()will return a promise that is resolved when that particular job is completed by the web worker. If you wish to empty the pool of workers, useclearWorkers()._core/utils/WebWorkerWrapper.js: This is the actual web worker script and handles the message passing between the worker and main thread. The worker contains an instance ofWebWorker.js(see below) that contains the functions to actually operate on the data. This class should not need to be edited._core/utils/WebWorker.js: Is a lightweight parent class that provides some default data operationsutils/WebWorker.js: Modify thehandleMessage(message, workerRef)function to handle whatever jobs you wish to perform. Themessageparameter is theoptionsobject that is passed toWorkerManager.queueJob(options), theworkerRefparameter is a reference to the actual WebWorker instance.
To start using web workers:
- Create a component or action to extract the
WorkerManagerfrom state
let manager = state.webWorker.get("workerManager")- Populate the worker pool or modify
appConfig.DEFAULT_WEB_WORKER_NUMto prepopulate the worker pool
manager.createWorkers(2);- Queue a job and listen for the job to complete
manager.queueJob({
  operation: "WORKER_TASK_TEST",
  data: [1,2,3,4]
  }).then((resp) => {
    console.log(resp);
    }, (err) => {
      console.warn("Error in worker", err);
});- Optionally clear the worker pool when complete
manager.clearWorkers();The web worker abstraction is also configured to support Transferables. Using transferables can be extremely helpful when dealing with very large amounts of data. Normally all data is passed to the worker thread via a copy. Transferables are transfered through a change in thread ownership which is a "zero-copy operation" read more about that here and can result in vast performance improvements.
A typical job options object might look like:
manager.queueJob({
    operation: "DO_A_THING",
    x: [1,2,3]
})
and the worker would receive an object:
{
    operation: "DO_A_THING",
    x: [1,2,3]
}
where the x array is copied into the worker thread. But if you were to use job options with the a "transfer" key like this:
let x = new Float64Array([1.0,2.0,3.0]);
manager.queueJob({
    operation: "DO_A_THING",
    x: x.buffer,
    transfer: [x.buffer]
})
then the backing Float64Array's ArrayBuffer (which supports the Transferable interface) would be transfered to the worker with no copy overhead.
Github pages are a great way to host static content right out of your Github repos. One simple way to deploy to Github pages if you don't have a continuous integration service set up or available is to use the deploy.bash script found in the scripts directory to push a built version of your application to Github pages. Note, you'll need to enable Github pages for your repository. Also note that all Github pages are public even if your repository is private. Follow these steps below to deploy. The deploy script included works with multiple branches as well which can be useful for comparing built branches, sharing testable branches with others, etc.
- Run
npm run test:cover - Run
npm run build(you may want to verify that your build works usingnpm run open:dist) - Make a copy of your entire repository folder and
cdinto the copy - Run
chmod a+x scripts/deploy.bashto give the deploy script correct permissions - Run
git branch -D gh-pagesto ensure that your local gh-pages branch does not exist - Run
npm run deployand verify that the deployment was successful by navigating to:https://github.com/pages/[USER_OR_ORG]/[REPO]/branches/[BRANCH]/ - Example:
https://github.com/pages/nasa/common-mapping-client/branches/master/wherenasais the organization name,common-mapping-clientis the repository name, andmasteris the branch name. - Cleanup by removing the folder you were just in

Main tech under the hood. Yes, this is a lot of dependencies (actually this isn't even the full list) but that's modern web development for you. We've tried to limit the number of unnecessary dependencies included in CMC but you may find that for your own application you may be able to remove some dependencies that your application does not require (e.g. Cesium, VisJS, react-ga, etc.)
| Tech | Description | Learn More |
|---|---|---|
| React | Fast, composable client-side components. | |
| Redux | Enforces unidirectional data flows and immutable, hot reloadable store. Supports time-travel debugging. Lean alternative to Facebook's Flux. | |
| Cesium | An open-source JavaScript library for world-class 3D globes and maps. | |
| Openlayers | A high-performance, feature-packed library for all your mapping needs. | |
| vis.js | vis.js is a library for creating lightweight, dynamic data visualizations. | |
| fetch | An easier Javascript request library adhering to the new Fetch standard. | |
| Moment | Parse, validate, manipulate, and display dates in JavaScript. | |
| Material-UI | React components that implement Google's Material Design. | |
| TurfJS | Advanced geospatial analysis for browsers and node. | |
| ArcJS | Great Circle routes in Javascript. | |
| Proj4js | JavaScript library to transform coordinates from one coordinate system to another, including datum transformations. | |
| Babel | Compiles ES6 to ES5. Enjoy the new version of JavaScript today. | ES6 REPL, ES6 vs ES5, ES6 Katas |
| Webpack | Bundles npm packages and our JS into a single file. Includes hot reloading via react-transform-hmr. | Quick Webpack How-to |
| Browsersync | Lightweight development HTTP server that supports synchronized testing and debugging on multiple devices. | Intro vid |
| Karma | Test runner for Javascript. | |
| Mocha | Automated tests with Chai for assertions and Enzyme for DOM testing without a browser using Node. | |
| ESLint | Lint JS. Reports syntax and style issues. Using eslint-plugin-react for additional React specific linting rules. | |
| Prettier | Prettier is an opinionated code formatter. | |
| SASS | Compiled CSS styles with variables, functions, and more. | |
| npm Scripts | Glues all this together in a handy automated build. | Why not Gulp? |
| PostCSS | PostCSS is an CSS autoprefixer that automatically adds vendor prefixes from Can I Use to your CSS to ensure cross-browser compatibility | |
| showdown | A Markdown to HTML converter written in Javascript | |
| react-ga | A JavaScript module that can be used to include Google Analytics tracking code in a website or app that uses React for its front-end codebase. | |
| react-slingshot | The React/Redux/Webpack starter kit CMC is based off of. CMC has diverged a fair bit from React-Slingshot in many respects but still owes a great deal of its webpack structure, config, npm scripts, and dev server code to react-slingshot. | |
| Modernizr | Modernizr tells you what HTML, CSS and JavaScript features the user’s browser has to offer. CMC uses Modernizr to detect certain browser features such as webgl and fullscreen and degrade gracefully if these features are not present. |
The main contributors to CMC are Flynn Platt flynn.platt@jpl.nasa.gov and Aaron Plave aaron.plave@jpl.nasa.gov. Please get in contact with us via email or chat if you have any questions, are considering using CMC, or if you would like to contribute to CMC.
We welcome contributions and ask that you submit pull requests through a fork of cmc-core. If you would like to be a more direct contributor to cmc-core then please contact us and we will discuss adding you to the cmc-core repository.
For issue reporting please visit the github issues page for cmc-core here.
If you use CMC for your project please let us know, we'd love to see what you're doing and add you to our list of projects that use CMC.
Copyright 2017, by the California Institute of Technology. ALL RIGHTS RESERVED.
United States Government Sponsorship acknowledged. Any commercial use must be
negotiated with the Office of Technology Transfer at the California Institute
of Technology.

This software is subject to U.S. export control laws and regulations and has
been classified as EAR99.  By accepting this software, the user agrees to comply
with all applicable U.S. export laws and regulations. User has the responsibility
to obtain export licenses, or other export authority as may be required before
exporting such information to foreign countries or providing access to foreign persons.
 Licensed under the Apache License, Version 2.0 (the "License");
 you may not use this file except in compliance with the License.
 You may obtain a copy of the License at

      http://www.apache.org/licenses/LICENSE-2.0

 Unless required by applicable law or agreed to in writing, software
 distributed under the License is distributed on an "AS IS" BASIS,
 WITHOUT WARRANTIES OR CONDITIONS OF ANY KIND, either express or implied.
 See the License for the specific language governing permissions and
 limitations under the License.