Integrating with BlueIris
BlueIris security camera software and this project are an ideal match. Instead of cameras triggering alerts because spider webs floated in front of your cameras you can integrate BlueIris with this project and get local, reliable, AI motion detection for your security system.
To get a video overview of the general approach watch Build The BEST Security Camera NVR: Free Locally Processed AI Computer Vision with Blue Iris by The Hook Up. It inspired this project and these instructions borrow heavily from the configuration options shown in the video. Timestamped links to the relevant portion of the video are included at each applicable step in this guide.
These instructions are will walk you step by step through setting up a single camera so it can be triggered to record with a webRequest handler. Once you've set it up once you'll be happy you did it!
Note that these steps assume you already have your web cameras configured to provide an RTSP HD main stream and SD substream. Explaining how to do that for every camera on the market is beyond the scope of this guide, however you can see the steps for doing it on a common IP camera interface in The Hook Up's Video
- Create a folder to store recorded footage from the security cameras
- Create a folder to store snapshots from the SD security cameras for AI analysis
- Configure the BlueIris webserver to accept local incoming requests from the AI system to trigger HD camera recording
- Configure SD cameras to record 24x7 and output probable motion snapshots when basic motion is detected
- Configure HD cameras to record when motion is detected by the AI system
The guide walks through these steps for configuring a single camera. Once you have a single camera working you'll repeat steps 4 and 5 for each additional camera you have in your system.
These steps come directly from The Hook Up's video.
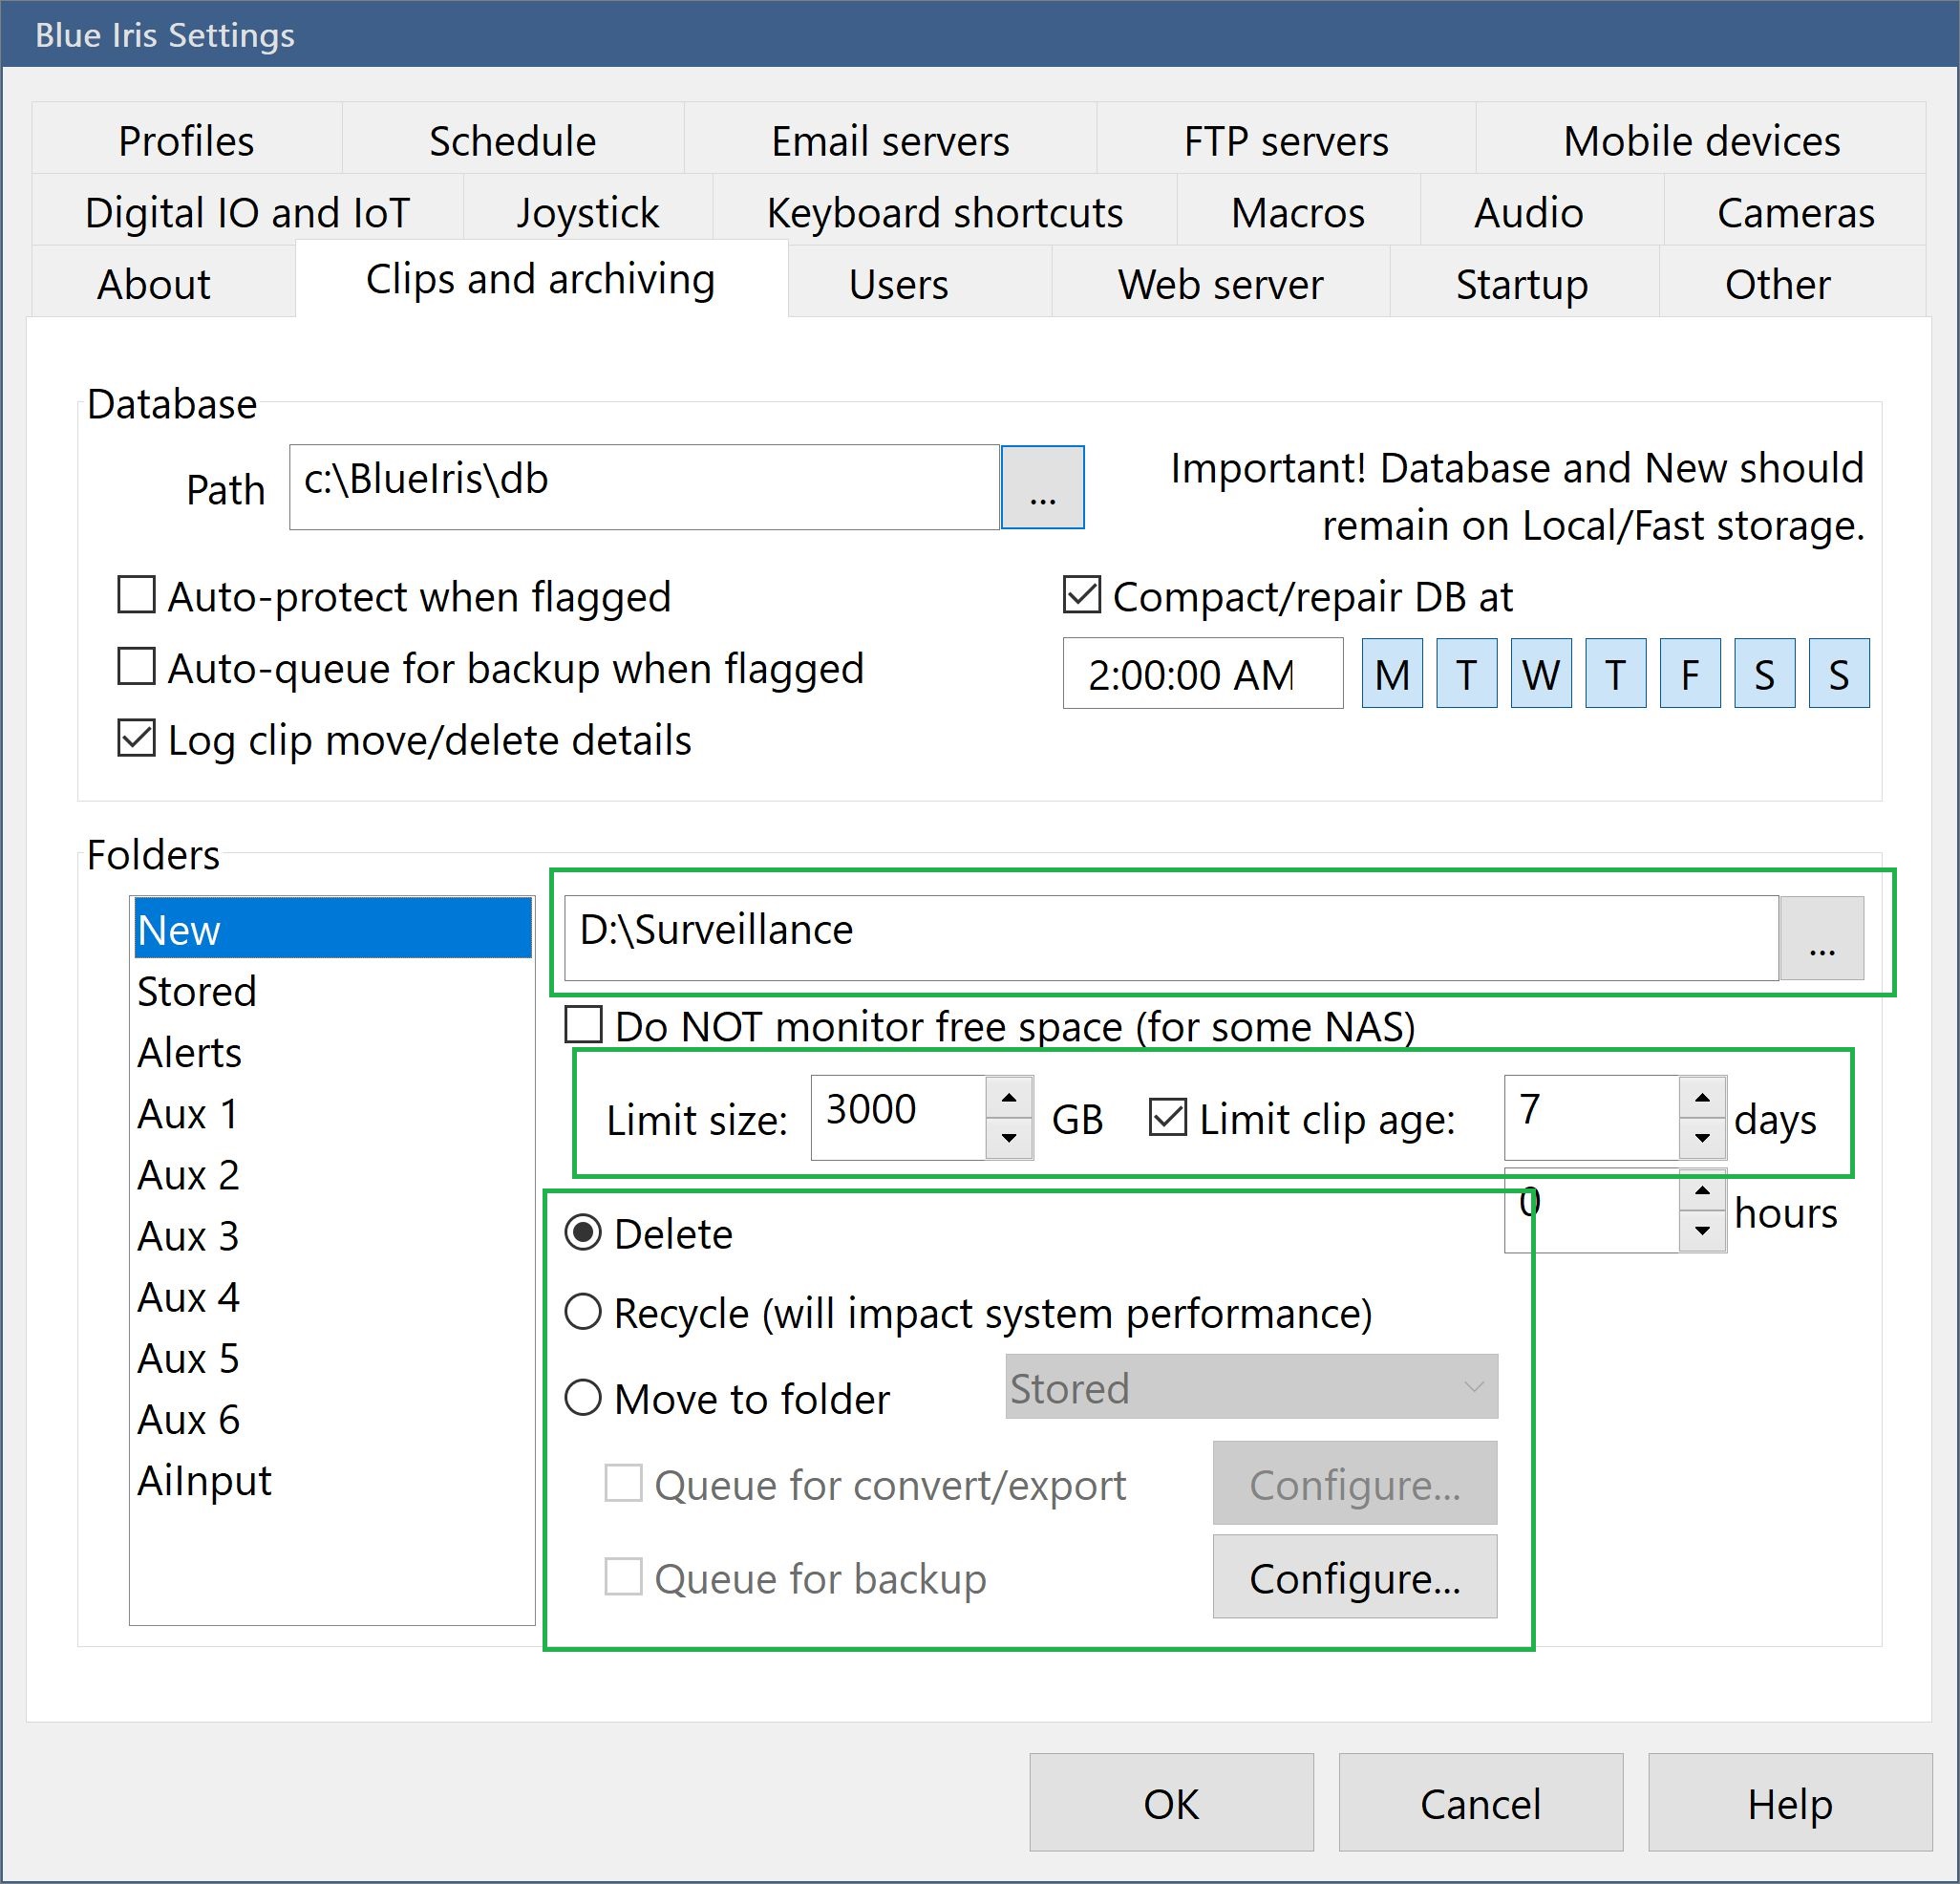
- Open the BlueIris General Settings > Clips and archiving tab.
- Create a new folder called surveillance. Limit the size to an amount and clip age that works for your hard drive setup and decide whether you want to delete or archive clips
Sample configuration that allocates 3000GB for storage, retains videos for up to one week, and deletes videos when required:
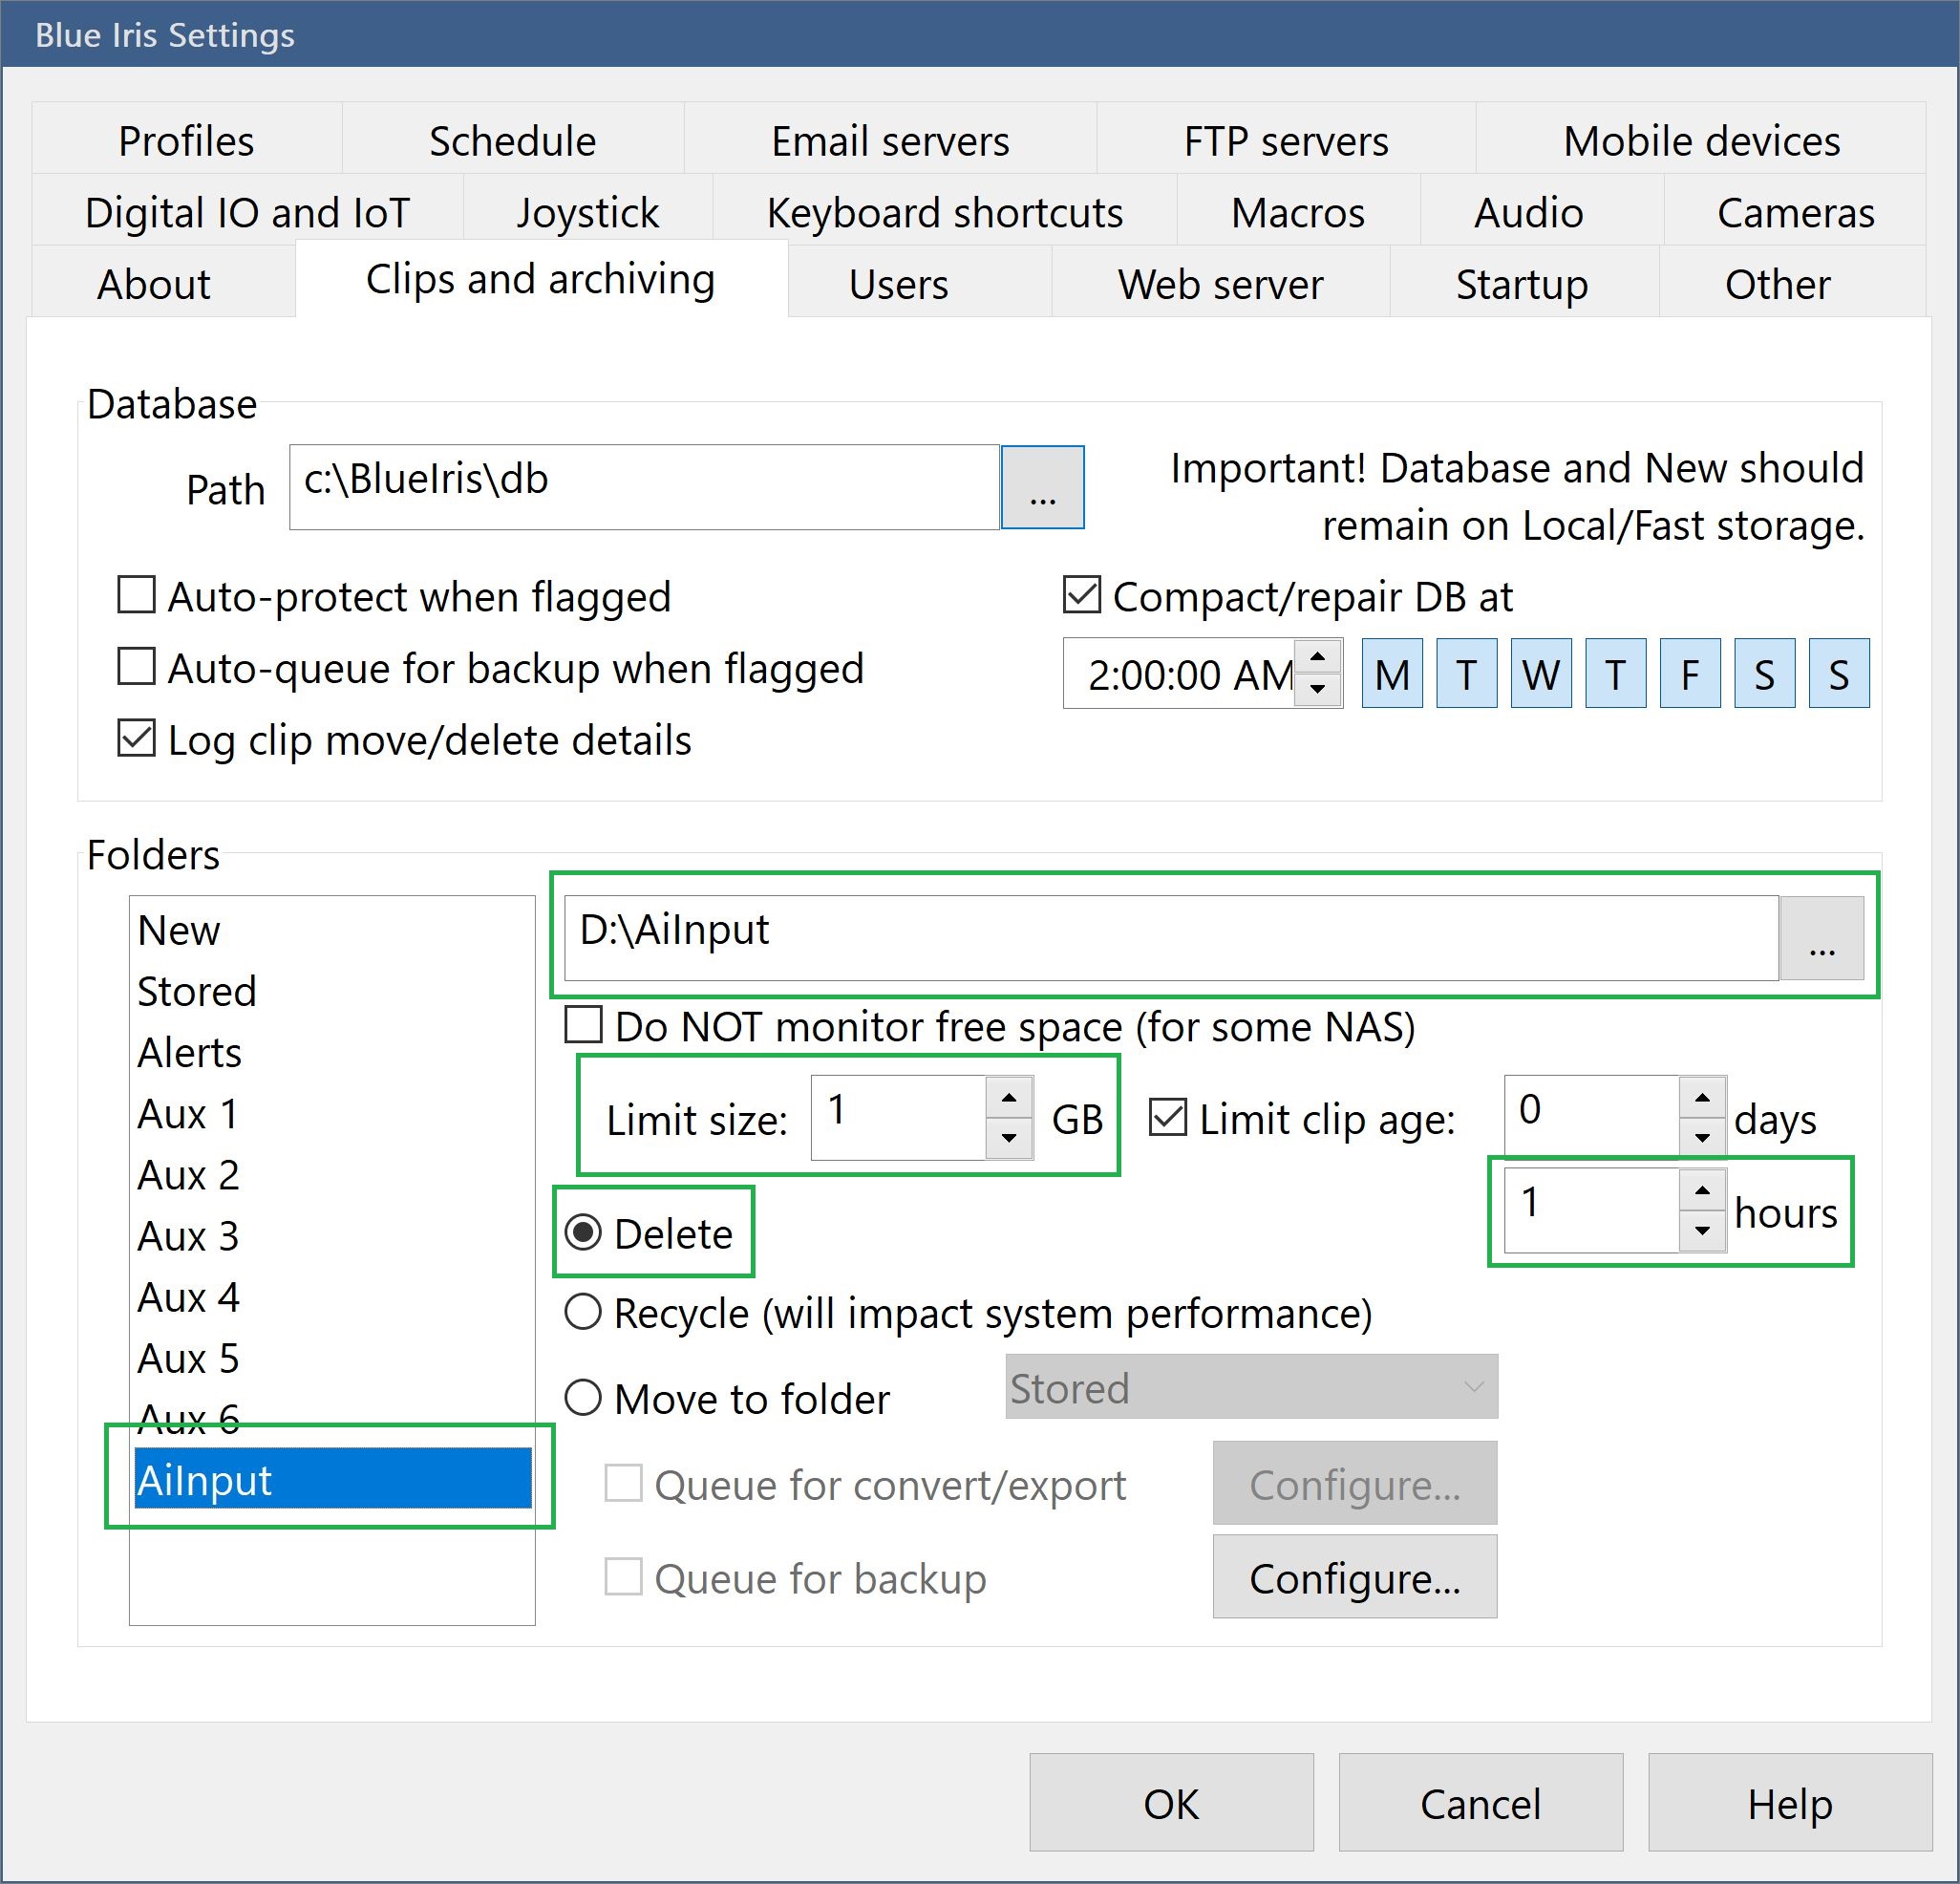
These steps come directly from The Hook Up's video. The low-resolution snapshots are used by the AI vision system to detect objects.
- Open the BlueIris General Settings > Clips and archiving tab.
- Click on the Aux 7 folder.
- Change the Folder to aiinput on one of your computer's drives.
- Limit the size to 1 GB and the retention time to 1 hour.
- Tap and hold on the Aux 7 name in the folder list and rename it to AiInput.
These steps are based on The Hook Up's video with minor modifications.
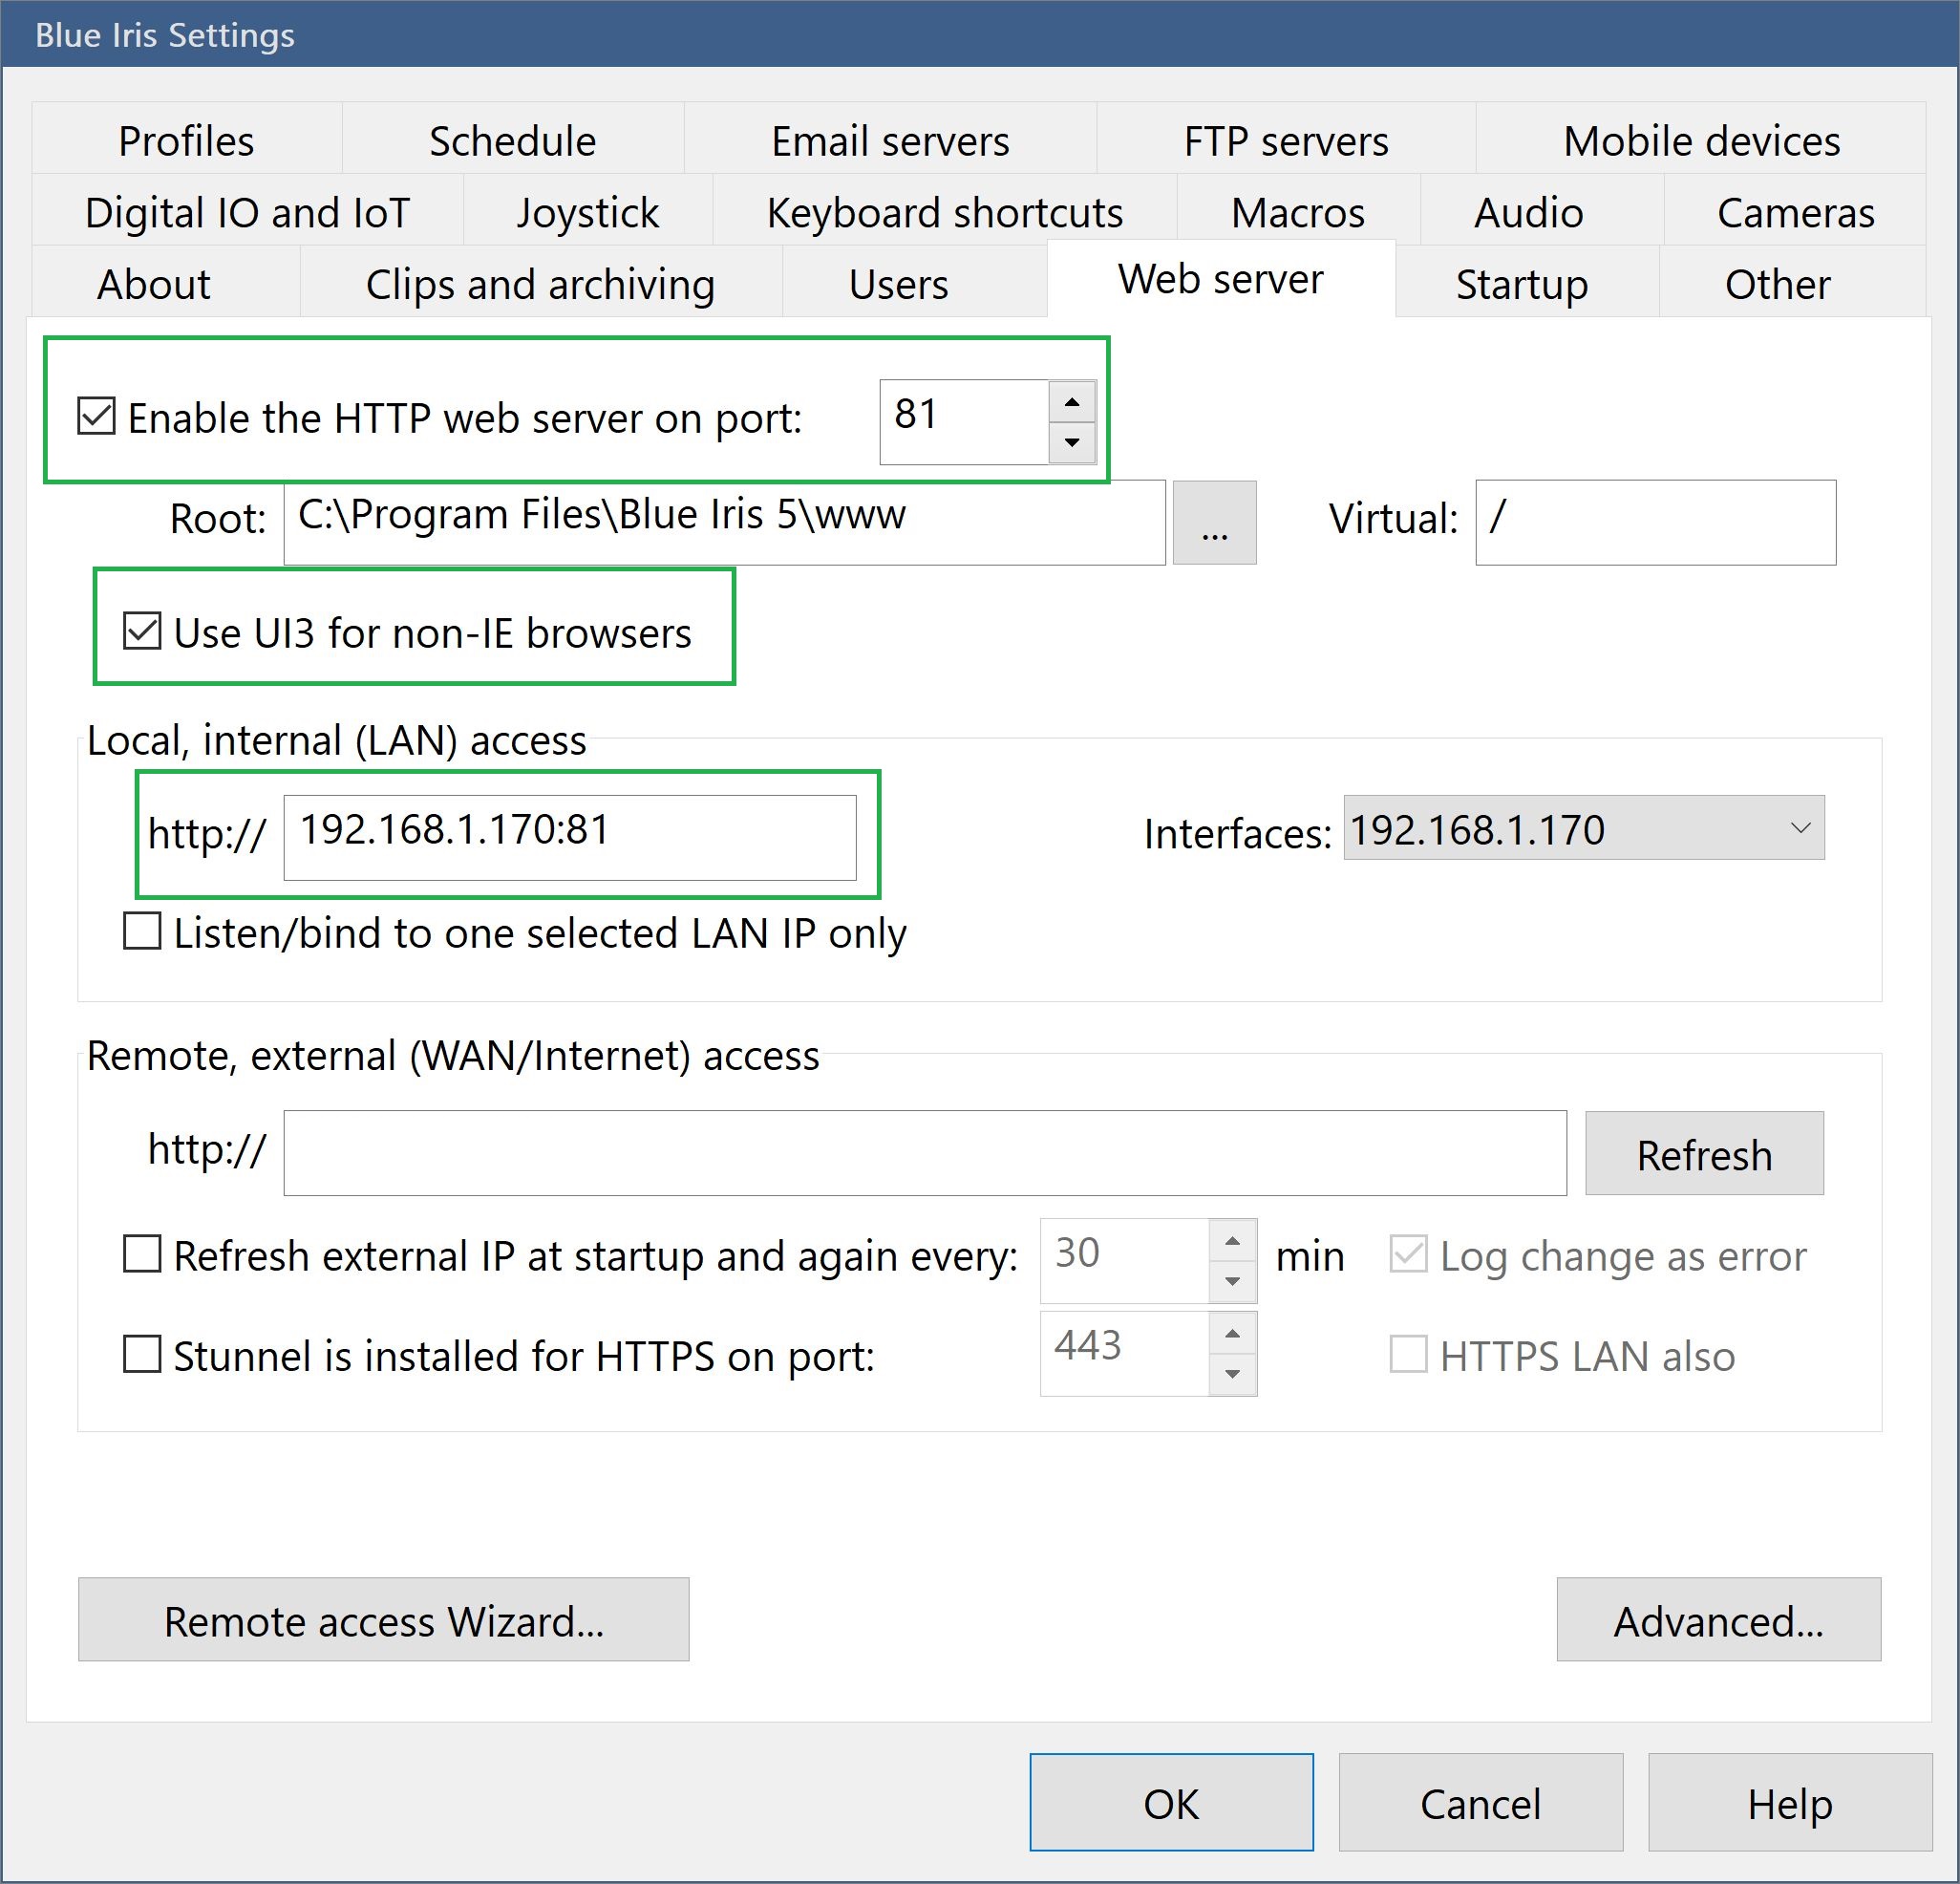
- Open the BlueIris General Settings > Web server tab.
- Configure the port as you prefer. This guide assumes BlueIris is running on port 81.
- Check the Use UI3 for non-IE browsers. Don't worry, it works fine with Microsoft Edge :)
- Confirm the correct local IP address is shown in the Local, internal (LAN) access setting.
- Optionally configure external access (outside the scope of this guide).
- Click the Advanced... button
- Change the Require from: dropdown to Non-LAN only.
- Uncheck Use secure session keys and login page.
- Add your local IP address range to the Limit IP addresses: field, for example ^192.168.1.*. Note the caret at the front of the IP address, which is required.
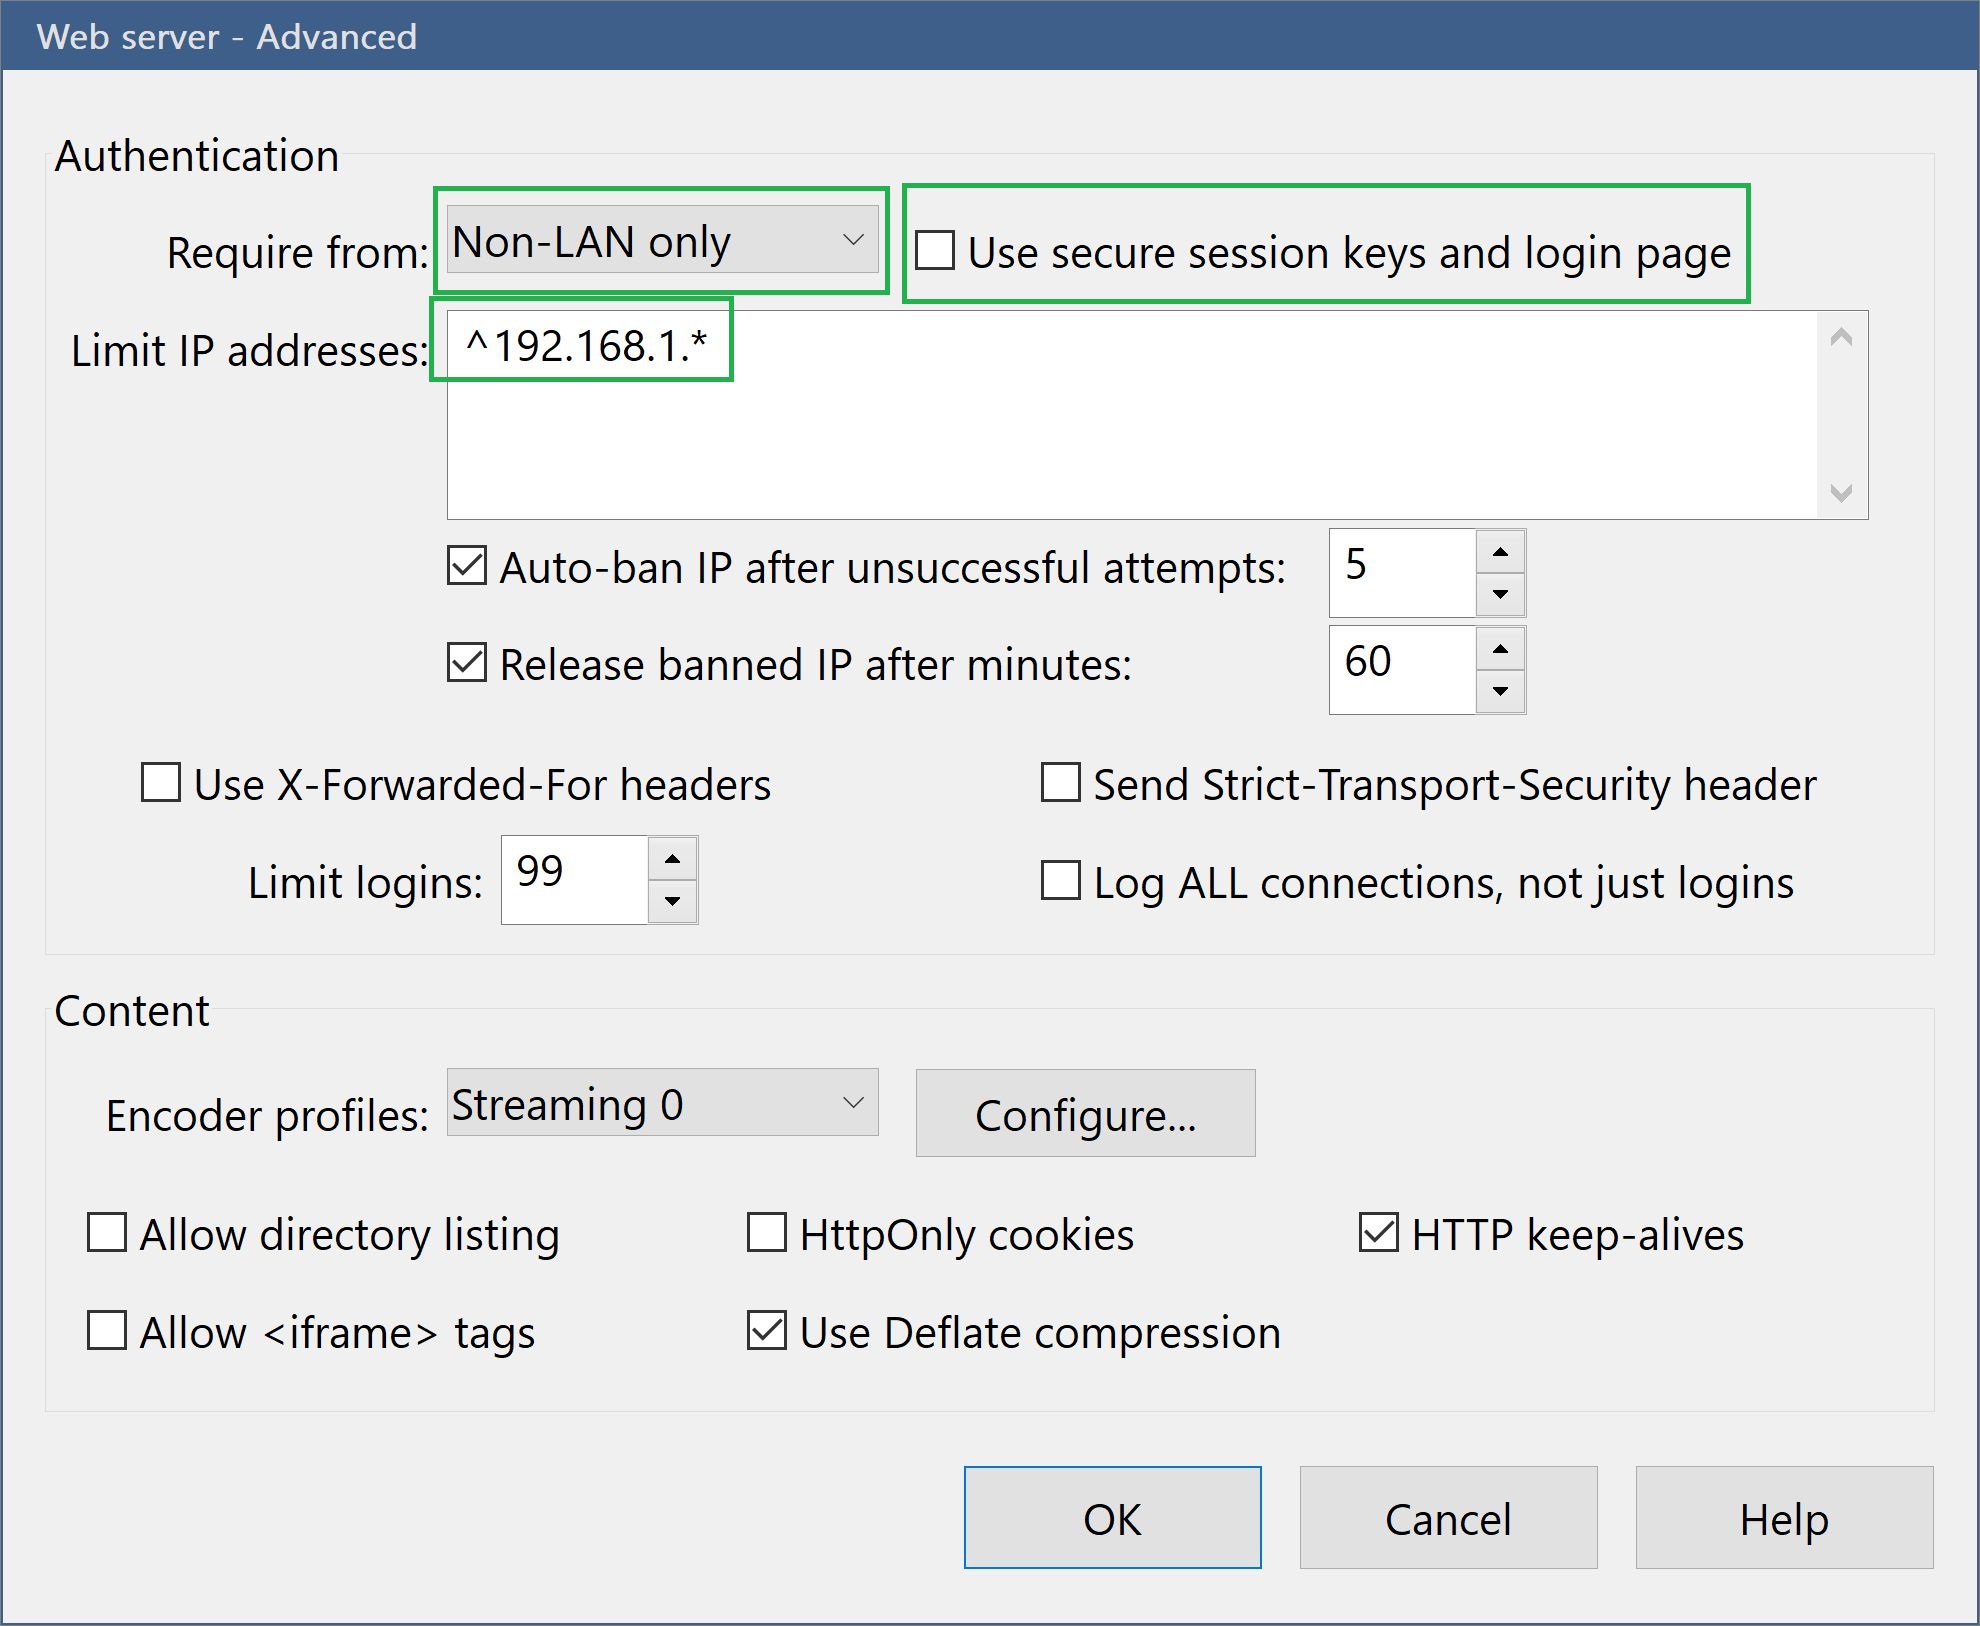
The above configuration will allow the AI trigger system to call BlueIris to initiate recording without requiring a username or password. Since the password-free access is limited to only internal IP addresses it is reasonable to leave it in this configuration long-term.
If you prefer it is possible to require a username and password via the URL used to trigger recording, however it is more complicated to configure and hard to troubleshoot. Get the system working with the above setup first to ensure everything works end-to-end then decide if it's worth adjusting the configuration to require a plain-text username and password in the URL.
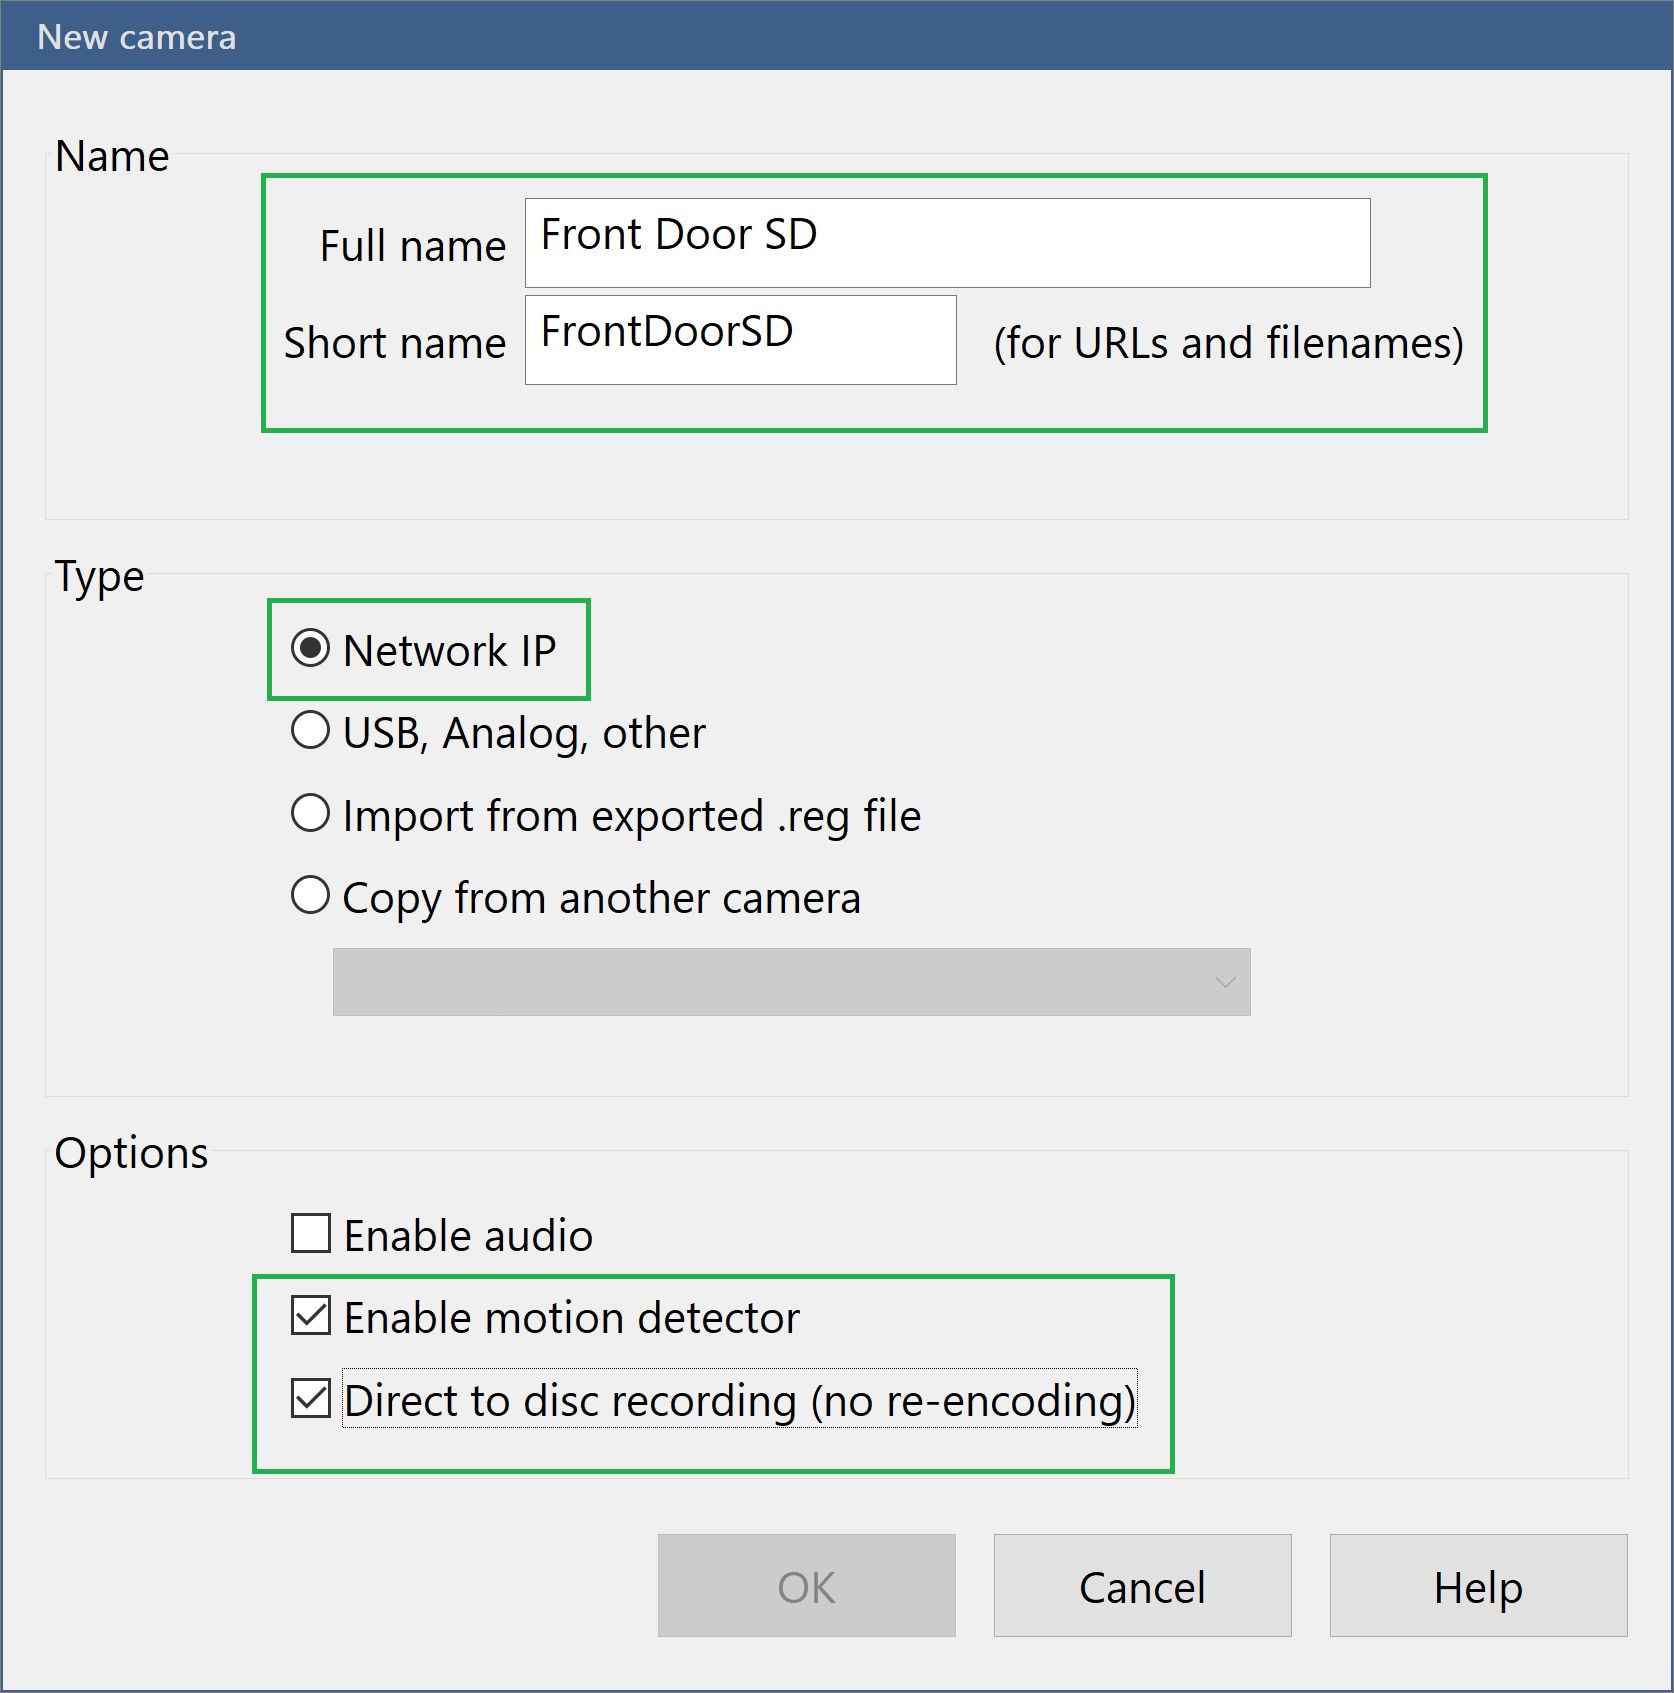
These steps assume you are using a network IP camera such as those from Hikvision, although they will work with any camera that's capable of integrating with BlueIris. There are a lot of steps but don't worry. They're all straightforward and once you've set up one SD camera you can use the copy settings feature in BlueIris to duplicate the configuration for your remaining cameras.
These steps are based on The Hook Up's video
- Go to Add new camera.
- Provide a descriptive name, e.g. Front Door SD.
- Provide a short name, e.g. FrontDoorSD. The short name will be used to identify the camera's snapshot images in the AI system configuration so make it identifiable and easy to remember for use later.
- Select Network IP as the type.
- Check Enable motion detector. This motion detection is used to create snapshot images of suspected motion. The AI system will analyze images captured by this to determine if meaningful objects actually caused the motion detection.
- Check Direct to disk recording (no re-encoding).
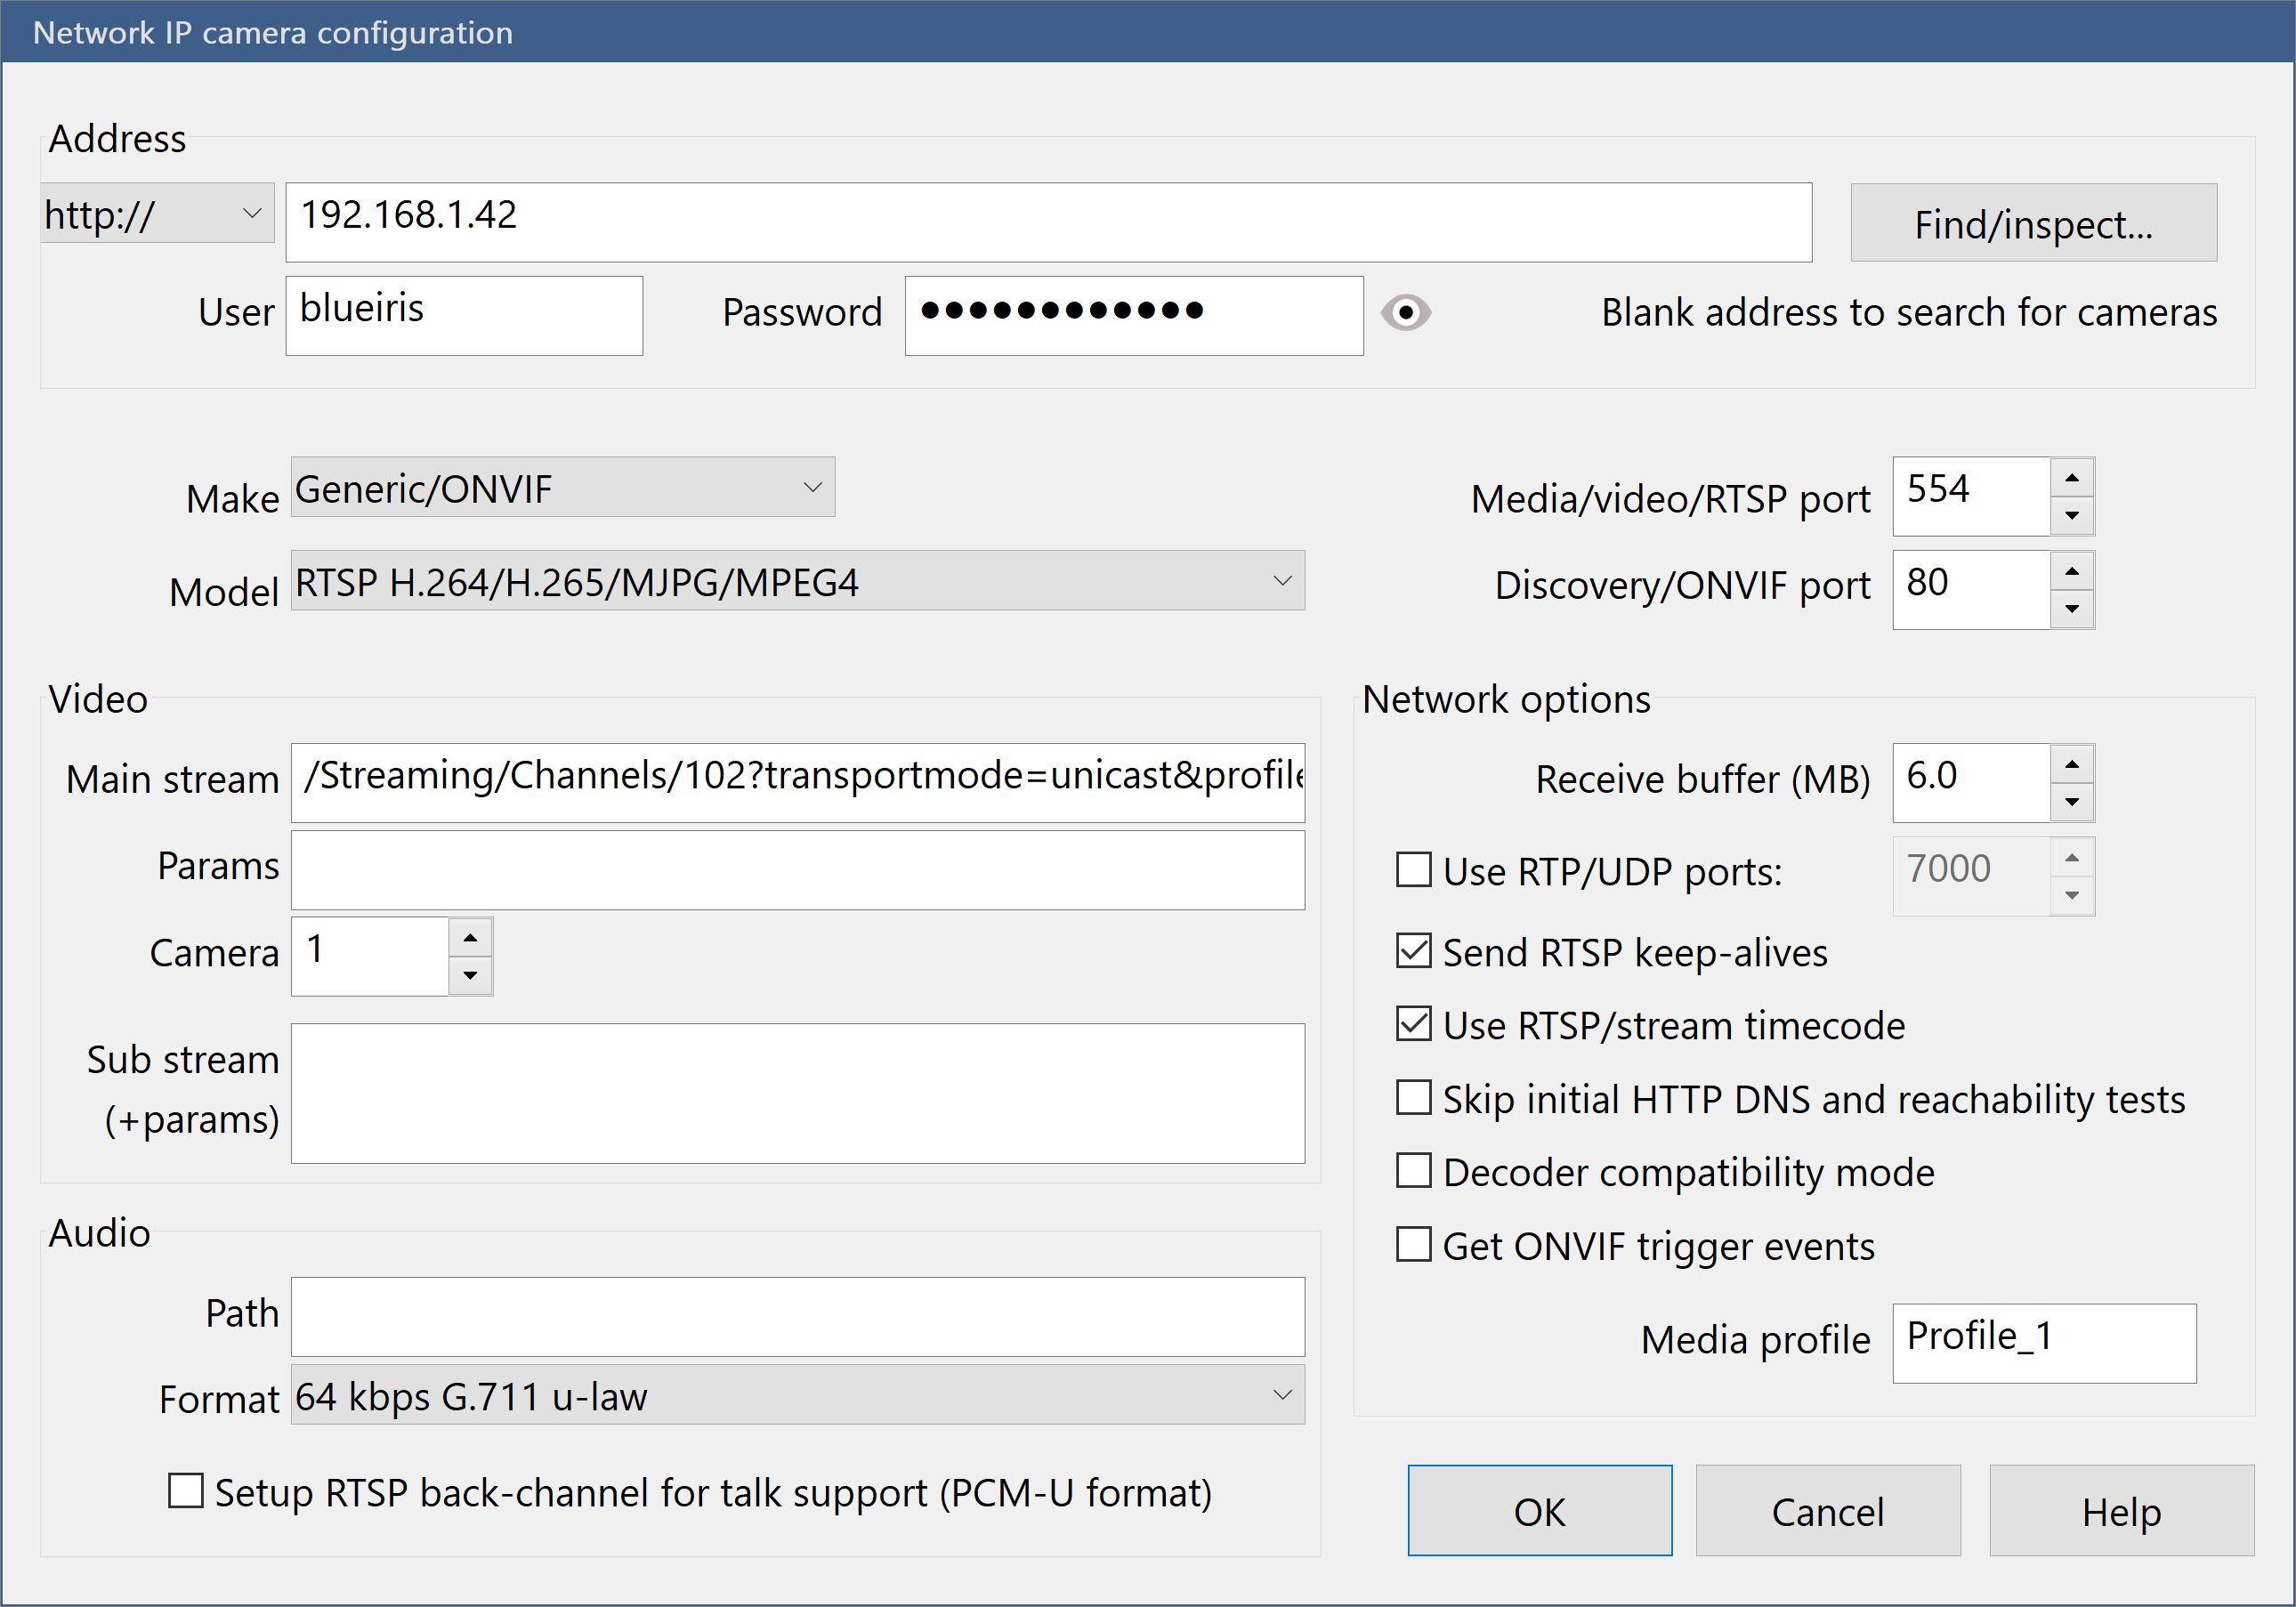
These steps are based on The Hook Up's video.
- Enter the IP address for camera in the Address box.
- Enter the User and Password for the camera if required.
- Enter the path to the substream for the camera into Main stream field. It may seem backwards but this must be the low resolution substream for the camera and it must go into the Main stream field. The intention is to configure a permanent low-resolution stream that can record 24x7 and produce candidate images for the AI system.
The Find/inspect... button is useful during this part of the setup to test connectivity to the camera. If you paste the entire URL to the camera feed into the box in step 1 and then click Find/inspect... after step 2 BlueIris will attempt to connect to the camera and will auto-populate the Make, Model, and Main stream fields for you.
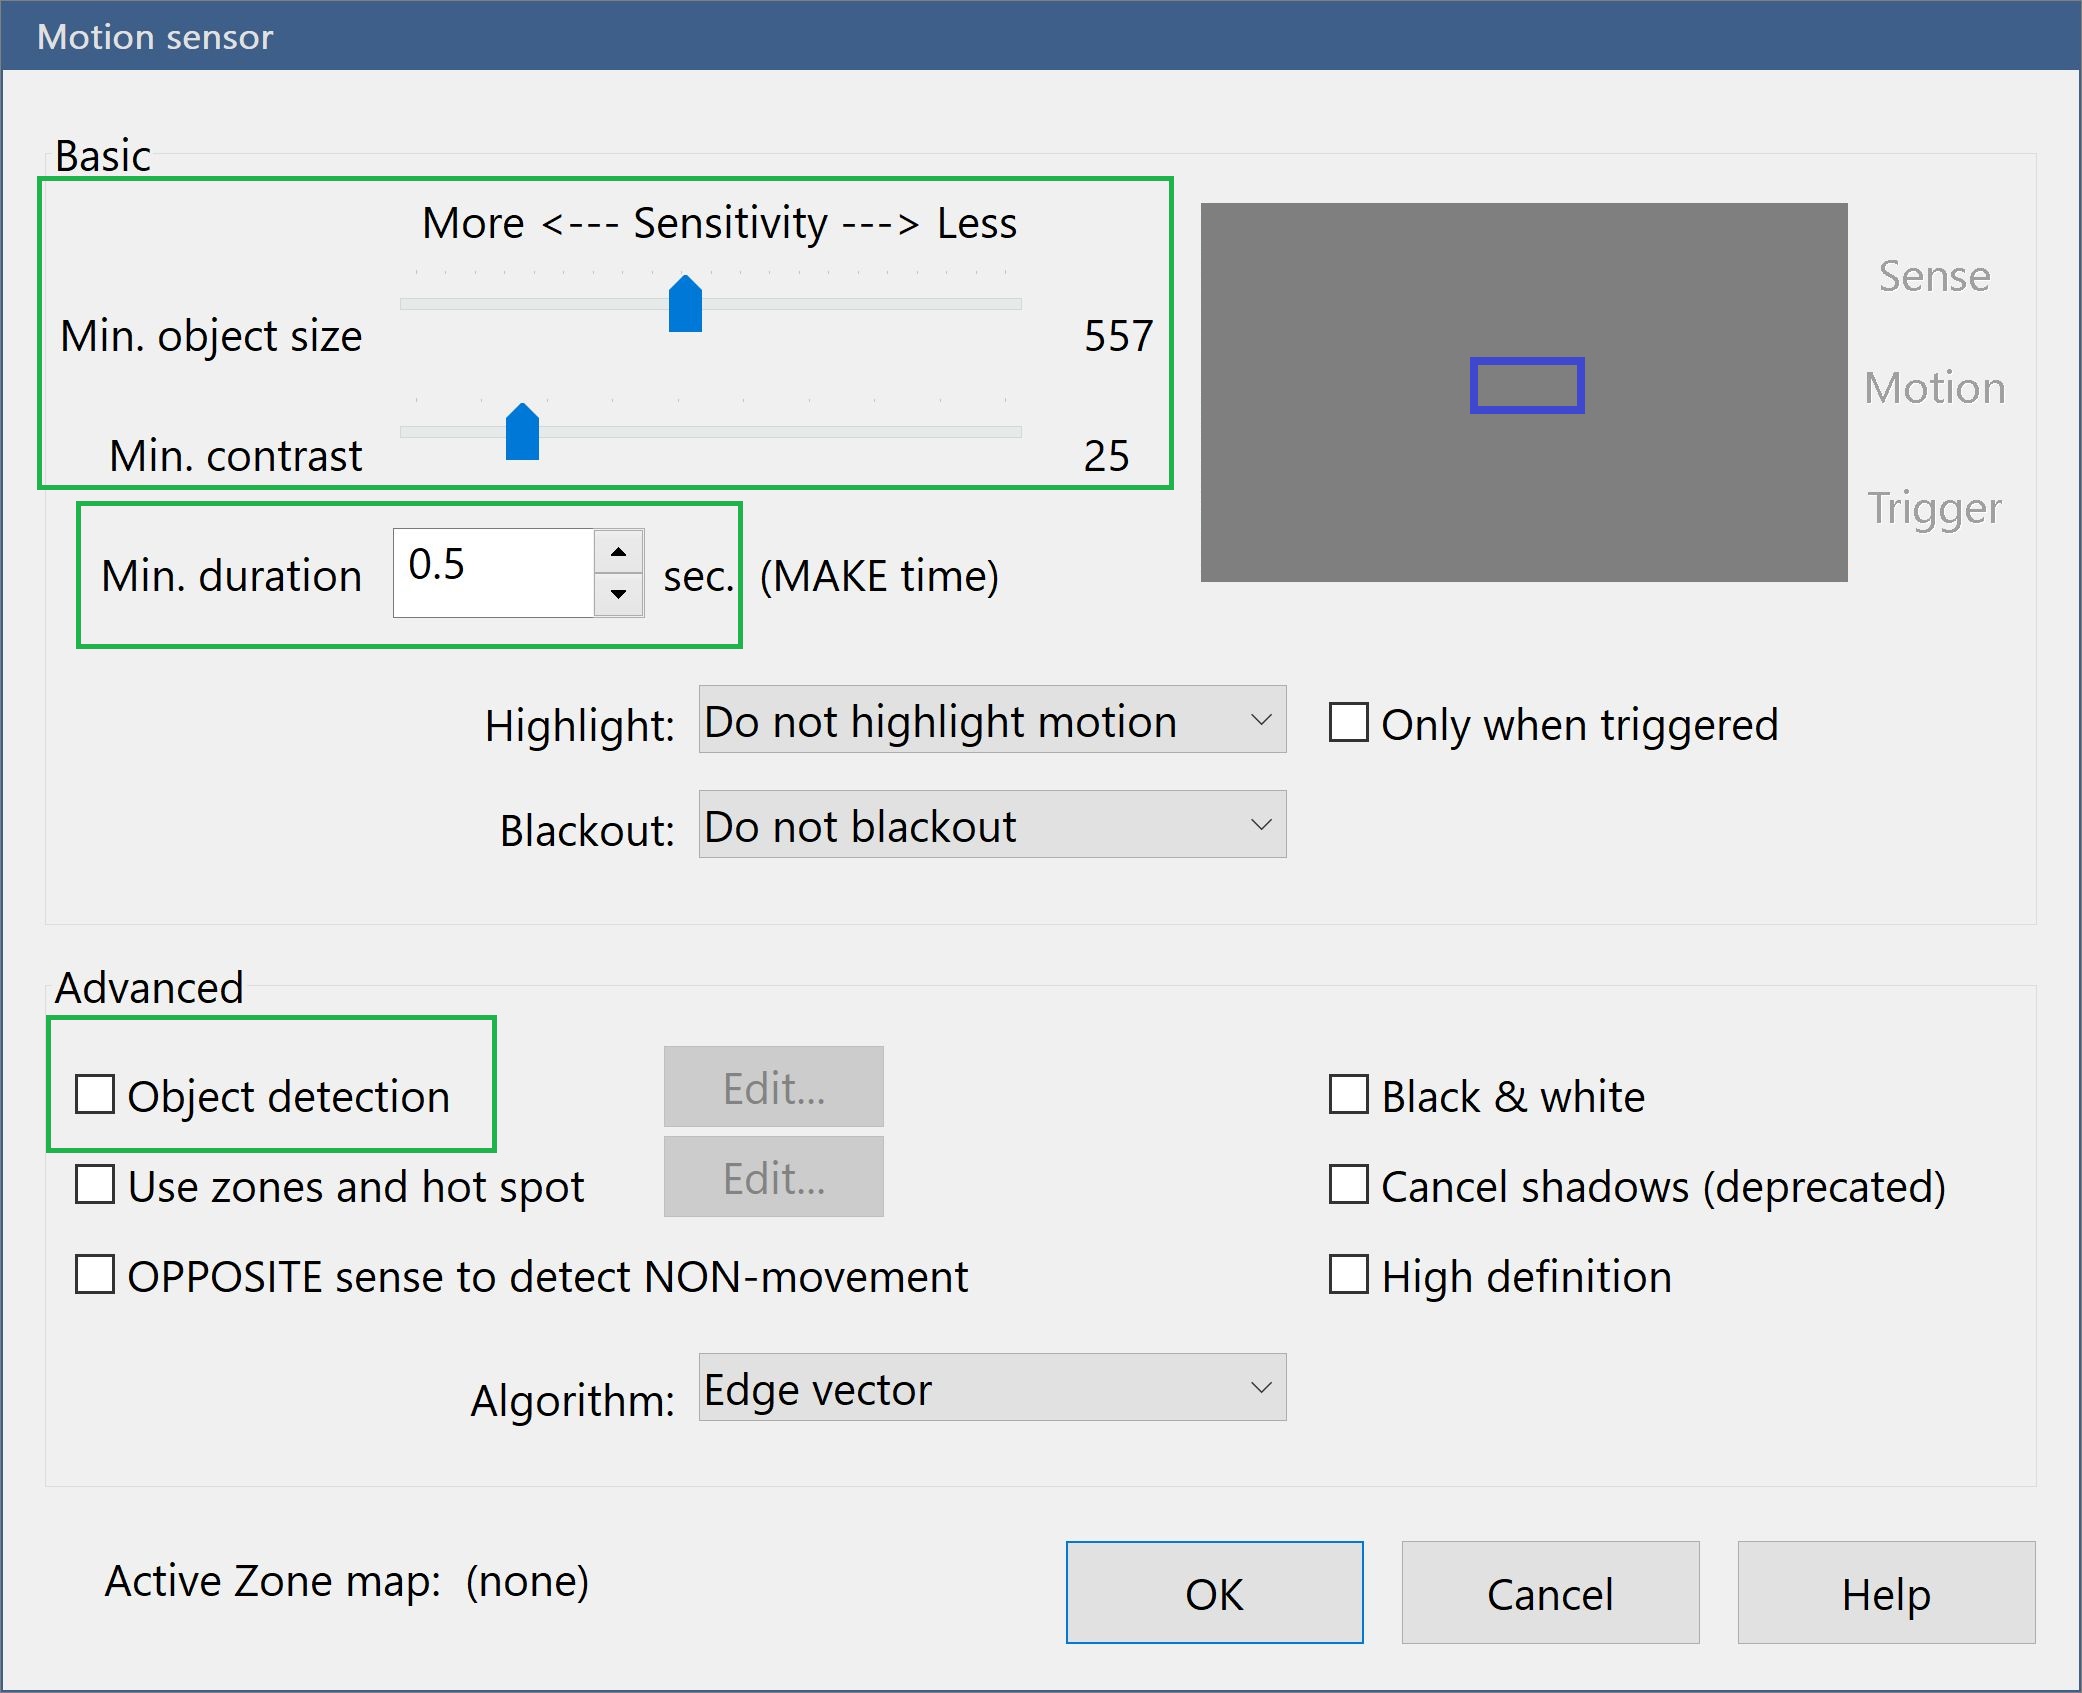
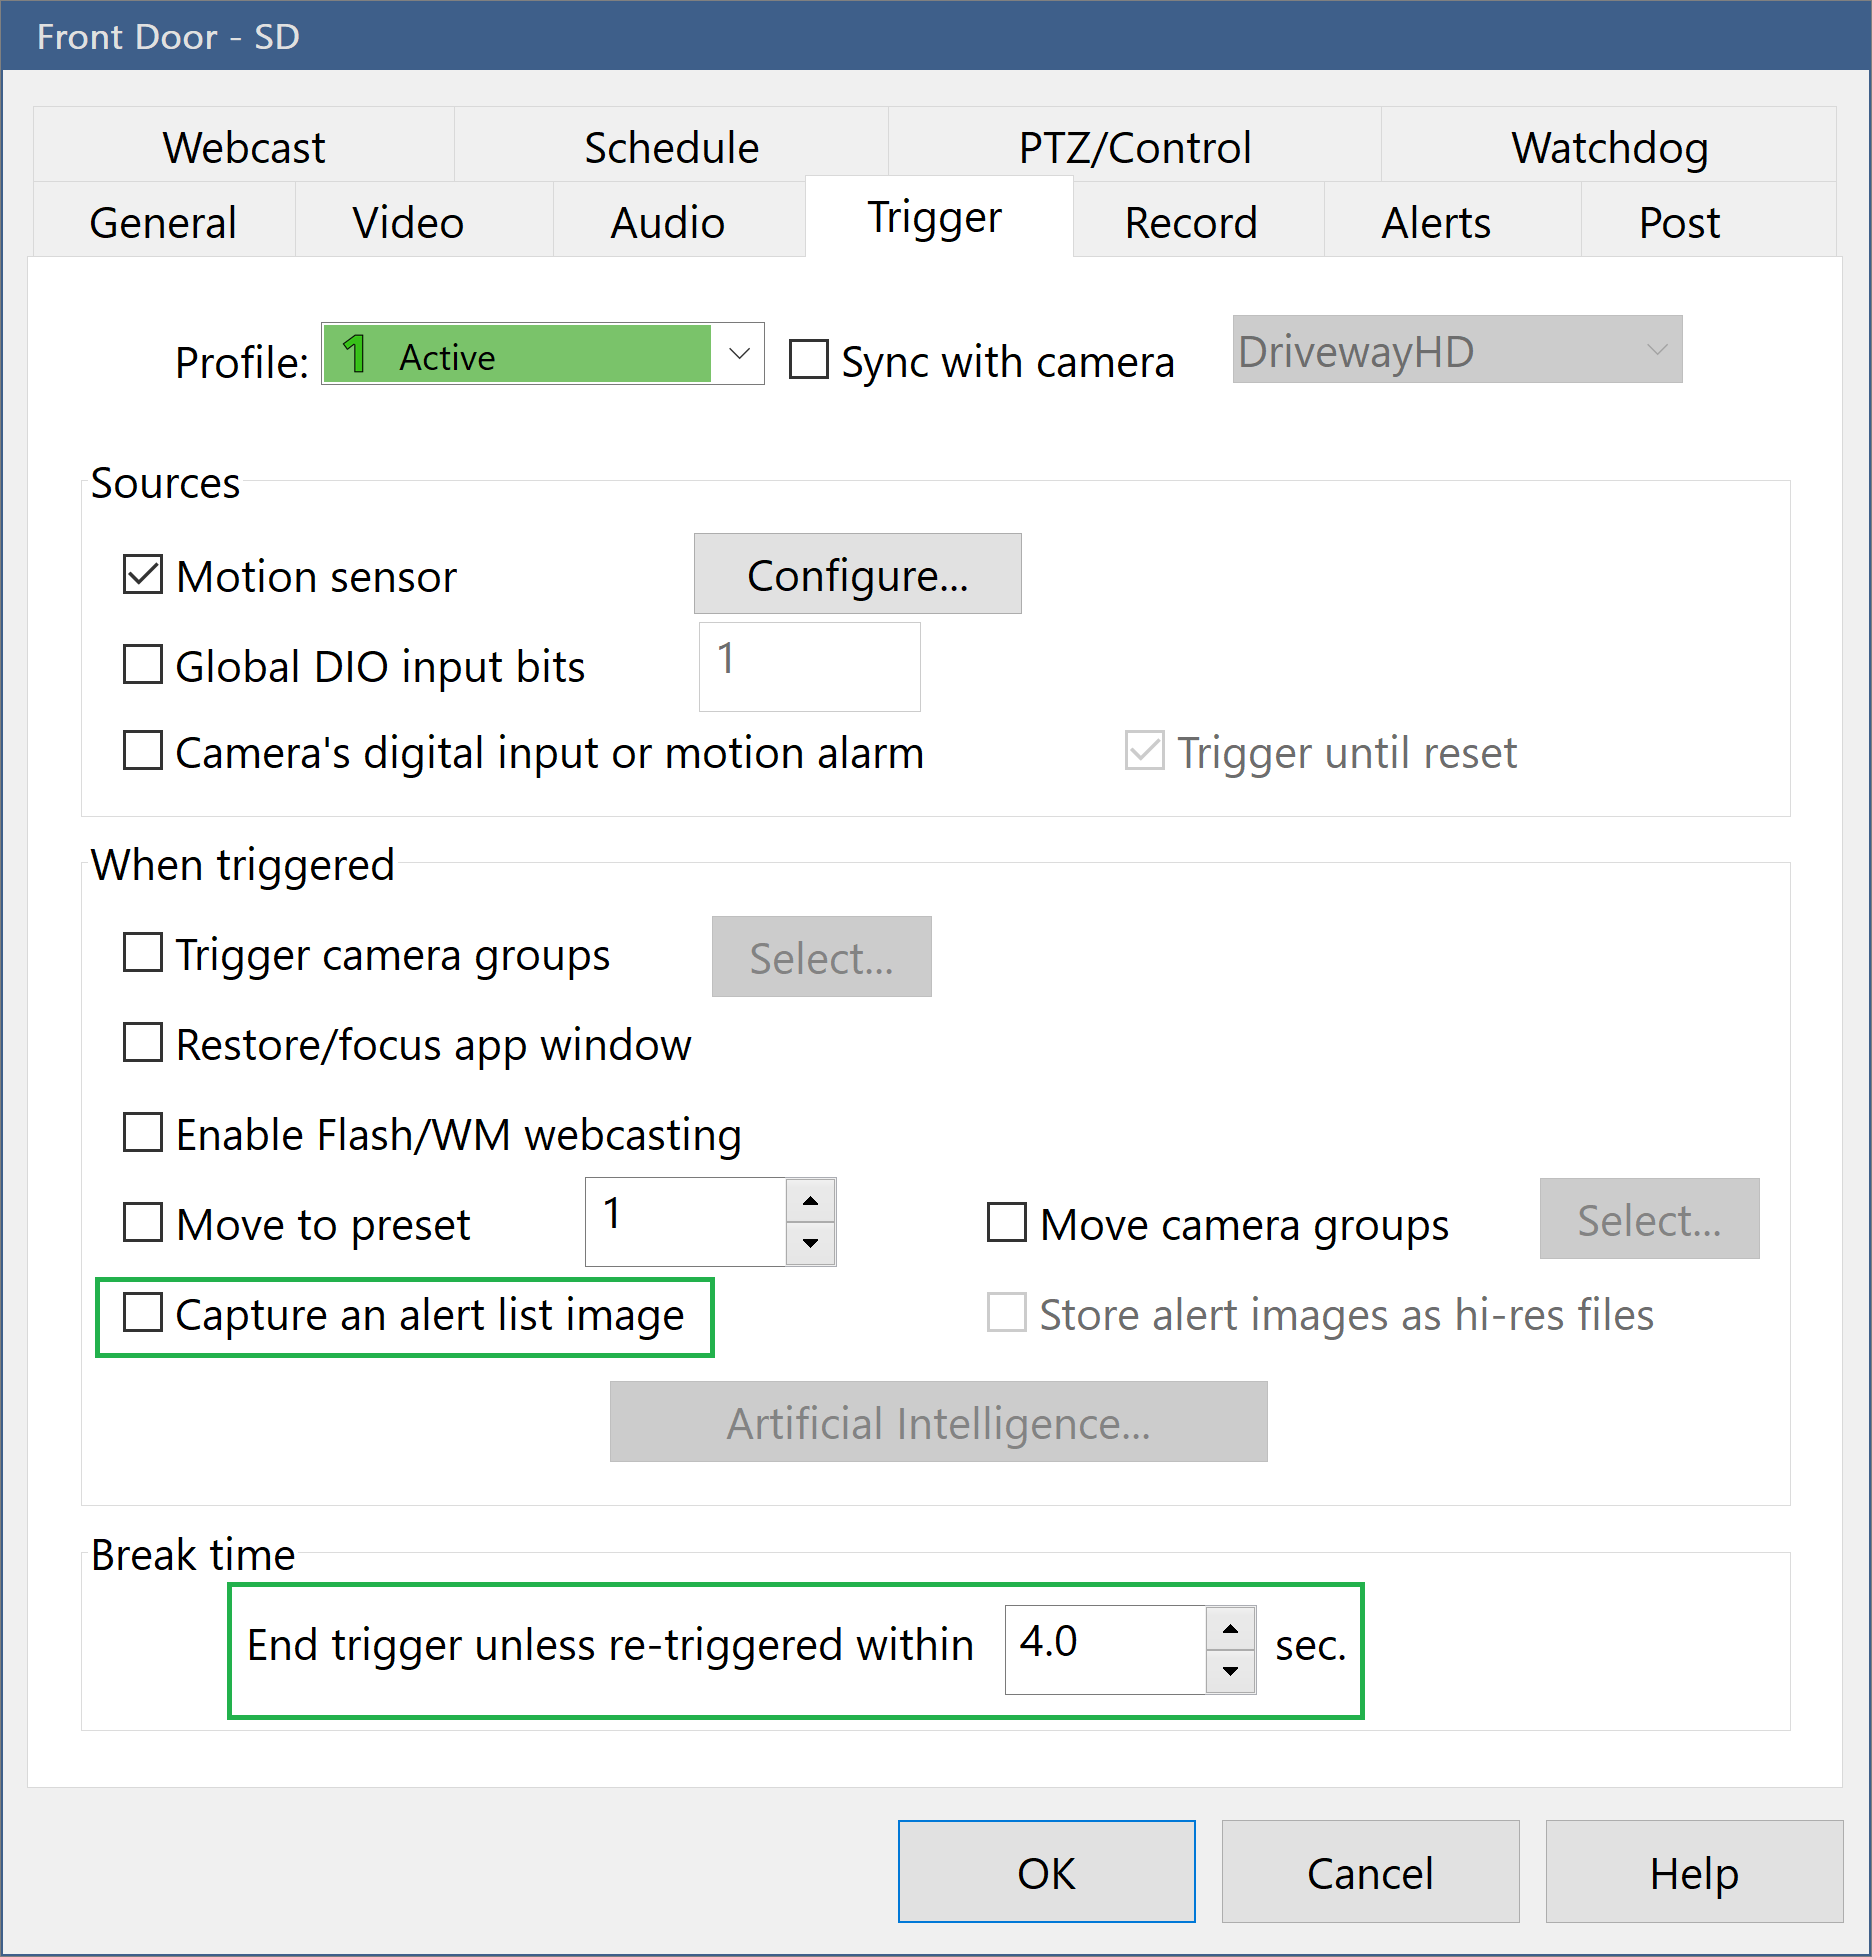
These steps are based on The Hook Up's video. The motion detected by these settings will not directly trigger HD stream recording: it only provides the candidate image for the AI system to detect objects that should actually trigger HD recording.
- Open the Trigger tab for the camera.
- Click the Configure... button for Motion sensor.
- Set Min. duration to 0.5.
- Optionally adjust the Min. object size and Min. contrast sliders to be more sensitive.
- Disable Advanced object detection. This will get done in the AI system instead.
- Click Ok to return to the Trigger tab.
- Uncheck Capture an alert list image.
- Set the Break time to 4 seconds.
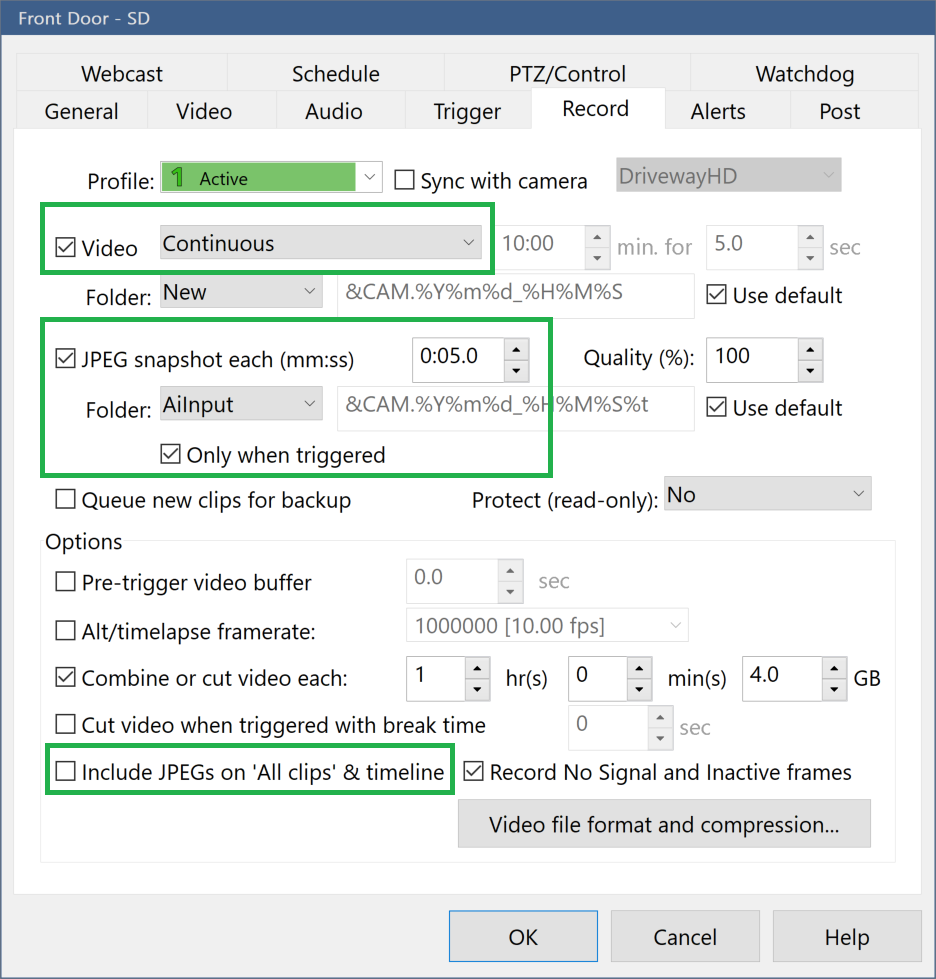
These steps are based on The Hook Up's video.
- Open the Record tab for the camera.
- Change the Video dropdown to Continuous.
- Check the JPEG snapshot each (mm:ss) option.
- Change the time period to 5 seconds.
- Change the JPEG snapshot folder to aiinput.
- Check the Only when triggered option.
- Uncheck the Include JPEGs on All Clips & timeline option.
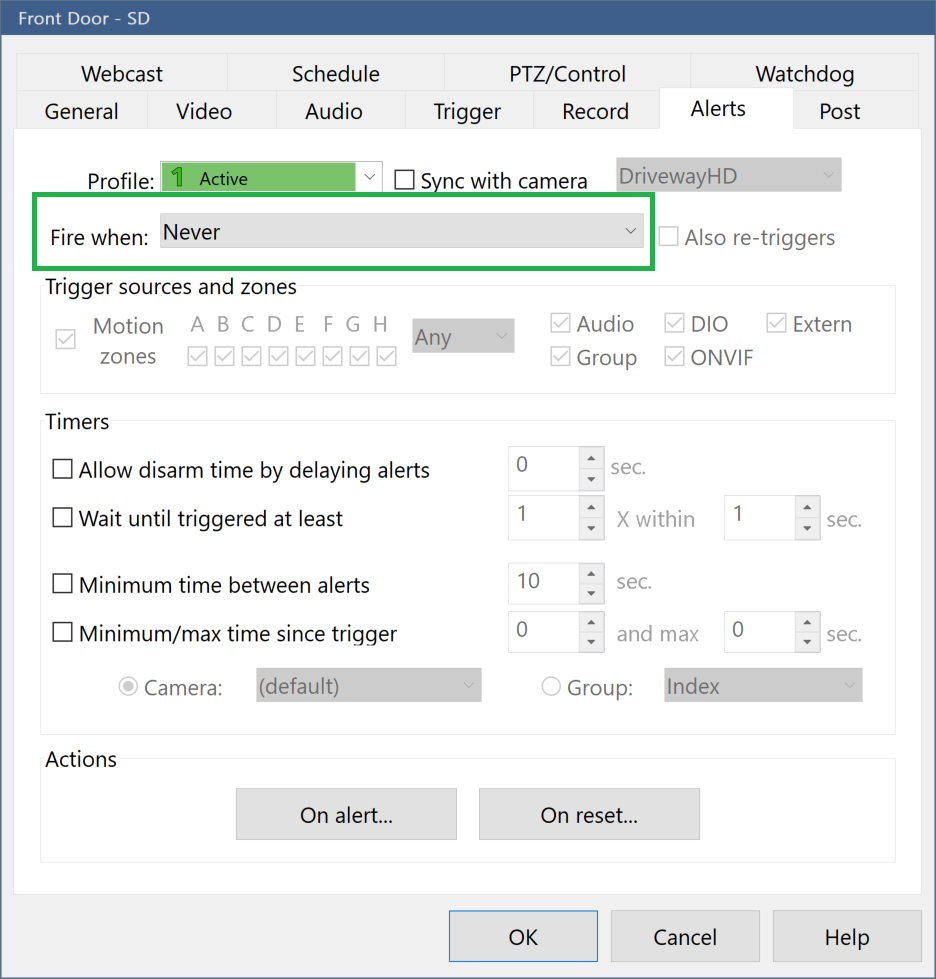
These steps are based on The Hook Up's video.
- Open the Alerts tab for the camera.
- Change the Fire when dropdown to Never.
At this point your first SD camera should be configured correctly. Verify that:
- BlueIris shows the live video feed
- Images are output to the aiinput folder if you walk in front of the camera
If it works congratulations! Take a break before proceeding to set up the HD feed. If it didn't work go back and double-check all the settings, paying close attention to the URL entered for the camera feed.
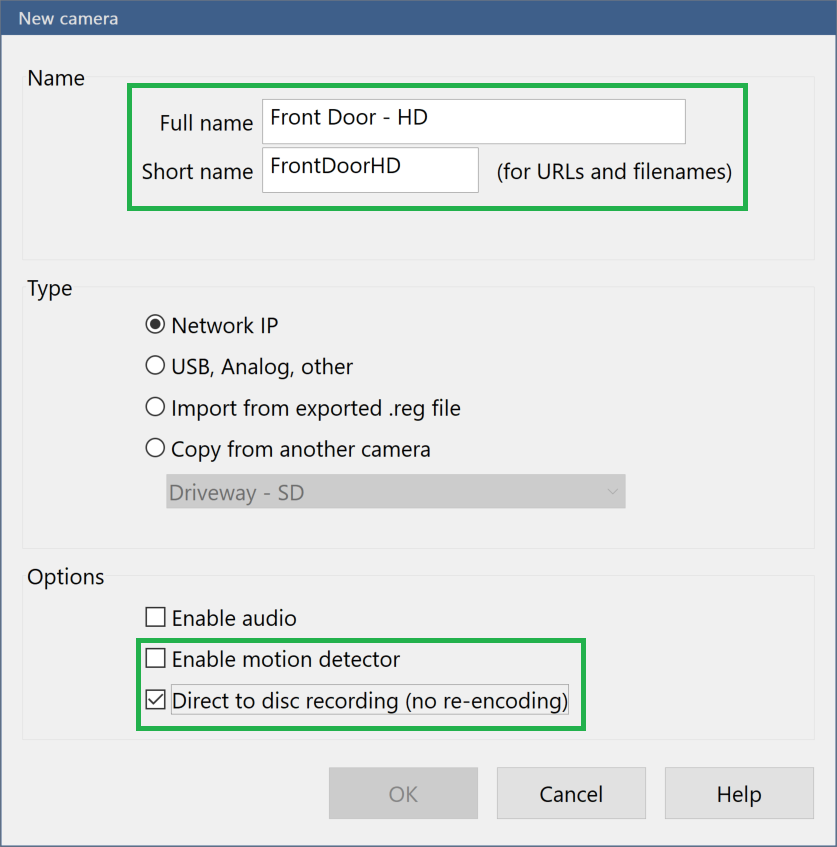
These steps assume you are using a network IP camera such as those from Hikvision, although they will work with any camera that's capable of integrating with BlueIris.
These steps are based on The Hook Up's video
- Go to Add new camera.
- Provide a descriptive name, e.g. Front Door HD.
- Provide a short name, e.g. FrontDoorHD.
- Select Network IP as the type.
- Do not check Enable motion detector. It should stay off as the AI system will handle detecting and triggering motion for the HD camera.
- Check Direct to disk recording (no re-encoding).
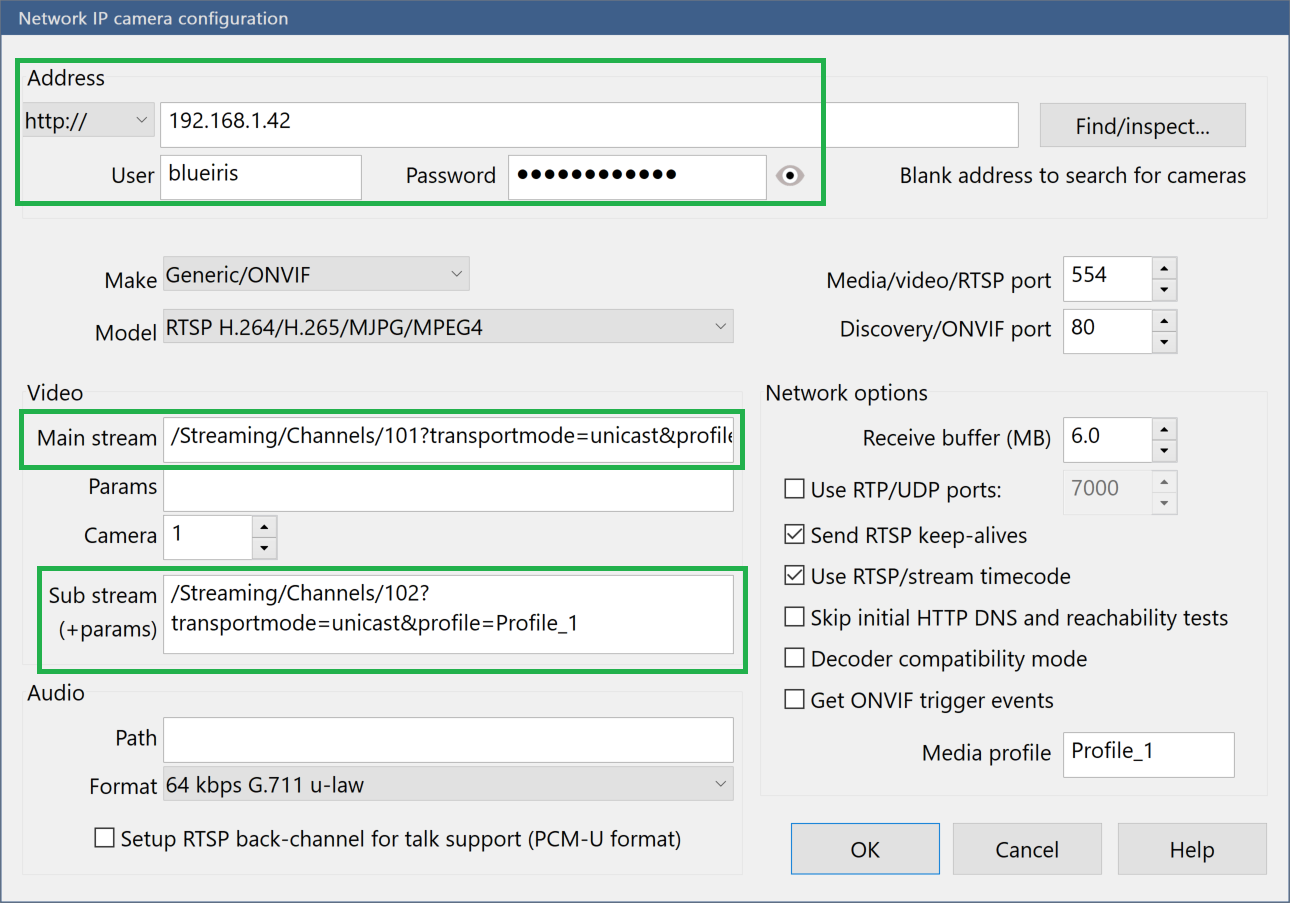
These steps are based on The Hook Up's video with an important additions to improve CPU usage.
- Enter the IP address for the camera in the Address box.
- Enter the User and Password for the camera if required.
- Enter the path to the main for the camera into Main stream field.
- Enter the path to the substream for the camera into the Sub stream field. If your version of BlueIris doesn't have this field then upgrade to a newer version. It's well worth it for the CPU usage improvements!
The Find/inspect... button is useful during this part of the setup to test connectivity to the camera. If you paste the entire URL to the camera feed into the box in step 1 and then click Find/inspect... after step 2 BlueIris will attempt to connect to the camera and will auto-populate the Make, Model, and Main stream fields for you.
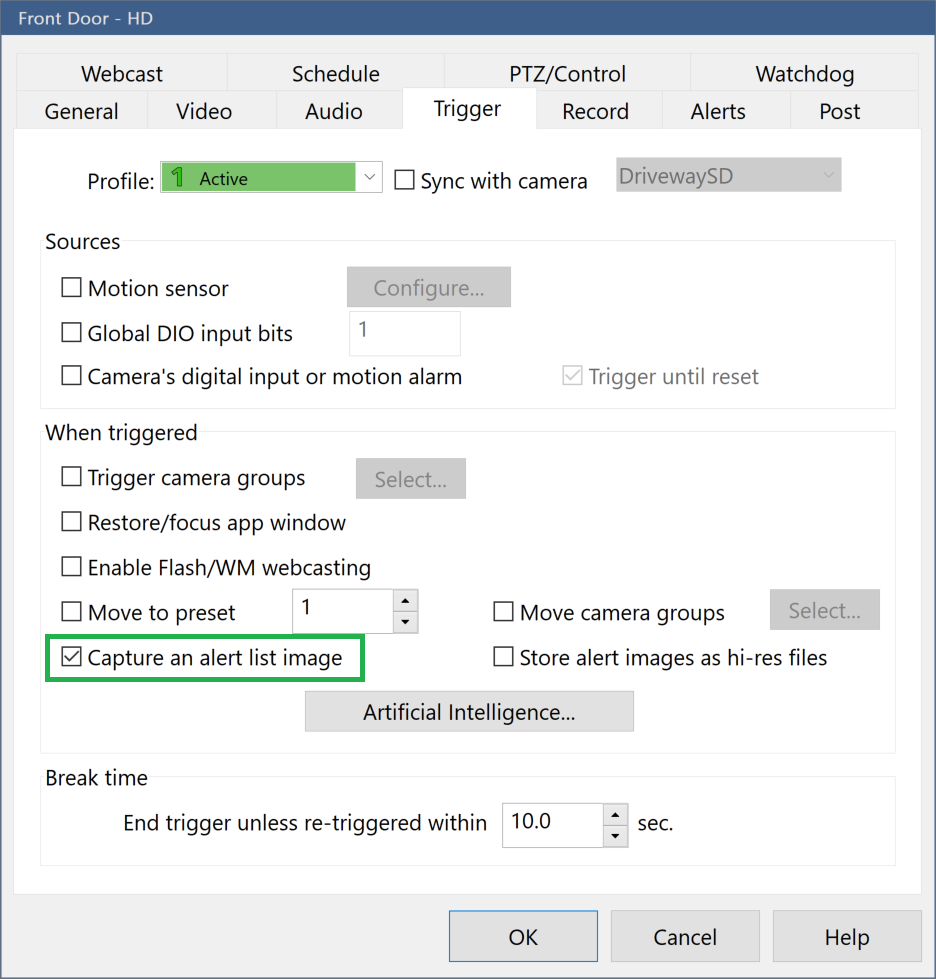
These steps are based on The Hook Up's video.
- Check the Capture an alert list image box.
Easy!
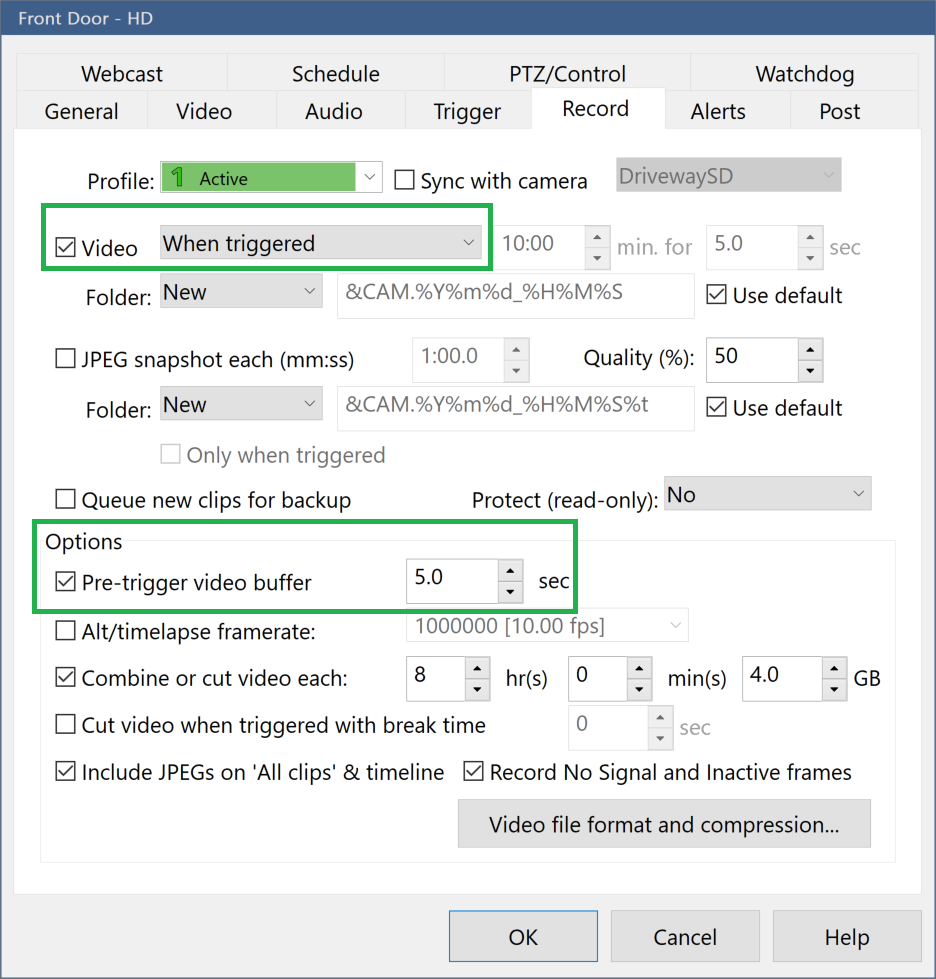
These steps are based on The Hook Up's video.
- Select When triggered in the Video dropdown. The trigger will come from the AI system.
- Check the Pre-trigger video buffer and set the duration to at least 5 seconds.
At this point the HD camera should be set up correctly. Verify you see a low-resolution feed when the camera is in the grid view of BlueIris but that it switches to the high-resolution feed when you open the camera's feed full-screen.
If it didn't work go back and double-check all the settings, paying close attention to the URL entered for the camera feed.
Then verify you can trigger the camera via a web request. Open a web browser and
navigate to the camera's trigger URL, which looks like
http://192.168.1.170:81/admin?trigger&camera=FrontDoorHD. Replace the ip address, port, and
HD camera name with your configuration's values. If the configuration is correct
you will receive a response similar to this:
signal=green
profile=1
lock=0
camera=Front Door - HD
If you get authorization errors verify everything from configure the BlueIris web server was done correctly.
Remember the trigger URL: it's the value you need for the uri property when configuring the AI system's
webRequest handler.